Versions Compared

Key

  • This line was added.
  • This line was removed.
  • Formatting was changed.

This page provides information about the color variations creation in Chaos Anima.


Overview

...

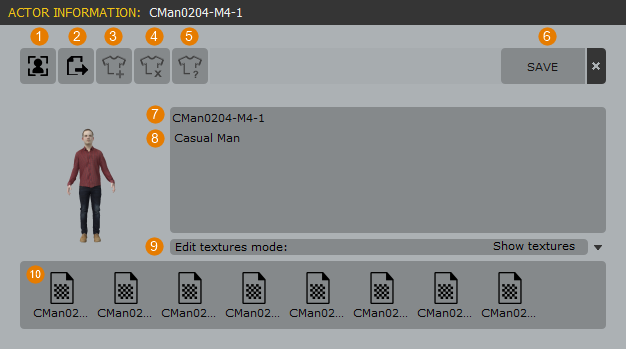
The texturing tools inside Anima give you the ability to quickly and effortlessly generate limitless color variations for your characters.

Using the Edit Mode you can specify exactly which sub-materials will be used to limit color variations to selected parts of the model. You can use this feature, for example, to preserve skin and hair while randomizing clothing colors.

For even more control, the Hue, Saturation, Lightness, and Threshold sliders will allow you to protect parts of a texture based on the image information.

You can also load maps into a 3rd party photo editing app from Anima to work on the textures directly. When you select to edit the textures, Anima moves them to a temporary folder, and once you save your files they’re automatically moved back to the project folders for a seamless bidirectional workflow.


Workflows

...

Section
Column
width40%

Edit Textures

To customize your character their textures can be modified in a 3rd party editing program like Photoshop. To do this:

  1. Switch anima® to content Edit Mode
Column
width5%


Column
width55%
Image Added


...


Section
Column
width40%

2. Select a character from the Actors Library.

3. Select the Rest-Pose and Actor Editor mode from the Motion Clips library

Column
width5%


Column
width55%
Image Added


...


Section
Column
width40%

4.If you are trying to edit a library Default Actor or a Purchased Actor you need to first create a “local copy” of it inside your Project. Right-click and select Duplicate.

Column
width5%


Column
width55%
Image Added


...


Section
Column
width40%

5. The new asset will be marked with a “start icon” identifying it as “Project Asset“. Now, select it.

6. In the Actor Information Panel, double-click on any of the Textures in the maps list

Column
width5%


Column
width55%
Image Added


...


Section
Column
width40%

7. A folder will open showing all of the texture maps for the selected actor.

Column
width5%


Column
width55%
Image Added


...


Section
Column
width40%

8. Open any of these in an image editor and make your changes.

Column
width5%


Column
width55%
Image Added


...


Section
Column
width40%

9. When you’re done save the texture and return to Anima.

10. Click Save in the Actor Information panel to commit the changes and update the preview.

UI Text Box
typenote

If you don’t want to affect the system actors for this project you can duplicate the character. This will create a copy of all relevant assets including the textures.

Column
width5%


Column
width55%
Image Added


Create Color Variations

...


Section
Column
width40%
  1. Select a character from the Actors Library.
  2. Select the Rest-Pose and Actor Editor mode from the Motion Clips library
  3. In the Actor Information Panel, change the Edit Textures mode to Generate Variations
  4. Use the Variation slider to move through the existing variations.
  5. To Create a new variation, click Image Added.
  6. Change the colors using the Color Filter, Filter amount, Modify Hue, Modify Saturation and Modify Luminosity sliders.
  7. If you’d like to add another variation, click Image Added again and repeat the process.
  8. You can also randomize the color settings by clicking Image Added. Keep clicking until you find a combination you like and either click save or use the sliders to fine-tune it.
  9. When you’re happy with your variations click Save. They’ll now be available for every scene saved in this project.


UI Text Box
typetip

To delete the current variation, click the Image Added button.

Column
width5%


Column
width55%
Image Added


Protect Materials

...


Section
Column
width40%

To control what parts of a model to randomize, you can set different materials asChangeable or Protected. Only changeable materials can be edited using the Generate Variations tool. So anima® automatically detects the materials applied to your character models and assigns them to the Protected list. To be able to add variations, you can move one or more materials to the Changeable by following these steps:

  1. Select a character from the Actors Library.
  2. Select the Rest-Pose and Actor Editor mode from the Motion Clips library.
  3. In the Actor Information Panel, change the Edit Textures mode to Protect Range.
  4. Drag the materials you want to be able to edit from the Protected list to the Changeable list. 
  5. The protected part of the model is shown in solid yellow, and the changeable part displays their maps.
  6. Switch Edit Textures Mode to Generate Variations and follow the instructions in the previous procedure to create new colors.
Column
width5%


Column
width55%
Image Added

Protect Parts of Textures Based on Hue, Saturation, and Lightness

...

Section
Column
width40%

In addition, to be able to protect whole materials, anima® also enables you to protect parts of a map based on image data include the hue, saturation, and lightness of pixels. You can do that by following the steps described below:


  1. Select a character from theActors Library.
  2. Select the Rest-Pose and Actor Editor mode from the Motion Clips library.
  3. In the Actor Information Panel, change the Edit Textures mode to Protect Range.
  4. Drag the materials you want to be able to edit from the Protected list to the Changeable list.
  5. At the moment the whole material will be changeable, for example, this man’s shoes, trousers and shirt will all be editable. Note the protected areas shown in yellow.
Column
width5%


Column
width55%
Image Added


...


Section
Column
width40%

6. Change the Protect Hue Range, Protect Saturation Range and Protect Lightness range sliders to isolate the part of the image you want to protect. In this example, we want to protect everything but the red checkers on the shirt.

7. Use the Threshold slider to increases or decreases the amount of partially selected areas. The image shows our example with the shirt isolated.

Column
width5%


Column
width55%
Image Added


...


Section
Column
width40%

8.Save and switch Edit Textures Mode to Generate Variations and follow the instructions in the previous procedure to create new colors. In our example, we’re creating variations of just the shirt, even though the trousers are a part of the same texture and no mask has been manually created!

Column
width5%


Column
width55%
Image Added

PARAMETERS

Section

Actor Information


Column
width40%


  1. Snapshot Thumbnail
    Takes a snapshot of the current character and sets it as the thumbnail
  2. Import Thumbnail
    Opens a file browser so you can load a thumbnail from disk. File formats supported are JPG, PNG, and TGA.
  3. Add New Variation
    Click this button to add a new color Variation for the selected character. Only available when Edit Textures mode is set to Generate Variations.
  4. Delete Current Variation
    Click this button to delete the active color Variation for the selected character. Only available when Edit Textures mode is set to Generate Variations.
  5. Randomize Current Variation
    Click this button to randomize the parameters of the color Variation for the selected character. This can be a very fast way to quickly create a lot of variations and works well as the starting point for custom colors. Only available when Edit Textures mode is set to Generate Variations.
  6. Save
    Save the changes to the selected character.
  7. Custom Name
    The name of the selected character. If this is an imported character the file name will be used automatically but you can edit it here.
  8. Description
    A description of the selected character. You can use this to include any useful information about the actor.
  9. Edit Textures Mode
    Sets the Texture editing mode. Use Show Textures to give you instant access to all available maps for easy manipulation in a 3rd party photo editing program. Use Protect Range to control which Material and parts of the maps are affected by the color variations features. Use Generate Variations to create color variations for your models in just a few clicks.
  10. Texture Maps
    Show a list of all the texture maps used on the selected actor. Double click one of these to open a folder where they will be available for editing in a 3rd party app.
Column
width5%


Column
width55%


Image Added


Protect Range

...

Section
Column
width40%
  1. Protect Hue Range
    Defines a hue range that will not be affected by color variations.
  2. Protect Saturation Range
    Defines a saturation range that will not be affected by color variations.
  3. Protect Lightness Range
    Defines a lightness range that will not be affected by color variations.
  4. Threshold
    Controls how wide a range is in the selection, and increases or decreases the amount of partially selected areas. Low values to restrict the range and create an abrupt transition between protected and unprotected areas, higher values increase the range and create a smoother transition.
  5. Changeable Materials
    List the materials that will be used to create color variations.
  6. Protected Materials
    List the materials that will not be used to create color variations
Column
width5%


Column
width55%
Image Added


Generate Variations

...

Section
Column
width40%
  1. Variation
    Sets the current color variation. Move this slider to go through all your saved variations.
  2. Color Filter
    Sets the Hue value of the Color Filter. This is mixed with the original maps and any Hue, Saturation and luminosity modifications. The strength of the mix effect is controlled by the filter amount.
  3. Filter Amount
    Controls the strength of the color filter effect. At 100% Only the Color Filter effect is used. At 0% Only the Modify Hue effect is used. Values in between blend between the Color Filter and Modify Hueeffects.
  4. Modify Hue
    Shifts the hue for the changeable parts of the maps.
  5. Modify Saturation
    Edits the saturation for the changeable parts of the maps.
  6. Modify Luminosity
    Edits the lightness for the changeable parts of the maps.
Column
width5%


Column
width55%
Image Added