Versions Compared

Key

  • This line was added.
  • This line was removed.
  • Formatting was changed.

...

Section
Column
width40%

In this tutorial, we show how Phoenix works together with Particle Flow (PFlow).
Particles are generated by using 3ds Max's PFlow. There are two particle systems in the scene. One for the main flame of the flamethrower and another for the fire dripping from the main flame.


PFlow's particles contain velocity data and Phoenix can use it as a source for fire and smoke to produce realistic flamethrower. This effect can be also used for dragon breathing fire simulation.

We take advantage of the Time Base - Particle Age, a powerful feature of the Fire/Smoke Source. It allows you to animate the emission of fluid based on the age of each individual particle.

This simulation requires Phoenix 4.0030 Official Release and V-Ray 5 Official Release for 3ds Max 2017 at least. If you notice a major difference between the results shown here and the behavior of your setup, please reach us using the Support Form.


Press the Download button below to get an archive with the start and end scenes.

This download package does not contain the HDRI maps used in the scene.


Anchor
down
down

UI Button
sizelarge
icondownload
titleDownload Project Files
urlhttps://drive.google.com/uc?export=download&id=1m1AzJqee1vylIZd00o5TU-R3tWZdPber

Column
width60%
HTML
<iframe width="800" height="450" src="https://www.youtube.com/embed/zauI9cWZdKw?version=3&loop=1&playlist=zauI9cWZdKw" frameborder="0" allowfullscreen></iframe>

...

UI Text Box
typetip

In this tutorial we have many steps to follow. To keep it concise, let's focus only on the Phoenix related steps and feel free to use the camera and light settings in the provided sample scene.

For your reference, below you can find the light and camera settings.


Expand
titleClick here to see the Camera and Light Settings...


Camera Setting


Section
Column
width40%

Add a Command Panel → Cameras → V-Ray → VRayPhysicalCamera.

The exact position of the Camera is XYZ: [ 4.5, -35.0, 0.5 ].

The exact position of the Camera Target is XYZ: [ 12.0, -1.0, 5.5 ].

Aperture → F-Number is set to 2.4.

Aperture → Shutter Speed is set to 200.

Color & Exposure → White Balance is set to Custom with RGB color (255, 160, 59).

Column
width60%


Section
Column
width40%

We animate the camera. From frame 0 to frame 90, its position moves from XYZ: [ 4.5, -35.0, 0.5 ] to XYZ: [ 3.2, -35.0, 0.3 ].

Column
width60%


Lighting


Section
Column
width40%

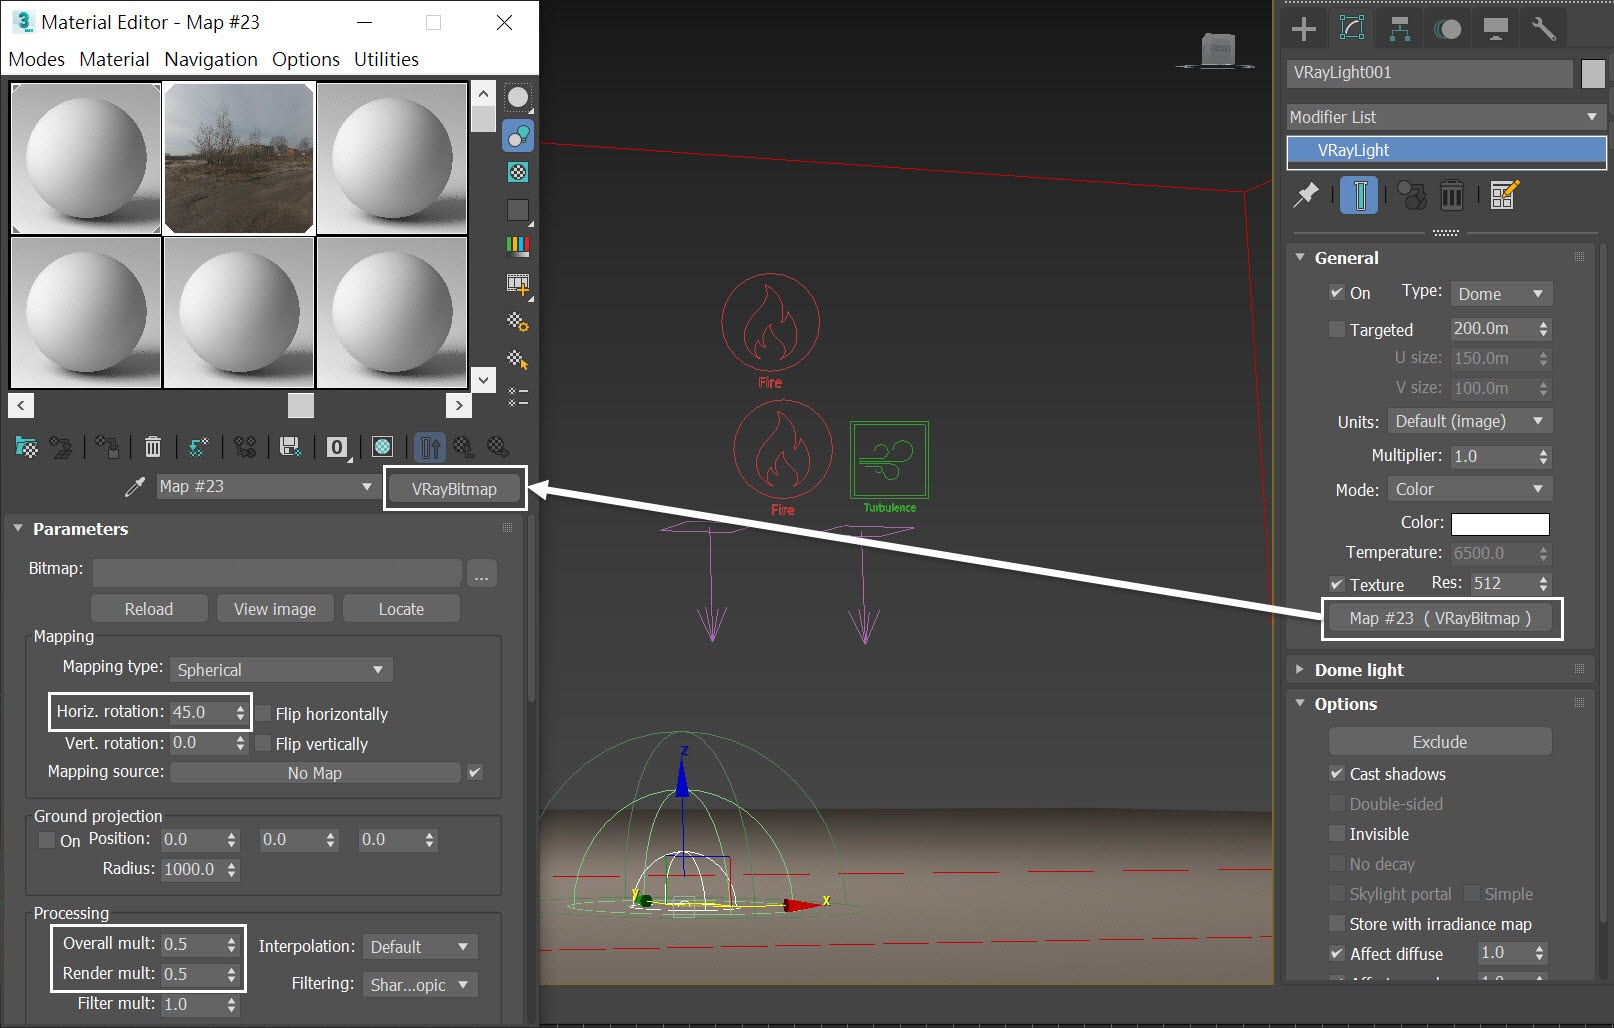
From Command Panel → Light → V-Ray → VRayLight create a V-Ray Light in the scene.

The exact position of the V-Ray Light is XYZ: [ 19.0, -9.0, 0.0 ].

Plug a VRayBitmap map to the map slot.

Set the Horiz. rotation to 45.0.

Decrease both Overall multiplier and Render multiplier to 0.5.

medium
UI Text Box
size
typeinfo

Starting with V-Ray 5, the VRayHDRI map is renamed to VRayBitmap.

Column
width60%


Section
Column
width40%

From Command Panel → Light → V-Ray → VRaySun, create a VRaySun in the scene.

The exact position of the VRaySun is XYZ: [ 17.8, 0.0, 19.2 ].

Decrease the Intensity multiplier to 0.025.

Enable the Invisible option to avoid any unwanted highlights in your rendering.

UI Text Box
typeinfo

VRaySun is the light that enhances the contrast of the smoke coming from the flamethrower. Otherwise, using only the environmental lighting makes the smoke look flat.

Column
width60%

...

Section
Column
width40%

Now we see distinctive fire tongues emerging from the flame.

To introduce more randomness in the smoke let's add Phoenix Turbulence in the next step.

Column
width60%
HTML
<iframe width="800" height="450" src="https://www.youtube.com/embed/-kTRKTwDmT8?version=3&loop=1&playlist=-kTRKTwDmT8" frameborder="0" allowfullscreen></iframe>


Adding Phoenix Turbulence for Smoke Swirls

...