Versions Compared

Key

  • This line was added.
  • This line was removed.
  • Formatting was changed.

Floatingpagetoc

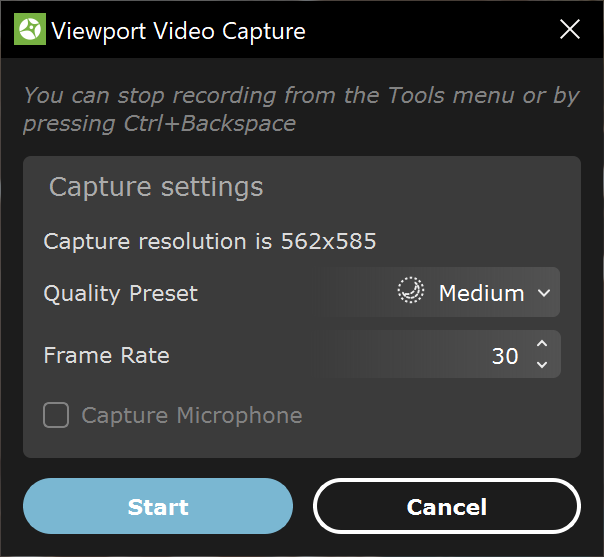
This page provides information about the Tool menu and its sub-menus in Chaos Vantage.


Section
Column
width60%

High Quality Render – Opens the Render setup... dialog where you can specify render parameters for still, sequence or batch rendering. See the Render setup  section below. (Shortcut: Ctrl+R )

Record Camera Movement – Creates a new camera slot in the Camera tab and records its movement. (Shortcut: Ctrl+Shift+R )

Quick Record Viewport – Starts capturing the viewport to an .mp4 file in the .vrscene file location. (Shortcut: Ctrl+Backspace)

Record Viewport to Video File – Opens the Viewport Video Capture dialog where you can specify the quality preset and frame rate . See the Viewport Video Capture  section below.

Column
width5%


Column
width35%


Anchor
quality
quality
Render setup


Tabs Container
directionhorizontal
Tabs Page
titleStill image
Section
Column
width60%

Render output – Specifies the render output - a still or an animation sequence

Resolution Preset – Sets the render resolution from 4 predefined resolutions:

720p; 1080p; 1440p; 2160p(4K)

Aspect - Sets the aspect of the render resolution.

Width – Sets the width of the rendered snapshot in pixels.

Height – Sets the height of the rendered snapshot in pixels.

Samples – Specifies the samples per pixel for refining the image.

Pixel buffers – The amount of additional memory required for the currently set render resolution.

Auto-exposure – When enabled, exposure will be automatically calculated. Set exposure in camera will be ignored.

Denoiser – When enabled NVIDIA AI denoiser will be applied to the rendered image. Denoiser amount will be 0, when disabled or 100, when enabled.

Only final pass – applies the denoiser only during the final pass. This greatly reduces render time when used with high Samples count.

Denoiser Stats – The amount of additional memory required for the denoiser for the currently set render resolution.

Light Cache – Enables Light Cache when rendering.

Light Cache Stats – The amount of additional memory required for light cache for the currently set render resolution.

Motion Blur – Enables the rendering of motion blur for the rendered image with the settings set in File > Advance Scene Settings > Camera > Exposure time.

Approx. GPU memory needed – Displays an approximation of the needed GPU memory for the currently set render resolution and settings.

Camera enqueue mode – Sets the mode that specifies how cameras are added to the render queue when Add to Queue button is pressed.

One – When Add to Queue button is pressed, only the cameras specified in Camera drop-down will be added to the render queue.
All – When Add to Queue button is pressed, all scene cameras will be added to the render queue.

Camera – Specifies the rendering camera from a list of available scene cameras or <current camera> position.

Camera Type – Specifies the type of the camera to be used when rendering a snapshot.

Perspective – Sets the current scene camera to be used to render the snapshot.
Cube 6x1 – Sets the use of a Box camera with the cube sides arranged in a single row useful in generating cubic VR output.
Stereo Cube 6x1 – Sets the use of a Left/Right stereo Box camera with the cube sides arranged in a single row useful in generating cubic stereo VR output.
Spherical – Sets the use of a spherical camera with independent horizontal (FOV X) and vertical (FOV Y) FOV selection that is useful for generating latlong images for spherical VR use.
Stereo Cube 6x1
Stereo spherical – Sets the use of a spherical Left/Right stereo camera with independent horizontal (FOV X) and vertical (FOV Y) FOV selection and that is useful for generating latlong images for spherical VR use. The stereo strength can be adjusted by modifying the Eye dist parameter.

FOV X – Specifies the horizontal field-of-view angle. Available only when Camera Type is set to Spherical or Stereo spherical.

FOV Y – Specifies the vertical field-of-view angle. Available only when Camera Type is set to Spherical or Stereo spherical.

Eye dist – Specifies the eye distance for which the stereoscopic image is rendered. Available only when Camera Type is set to Stereo Cube 6x1 or Stereo spherical.

Focus rotation – When enabled the left and right views are rotated so that their focus points coincide at the distance specified by the Focus Distance parameter in the Camera tab. When disabled the left and right views directions are parallel.

Top/Bottom – When enabled, the output layout for the views will be Top(for left eye) and Bottom(for right eye). When disabled, the output layout will be Left(for left eye) and Right(for right eye).

Save PNG alpha – When enabled, stores the environment in the alpha channel of the .png file. In the ''Save Image' window a .png file format must be specified.

Output path – Specifies the output file path where the still image is saved.

Add to Queue – Adds currently set camera in Camera option and current to a queue for batch rendering multiple cameras or animation sequence.

Show Queue – Shows the batch rendering queue list of added cameras. See the Render queue  section below.

Start Queue – Starts batch rendering of the added cameras and/or animation sequences. Button is disabled if there are no cameras in the batch rendering queue.

Delete Queue - Clears the batch rendering queue. Button is disabled if there are no cameras in the batch rendering queue.

Start – Starts rendering of the set Camera and current render settings. Button is disabled if there are cameras in the batch rendering queue.

Cancel  – Closes the Render setup dialog.


UI Text Box
typenote

In the 'Save Image' window a .png or .exr file type must be added after the specified file name

e.g Camera01.png or Camera01.exr

UI Text Box
typeinfo

 Set values and parameters are auto saved and will be used between sessions.

Column
width5%
 
Column
width35%

Tabs Page
titleSequence
Section
Column
width60%

Render output – Specifies the render output - a still or an animation sequence

Resolution Preset – Sets the render resolution from 4 predefined resolutions:

720p; 1080p; 1440p; 2160p(4K)

Aspect - Sets the aspect of the render resolution.

Width – Sets the width of the rendered snapshot in pixels.

Height – Sets the height of the rendered snapshot in pixels.

Samples – Specifies the samples per pixel for refining the image.

FPS – Specifies the frames per second for the animation.

First frame – Specifies first frame of the animation sequence.

Last frame – Specifies last frame of the animation sequence.

Pixel buffers – The amount of additional memory required for the currently set render resolution.

Auto-exposure – When enabled, exposure will be automatically calculated for each frame. Set exposure in camera will be ignored.

Denoiser – When enabled NVIDIA AI denoiser will be applied to the rendered image. Denoiser amount will be 0, when disabled or 100, when enabled.

Reduce flickeringEnables temporal rendering of the AI denoiser. Results and details may be blurry when enabled. Disabling it may increase image sharpness.

Only final pass – applies the denoiser only during the final pass. This greatly reduces render time when used with high Samples count.

Denoiser Stats – The amount of additional memory required for the denoiser for the currently set render resolution.

Light Cache – Enables Light Cache when rendering.

Light Cache Stats – The amount of additional memory required for light cache for the currently set render resolution.

Motion Blur – Enables the rendering of motion blur for the rendered image with the settings set in File > Advance Scene Settings > Camera > Exposure time.

Approx. GPU memory needed – Displays an approximation of the needed GPU memory for the currently set render resolution and settings.

Camera Type – Specifies the type of the camera to be used when rendering a snapshot.

Perspective – Sets the current scene camera to be used to render the snapshot.
Cube 6x1 – Sets the use of a Box camera with the cube sides arranged in a single row useful in generating cubic VR output.
Stereo Cube 6x1 – Sets the use of a Left/Right stereo Box camera with the cube sides arranged in a single row useful in generating cubic stereo VR output.
Spherical – Sets the use of a spherical camera with independent horizontal (FOV X) and vertical (FOV Y) FOV selection that is useful for generating latlong images for spherical VR use.
Stereo Cube 6x1
Stereo spherical – Sets the use of a spherical Left/Right stereo camera with independent horizontal (FOV X) and vertical (FOV Y) FOV selection and that is useful for generating latlong images for spherical VR use. The stereo strength can be adjusted by modifying the Eye dist parameter.

FOV X – Specifies the horizontal field-of-view angle. Available only when Camera Type is set to Spherical or Stereo spherical.

FOV Y – Specifies the vertical field-of-view angle. Available only when Camera Type is set to Spherical or Stereo spherical.

Eye dist – Specifies the eye distance for which the stereoscopic image is rendered. Available only when Camera Type is set to Stereo Cube 6x1 or Stereo spherical.

Focus rotation – When enabled the left and right views are rotated so that their focus points coincide at the distance  specified by the Focus Distance parameter in the Camera tab. When disabled the left and right views directions are parallel.

Top/Bottom – When enabled, the output layout for the views will be Top(for left eye) and Bottom(for right eye). When disabled, the output layout will be Left(for left eye) and Right(for right eye).

Output file type – Specifies the file type for the rendered sequence.

Image – Output of the animation will be an imagesequence. In the ''Save Image' window a .png or .exr file format can be specified for the image sequence.
Image + MP4 – Output of the animation will be an image sequence and an .mp4 file. In the ''Save Image' window a .png or .exr file format can be specified for the image sequence.
Image + MKV – Output of the animation will be an image sequence and an .mkv file. In the ''Save Image' window a .png or .exr file format can be specified for the image sequence.
MP4 – Output of the animation will be an .mp4 file.
MKV – Output of the animation will be an .mkv file.

Save PNG alpha – When enabled, stores the environment in the alpha channel of the .png file. In the ''Save Image' window a .png file format must be specified.

Output path – Specifies the output file path where the still image is saved.

Add to Queue – Adds currently set camera in Camera option and current to a queue for batch rendering multiple cameras or animation sequence.

Show Queue – Shows the batch rendering queue list of added cameras. See the Render queue  section below.

Start Queue – Starts batch rendering of the added cameras and/or animation sequences. Button is disabled if there are no cameras in the batch rendering queue.

Delete Queue - Clears the batch rendering queue. Button is disabled if there are no cameras in the batch rendering queue.

Start – Starts rendering of the set Camera and current render settings. Button is disabled if there are cameras in the batch rendering queue.

Cancel  – Closes the Render setup dialog.


UI Text Box
typenote

In the 'Save Image' window a .png or .exr file type must be added after the specified file name

e.g Camera01.png or Camera01.exr

UI Text Box
typeinfo

 Set values and parameters are auto saved and will be used between sessions.

Column
width5%
 
Column
width35%

Anchor
renderQueue
renderQueue
Render Queue


Section
Column
width60%

When checked, enables the rendering of the camera/animation sequence in the render queue.

Name of render queue item.

Loads the camera/animation sequence settings to the Render setup dialog.

Overwrites the camera/animation sequence settings from the Render setup dialog.

Removes the camera/animation sequence from the render queue.

Thumbnail of the render camera.

Camera type.

Render resolution.

Frame range of animation sequence.

FPS of animation sequence.
Column
width5%
 
Column
width35%


Anchor
viewportRec
viewportRec
Viewport Video Capture


Section
Column
width60%

Capture resolution – Shows the resolution at which the viewport will be captured. This can be controlled by resizing the Chaos Vantage app window.

Quality Preset – Specifies a preset for the capture quality.

High – High video quality with large file size.
Medium – Medium video quality with reasonable file size .
Low – Low video quality with very little file size.

Frame rate – Sets how many frames per second will be captured. Lower values will produce lower file size but video will have choppy quality while large values will result in smooth video quality but with large file size.

Capture Microphone – Enables the capture of input audio during viewport capture.

Start – When clicked opens a "Save Video" window to specify where the capture will be saved. After confirmation with the Save button starts the viewport capture.

Cancel – Closes the "Viewport Video Capture" window.

Column
width5%
 
Column
width35%