![]()
Page History
This page provides information about the Render Parameters rollout in the Settings tab of the V-Ray Asset Editor.
Overview
...
Render Parameters rollout of the Settings tab exposes several options that control the Progressive or Bucket image samplers. You can also select an Antialiasing Filter and find a number of Optimization settings here. Note that the exposed controls vary depending on the combination of selections between CPU/GPU, Interactive/Production, and Progressive/Bucket options. Changing the Quality preset from the Render rollout sets a number of options with appropriate values for the selected preset. Generally, the Quality presets work for a wide variety of scenes and you do not need to adjust the settings any further.
Quality
...
| Section | ||||||||||||||||
|---|---|---|---|---|---|---|---|---|---|---|---|---|---|---|---|---|
|


...
Interactive Parameters
...
| Section | ||||||||||||||||
|---|---|---|---|---|---|---|---|---|---|---|---|---|---|---|---|---|
|

Antialiasing Filter
...
| Section | |||||||||||||||||
|---|---|---|---|---|---|---|---|---|---|---|---|---|---|---|---|---|---|
|

| Anchor | ||||
|---|---|---|---|---|
|
| Expand | |||||||||||||||||||||||||||||
|---|---|---|---|---|---|---|---|---|---|---|---|---|---|---|---|---|---|---|---|---|---|---|---|---|---|---|---|---|---|
| |||||||||||||||||||||||||||||
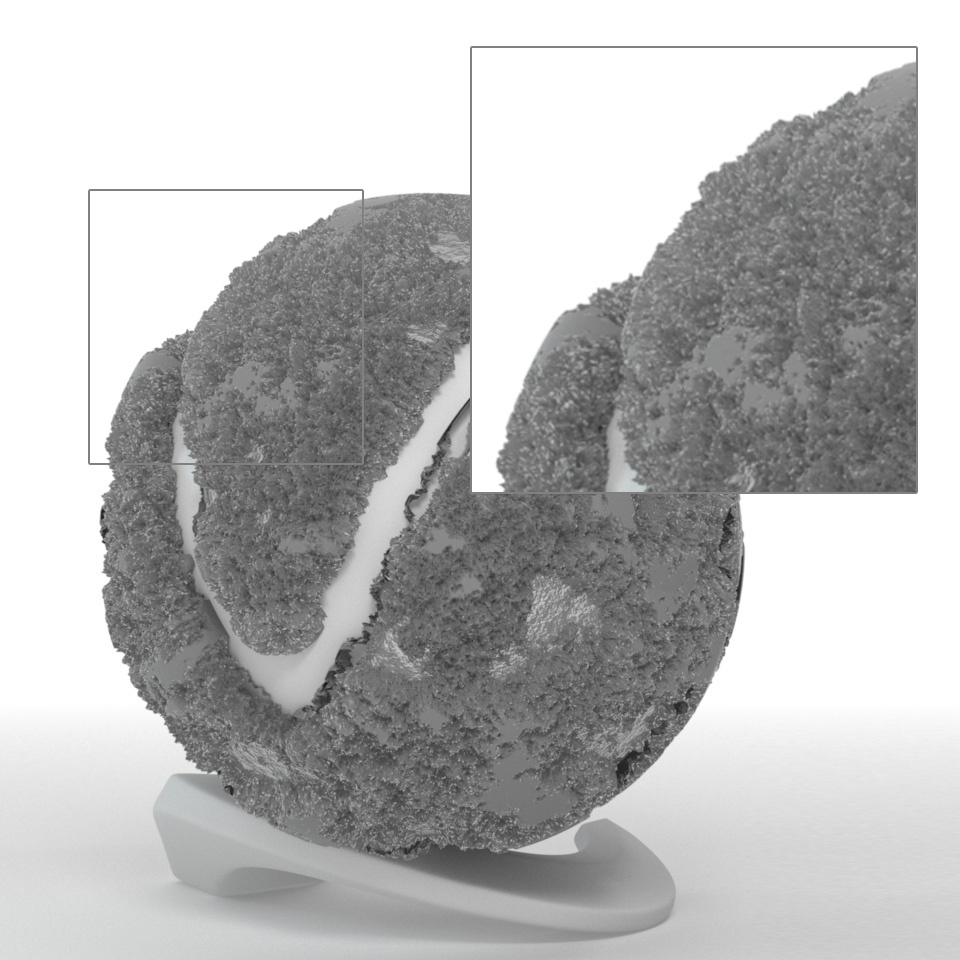
Example: Antialiasing Filter
Here is an example briefly demonstrating the effect of different anti-aliasing filters on the final result. Note that rendering with a particular filter is not the same as rendering without a filter and then blurring the image in a post-processing program like Adobe Photoshop. Filters are applied on a sub-pixel level, over the individual sub-pixel samples. Therefore, applying the filter at render time produces a much more accurate and subtle result than applying it as a post effect. The zoomed in images below have been zoomed in and cropped 300%.
|


Color Management
...
| Section | ||||||||||||||||||||||
|---|---|---|---|---|---|---|---|---|---|---|---|---|---|---|---|---|---|---|---|---|---|---|
|

| UI Text Box | ||||||||||||||||||||||||||||||||||||||||||||||||||||||||||||||||||
|---|---|---|---|---|---|---|---|---|---|---|---|---|---|---|---|---|---|---|---|---|---|---|---|---|---|---|---|---|---|---|---|---|---|---|---|---|---|---|---|---|---|---|---|---|---|---|---|---|---|---|---|---|---|---|---|---|---|---|---|---|---|---|---|---|---|---|
| ||||||||||||||||||||||||||||||||||||||||||||||||||||||||||||||||||
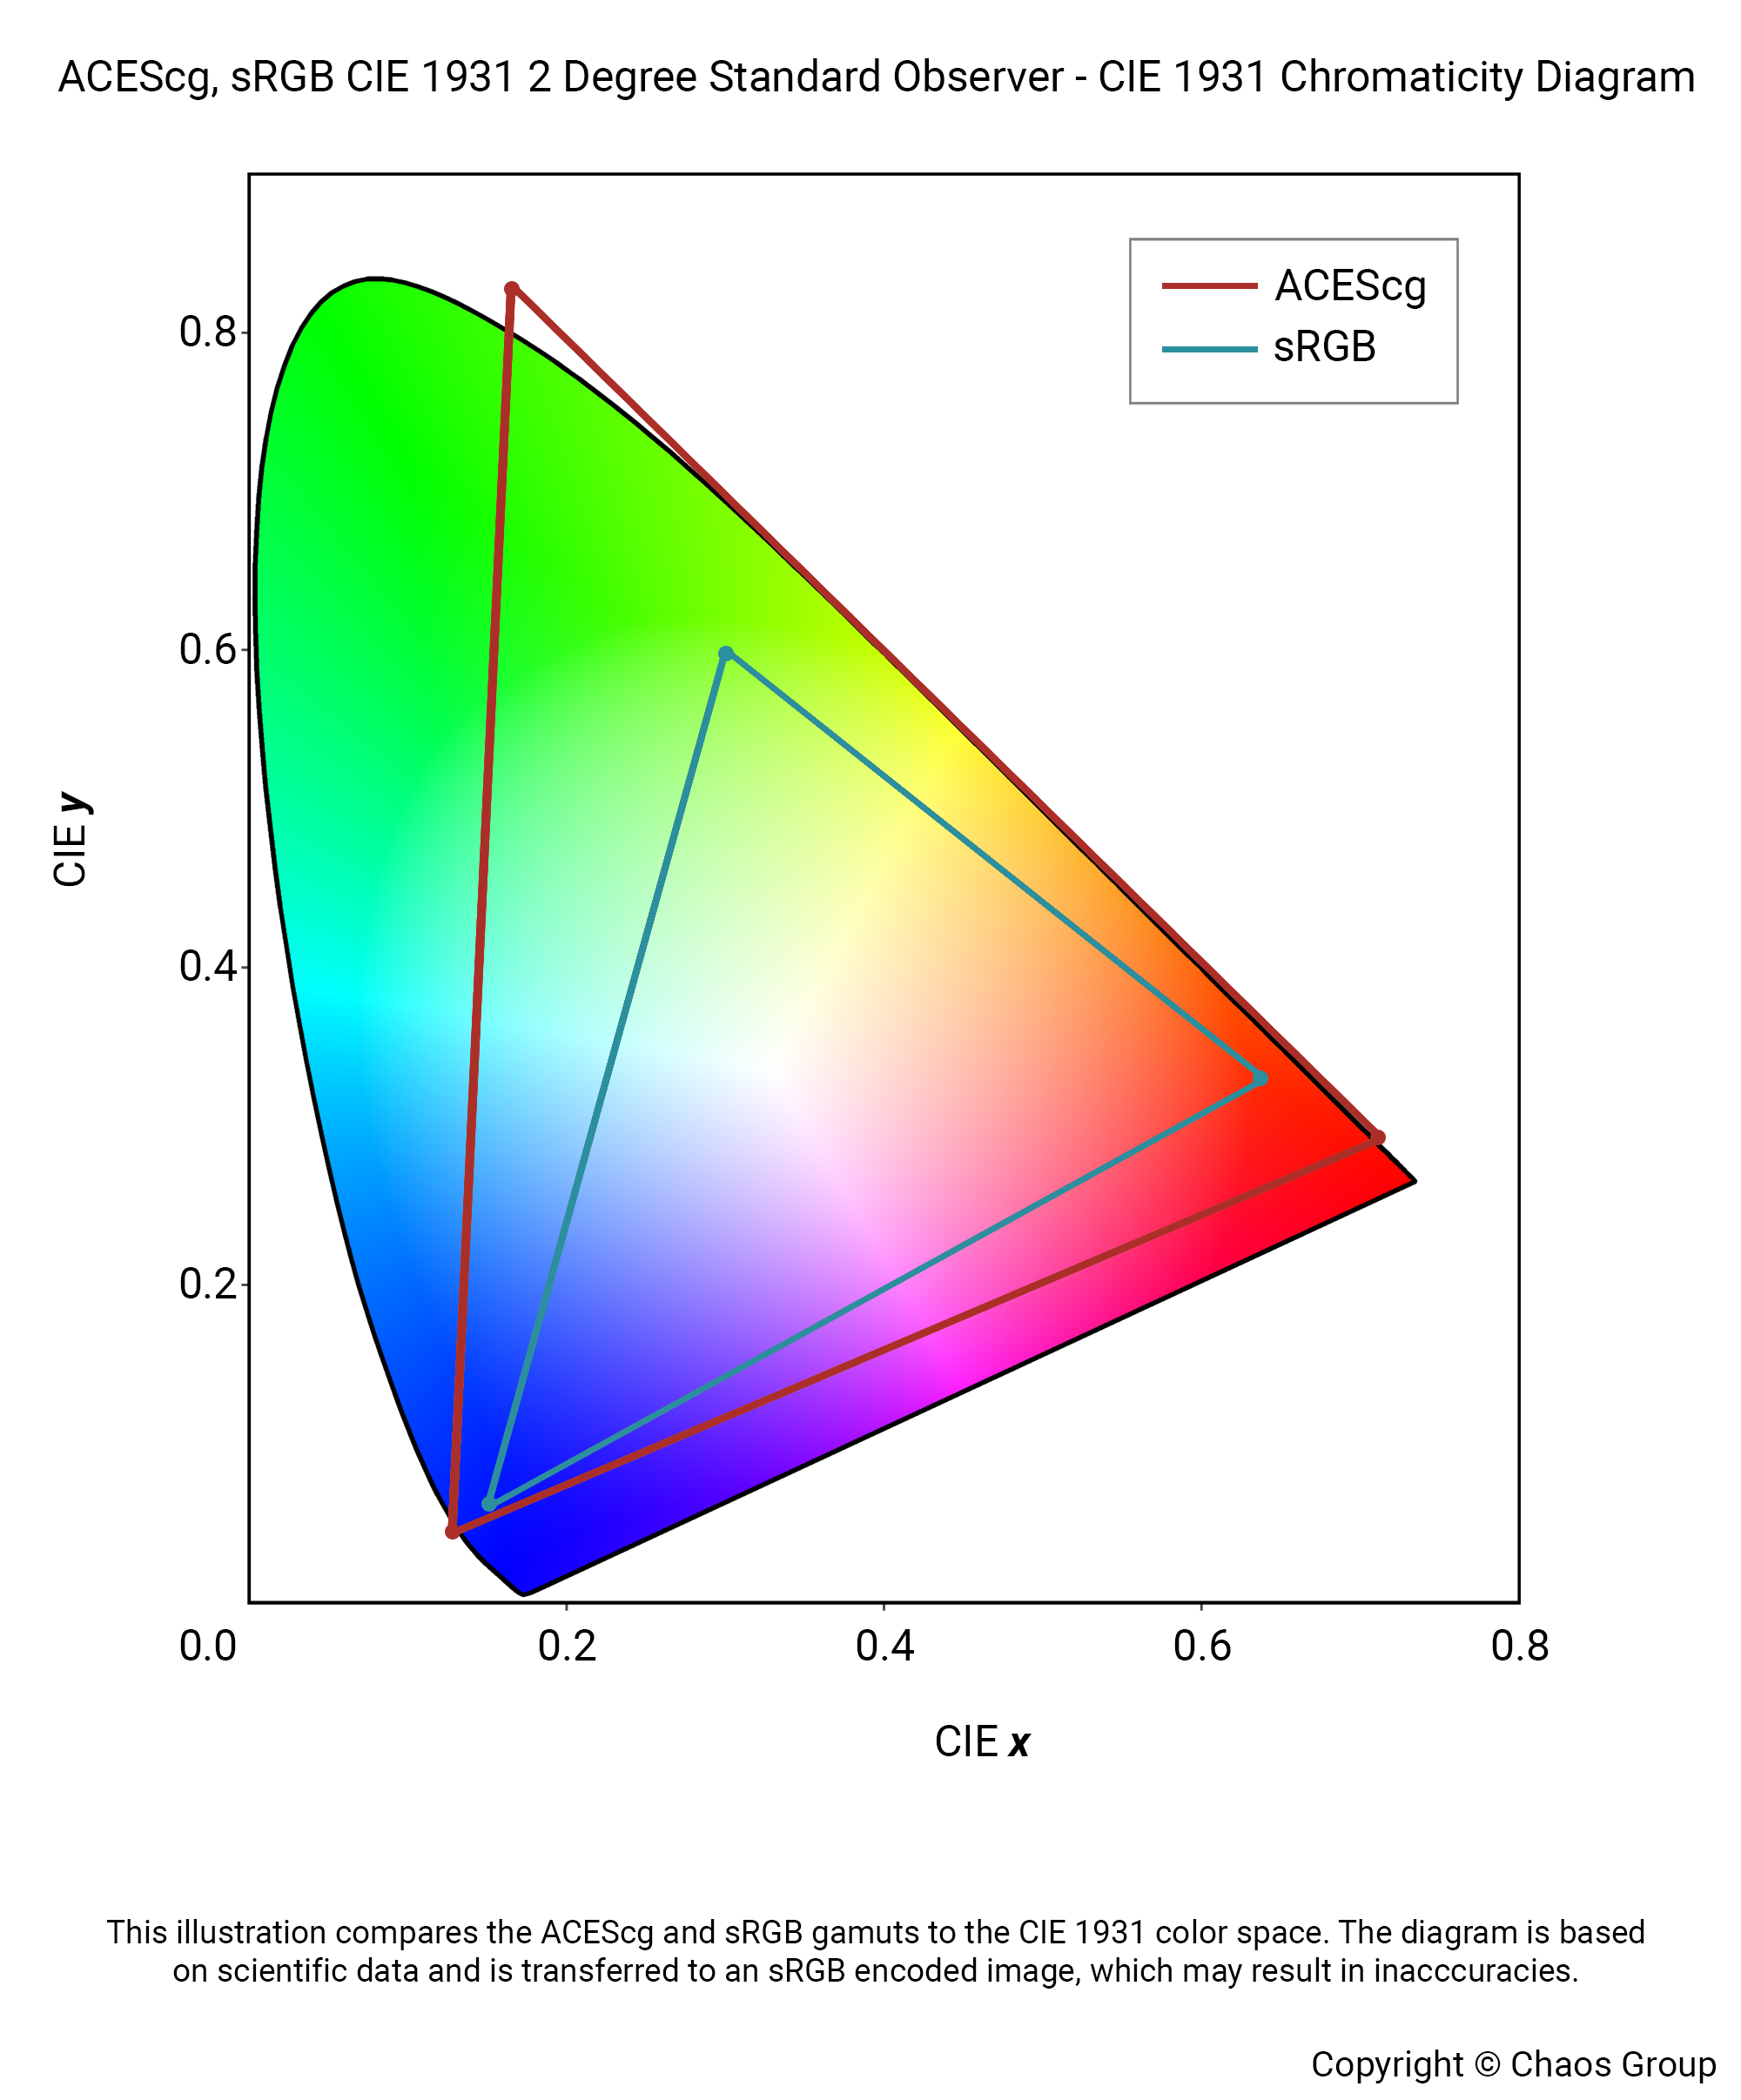
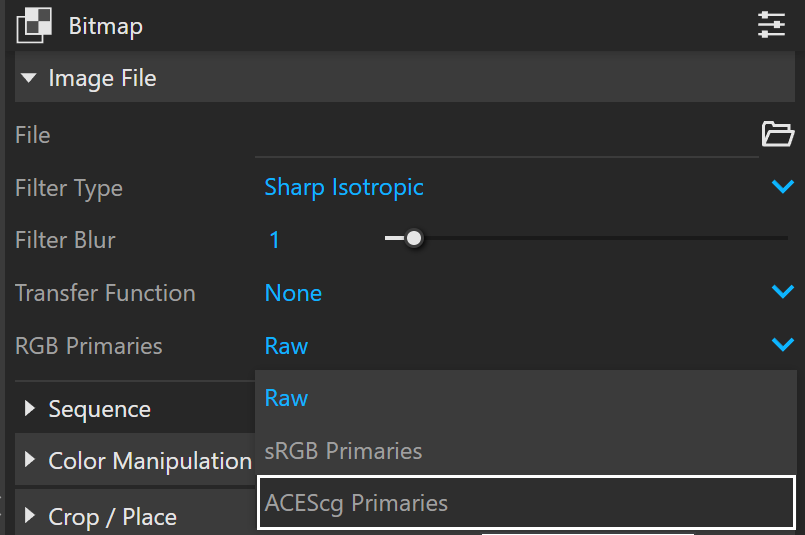
ACES is the Academy Color Encoding System and developed by the Academy of Motion Picture Arts and Sciences. ACEScg is the version of the ACES encoding system for computer graphics, widely adopted in the industry. It has become the industry standard, because compared to sRGB, ACEScg works with a lot more color information, illustrated in this gamut graph. To see ACEScg setup in V-Ray for SketchUp, expand below.
|

...
Optimizations
...
| Section | |||||||||||||||||
|---|---|---|---|---|---|---|---|---|---|---|---|---|---|---|---|---|---|
|

Switches
...
| Section | |||||||||||||||||
|---|---|---|---|---|---|---|---|---|---|---|---|---|---|---|---|---|---|
|

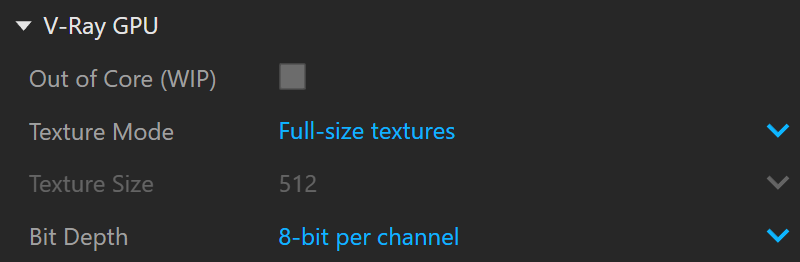
V-Ray GPU
...
| Section | ||||||||||||||||||||||
|---|---|---|---|---|---|---|---|---|---|---|---|---|---|---|---|---|---|---|---|---|---|---|
|