![]()
Page History
This page describes how to import a the V-Ray Proxy attributes in Maya using the old V-Ray proxy into Maya that was previously exportednode.
floatingpagetoc
Overview
...
The proxy import process creates a VRayMesh node which imports VRayProxy loads geometry from a file on disk . The node can load V-Ray proxy (.vrmesh) and Alembic (.abc) files. After the V-Ray proxy is imported, its parameters appear in the Attribute Editor.
To see how to import a V-Ray Proxy using the "vrayCreateProxy" command, please refer to Scripting and Programming page.
UI Path
| Section | |||||||||||||||
|---|---|---|---|---|---|---|---|---|---|---|---|---|---|---|---|
|
| UI Text Box | ||
|---|---|---|
| ||
A VRayProxy object can also be created by dragging and dropping a .vrmesh or .abc file directly in your active viewport. |
Import V-Ray Proxy
This dialog sets basic import parameters and creates the VRayProxy node.
| Section | |||||||||||||||||||||||||
|---|---|---|---|---|---|---|---|---|---|---|---|---|---|---|---|---|---|---|---|---|---|---|---|---|---|
|
Single file (frame formatting is supported) – Allows importing of one proxy file at a time. Frame formatting allows you to specify reading animated proxies where each frame is in a separate file. The formatting is displayed in the import window and it automatically sets the Animation parameters .
Multiple files – Allows importing of multiple proxy files at once. Frame formatting is not supported for this mode, and the Object path option works only if all imported proxies are Alembic files sharing the same object structure.
Node name – Name of the scene object to be created in Maya.
File(s) – File(s) to import.
Object path – Specifies which objects to import based on their starting paths in an Alembic file structure. Additional parameters are available in the Alembic proxy parameters rollout after import.
Create – Imports the proxy object and closes the dialog. Additional parameters appear in the Attribute Editor after the proxy is created.
VRayProxy Attributes
These parameters appear in the Attribute Editor after the VRayProxy node has been created and the mesh has been imported.
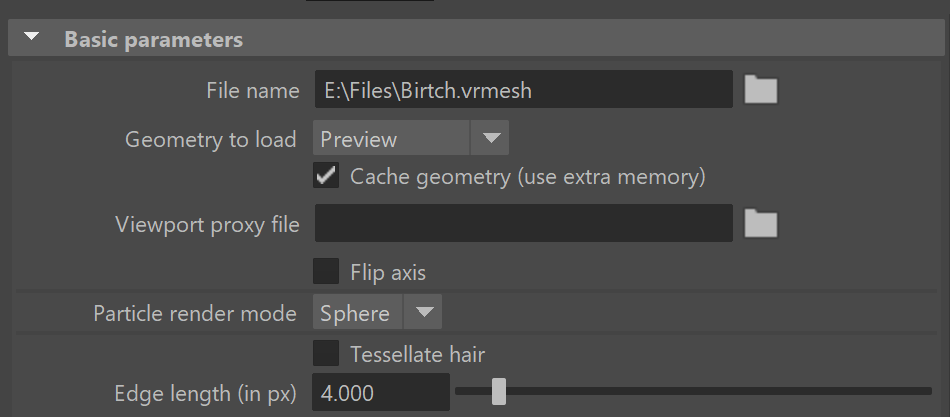
Basic Parameters
...
at render time only. The geometry is not present in the scene, and does not use up any resources, except for the viewport preview. This allows rendering scenes with many millions of faces, more than Maya itself can handle.
The V-Ray Proxy in Maya is a VRayProxy node that loads the geometry from a file on disk. The node loads alembic (.abc) and V-Ray Proxy (.vrmesh) files. Any mesh can be exported to an .abc or .vrmesh file from Maya and then loaded as a proxy.
Meshes are exported to a special .vrmesh file format. This file contains all geometric information for a mesh such as vertices and face topology as well as texture channels, face material IDs, smoothing groups, and normals. In short, everything that is needed to render the mesh is included in the file. In addition, the mesh is preprocessed and subdivided into chunks for easier access. The file also contains a simplified version of the mesh used for preview purposes in the viewports. More information about the .vrmesh file format is available in the V-Ray SDK documentation that comes with the V-Ray for Maya installation.
| UI Text Box | ||||
|---|---|---|---|---|
| ||||
V-Ray 5 introduces a new and improved VRayProxy node that's simpler, faster and offers new and powerful features. Scenes using the old V-Ray Proxy can be easily converted to the new VRayProxy with the built-int converter found in the V-Ray menu > Tools > Convert to New V-Ray Proxy Node. |
After loading the file, the V-Ray Proxy attributes are accessible in the Attribute Editor.
To load files with V-Ray Proxy, see the Import V-Ray Proxy page.
To export meshes to V-Ray Proxy, see the Export Mesh to V-Ray Proxy page.
Basic Parameters
...
| Section | ||||||||||
|---|---|---|---|---|---|---|---|---|---|---|
|
...
|
...
|
...
|
...
|
...
|
...
|
...
|
...
|
...
|
...
Alembic Layers
...
This rollout becomes active only if the loaded proxy file is in .abc file file format.
The Alembic layers feature allows modification of a selected alembic proxy by adding layer files on top of it. Each layer transforms the proxy with a different set of properties. These transformations include adding properties to a shape (e.g. UV mapping of an object that has no UVs), overriding properties, adding new objects, pruning objects or properties, replacing an object's (or properties') hierarchy with a new one, etc.
You can combine different cache files. Whenever the same object is found in a layer, all of its properties are considered.
| Section | |||||
|---|---|---|---|---|---|
|
...
|
...
|

Anchor proxyAnimationParams proxyAnimationParams
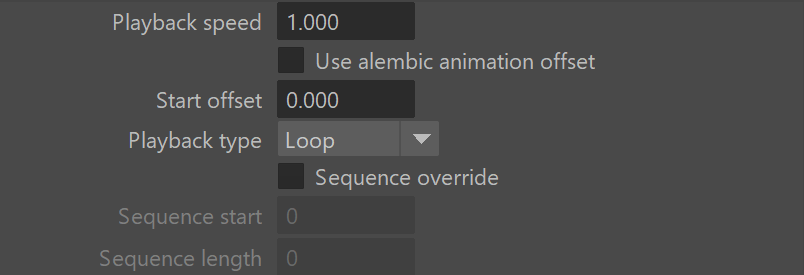
Animation Parameters
...
| Section |
|---|
...
|
...
|
...
|
...
|
...
|
...
|
...
|
...
|
Restore the Mesh
...
| Section | |
|---|---|
|
...
|
...
|
...
|
...
|
...
|
...
|

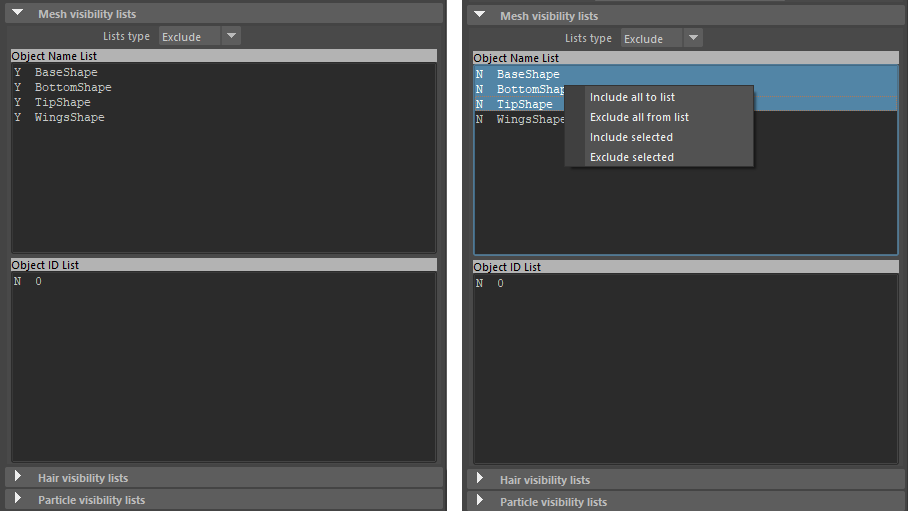
Visibility Lists
...
| Section | |||||
|---|---|---|---|---|---|
|
...
...
|
...
|
...
|
| Anchor | ||||
|---|---|---|---|---|
|
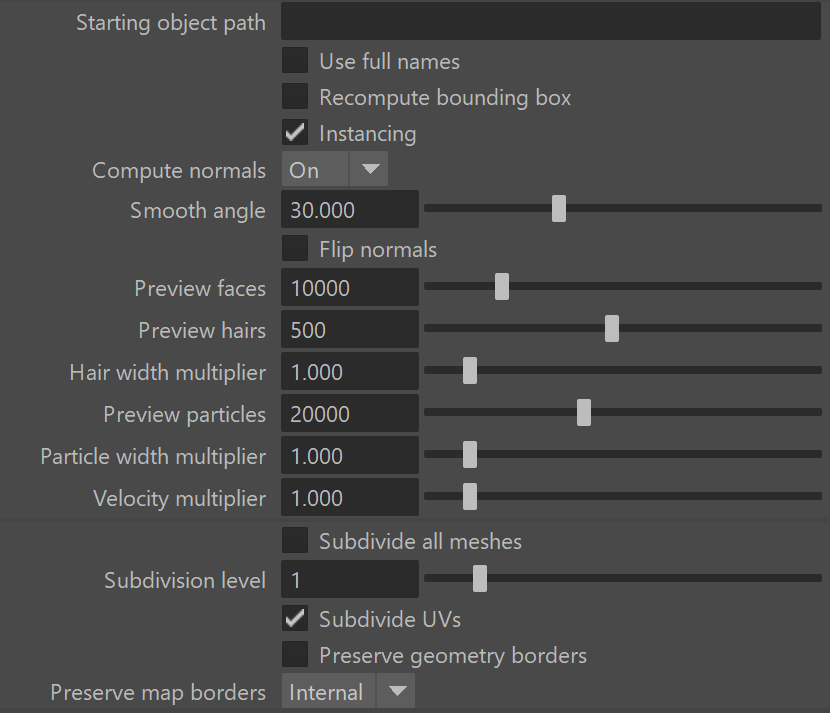
Alembic Proxy Parameters
...
| Section |
|---|
...
|
...
|
...
|
...
|
...
|
...
|
...
|
Point Cloud
...
| Section |
|---|
...
|
...
|
...
|
...
|

Material assignment overrides
...
| Section | |||||
|---|---|---|---|---|---|
|
...
|
...
|
...
|
...
|
...
|
...
|

file.
| Code Block | ||||
|---|---|---|---|---|
| ||||
<materialAssignmentRules> <patternRule> <pattern>pCube*</pattern> <material>VRayMtl1@material</material> </patternRule> </materialAssignmentRules> |
...
| UI Text Box | ||
|---|---|---|
| ||
The material assignment overrides is still a highly experimental feature and can change at any point! |
VRayMesh File Info
...
| Section |
|---|
...
|
...
|
...
| ||||
| ||||
|
...
|

Notes
...
| Fancy Bullets | ||
|---|---|---|
| ||
|