![]()
Page History
This page provides information on the V-Ray Bitmap Texture.
Overview
Overview
...
| Section | |||||
|---|---|---|---|---|---|
|
...
|

Tiled OpenEXR and TIFF Files
...
You can convert many common image file formats to tiled OpenEXR files using the img2tiledexr tool. You can also convert all files in a scene using the Vthe V-Ray Bitmap to VRayBitmap converter script. Conversion to tiled TIFF can be done using the maketx tool from the OpenImageIO library.
Tiled TIFF files have the advantage that they can store 8-bit color components, whereas OpenEXR stores at least 16 bits. This means that tiled 8-bit TIFF textures are smaller on the disk and take up less RAM while rendering.
Tags and Environment Variables in Bitmap Names
...
VRayBitmap allows the use of named tags, enclosed with the characters < and >, which are replaced at render time with other strings.
| Anchor | ||||
|---|---|---|---|---|
|
Tags for Multi-Tiles
Some modeling applications allow to specify specifying a different bitmap file for different portions of a model, based on the UV coordinates of that model. For example, one file may be used for UVs in the range [0,0] x (1,1), another file may be used for UVs in [1,0] x (2,1) and so on. There are several ways to specify the correct file for each tile, and in each case, a different format for the file name is used in the File node. This is done by using special tags in the file name, which are replaced at render time with a particular string, based on the UVs of the current shading point.
...
Upper-case tags usually assume the tile coordinates start from 1, whereas lower-case tags assume the tiles start from 0.
Mari Tiles and the <UDIM> Tag
Mari forms the file name of textures using a four-digit number equal to 1000+(u+1+v*10). So the UV tile [0,0] x (1,1) is assigned the number 1001, UV tile [0,1] x (1,2) is assigned 1011 and so on. To specify a Mari-style tiled texture, use the <UDIM> tag in the file name, which is then replaced with the respective four digits, for example, my_texture_<UDIM>.exr becomes my_texture_1001.exr and so on during rendering.
Mudbox Tiles and the <UVTILE> Tag
Mudbox can form the file name in many ways, but the default format is to use _uU_vV in the file name where U=u+1 and V=v+1 are the tile coordinates plus one. So the UV tile [0,0] x (1,1) is marked with _u1_v1, UV tile [0,1] x (1,2) is marked with _u1_v2 and so on. To specify this format, use the <UVTILE> tag in the file name. If you use lower case letters <uvtile> , then the tile coordinates will start from 0, instead of one, so tile [ 0,0] x (1,1) will be resolved to _u0_v0 and so on. For example, my_texture<UVTILE>.exr becomes my_texture_u1_v1.exr and so on during rendering.
The $U and $V Tags
You can also specify the u and v coordinates of the tiles separately by using the $U and $V tags. Each of them is expanded to the respective 1-based coordinate of the tile. For example, if the file name is specified as my_texture_$U_$V.exr, this becomes my_texture_1_1.exr and so on. You can use lower-case tags to make the tile coordinates start from zero, instead of 1, for example my_texture_$u_$v.exr becomes my_texture_0_0.exr and so on.
...
For example, if the first image in the sequence is located at C:\textures\myImage.0001.png, change the string to C:\textures\myImage.<frameNum>.png and V-Ray will look looks for an image that corresponds to each frame within the animation range.
Environment Variables
You can include environment variables in the form ${VAR_NAME} which , which are replaced with the value of the respective environment variable during rendering. For example, if the file name is specified as ${TEX_PATH}\${PROJ_FOLDER}\mytexture.exr, then V-Ray will look looks up the environment variables TEX_PATH and PROJ_FOLDER and replace replaces the tags with their values. Suppose that TEX_PATH is set to c:\textures and PROJ_FOLDER is set to proj1, then the final bitmap file name will is be expanded as c:\textures\proj1\mytexture.exr
Bitmap Properties
...
| Section | ||||||||||||||||
|---|---|---|---|---|---|---|---|---|---|---|---|---|---|---|---|---|
|
Common
| Section | |||||||||||||||
|---|---|---|---|---|---|---|---|---|---|---|---|---|---|---|---|
|
Mapped
| Section | |||||||||||||||
|---|---|---|---|---|---|---|---|---|---|---|---|---|---|---|---|
|
Processing
| |||||||||||||||
| Section | |||||||||||||||
|---|---|---|---|---|---|---|---|---|---|---|---|---|---|---|---|
|
Time
| Section | |||||||||||||||
|---|---|---|---|---|---|---|---|---|---|---|---|---|---|---|---|
|
Noise
| Section | |||||||||||||||
|---|---|---|---|---|---|---|---|---|---|---|---|---|---|---|---|
|
...
|

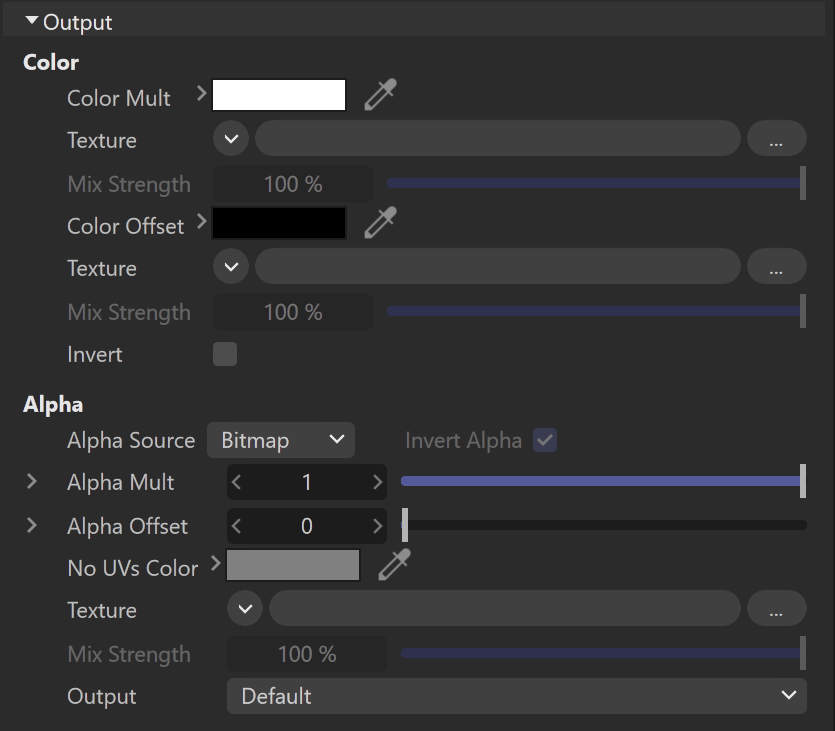
Output
...
| Section | |||||||||||||||
|---|---|---|---|---|---|---|---|---|---|---|---|---|---|---|---|
|
Mapping
...
| Section | |||||||||||||||
|---|---|---|---|---|---|---|---|---|---|---|---|---|---|---|---|
|

UV Noise
...
| Section | |||||||||||||||
|---|---|---|---|---|---|---|---|---|---|---|---|---|---|---|---|
|

Animation
...
Type – Determines whether the files are treated as an image Sequence or an Explicit animation. The Sequence Type reads the files as a whole animation, and offers more intuitive settings. It is ideal for general purposes. The Explicit type allows you to manually animate and offset the animation frames, and offers more advanced settings.
| Section | |||||||||||||||
|---|---|---|---|---|---|---|---|---|---|---|---|---|---|---|---|
|

...
| Section | |||||||||||||||
|---|---|---|---|---|---|---|---|---|---|---|---|---|---|---|---|
|

Image File List (.IFL)
...
| Section | |||||||||||||||
|---|---|---|---|---|---|---|---|---|---|---|---|---|---|---|---|
|
