Versions Compared

Key

  • This line was added.
  • This line was removed.
  • Formatting was changed.

...

UI Text Box
typeinfo

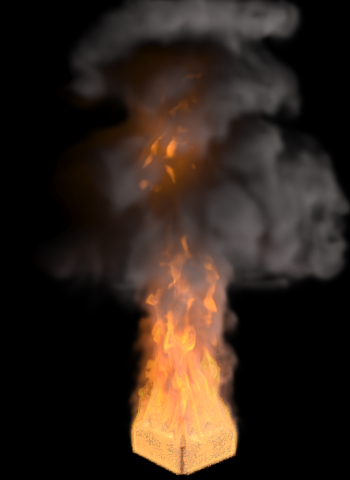
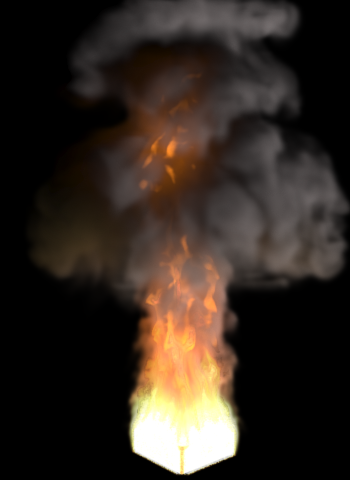
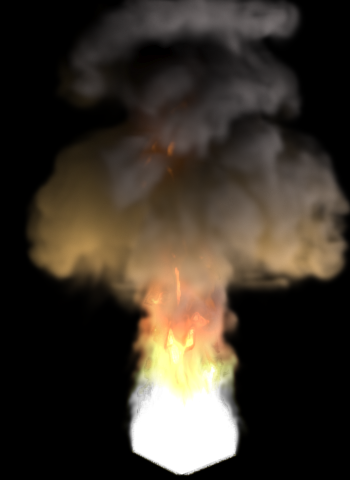
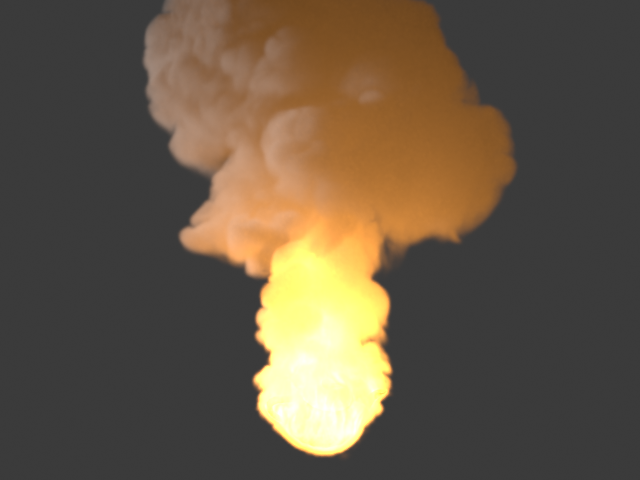
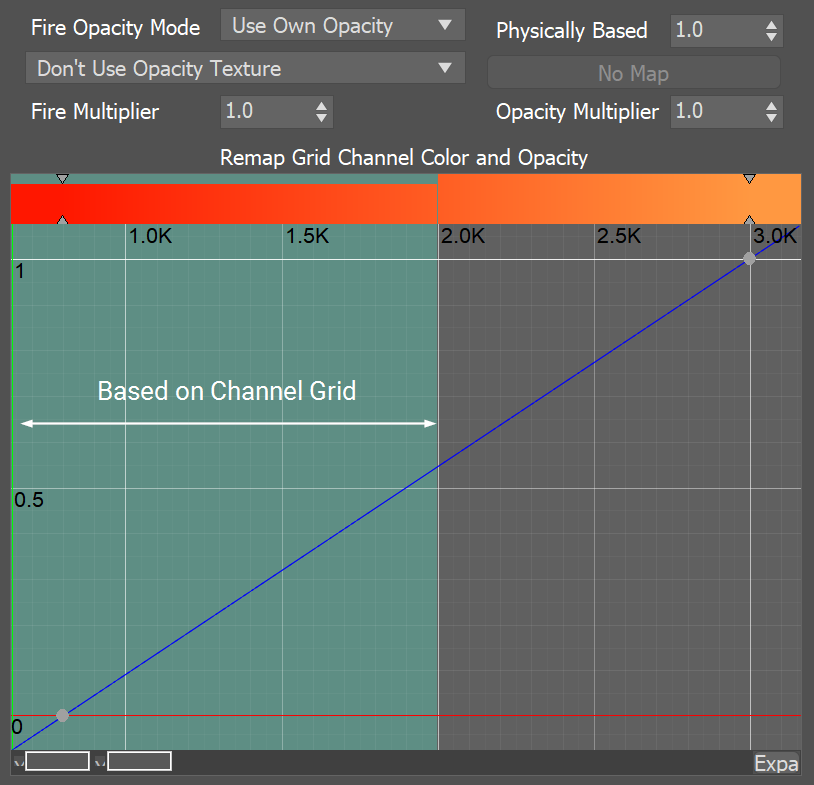
In the volume shader, there are two types of content - diffuse and emissive. For simplicity we call the diffuse content 'Smoke' and the emissive content 'Fire', though the volume shader is flexible enough that you can render a simulation's fire as smoke and a simulation's smoke as fire.

Diffuse needs external light in order to become visible, and also casts shadows. Emissive on the other hand is visible even without being lit by lights, ignores their illumination and does not cast shadows on itself. In addition, Phoenix has different tools that help you gain more control over how fire illuminates the smoke and the scene - see the Create Fire Lights section.

Both smoke and fire have their own color and alpha (alpha is a synonym for opacity, and transparency is the opposite of opacity).

Fire color and alpha, smoke color and smoke alpha can each be mapped to a physical grid channel, coming from the simulation. Color gradients are used to remap a physical channel to render color, and the diagrams (also called ramps or curves) are used to remap a physical channel to render opacity or intensity.

Also, each of them can be mapped to a texture, or to a grid channel multiplied by a texture. Textures have infinite resolution and can increase the detail above the resolution of the grid; By default textures are static in space, but using TexUVW they can move together with the fluid.

When there are both diffuse and emissive (smoke and fire) in the same voxel, there are 3 ways to determine the resulting color and alpha in that voxel - see the Fire Opacity Mode option.

...

General Parameters

...

Section
Column
width60%40%

Anchor
BasedOn
BasedOn

Based on | earg – Specifies the source channel that will be rendered as fire. By default the Temperature channel is used.

  • Disabled - the emission component of the shader will be disabled
  • Temperature
  • Smoke
  • Speed
  • Fuel
  • Texture - the emission will be based on the texture map specified in the Texture parameter
  • RGB

? – Opens the help documents.

Texture | etxt – If Based on is set to Texture, this slot specifies the texture from which fire is rendered. This slot can also specify a texture to be used with the Modulate option. For more information on texture mapping in Phoenix, please check the Texture mapping, moving textures with fire/smoke/liquid, and TexUVW page.

Modulate | mod_e – Enabling this option multiplies the Based on channel by the map in the Texture slot. This is only effective when Based on is not set to Texture.

Reset to Defaults – Resets the rollout settings to their default values.

Column
width5%


Column
width35%55%


Anchor
Light
Light

Light Emission Parameters

...

UI Text Box
typenote

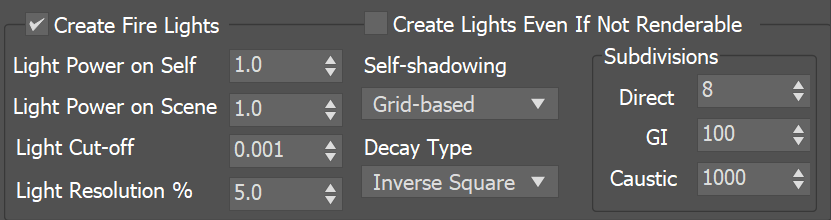
All Fire Lights options are ignored when rendering with V-Ray GPU. Enable Global Illumination from the V-Ray Settings if you need the Smoke and/or the scene to be illuminated by the fire.

Section
Column
width60%40%
UI Text Box
typeinfo

When using Global Illumination (GI), the fire will illuminate everything (scene objects as well as the Simulator's own Smoke) automatically but the rendering will take longer. Turning on Create Fire Lights simulates GI by placing light sources in the bright parts of the fire, which gives similar results and renders much faster. The color and power of these lights are adjusted automatically but can be overridden.

The smoke illumination caused by the Simulator's own fire can be controlled with the Self Shadowing option. If enabled, the smoke will obstruct the path of light from the fire, creating a much more realistic look but decreasing rendering performance. To gain back the rendering speed, set Self Shadowing to Grid-based and decrease the Light Grid Resolution (%) parameter to reduce the number of generated lights.

Create Fire Lights | al_enable – When enabled, allows the fire to shine on smoke and on surrounding objects in the scene even without using Global Illumination (GI). With GI, the fire will automatically illuminate the other scene objects and the simulator's own smoke, but the rendering will take quite long. Enabling Create Fire Lights simulates GI by placing light sources in the bright parts of the fire, which produces similar results and renders much faster. 

UI Text Box
typenote

If Create Fire Lights is enabled when rendering using GI, additional light sources will still be created by the fire at render time. You should disable Create Fire Lights if you want to let the GI naturally illuminate the scene.

Using Generate GI and Receive GI options from the V-Ray Object Properties will be ignored while Create Fire Lights is enabled.

Create Lights Even If Not Renderable | persistlights – When enabled, forces the simulator to emit light over the scene even if rendering the simulator itself is disabled. Can be used for compositing when the simulator is rendered in a separate pass.

Div
stylemargin-top: 10px
idFireSmoke_Fire_LightPowerOnSelf

Light Power On Self | lightsmultself – Controls the light intensity over the simulator's own smoke. This will not change the intensity and color of the fire itself; only the illumination over the smoke is affected.

Anchor
PowerMult
PowerMult
Light Power On Scene | lightsmult – Controls the light intensity over all scene objects except the Phoenix Simulator itself.

Light Cut-off | al_cutoff – This is a V-Ray specific control that works the same as the VRayLight cutoff parameter. This parameter specifies a threshold for the light intensity, below which the light will not be computed. This can be useful to limit the effect of the Phoenix light to some distance around the simulator. Larger values cut away more light; lower values make the light range larger. At 0.0, the light will be calculated for all surfaces, but the rendering could slow down significantly. Note that you need to reduce this parameter is sharp circular banding artifacts become visible.

Anchor
SelfShadowing
SelfShadowing
Self-shadowing | selfshadow – Enables self-shadowing of the smoke from the fire's light. If enabled, the smoke will obstruct the path of light from the fire, creating a much more realistic look but decreasing rendering performance. To gain back the rendering speed, set Self-Shadowing to Grid-based and decrease the Light Grid Resolution (%) parameter to reduce the number of generated lights. See the Self-Shadowing example.

None – Smoke will not obstruct the light propagation and will be brightly lit.
Ray-traced – The simulator's smoke will be illuminated by the fire's light sources using precise but slow ray-tracing. Note that the fire lights always illuminate the rest of the scene using ray-tracing. This mode is physically correct and takes into account non-transparent obstacles inside the Phoenix volume, but requires intense computation and can take considerable time to render and clear the noise from the image.
Grid-based – The self-illumination of the smoke will be calculated separately from the light that the simulator casts on the scene using an approximate fast formula. While Ray-traced may produce noise, this mode has no such effect - the resulting illumination on the smoke is always smooth. However, any obstacles inside the Phoenix volume are ignored by this mode and will not cast shadows on the smoke from the simulator's own light. The Light Resolution (%) parameter can be used to lower the resolution of the light grid and further speed up the illumination process. Reducing the grid will generally produce smoother self-illumination. Note that using Grid-based self-shadowing requires additional memory, so beware of high RAM usage with high resolution grids or many copied or instanced volumes.

Decay Type | al_decay – Controls how quickly the simulator's emissive light fades when travelling away from the fire light sources:

None – The light does not fade at all unless it's obstructed.
Inverse – The light intensity fades with the inverse of the distance. E.g. at a distance of 5 units, the intensity will be 1/5th of the intensity of the emitter.
Inverse Square – The light fades with the inverse square of the traveled distance. This is the physically correct light propagation. For example, at a distance of 5 units, the intensity will be 1/25th of the intensity of the emitter.

Anchor
GridReduction
GridReduction
Light Resolution (%) gridreduct – Specifies the resolution of the light grid as a percentage of the fire grid's resolution. Perfect illumination from fire could be achieved by placing a light in each fire cell, but this could take a tremendous amount of time to render and such accuracy is usually not necessary to approximate the fire's illumination convincingly. In order to speed up rendering, a separate light grid is created internally which can have a lower resolution than the fire grid, and this light grid is populated with one Omni light per each cell. The lower resolution (and thus fewer lights) speeds up rendering at the expense of some illumination detail, which might not always be visible anyway. At a value of 100, the light grid has the same resolution as the fire grid. The smaller the Light Resolution is, the smoother the illumination becomes and the faster the rendering is. However, at very low values the fire might not blend well with the light it casts on the smoke. See the Grid Reduction example.

UI Text Box
typenote

The Subdivisions section affects the rendering under V-Ray only. The parameters control how many rays have to be traced in order to calculate the lighting. The larger the ray count, the better looking the result will be, but it will render more slowly. For general explanation of how light sampling works, see the V-Ray Image Sampler page.

Direct | subdivs – Sampling control for direct lighting. This parameter controls the number of the rays traced from the shaded point toward the fire in order to find the optical passability between them. The number of rays cast towards the fire is the square of this value. If the value is zero, a special case is used and all emissive lights are sampled. This could be quite slow when having a big number of emissive lights.

GI gisubdivs –Sampling control for indirect lighting. This parameter controls the number of rays traced from the fire to the scene when global illumination (GI) is calculated. For example, when using a Global Photon Map, this specifies the photon count.

Caustic | csubdivs – Sampling control for Caustic effects. Similar to GI subdivisions, but used when caustics are calculated.

Column
width5%


Column
width35%55%


Anchor
SelfShadowing
SelfShadowing

...

Section
Column
width5%


Column
width30%

Image Added Image Removed
Self-shadowing = None
(render time = 2 min )

Column
width30%

Image Added Image Removed
Self-shadowing = Ray-traced
(render time = 17 min )

Column
width30%

Image Added Image Removed
Self-shadowing = Grid-based, Light Resolution (%) = 10
(render time = 1 min )  

Column
width5%


...

Section
Column
width5%


Column
width30%

Image AddedImage Removed
Self-shadowing = Grid-based, Light Resolution (%) = 1
render time = 40 secs

Column
width30%

Image AddedImage Removed
Self-shadowing = Grid-based, Light Resolution (%) = 10
render time = 58 secs

Column
width30%

Image AddedImage Removed
Self-shadowing = Grid-based, Light Resolution (%) = 100 (no reduction at all)
render time = 6:39 mins

Column
width5%


Anchor
Color
Color

Color

...

Section
Column
width60%45%

Anchor
IgnoreAlpha
IgnoreAlpha

Div
stylemargin-top: 10px
idFireSmoke_Fire_FireOpacityMode

Fire Opacity Mode fire_opacity_mode – While smoke has its own opacity in the Smoke Opacity rollout, the Fire opacity can be determined in either one of the following three ways:

Use Smoke Opacity – Fire will use the same opacity that is set to the smoke in the Smoke Opacity rollout. This means the fire will not be visible in cells where there is no smoke.
Fully Visible – Fire will always render as if it has full opacity, but will not produce alpha. This way fire will be visible even in cells that have no opacity. This mode is intended for use with Phoenix simulations, such as simulations with sources that emit Temperature but do not emit Smoke. During rendering, Phoenix internally composes the fire with the scene using additive blending, and such blending must be used when compositing fire manually. However, this mode is not suitable for compositing fire mixed with smoke.
Use Own Opacity – Custom varying opacity for the fire using the Opacity diagram and/or using a texture.

Anchor
BlackBody
BlackBody
Physically Based | blackbody – Transitions between an artistic look of the fire (when set to 0) and a realistic physically-based Intensity (when set to 1). The realistic mode multiplies the fire intensity by the Black Body Radiation model, which gives strong brightness to the hot parts of the fire. See the Physically Based example.

Opacity Texture Mode | mod_et –  Available only when the Fire Opacity Mode is set to Use Own Opacity.

Don't Use Opacity Texture – The Fire Opacity will be based entirely on the Color and Opacity Curve below.
Multiply Opacity By Texture – The Color and Opacity Curve will be multiplied by the specified texture to produce the final Fire Opacity.
Fire Opacity From Texture – The Fire Opacity will be based entirely on the specified texture - the Color and Opacity Curve below will be ignored.

Opacity Texture | ettxt – If Opacity Texture Mode is set to Multiply Opacity By Texture or Fire Opacity From Texture, this slot specifies the texture used to modulate the Fire Opacity. For more information on texture mapping in Phoenix, please check the Texture mapping, moving textures with fire/smoke/liquid, and TexUVW page.


Div
stylemargin-top: 10px
idFireSmoke_Fire_FireMultiplier

Fire Multiplier | emult – General multiplier for the fire color's intensity.

Opacity Multiplier | etmult – Multiplier for the fire's own opacity when it is detached from the Smoke Opacity. Used only when the Opacity Mode is set to Use Own Opacity.
Column
width5%


Column
width35%50%

Image Removed

...

Image Added

Color Gradient and Intensity/Opacity Curve

...

Section

Example: Physically Based


UI Text Box
typetip

The Physically Based parameter can alter the apparent brightness of the fire to dial in a specific look for the fire. This example illustrates transitioning from a darker artistic look (0) to a photorealistic look (1).

Here are the settings used for the following renders:


Section
Column
width5%


Column
width30%


Physically Based = 0

Column
width30%


Physically Based = 0.1

Column
width30%


Physically Based = 1

Column
width5%