Versions Compared

Key

  • This line was added.
  • This line was removed.
  • Formatting was changed.

...

Section
DownloadB


Column
width40%

The instructions on this page guide you through the process of setting up an exploding Wine Glass simulation. The main takeaway of this tutorial is an understanding of how Surface Tension and the Steps per Frame parameters affect the movement of the liquid. The explosive effect is achieved through the use of a native Max Wind Force, which is the main driver of the simulation. Additional velocities are sourced into the simulation from the baked Rigid Body simulation of the wine glass and the Phoenix Turbulence force.


This simulation requires Phoenix 4.20 Official Release and V-Ray Next 5, Update 2.3 Official Release for Max 20172018 at least. If you notice a major difference between the results shown here and the behavior of your setup, please reach us using the Support Form.


The Download button below provides you with an archive containing the start and end scenes.

Anchor
DownloadB
UI Button
sizelargedisplayblock
icondownload
titleDownload Project Files
urlhttps://drive.google.com/uc?export=download&id=1gHXGDg2CA38xlde5jZODTgEWWYPdd85-1LYmyFfGrRKh7WSqGyynv39SRMviHMLnE

Column
width60%

Image Modified


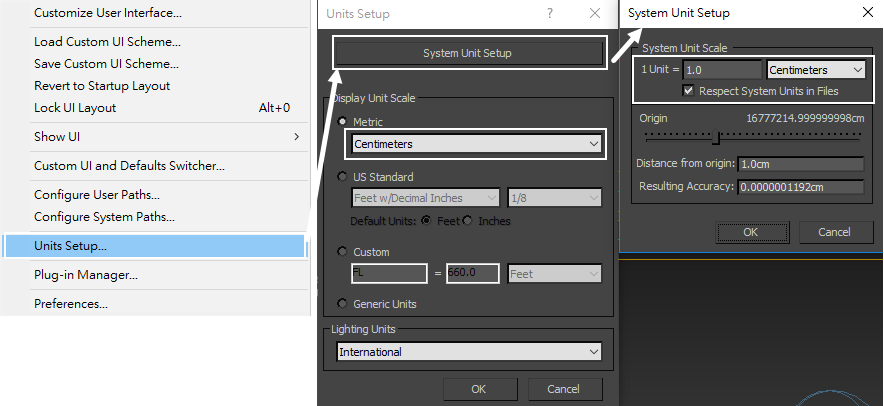
System Units Setup

...

Section
Column
width50%

Scale is crucial for the behavior of any simulation. The real-world size of the Simulator in units is important for the simulation dynamics. Large-scale simulations appear to move more slowly, while mid-to-small scale simulations have lots of vigorous movement. When you create your Simulator, you must check the Grid rollout where the real-world extents of the Simulator are shown. If the size of the Simulator in the scene cannot be changed, you can cheat the solver into working as if the scale is larger or smaller by changing the Scene Scale option in the Grid rollout.

The Phoenix solver is not affected by how you choose to view the Display Unit Scale - it is just a matter of convenience.


Go to Customize -> Units Setup and set Display Unit Scale to Metric Centimeters.

Also, set the System Units such that 1 Unit equals 1 Centimeter.

Column
width50%

...

Section
Column
width40%

Phoenix allows you to preview the forces in your scene which eliminates the process of constant tweaking and simulating. You can preview any Max native force as well as all the forces that ship with Phoenix.

To see the effect of a force on your container, enable Forces from the Preview tab of your Simulator. 

Note

Note that when Auto Range is Enabled, the Min and Max values of the incoming velocities are displayed. This could be incredibly useful when setting up the Magnitude of your forces or troubleshooting your simulation. If the Max value was along the lines of 5000, you would naturally expect your simulation to 'explode'. Take note of those values when tweaking the Force Fields.

...


...

section

Column
width40%

The desired explosive effect of the liquid is achieved through a standard 3ds Max Wind Force combined with Phoenix Turbulence.


To create the Wind Force go to Create panel → Space Warps → Forces.

Depending on the placement, the look of the simulation will vary dramatically. Experiment to find a desirable result. In this tutorial the position position of the force is at the center of the glass. The exact position of the Wind force in the scene is [ -58, 0, 195 ].

Change its type to Spherical. This will cause the force to affect the liquid in all directions.

Set the Strength to 30.0.

Column
width60%

...

Section
Column
width10%


Column
width310px

Column
width280px

Column
width10%


...


Section
Column
width40%

 This This piece of geometry will not need to be rendered or displayed in the viewport. Access its Object Properties from the quad menu and enable Display as Box and disable Renderable.

Column
width60%

...

Section
Column
width40%

The Simulator → Grid parameters are tweaked as follows:

The Scene Scale is set to 1.0.

The Cell Size is set to 1.0 cm.

The X/Y/Z Size of the Simulator is set to 110/110/140 as a starting point.

The Adaptive Grid is enabled. This tells Phoenix to track the Liquid and increase the size of the simulator when the particles get close to the boundary.

The Extra Margin is set to 5.

The Expand and Don't Shrink is disabled

Column
width60%

...

Section
Column
width40%

The quality of the liquid’s mesh depends on the Dynamics settings. In this setup the Gravity is set to 0.8, the Steps per Per Frame to 7, Surface Tension Strength to 0.05.

Column
width60%

...

First, let's look at Steps per framePer Frame (SPF). 

UI Text Box
typetip

One of the most important parameters of the simulator, with significant impact on quality and performance. To understand how to use it, keep in mind that the simulation is a sequential process and happens step by step. It produces good results if each simulation step introduces small changes, but it's also a trade-off between performance and detail, as described below.

For example let's take an object that is hitting the liquid surface with high speed. If at the first step the object is far away from the water and at the second step, the object is already deep under the water - the result won't look good. You have to introduce intermediate steps until the changes of each step get small enough. The Steps per frame Per Frame option creates these steps within each frame. A value of 1 means that there are no intermediate steps and each step is exported into the cache file. A value of 2 means that there is one intermediate step, i.e. each second step is exported to the cache file while the intermediate steps are just calculated, but not exported.

Signs that the Steps per framePer Frame need to be increased are:

  • Liquid simulations have too many single liquid particles.
  • Liquid simulations are torn and chaotic.
  • Liquid simulations of streams have steps or other periodical artifacts.
  • Fire/Smoke simulations have artifacts that produce a grainy appearance.

More often than not, those issues will be caused by the simulation moving too quickly (e.g. the emission from the source is very strong or the objects in the scene are moving very fast). In such cases you should use a higher SPF.

Keep in mind that higher Steps Per Frame decreases the performance in a linear way, i.e. if you increase the SPF twice, your simulation will go twice as slow. However, the quality does not have a linear relation to the SPF. Each simulation step kills fine details, and thus for maximum detail it's best to use the lowest possible SPF that runs without any of the issues mentioned above. For additional information, please refer to Phoenix Explained.

...

Section
Column
width50%

Steps per frame Per Frame = 1


Column
width50%

Steps per frame Per Frame = 15


...


Next is the Surface Tension Strength. This parameter plays an important role in small-scale liquid simulations because an accurate simulation of surface tension indicates the small scale to the audience. Lower Strength values will cause the liquid to easily break apart into individual liquid particles, while higher values will make it harder for the liquid surface to split and will hold the liquid particles together. 

...

Section
Column
width40%

By default, Phoenix uses a grid-based method for creating the mesh rather than a particle-based one. As a result, the mesh may appear jagged in places. These artifacts can be reduced by adjusting the Smoothness parameter in the Rendering rollout.

Column
width60%


...

Section

The following examples show the simulation with different Smoothness values.


Column
width50%

Smoothness = 0


Column
width50%

Smoothness = 100

...

UI Text Box
typenote

It is very important to pick the correct mesh for the distance expression. In this case "frag_mesh" mesh should be selected, because this is the existing one in the scene after the 2nd frame of the animation.


Materials

...

Glass Material

...

Section
Column
width40%

To create a realistic glass material:

Set the Diffuse color to RGB [ 0, 0, 0 ].

Set the Reflect and Refract colors to RGB [ 255, 255, 255 ].

Set the Fresnel IOR to 1.6.

Set the Refraction and Reflection Max depth to 20. In addition, enable Abbe number to add a dispersion effect to the glass8.

Column
width60%

Image RemovedImage Added


Wine

...

Material

...

Section
Column
width40%

To create a realistic red wine material:

Set the Diffuse color to RGB [ 0, 0, 0 ].

Set the Reflect and Refract colors to RGB [ 255, 255, 255 ].

Set the Reflection the Glossiness to 0.55.

Set the  Fresnel IOR to 1.63.

Set the Reflection and Refraction Max depth to 20. In addition, enable Abbe number to add a dispersion effect to the wine.8.

Set the Fog color to RGB [ 166, 23, 20 ].

Set the Fog multiplier Depth to 0100.005.

Set the Fog bias to -1.0.

Columncolumn
width60%

Image RemovedImage Added


The red wine itself has a special color, it's transparent but not completely translucent. That's why in this material uses the Fog color, which specifies the attenuation of light as it passes through the material. This option allows the user to simulate the fact that thick objects look less transparent than thin objects. Note that the effect of the fog color depends on the absolute size of the objects and is therefore scene-dependent unless the Fog system units scaling is enabled. Another option, helping to improve the material presentation, is the Fog multiplier, which can be used to fine-tune the strength of the fog. In addition, the Fog bias allows you to control the color transition. A negative value will make the liquid to appear thicker.


Section


The following examples show the simulation with different Fog bias values.


Column
width4%


Column
width350px

Image Removed
Fog Bias = 0.0

Column
width350px

Image Removed
Fog Bias = -0.5

Column
width350px

Image Removed
Fog Bias = -1.0


Lighting and Camera

Lighting and Camera

...

Section
Column
width40%

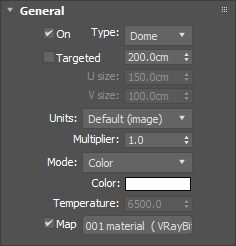
The source of illumination in the scene is a single V-Ray Dome Light.

Press on the Cosmos icon in the V-Ray toolbar. In the HDRIs section  → Studio  → choose Studio 001. Press the green arrow to Import the HDR map. Chaos Cosmos generates a VRayLight in the scene with the HDR map plugged in the Texture slot.

The exact position of the V-Ray Light is XYZ: [4500, 0, 0].

UI Text Box
typeinfo

Starting with V-Ray 5, the VRayHDRI map is renamed to VRayBitmap.

Set the Multiplier to 1

Section
Column
width40%

The source of illumination in the scene is a single V-Ray Dome Light.

To add one, go to Create → Lights → V-Ray Dome Light.

Set the Multiplier to 2.

Make the Dome Light Invisible in the rendered image from the Options tab.


Column
width60%

Image Removed


Image Added


...


Section
Column
width40%

For this setup a VRayPhysicalCamera is used.


The Film Gate is set to 36.0.

The Focal Length is set to 40.0.

The Film Speed (ISO) is set to 100.

The F-Number is set to 2.0.

The Shutter Speed is set to 200.

The Depth of field is enabled.

The Exposure is enabled and set to Temperature set to 6100 K.


In this tutorial the exact position of the Camera is [ -425, -750, 200 ]

and of the Camera Target is [ -16, -65, 187 ].

Column
width60%

...

Section
Column
width40%

The Image Sampler Type is set to ProgressiveBucket.

The Render time is  Max subdivs are set to 2.54.

The Noise thresholdBucked width is set to 16.0.005.

Column
width60%

Image RemovedImage Added


...


Section
Column
width40%

A V-Ray Denoiser Render Element is added to the final image. The Denoiser takes an existing render and applies a denoising operation to it after the image is completely rendered in order to remove the noise in the image.

For this tutorial the Default settings of the element are used.

Column
width60%


...


Section
Column
width40%

The V-Ray Physical Camera offers additional exposure controls, but you can also fine-tune renders using the Old V-Ray Frame Buffer. In this case the 

Curves 

Curves setting is used to add more contrast to the image.


Column
width60%

Image RemovedImage Added


Final Results

Image Removed

...

...

Section
Column
width50%

Image Modified


Column
width50%

Image Modified