![]()
Page History
This page contains information on the Layers panel in the V-Ray Frame Buffer.
Overview
...
| Section | ||||||||||||||||||||||||||||
|---|---|---|---|---|---|---|---|---|---|---|---|---|---|---|---|---|---|---|---|---|---|---|---|---|---|---|---|---|
|
Layers Menu
...
Commands available for the Layers panel are located at the top of the panel. Press on the icons to see the expanded list of commands for the stacked buttons.
| Section | ||||||||||||||||||||||||||||
|---|---|---|---|---|---|---|---|---|---|---|---|---|---|---|---|---|---|---|---|---|---|---|---|---|---|---|---|---|
|
| Creates a layer. Multiple layers of the same type can be added. Folder – Allows grouping multiple layers in folders. This is only available when the Source layer is set to Composite; |
| Deletes the selected layer(s). |
| Saves a layer tree preset. |
| Loads a layer tree preset. |
| Quick access to custom layer presets. You must set the path to it in the VFB Settings. |
| Undo various actions related to layers such as create, delete, reorder or modify a layer. |
| Redo various actions related to layers such as create, delete, reorder or modify a layer. |


...
Command | Description |
|---|---|
| Reset | Resets all changes done to the selected layer. |
| Save | Saves the layer as a preset. |
| Load | Loads a preset for the selected layer. |
| Delete | Deletes the selected layer. |
| Save all CCs as LUT | Bakes all the color corrections to a LUT file. It can be used with RMB on a Display Correction layer and saves only the corrections in its section, but ignores their masks. |
| New Layer | Creates a new layer. |
| Duplicate | Duplicates the selected layer. |
| Blend Modes | Specifies how the selected layer blends with the result from all layers below it. |
| UI Text Box | ||
|---|---|---|
| ||
Color correction layers like Exposure and White Balance can be applied to a single layer instead of the entire composite. You can do that by selecting a layer and then adding a new correction or by dragging the correction layer to another layer until an arrow icon appears. |
The Stamp, Display Correction, Sharpen/Blur, Denoiser, Lens Effects and Source layers are listed in the Layers panel by default to any rendered image. Their order cannot be changed.
...
| UI Text Box | ||
|---|---|---|
| ||
If you want to keep the layers that come with the Max scene, turn the Auto Load Layers option off from VFB > Options > History tab. If you want to load layers from an external image, enable the Auto Load Layers option and check how you save those images. |
Composite Layer options
...
| Section | ||||||||||||||||
|---|---|---|---|---|---|---|---|---|---|---|---|---|---|---|---|---|
|

...
Blend modes
...
| Section | |||||||||||||||||
|---|---|---|---|---|---|---|---|---|---|---|---|---|---|---|---|---|---|
|

| UI Text Box | ||
|---|---|---|
| ||
When adding a new layer, it is placed on top of the stack and it is considered the foreground (FG). The result of all layers below it is considered the background (BG). Layers are applied from the bottom to the top. Where darker and lighter pixels are mentioned below, it is in relation to mid-grey. |
...
| Blend Mode* | Description |
|---|---|
| Overwrite | Displays the current layer (FG) on top of all layers (BG) without blending. This is the default. |
| Normal | Blends the alpha of the VRayMtlSelect render element's material and other layers. See Notes for more information. |
| Average | The average of the current layer (FG) and the result from the layers below it (BG). |
| Add | Adds the FG to the BG. |
| Subtract | Subtracts the FG from the BG. Does not affect completely black areas. |
| Divide | Subtracts the BG from the FG. Dark areas of the render are brightened, while bright areas of the render are not changed significantly. Does not affect completely white areas. |
| Darken | Compares the FG to the BG and takes the darker pixel values of the two. |
| Multiply | Multiplies the FG by the BG. |
| Color Burn | The color of the FG is applied to darker pixels in the BG. |
| Linear Burn | Same as Color Burn but with less contrast. |
| Lighten | Compares the FG to the BG and takes the lighter of the two. |
| Screen | Makes both light and dark areas lighter. |
| Pin Light | Replaces the BG colors depending on the brightness of the FG color. If the FG color is lighter than mid-gray, BG colors darker than the FG color are replaced and vice versa. |
| Difference | Compares the pixels in the BG and FG and subtracts the darker pixels from the brighter ones. |
| Exclusion | Same as Difference but with less contrast. |
| Hue | Uses the hue from the FG , while the value and saturation are taken from the BG. |
| Saturation | Uses the saturation from the FG, while the value and hue are taken from the BG. |
| Color | Uses the hue and saturation from the FG, while the value is taken from the BG. |
| Value | Uses the value from the FG, while the hue and saturation are taken from the BG. |
| Hard Mix (8bit) | Adds the FG to the BG and for each color component returns a value of 255 if the result is 255 or greater, or returns 0 if the result is less than 255. |
| Color Dodge (8bit) | The color of the FG is applied to lighter pixels in the BG. |
| Linear Dodge (8bit) | Same as Color Dodge but with less contrast. |
| Spotlight (8bit) | Same as Multiply, but with twice the brightness. |
| Spotlight Blend (8bit) | Same as Spotlight, but additionally brightens the BG. |
| Overlay (8bit) | Darker pixels become darker where the BG is dark and brighter pixels become brighter where the BG is bright. |
| Soft Light (8bit) | Darker pixels become darker where the FG is dark and brighter pixels become brighter where the FG is bright. |
| Hard Light (8bit) | Spotlight is applied to pixels where the FG is dark and Screen is applied to pixels where the FG is bright. |
| Anchor | ||||
|---|---|---|---|---|
|
Proportion Guide
...
| Section | |||||||||||||||||
|---|---|---|---|---|---|---|---|---|---|---|---|---|---|---|---|---|---|
|

...
Stamp
...
| Section | |||||||||||||||||||||||||||||||||||||||||||||||||||||||||||
|---|---|---|---|---|---|---|---|---|---|---|---|---|---|---|---|---|---|---|---|---|---|---|---|---|---|---|---|---|---|---|---|---|---|---|---|---|---|---|---|---|---|---|---|---|---|---|---|---|---|---|---|---|---|---|---|---|---|---|---|
|

...
Masks
...
| Section | |||||||||||||||||
|---|---|---|---|---|---|---|---|---|---|---|---|---|---|---|---|---|---|
|

| Anchor | ||||
|---|---|---|---|---|
|
...
| Section | ||||||||||||||||
|---|---|---|---|---|---|---|---|---|---|---|---|---|---|---|---|---|
|

| UI Text Box | ||
|---|---|---|
| ||
Normally you would specify the ICC file for your calibrated monitor here. Programs like PhotoShop display images using your (primary) monitor's ICC profile automatically. However (at least for the moment), 3ds Max is not a color-managed application and you must manually load the monitor ICC profile into the V-Ray frame buffer in order to match the appearance of your images in PhotoShop. |
...
| Anchor | ||||
|---|---|---|---|---|
|
OpenColorIO (OCIO)
...
| Section | ||||||||||||||||
|---|---|---|---|---|---|---|---|---|---|---|---|---|---|---|---|---|
|

ICC
...
| Section | |||||||||||||||||
|---|---|---|---|---|---|---|---|---|---|---|---|---|---|---|---|---|---|
|

ICC Profile
...
| Section | ||||||||||||||||
|---|---|---|---|---|---|---|---|---|---|---|---|---|---|---|---|---|
|

Source
...
| Section | ||||||||||||||||
|---|---|---|---|---|---|---|---|---|---|---|---|---|---|---|---|---|
|

...
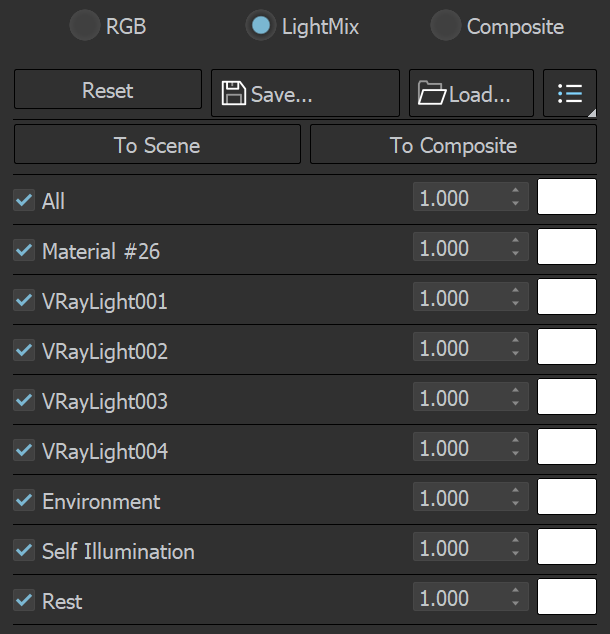
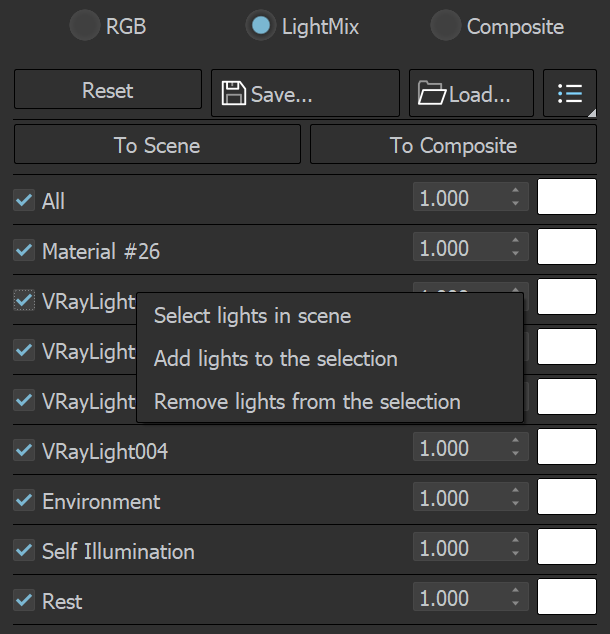
LightMix Mode
...
| Section | ||||||||||||||||||||||||||
|---|---|---|---|---|---|---|---|---|---|---|---|---|---|---|---|---|---|---|---|---|---|---|---|---|---|---|
|

...
...
| Section | ||||||||||||||||||||||
|---|---|---|---|---|---|---|---|---|---|---|---|---|---|---|---|---|---|---|---|---|---|---|
|
Lens Effects
...
| Section | |||||||||||||||||
|---|---|---|---|---|---|---|---|---|---|---|---|---|---|---|---|---|---|
|

...
Sharpen/Blur
...
| Section | |||||||||||||||||
|---|---|---|---|---|---|---|---|---|---|---|---|---|---|---|---|---|---|
|

Denoiser
...
| Section | ||||||||||||||||
|---|---|---|---|---|---|---|---|---|---|---|---|---|---|---|---|---|
|


Background
...
| Section | |||||||||||||||
|---|---|---|---|---|---|---|---|---|---|---|---|---|---|---|---|
|


...
| Section | ||||||||||||||||
|---|---|---|---|---|---|---|---|---|---|---|---|---|---|---|---|---|
|

Exposure
...
| Section | |||||||||||||||||
|---|---|---|---|---|---|---|---|---|---|---|---|---|---|---|---|---|---|
|

...
White Balance
...
| Section | ||||||||||||||||
|---|---|---|---|---|---|---|---|---|---|---|---|---|---|---|---|---|
|

...
Hue/Saturation
...
| Section | |||||||||||||||||
|---|---|---|---|---|---|---|---|---|---|---|---|---|---|---|---|---|---|
|

Color Balance
...
| Section | |||||||||||||||||
|---|---|---|---|---|---|---|---|---|---|---|---|---|---|---|---|---|---|
|

Curves
...
| Section | ||||||||||||||||||||||||||||||||||||||||||||||||||||||||||||||
|---|---|---|---|---|---|---|---|---|---|---|---|---|---|---|---|---|---|---|---|---|---|---|---|---|---|---|---|---|---|---|---|---|---|---|---|---|---|---|---|---|---|---|---|---|---|---|---|---|---|---|---|---|---|---|---|---|---|---|---|---|---|---|
|
| UI Text Box | ||
|---|---|---|
| ||
To create a point, select the Picker, then go to Render View and click. Hold click + mouse move to create and move the point. |
| UI Text Box | ||
|---|---|---|
| ||
When working with .acv files, some approximations are performed because the curves in the .acv files are described by a different mathematical formulas. |
...
Lookup Table
...
| Section | |||||||||||||||||
|---|---|---|---|---|---|---|---|---|---|---|---|---|---|---|---|---|---|
|

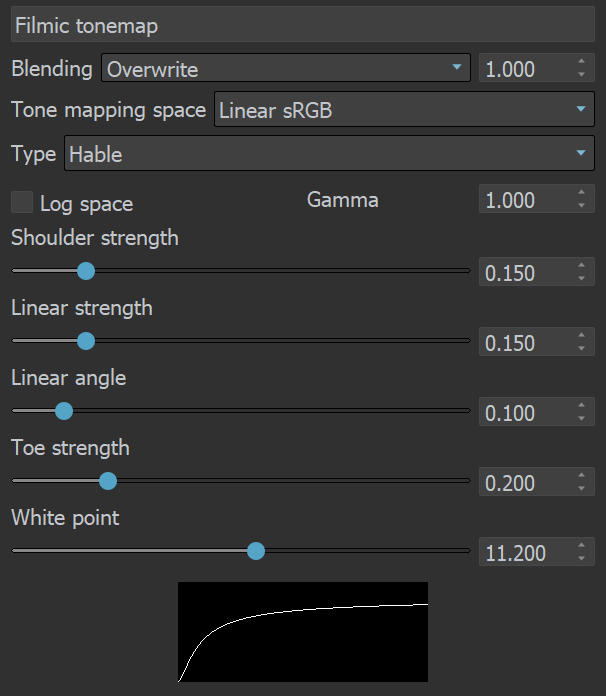
Filmic Tonemap
...
| Section | ||||||||||||||||
|---|---|---|---|---|---|---|---|---|---|---|---|---|---|---|---|---|
|
...
Example: Filmic Tonemap Layer Added
| Section | ||||||||||||||||||||||||||||||||||
|---|---|---|---|---|---|---|---|---|---|---|---|---|---|---|---|---|---|---|---|---|---|---|---|---|---|---|---|---|---|---|---|---|---|---|
|

...
Example: Filmic Tonemap Types
| Section | |||||||||||||||||||||||||||||||||||||||||||
|---|---|---|---|---|---|---|---|---|---|---|---|---|---|---|---|---|---|---|---|---|---|---|---|---|---|---|---|---|---|---|---|---|---|---|---|---|---|---|---|---|---|---|---|
|


...
...
Example: Fine-tune VRayLightMtls in post in VFB
...
| Align | ||
|---|---|---|
| ||
|
...
...
Example: Apply Masks in VFB
This video shows you how to apply masks on Lens Effects and Denoiser in the VFB.
| Align | ||
|---|---|---|
| ||
|
...
Notes
...
| Fancy Bullets | ||
|---|---|---|
| ||
|