![]()
Page History
...
The upper most part of the Timeline Area is where the Playback Buttons, the View Buttons, and the Control Buttons can be are found. Each group gives you control over different aspects of Pdplayer.
...
In the middle of the Timeline Area is the Timeline itself followed by the Layer Stack.
Playback Buttons
...
The Playback Buttons as their name suggests control the playback. You can use those Use these controls to play your composition both forward and backward, or if you want to closely inspect it you can the imagery, go through it frame by frame. You can also change the frame rate at which the composition is being played.
...
The channel view buttons control the channels which Pdplayer will show in the Preview Area. They are Red, Green, Blue, Alpha, Luma and Depth. You can view a particular channel by left clicking on it. This will make all buttons “dark” except for the one being shown. You can also right click on any of the buttons and choose which channels to be displayed from a menu. The following pictures show the Channel View Buttons along with the effect each option has.
...
4 – Toggles between black and checkerboard background. Right click to choose from a list of different backgrounds as shown below. In addition to the default colors, you can choose a custom color or paste a color that you have copied. Finally, you can set any color as a Default color.
...
5 – Toggles the vertical synchronization on and off for the screen. This prevents tearing, but will may have a performance hitcost. . Right click on the button to bring out additional options for the screen synchronization.
...
8 – Enables or disables the output device. Right click to choose from a list of available devices.

It is important to note Note that the resolution of the output signal will be the same as the resolution of the Mask. In cases where the output device does not support the Mask resolution, it will not work.
...
On the left hand side of Timeline is the Playback Frame rate parameter that , which specifies the rate at which the movie or sequence is being played in frames per second. You can change this either by clicking and dragging with the left mouse button, or by double clicking it and typing entering a number. You can also right click on the number to select from list of predefined frame rates (shown here):

Layers
...
Below the Timeline are all the layers. Each layer is , each represented by a bar with a name.
![]()
On the left hand side of the layers there are four indicators. : The first one is the number of the layer. The , while the next icon is the transparency of the layer. You can show or hide the layer by clicking on this icon or change the transparency using the mouse wheel over it. The third icon is available when the layer contains audio. It allows you to control the volume of the audio for the specific layer. The last icon controls the layer blending. Right click on it to change the blending and alpha mode of this layer.
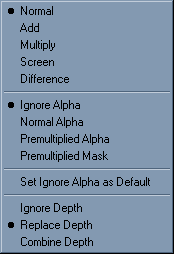
Blending modes context menu
...
The first part of the menu allows you to choose between the five basic blending modes for the layer. You can also choose the alpha mode for the layer and the way Pdplayer uses the information in the depth channel. The different Alpha and Blending modes are explained in the Blending Panel page.
Right clicking a layer in the timeline will bring up an additional layer context menu. For more information on the context menu, see the Layers page.
 Layer context menu