Versions Compared

Key

  • This line was added.
  • This line was removed.
  • Formatting was changed.

...

Section
bordertrue

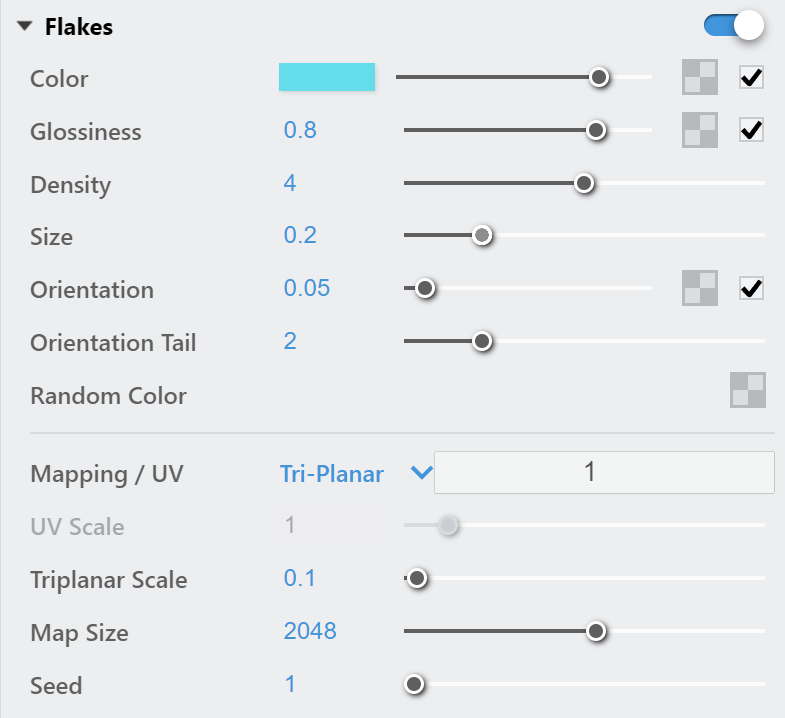
The Car Paint 2 material simulates metallic car paint. It is a complex material with three layers: a base diffuse layer, a flake layer, and a clear coat layer. The material allows the adjustment of each of these layers separately.

The new Car Paint 2 material's advantage is that it uses GGX BRDF type and offers a base glossiness tail falloff option.


UI Paths


Section
Column
width60%

||V-Ray Asset Editor|| > Materials (right-click) > Car Paint 2

||V-Ray Asset Editor|| > Materials (left-click) > Car Paint 2

Column
width5%


Column
width35%

Image Removed


Parameters

UI Options

...

Section
Column
width60%

The Car Paint 2 material settings are organized in in Basic and  and Advanced modes modes. You can switch the mode from the toggle button (Image Removed) under the the Preview Swatch.

From the the Add Attribute button, you you can select additional attributes that can add up to the appearance of the material. For more information, see the see the Attributes   section.Holding down Ctrl while having the Add Attribute menu

UI Text Box
typetip
Holding down Ctrl while having the Add Attribute menu open, allows selecting multiple entries without closing the dropdown.

The context options menu of the Color Slot allow to Copy and Paste a color from one color slot to anotherslot provides options to Copy and Paste, as well as to reset Reset the color selection.

A Reset option option is provided in the context menu of each Number Slider. You can reset the slider value to the default one.

Column
width5%
 
Column
width35%
Image Removed

Image Added


Parameters

...

Section
Column
width60%

Base

Color – Specifies the diffuse/reflection color for the base layer.

Reflection – Controls the reflectivity of the base layer. The reflection color itself is the same as the Base color.

Glossiness – Controls reflection glossiness for the base layer.

Tail Falloff – Controls the transition from highlighted areas to non-highlighted areas. Higher values make the transition sharper, while lower values make the transition more defusediffuse.


Base Bump

Mode/Map – Specifies the type of bump map or normal map to apply to the base layer if a map file is specified.

Bump Map – A height map should be used.
Normal Map – RGB normal map should be used. Note that in most cases the normal map bitmap color space should be set to Linear to ensure correct results.
Local Space Bump – A height map should be used. Unlike the standard Bump mode, in this case the height is not measured in scene units. It is only determined by the raw texture values. Scaling objects will not affect the local space effect. This option has to be selected for the round edges effect (Edges texture used as bump).

Amount – A multiplier for the bump/normal effect.

Column
width5%


Column
width35%

Image Modified


...


Section
Column
width60%

Flakes

Color – Specifies the color of the metal flakes.

Glossiness – Controls the glossiness of the metal flakes. It is not recommended to set this above 0.9 as it may produce artifacts.

Density ** – Controls the number of flakes for a certain area. Lower values produce less flakes and higher values produce more flakes. Set this to 0.0 to produce a material without flakes.

Size ** – Controls the size of the flakes relative to the distance between them. Higher values produce bigger flakes and lower values produce smaller flakes.

Orientation – Controls the orientation of the flakes relative to the surface normal. When this is 0.0, all flakes are perfectly aligned with the surface. When it is 1.0, the flakes are rotated completely randomly with respect to the normal. Values above 0.5 are not recommended as they can produce artifacts. 

Orientation Tail – Controls the transition from highlighted areas to non-highlighted areas.

Random Color – Sets colors from the specified map to the flakes in a random pattern. Only the U (horizontal) axis of the map is sampled for colors (the bottom part of an image).


Mapping/UV – Specifies the method for mapping the flakes.

Mapping Channel – Flakes are mapped using the specified channel.
Triplanar – The material automatically computes mapping coordinates in object space based on the surface normals.

UV Scale – Controls the scale of the entire structure, when the Mapping type is set to Mapping Channel.

Triplanar Scale – Scales the entire structure, when the Flake mapping type is set to Triplanar.

Map Size – Internally the material creates several bitmaps to store the generated flakes. This parameter determines the size of the bitmaps. Lower values reduce RAM usage, but may produce noticeable tiling in the flake structure. Higher values require more RAM, but tiling is reduced. Be careful when using the Directional filtering method, as it may quickly take up gigabytes of RAM for larger map sizes. 

Seed – Sets the random seed for the flakes. Changing this produces different flake patterns.

Column
width5%


Column
width35%

Image Modified


...


Section
Column
width60%

Coat

Color – Specifies the color of the coat layer.

Amount – Specifies the thickness amount of the coat layer. A value of 0 does not add a coat layer, while higher values blend the coat gradually.

Glossiness – Controls the glossiness of the coat reflections.

IOR – Specifies the Index of Refraction for the coat layer.


Coat Bump

Mode/Map – Specifies the type of bump map or normal map to apply to the coat layer if a map file is specified.

Bump Map – A height map should be used.
Normal Map – RGB normal map should be used. Note that in most cases the normal map bitmap color space should be set to Linear to ensure correct results.
Local Space Bump – A height map should be used. Unlike the standard Bump mode, in this case the height is not measured in scene units. It is only determined by the raw texture values. Scaling objects will not affect the local space effect. This option has to be selected for the round edges effect (Edges texture used as bump).

Amount – Multiplies the bump map effect. 

Column
width5%


Column
width35%

 Image Modified


...


Section
Column
width60%

Reflection Options

Trace Depth – Specifies the maximum number of times a ray is reflected by the material. 

Cutoff – Specifies a threshold below which reflections do not be traced. V-Ray tries to estimate the contribution of reflections to the image, and if it is below this threshold, these effects are not computed. Do not set this to 0.0 as it may cause excessively long render times in some cases.

Base Reflections – When disabled, the base layer only produces specular highlights, but no actual reflections are traced. 

Flake Reflections – When disabled, the flakes only produces specular highlights, but no actual reflections are traced. 

Coat Reflections – When disabled, the coat layer only produces specular highlights, but no actual reflections are traced. 

Column
width5%


Column
width35%

Image Modified


...


Section
Column
width60%

Multipliers

Mode – Specifies one of the following methods for adjusting textures.

Multiplier – Multipliers can be specified to adjust colors and textures.
Blend Amount – Blend amounts can be specified to adjust colors and textures.

Base Color – Controls the intensity of the diffuse color for the base layer.

Base Glossiness – Controls the intensity of the base layer's reflection glossiness.

Flake Color – Controls the intensity of the color for the metal flakes.

Flake Glossiness – Controls the intensity of the metal flake glossiness.

Coat Color – Controls the intensity of the coat layer color.

Coat Glossiness – Controls the intensity of the coat layer's glossiness.

Coat Amount – Controls the intensity of the coat reflections.

Column
width5%


Column
width35%

Image Modified


Override Control

...

Section
Column
width60%

Control Override

Can be Overridden * * When enabled, the material can be overridden when overridden when you enable the Opaque override option in the Global Overrides tab of Appearance Manager.
Column
width5%


Column
width35%

Image Removed

...

Image Added

Attributes

...

The attributes from the following expandable menus are Attributes available for the  Car Paint material Car Paint 2 material are as follows.

Anchor
Attributes
Attributes


Contour


Expand
titleContourOutline
Section
Column
width60%

The Contour attribute is available only when the engine is set to CPU. It is currently not supported for GPU.

Line Color – Specifies the color of the outlines.

Opacity – Specifies the opacity of the outlines.

Normal Threshold – Determines when lines will be created for parts of the same object with varying surface normals (e.g. at the inside edges of a box). A value of 0.0 means that only 90 degrees or larger angles generate internal lines. Higher values mean that smoother transitions between face normals can also generate a line. Setting this value to 1.0 fills curved objects completely.

Overlap Threshold – Determines when outlines will be created for overlapping parts of the one and the same object . Lower values reduce the internal overlapping lines, while higher values produce more overlap lines. Setting this value to 1.0 fills curved objects completely.

Width – Specifies the width of the outlines.

Inner Line Control – Enables a separate control for the inner edges.

Inner line Color – Specifies the color of the inner lines

Inner Width – Specifies the width of the inner lines.

UI Text Box
typenote

Some of the global parameters have an effect on all materials with Contour attribute. These parameters are Width Type, Trace Bias, Hide Inner Lines, Visible in Reflections/Refractions, and Compensate EV.

Column
width5%


Column
width35%

Image Removed

Outline


Multiexcerpt include
MultiExcerptNameOutline Attribute
PageWithExcerptOutline Attribute

Expand
titleRaytrace Properties

Raytrace Properties


Section
Column
width60%

Visible to Camera – When enabled, makes objects using this material visible to the camera.

Visible to Reflections – When enabled, this option makes objects using this material visible for to Reflection rays.

Visible to Refractions – When enabled, this option makes objects using this material visible for the Refraction rays.

Cast Shadows – When disabled, all objects with this material applied do not cast shadows.

UI Text Box
typenote

Disabling the option will also make objects whit this material invisible to GI rays.

Column
width5%
 
Column
width35%

Image Removed


Multiexcerpt include
MultiExcerptNameRaytrace Properties Attribute
PageWithExcerptRaytrace Properties Attribute

Expand
titleMaterial ID

Material ID


Section
Column
width60%

ID Number – Isolates objects as an R/G/B mask in the MultiMatte Material render elements.

ID Color – Allows you to specify a color to represent this material in the Material ID VFB render element. 

UI Text Box
typenote

Each material is assigned with an automatically generated ID Color.

Column
width5%


Column
width35%
Image Removed

Multiexcerpt include
MultiExcerptNameMaterial ID Attribute
PageWithExcerptMaterial ID Attribute


Notes

...

Section
Fancy Bullets
typecircle
  • The Car Paint material needs to precalculate several textures related to the flakes. Depending on the Flake map size parameter, this may take a few seconds. When working in the material editor, this may lead to slight delays between changing a parameter and the update of the material swatch.