This page provides information on the V-Ray Proxy Scene Geometry object.
Overview
V-Ray Scene (.vrscene) is a file format which allows for assets, such as geometry, materials, and lights, to be shared together between all platforms that run V-Ray.
A Proxy Scene object is the result of importing a .vrscene file into your scene from the V-Ray Import Proxy option. Once imported, its parameters are available in the Asset Editor's Geometry tab.
V-Ray Scene materials and geometry are non-editable and lights can only be toggled on and off.
UI Paths
||V-Ray Asset Editor|| > Render with V-Ray (dropdown menu) > Export V-Ray Scene File

||V-Ray Objects Toolbar|| > Export Proxy
||V-Ray Objects Toolbar|| > Import Proxy or V-Ray Scene

SketchUp Menus Ribbon
||Extensions|| > V-Ray > Objects > Export Proxy
||Extensions|| > V-Ray > Objects > Import Proxy or V-ray Scene
Exporting a V-Ray Scene
You can export either the whole scene or a selection of objects as a .vrscene file.
Exporting Through the Asset Editor
To export the whole scene, open the Asset Editor, left-click on the arrow in the lower left corner of the render button . Another way is from the Extensions menu.
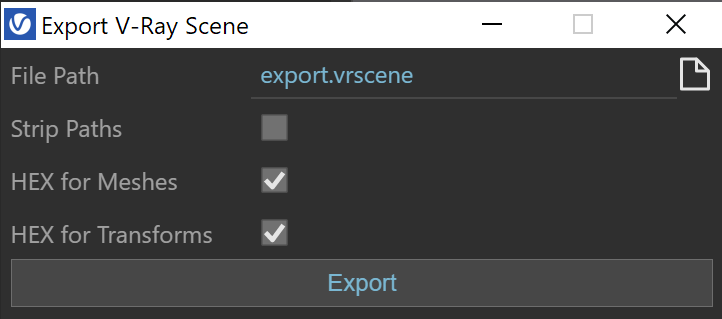
File Path – The name of the file. The file is saved in a custom folder, specified by pressing the Save File icon on the right.
Strip Paths – When enabled, all file paths of the assets in the vrscene are stripped down to file names. Conversion of the paths from absolute to relative allows safe vrscene transfer, as long as its asset files are moved to the same directory.
Hex for Meshes – Compresses geometry data in binary form to reduce its size, so it is preserved without any chance of round off errors.
Hex for Transforms – Compresses object transformation data in binary form to reduce its size, so it is preserve without any chance of round off errors.
Export – Exports the .vrscene file to the specified folder.
Exporting Through the Toolbar Button
To create a proxy through the V-Ray Objects Toolbar, select the group or component you want to export. The icon will remain inactive until an object in the scene is selected. When you select a group or component in the scene, the Export Proxy button will become active.
If you want to export a geometry selection, select the geometry and press the Export Proxy button. From the drop-down menu of the Mode option, choose Proxy Scene, and then press Export. Note that the geometry is exported together with its shaders and lightning.
Mode – Allows you to choose between Proxy Mesh (.vrmesh) and Proxy Scene (.vrscene) export. The addition of Proxy Scenes allows you to export a selection of geometry, lights, and special objects combined into a single proxy.
File Path – The name of the file. The file is saved in a custom folder, specified by pressing the Save File icon on the right.
Overwrite Existing File – When enabled, V-Ray automatically overwrites any existing file with the same name at the specified path.
Strip Paths – When enabled, all file paths of the assets in the vrscene are stripped down to file names. Conversion of the paths from absolute to relative allows safe vrscene transfer, as long as its asset files are moved to the same directory.
Replace Object with Proxy – If enabled, the source object is automatically replaced with its proxy version. Material assignments is preserved.
Export – Exports the .vrscene file to the specified folder.

Importing a V-Ray Scene
The easiest way to import a V-Ray scene, is to click on the Import Proxy or V-Ray Scene button and to choose a .vrscene file from your computer.
V-Ray Next for Sketch Up allows you to import .vrscene files that are exported with any other V-Ray product.
Cameras and render settings are not imported from .vrscene files even if they are present in the files themselves.
VRayScene Parameters
File Path – Specifies the VRScene file.
Preview Type – Specifies the viewport preview type. This does not affect the final render.
Preview Faces – Uses an automatically generated number of preview faces.
All Faces – Displays the full model.
Bounding Box – Displays a preview of the .vrscene using bounding boxes.
Point (Origin) – Displays the point of origin and axes directions stored within the VRScene geometry.
Custom Preview – This option allows for changing the proxy file without affecting/updating the preview geometry. The .vrscene in existing projects will be loaded with the Custom Preview enabled by default, making sure that no custom user preview geometry gets deleted by the automatic update.
Face Count – Sets the preview face count for the preview if Preview Faces is selected.
Lights – When enabled, lights from the imported VRScene will illuminate the current scene.
Be aware that depending on the V-Ray scene details, using the All Faces preview type can put substantial load on your system.
Use Mtl Override – When enabled, the global Material Override option in the Render Settings overrides the .vrscene proxy assets. When disabled, the materials in the referenced scene are not affected by the Material Override option in the Render Settings.

Animation
Enabled ( ) – Turns the Animation on and off.
Offset – Offsets the beginning of the animation by the given number of frames. You can use positive as well as negative values here. The default value of 0.0 starts the animation at the first available frame.
Playback Type – Determines how playback will behave.
Loop – The animation plays to the end and loops back to the first frame once it has finished.
Once – The animation plays once.
Ping-pong – The animation is looped by playing it backwards once the last frame has been reached and then playing it forward again when the first frame is reached again.
Playback Speed – A multiplier for the speed of the animation. A value of 1.0 plays the animation at normal speed, while 2.0 plays it at double speed and 0.5 plays it at half speed.
Animation Start – Specifies the frame used for the beginning of the animation.
Animation Length – Specifies the number of frames used to play the animation.

Notes
- Any external assets associated with the imported .vrscene file need to be accessible (have valid paths) for proper render results. Such assets may include image, .ies or .vrmesh files. Alternatively, the assets need to reside in the same folder as the .vrscene file.
- VRayScene proxies do not respond to changes during Interactive rendering. Any transformations or parameter changes of the proxy during Interactive rendering may cause unexpected behavior.
- Certain effects, such as displacement, are not supported for VRScene files exported using V-Ray 3.6 or earlier.
- Internally, SketchUp always operates in inches. Therefore, Proxy scenes dimensions are always set at a scale of 1 inch per original unit.
Memory usage can be viewed from the Stats section of the new V-Ray Frame Buffer.
The Hide Widget hides a Proxy Scene from the viewport only when set to Bounding Box and Point (Origin) preview type.