This page provides a step-by-step guide to creating a simple liquid simulation in Chaos Phoenix for Maya.

Overview


This is an Entry Level tutorial which requires no previous knowledge of Phoenix. A basic understanding of Maya would be helpful but is not a prerequisite for being able to follow along.

This tutorial is created using Phoenix 4.30 Official Release and V-Ray 5. You can download official Phoenix and V-Ray from https://download.chaos.com.

The instructions on this page guide you through the process of setting up a basic liquid simulation in Phoenix for Maya. By the end of the tutorial, you will be able to create your own liquid simulations, understand how the simulation interacts with other objects and will know the basics of editing some of the main settings of the Phoenix Liquid Simulator.

To follow the described steps, you will need the Phoenix for Maya plugin installed. If you notice a major difference between the results shown here and the behavior of your setup, please reach us using the Support Form.


This tutorial is a companion to go along with the QuickStart video posted on our YouTube channel.


The Download button below provides you with an archive containing the start and end scenes.


<iframe width="720" height="480" src="https://www.youtube.com/embed/5i1grQXytt8" frameborder="0" allow="autoplay; encrypted-media" allowfullscreen></iframe>

The video is created using Phoenix 3.0, but the text version of the tutorial is updated and uses Phoenix 4.30 Official. In any case of doubt you may refer to the text.


System Units Setup


Scale is crucial for the behavior of any simulation. The real-world size of the Simulator in units is important for the simulation dynamics. Large-scale simulations appear to move more slowly, while mid-to-small scale simulations have lots of vigorous movement. When you create your Simulator, you must check the Grid rollout where the real-world extents of the Simulator are shown. If the size of the Simulator in the scene cannot be changed, you can cheat the solver into working as if the scale is larger or smaller by changing the Scene Scale option in the Grid rollout.

Go to Windows → Settings and Preferences → Preferences → Settings and set the Working Units to Centimeters.

The units do not have to be set to centimeters to get the simulation to work. What's important is that the emitter (in this case, the sphere) is set to the proper real-world scale so that the simulation is correct for that situation. This is how Phoenix is able to know if it's simulating water in a glass or a boat on ocean waves.

Lightning and Rendering


To prepare your scene for rendering a simulation make sure V-Ray is set as your Renderer in the Render Settings window.


Add a Dome light to your scene and set it to be Invisible.

Scene Setup


In the following steps we will show how to create a basic liquid simulation with the Phoenix Tap Water Preset.

After that we will explain how to set the simulation manually step-by-step for greater flexibility and control.

Tap Water Preset


We will begin by using a quick water preset.


Create a polygonal sphere with a Radius of about 4.0 centimeters. This sphere will be the source of the liquid.


With the sphere selected, click on the Tap Water Preset button from the  Phoenix Shelf.


Now press the Start Simulation button in the shelf.


Let the simulation for a few seconds and you will have a chance to see the results in the viewport, click the Stop button to end the simulation process.


Render your current frame to see the simulation results. Note that the liquid fills the simulation volume container as it flows.

Manual Water Setup


Let’s take a look at setting up a water simulation manually.


If you're continuing from the Preset section above, select the Simulator and Source objects and delete them from your scene. If not, create a Sphere with a Radius of about 4.0 centimeters.

Click on the Create a Fluid Simulator button in the Phoenix Shelf and click and drag in the viewport to create a volume to encompass the sphere while leaving some room for the liquid to fall. Move the sphere near the top of the Simulator and make sure it is inside the volume.


If the previous simulation's caches are visible inside the volume, click the Delete the Simulator Cache Files button from the Phoenix Shelf, and then click Yes.


Click the Create a Liquid Source button in the Phoenix Shelf and and place the Source in your scene.

The Source object is a 2D non-renderable icon, so size and placement are only important for being able to select the Source when needed.


Select the sphere in the scene and Shift+Select the Source Object. Then click the Add Selected Objects button in the Source objects rollout in the Attribute Editor.

The Source node is where we control emitter properties, like the Discharge amount. The sphere is the actual emitter of the fluid inside the Simulator.


Select the Simulator and open the Liquid rollout in the Attribute Editor and check the Enabled checkbox.

This is required, because the Simulator in Maya is able to generate both Fire/Smoke and Liquid simulations.


Select the Simulator and navigate to the Grid rollout. There are located the parameters to control the resolution of the volume grid, which greatly affects the look and performance of the simulation.

Set the Scene Scale to 5.


Start the simulation from the Start button at the top of the Attribute Editor to confirm that the sphere is emitting the liquid inside the Simulator.


Now let’s get this simulation to look more like what we had with the preset.

Right now the edges of the pour are pretty jagged.

Expand the Dynamics rollout and adjust the Steps Per Frame to 12. This provides for a more natural look but will make the simulation run slower. The higher the Steps Per Frame, the longer the calculations, so try to find the lowest setting for the effect you need.


At this point the liquid is flowing right through the floor and disappearing. This means that the walls of the Simulator are open. Let's close them.

Open the Grid rollout, you can see the Container Walls are indeed all set to Open. Set the X/Y/Z values to Jammed Both


Start the simulation again. As the simulation runs, the liquid now looks smoother and collides with the bottom and the side walls of the Simulator.

It is, however, running slowly, so we can adjust the resolution by increasing the Cell Size.


Stop the simulation and navigate to the Grid rollout. We currently have about 4.7 million Total Cells to calculate. This is our simulation’s resolution. The larger the Cell Size value, the lower the simulation resolution, which will make the simulation run faster.

Increase the Cell Size value to 0.5, now the total resolution is about 3 million cells. Start the simulation again and you’ll see that it runs much faster.


Feel free to experiment with different settings.


Let's create a water material for the simulation.

Open the Hypershade, and create a new V-Ray Material. Make sure your Material Viewer is set to V-Ray to preview the material as it's created.

Set the Diffuse color to RGB [ 0, 0, 0 ].

Set the Reflect and Refract colors to RGB [ 255, 255, 255 ].

Set the Fresnel IOR to 1.33.

Enable the Affect Shadows.


Assign the material to the Simulator and render a frame.

 
Feel free to adjust the material and the lighting in the scene to achieve the liquid look you’re going for.

Example Scene


Now let’s make the liquid collide with and fill an actual object rather than just the Simulator’s grid.


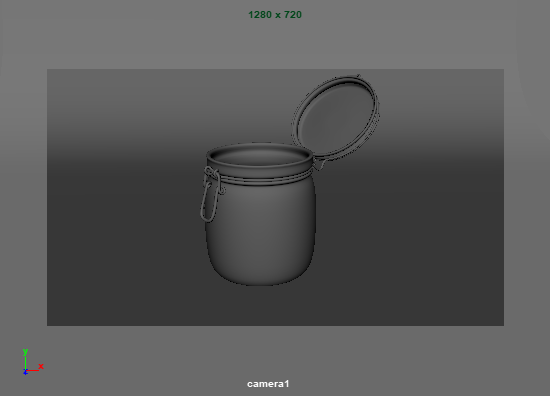
The following scene file can be downloaded from the Overview section above. It consists of a jar with a studio lighting setup and background.

Switch your view to camera1 see what will be rendered.


Return to the Perspective view and select the sphere. In the Phoenix Shelf click the Tap Water Preset like we did before.

We will need to adjust the Simulator Grid Size so that it covers both the sphere and the jar. Again, use the X/Y/Z Size parameters in the Grid rollout.

Use the Size attributes of the Simulator as opposed to simply scaling the Simulator container with Maya's Scale tool, as that may adversely effect the simulation.


Start the simulation. Once it is finished, go back to the camera view. Here is how the simulation looks so far.


Next, we will create materials for the water and the glass jar.

Open the Hypershade and create a new V-Ray Material.

Set the Diffuse color to RGB [ 0, 0, 0 ].

Set the Reflect and Refract colors to RGB [ 255, 255, 255 ].

Set the Fresnel IOR to 1.33.

Enable the Affect Shadows.

Assign this material to the Simulator.


Create another V-Ray Material for the glass jar.

Set the Diffuse color to RGB [ 0, 0, 0 ].

Set the Reflect and Refract colors to RGB [ 255, 255, 255 ].

Set the Fresnel IOR to 1.6.

Enable the Affect Shadows.

Select the glass part of the jar and assign this material.


Render a frame to see how the fluid is interacting with the jar. Any geometry inside a simulation container will automatically interact with the emitting fluid. In addition, geometry can be excluded from interactions, and you can even create Non-Solid geometries, which are geometries that a simulation can flow through, but still be used as sources or forces acting on the simulation. You can find more about this topic in our Solid and Non-Solid Bodies QuickStart tutorial.


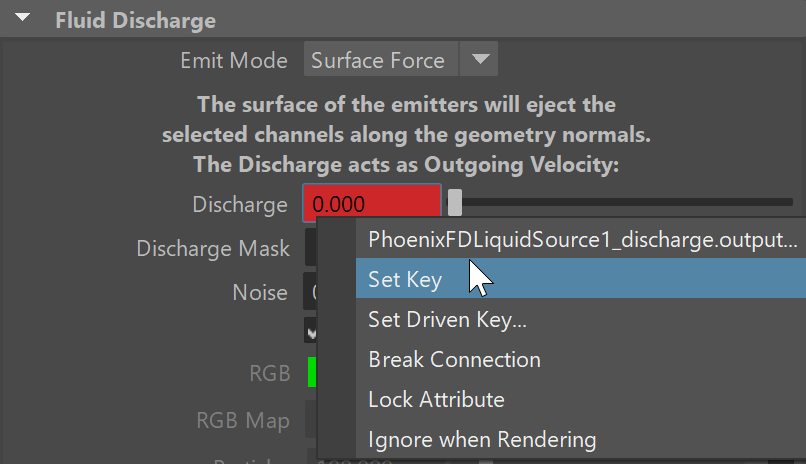
With the current simulation the fluid will eventually overflow the jar. To control how much fluid is discharged by the emitter, select the Liquid Source object and locate the Discharge parameter. Animating this value will control how much liquid is created, which can be used to start and stop the pouring of water.


Before proceeding, let's set the Grid Size of the Simulator.

Select the Simulator and navigate to the Grid rollout.

Set the Scene Scale to 2.685.

The Cell Size to 0.395.

Size ( X, Y, Z ) to ( 94, 185, 94 ).


We will animate the pour next, so scrub through the Timeline to return to the start. Select the Liquid Source and set the Discharge to 16.

Note that if this value is set to 0 on the first frame, nothing will be emitted even if you start the simulation.

Set a Key on Discharge for 16 on frame 22.


Then move to frame 23 and set another key with the value of 0.

Click and drag the key at frame 0 over to frame 20, so the liquid starts with a steady pour and then abruptly stops between frame 20 and 23.

Go back to the beginning of the Timeline and start the simulation and let it calculate to about Frame 50 so the animation can be seen.


After the simulation finishes you may notice that the result appears a little choppy if you scrub through the Timeline. To fix this, select the Simulator, go to the Preview rollout and turn off Show Mesh. Only particles for the liquid pour will be displayed and the simulation will scrub faster. At any point in the simulation you can turn Show Mesh back on to see the liquid better.


Notice that the fluid makes some drops that hit the in-sides of the Simulator walls. This can be fixed by making the liquid less spread out, as it falls into the jar. Also, take note of how the water is making contact with the top of the volume. We can fix that by moving the sphere down slightly to create a little more distance between it and the volume.


First, select the Simulator and in the Grid section, under Container Walls, make sure the X/Y/Z walls are set to Open.

This will keep any of those droplets from colliding with the Simulator.


Go into the Liquid rollout, and set the Consumed Liquid to 0, that way we are preserving all the liquid and none of it is evaporating away.


Now let’s fix the spreading of the liquid as the emitter stops discharging. Select the Liquid Source object and change the Emit Mode to Volume Brush. What this means is that instead of emitting the liquid from the surface area of the sphere, it will now emit from the whole volume of the sphere.

A window will ask to convert the emitter to a Non-Solid object. Select Yes. This will prevent the sphere geometry from interacting with the liquid simulation.


Finally, select the Simulator and under the Dynamics rollout reduce Steps Per Frame to 5


Start the simulation and you can see that the liquid is coming from the volume of the sphere now, as opposed to just from its outside surface.

Stop the simulation when the jar is halfway filled up and scrub back and forth to see the pour nicely contained even after the Discharge value turns off at frame 23.


Render the result from the camera1 view to see how the simulation looks.

<iframe width="640" height="360" src="https://www.youtube.com/embed/u2yNcPPyi_A?version=3&loop=1&playlist=u2yNcPPyi_A" frameborder="0" allowfullscreen></iframe>