This page provides information about the Hair material in V-Ray for SketchUp.


Overview


The Hair material is primarily designed for rendering hair and fur. The material is based around three components: a primary specular component, a secondary specular component, and a transmission component. A diffuse component is also provided for rendering of materials made up of cloth threads or other non-translucent fibers.

The primary specular component represents light that is reflected off the outer surface of a hair strand. The secondary specular component represents light that goes through the hair strand and is reflected off the back surface. The transmission component represents light that goes through the hair strand.

The image below illustrates the meaning of the three components:

Please note that V-Ray Hair material does not produce hair strands. You can use V-Ray Fur to procedurally create fur, hair or grass. V-Ray Fur produces flat strands if Hair material is applied to it.


UI Paths


||V-Ray Asset Editor|| > Materials (right-click) > Hair

||V-Ray Asset Editor|| > Create Asset (left-click) > Materials > Hair


Parameters


Some parameters are only available in Advanced mode.

Overall Color – A common color multiplier for all color components in the material (except for opacity). Used to easily change the look of the entire hair material.

Transparency – Controls the transparency of the material. Making the hair more transparent towards the tip may produce more smooth and realistic anti-aliasing at the expense of increased render times. If you map the tip opacity, make sure you do not make the strands thinner at the tip as well - transparency already creates the effect of thinning strands. You can enable the Opaque Shadows and Opaque GI options to reduce render times for transparent hair. Note that with transparent strands, it may be necessary to increase the Max. Transp. Levels option in the Global Switches rollout of the V-Ray settings too.


Diffuse


Color – Controls the diffuse component of the shader. Use this for materials made out of cloth threads or other non-translucent fibers, as well as for dirty hair. Note that clean hair or fur does not normally have a diffuse component, so in such a case, leave the parameter black.

Amount – The amount of the diffuse component of the material.


Primary Specular


Color – The primary specular color component, which corresponds to light that is reflected off the outer surface of hair strands (see the figure above). Normally this is dark gray.

Amount – A multiplier for the primary specular color.

Glossiness – The glossiness for the primary specular component. Values closer to 1.0 make the hair shinier and sleeker. Lower values give it a matted look.


Secondary Specular


Lock to Transmission – When enabled (the default), the color for the secondary specular component is derived from the color of the transmission component. Since a ray of light goes twice through the hair width, the color of the secondary specular component can be computed by multiplying the transmission color with itself. When this option is enabled, the hair color is mostly determined by the Transmission color component.

Color  – The color of the secondary specular component, which corresponds to light that is reflected off the back surface of the hair strands. If Lock to Transmission is enabled, this value is ignored and the secondary specular color is derived from the Transmission color.

Amount  – A multiplier for the secondary specular component. If  Lock to Transmission is enabled, this value is ignored and the secondary specular amount is derived from the transmission amount.

Glossiness – The glossiness for the secondary specular component. Values closer to 1.0 correspond to shiny and sleek hair. Lower values correspond to matted hair.


Transmission


Color – The color for the transmission component, which corresponds to light that goes through the hair strands. When Lock to Transmission is enabled, this color determines the overall hair color.

Amount – The amount of the transmission component.

Glossiness L/W – The glossiness of the transmission along and across the hair strand length. For more information, see the Transmission Glossiness Length and Width Parameters example below

The transmission component of the Hair material is stored in the Refraction render channel. 


Example: Transmission Glossiness Length and Width Parameters


This example shows the effect of the Transmission Glossiness Length and the Transmission Glossiness Width parameters. It shows a number of vertical strands (in this case, produced by VRayFur) lit from behind by a spherical light.

Note how each parameter changes the way light scatters along the length and the width of the strands. Higher values for the length glossiness compress the transmission highlight along the strand length, while lower values expand it.


Transmission Glossiness Length: 0.87
Transmission Glossiness Width: 0.98

 
Transmission Glossiness Length: 0.85
Transmission Glossiness Width: 0.95

 
Transmission Glossiness Length: 0.95
Transmission Glossiness Width: 0.85

 
Transmission Glossiness Length: 0.98
Transmission Glossiness Width: 0.87


Options


Some parameters are only available in Advanced mode.

Opaque Shadows – When enabled, the hair material is always opaque for shadow calculations. This speeds up the rendering of transparent hair.

Opaque for GI – When enabled, the hair material is always opaque for GI calculations. This speeds up the rendering of transparent hair. For more information, see the Opaque for GI example below.

Simplify for GI – When enabled, a simplified diffuse version of the BRDF is used for GI calculations. This may speed up the rendering of hair but may significantly change the final look.

Use Cached GI – Similar to the Use Irradiance Map option for the Generic material; if it is disabled, the hair material is always calculated with brute force GI. 

Light Multiplier – In the absence of GI, the hair may look very dark. GI is the proper way to correct this, but if GI must be really avoided, this multiplier can be used to brighten the hair.


Example: Opaque for GI


This example shows how important GI is for the appearance of hair, especially bright hair. GI is brute force and light cache has retrace.


Multipliers


Some parameters are only available in Advanced mode.

Mode – Specifies one of the following methods for adjusting textures.

Multiply – Multipliers can be specified to adjust colors and textures.
Blend Amount – Blend amounts can be specified to adjust colors and textures.

Overall Color – Controls the intensity of the Overall Color, which acts as a color multiplier for all color components in the material.

Transparency – Controls the intensity of the Transparency.

Diffuse Color – Controls the intensity of the diffuse component color of the shader.

Primary Spec. Color – Controls the intensity of the Primary Specular color component, which corresponds to the light reflected off the outer surface of the hair strands.

Secondary Spec. Color  – Controls the intensity of the Secondary Specular color component, which corresponds to the light reflected off the back surface of the hair strands.

Transmission Color – Controls the intensity of the Transmission color component, which corresponds to the light that passes through the hair strands.


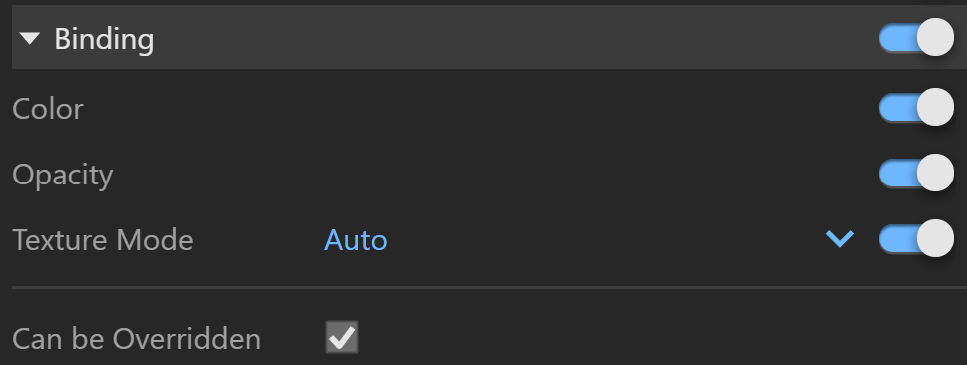
Binding


Binding Enables connection/binding between V-Ray and the corresponding base application material.

Color – Enables color binding. Changing the V-Ray material color changes the corresponding base application material color and vice versa.

Opacity – Enables refraction/opacity binding. Changing the SketchUp material opacity, however, does not change the V-Ray material. Instead, it disables the Opacity binding.

Texture Mode – Enables texture binding. Changing the V-Ray material texture changes the corresponding base application material texture and vice versa. 

Auto – By default binds the Diffuse texture to the base app material.
Texture Helper – Allows the use of a helper texture as a base application material map. The same helper is used if the binded texture is a procedural map. This is useful if every time you have to set texture placement for a map that can't be displayed accurately in the base app. 
Custom – Allows the use of a custom texture as base application material map. Disabling this parameter allows changing the base app material texture without affecting the V-Ray material. 
Bake – In this mode complex texture networks are baked to a single image used as a viewport preview. Differences between the rendered result and the viewport preview may occur due to the fact that only the texture confined within the 0 to 1 UV square is baked. This affects most procedural patterns and textures with custom UV placement configuration. Raytraced and Tri-planar textures are not supported.

It is recommended to save all raw bitmap buffers (textures embedded in SketchUp like SketchUp library materials textures) to disk before activating the Bake mode to preserve them.

Texture – Selected textures are displayed in the viewport. Keep in mind that procedural textures are not displayed. Note that the viewport texture will not affect the way the material is rendered in V-Ray. It is mainly used for preview purposes.


SketchUp2023_VRay6.2.1_Hair_Binding


Override Control


Can be Overriden – When enabled, the material can be overridden when you enable the override color option in the Global Switches.


Attributes


For more information on Attributes, see the Attributes section of the Materials page.

Holding down Ctrl (or Cmd on macOS) while having the Add Attribute menu open, allows selecting multiple entries without closing the dropdown.

Raytrace Properties


Visible to Camera – When enabled, makes objects using this material visible to the camera.

Visible to Reflections – When enabled, this option makes objects using this material visible for to Reflection rays.

Visible to Refractions – When enabled, this option makes objects using this material visible for the Refraction rays.

Cast Shadows – When disabled, all objects with this material applied do not cast shadows.


Material ID


ID Number – Isolates objects as an R/G/B mask in the MultiMatte render elements.

ID Color – Allows you to specify a color to represent this material in the Material ID VFB render element. 

Each material is assigned with an automatically generated ID Color.