In this chapter we'll cover some procedural textures which can be used in V-Ray.
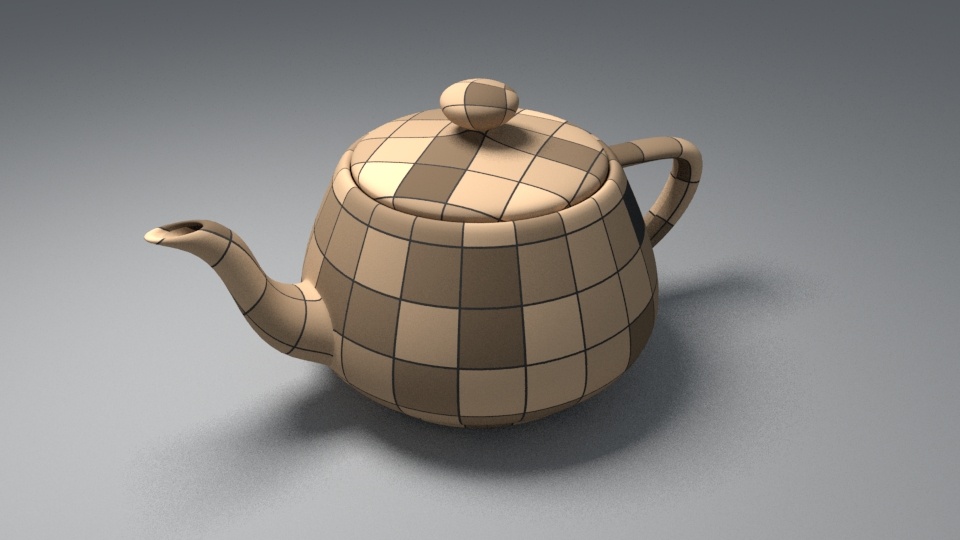
TexChecker
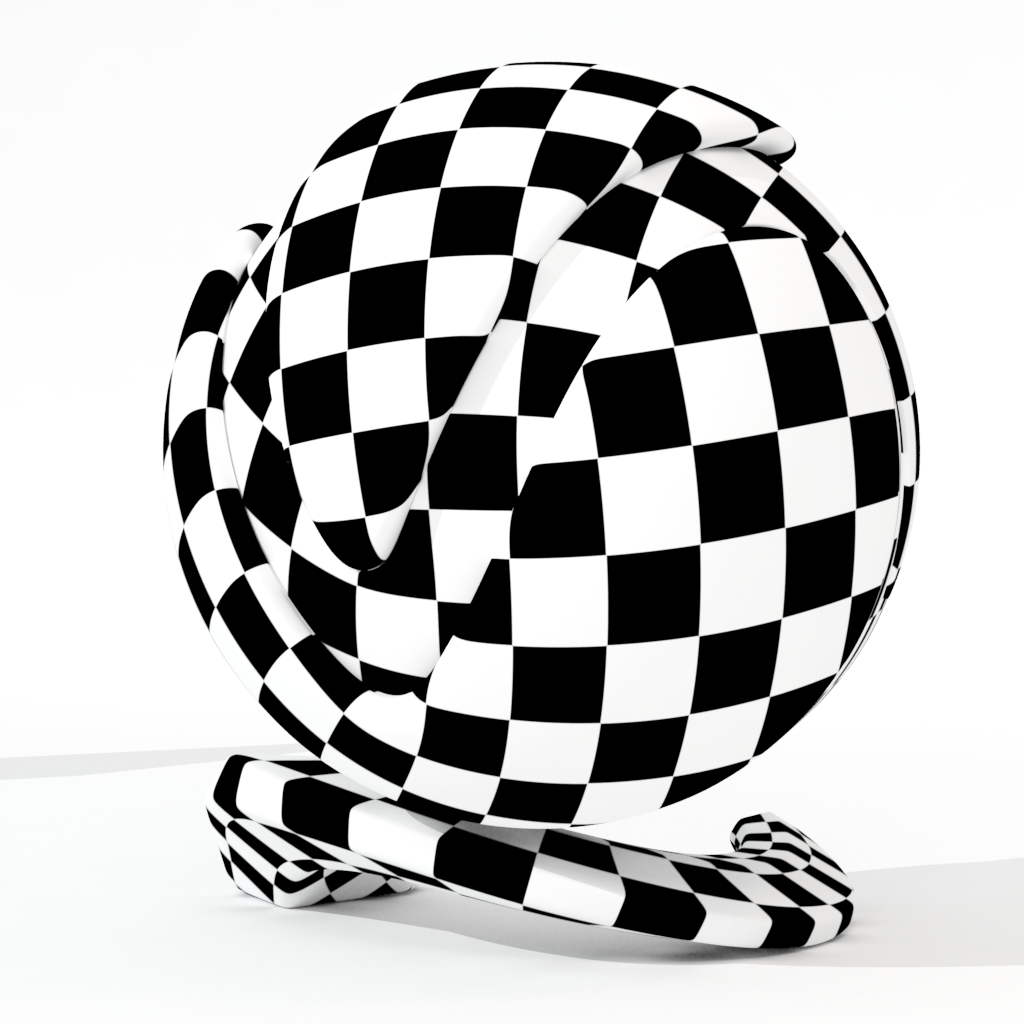
This texture generates checkerboard pattern. The two alternating colors are also texturable. We used it in one of the examples from the previous topic.
Parameters
Here's a list of the parameters for the texture. The last 3 are specific for the checker texture:
Common
- compatibility_with - This is used to differentiate between textures exported from different applications. The value means : 0 - 3ds Max (this is also the default), 1 - Maya, ...
- alpha_from_intensity - If 2 - the alpha is forced to 1.0f; 1 - the resulting alpha is the color intensity (if compatibility_with is 0) or the color luminance (if compatibility_with is 1); 0 - the alpha is taken from the bitmap alpha
- invert - If true, the resulting texture color will be inverted
- invert_alpha - If true and invert is on, the resulting texture alpha will be inverted too. If false, just the color will be inverted
- color_mult - A multiplier for the texture color
- color_offset - An additional offset for the texture color
- alpha_mult - A multiplier for the texture alpha
- alpha_offset - An additional offset for the texture alpha
- nouvw_color - The color when there are no valid uvw coordinates
- color - The resulting color
- out_transparency - The resulting transparency
- out_alpha - The resulting alpha
- out_intensity - The resulting intensity
- uvwgen - The uvw generator for the texture
- placement_type - The way the valid portion of the texture is applied: 0 - the whole texture is valid, 1 - crop, 2 -place
- u - U coordinate of the valid texture sector
- v - V coordinate of the valid texture sector
- w - Width of the valid texture sector
- h - Height of the valid texture sector
- jitter - Amount of random placement variation
- tile_u - If true there is horizontal tiling
- tile_v - If true there is vertical tiling
- uv_noise_on - If true the noise is enabled.
- uv_noise_animate - If true the noise is animated. Use "UV noise phase" to animate the noise.
- uv_noise_amount - UV noise amount
- uv_noise_levels - UV noise iterations
- uv_noise_size - UV noise size
- un_noise_phase - UV noise phase
Specific
- white_color - The white checker color
- black_color - The black checker color
- contrast - Contrast value
Example
TexCloth
The V-Ray Cloth Texture map can be used to generate a procedural cloth texture. It gives a high level of control making it an easy mater to produce the look of a loose or close weaved cloth. It also allows control over the amount of random weave distortion and its channels can be connected to texture maps.
Parameters
The common parameters are the same as in checker texture.
Specific parameters
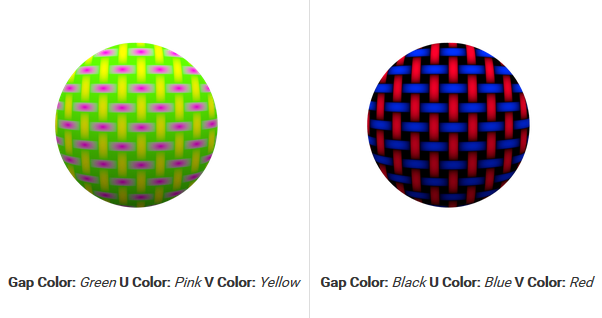
- gap_color - Controls the color of the gaps between the fabric fibers.
- u_color - Controls the horizontal thread color.
- v_color - Controls the vertical thread color.
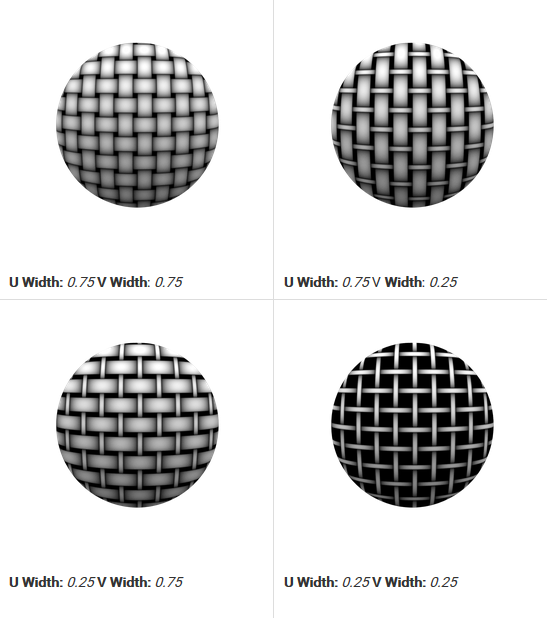
- u_width - Controls the horizontal thread width.
- v_width - Controls the vertical thread width.
- u_wave - Controls the amount of wave in the horizontal direction.
- v_wave - Controls the amount of wave in the vertical direction.
- randomness - Controls the amount of randomness in the weave of the cloth. Lower values are subtle, while higher values distort things more often in interesting ways.
- width_spread - Controls the gaps between the threads in the cloth texture. Higher values make the gaps bigger, while smaller values keep the threads tighter together. In this way a loose weave look can be achieved.
- bright_spread - Controls how far the lighter highlights on the threads reach in the weave.
Example
The following scene is rendered by using the scene bundle and uncommenting "vrscenes/map_33 TexCloth.vrscene".

U Width and V Width
U Wave and V Wave
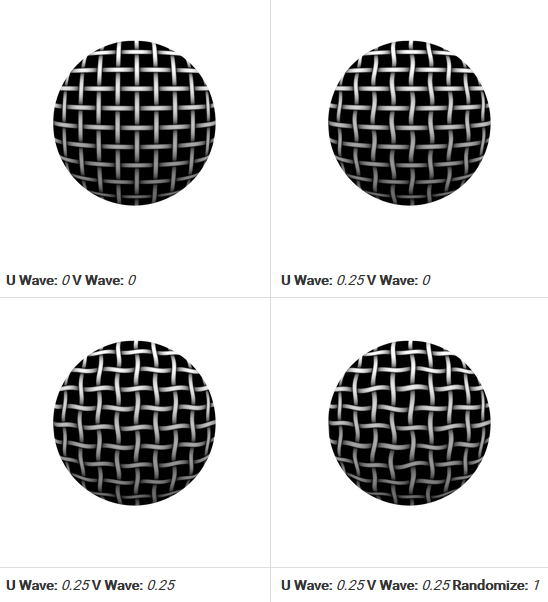
Randomness

U Color, V Color and Gap Color
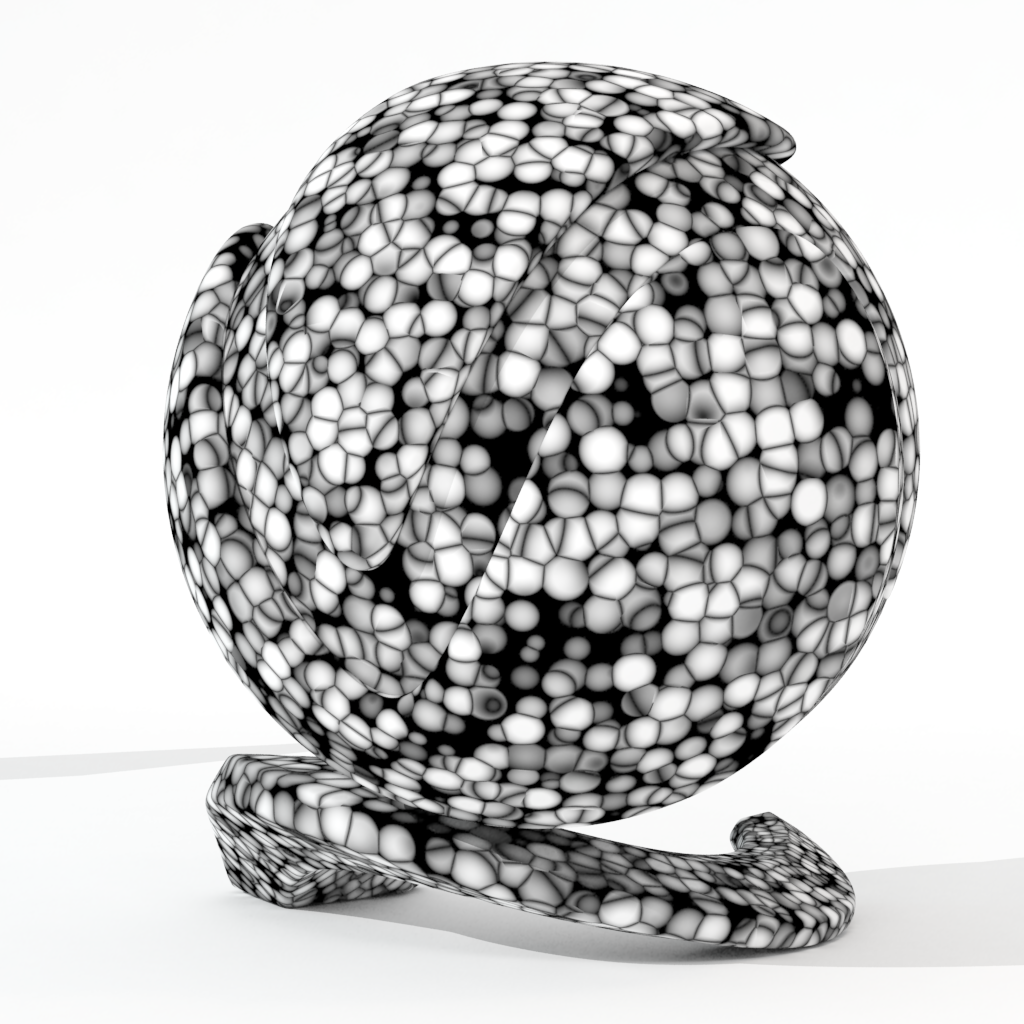
TexCellular
Procedural cellular noise pattern. Different types of cells are supported, including fractal.
Specific parameters
- center_color – Controls the color of the center of the cells.
- edge_color – Controls the color of the edges of the cells in the Cellular procedural texture.
- bg_color – Controls the color of the background of the Cellular procedural texture.
- size – Controls the size of the Cellular procedural texture.
- spread – Controls the spread of the procedural Cellular texture.
- density – Controls the Density of the Cellular texture.
- type – Specifies which type to use for the Cellular texture. 0 = dots; 1 = chips; 2 = cells; 3 = chess cells; 4 = plasma
- low - Low threshold (for the bg color)
- middle - Middle threshold (for the edge color)
- high - High threshold (for the center color)
- fractal - Whether to generate fractal noise
- fractal_iterations - The number of fractal iterations
- fractal_roughness - The fractal roughness (0.0f is very rough; 1.0 is smooth - i.e. no fractal)
- components - Outputs (F(1), F(2), F(3)) (the distances to the three closest points in the cellular context) as a Vector
Example
The following scene is rendered by using the scene bundle and uncommenting "vrscenes/map_28 TexCellular.vrscene".
TexCurvature
TexCurvature is a texture that will effectively sample the underlying mesh for curves. A region around each shaded point gets sampled with additional rays (similar to VRayDirt) and all additional normals are averaged to get a "smooth" normal at the original point. This normal is used to compute the color. The color at each shaded point is a greyscale value: darker values are dents (or holes), lighter values are peaks. The parameters should be adjusted by trail and error since they generally depend on the scale used, hence the defaults might not be appropriate at all in some cases.
Specific parameters
- subdivs – Controls the number of samples around each shaded point.
- sample_spread – Controls the radius of the sampled region
- out_color_min - Output color min value. Allows the output color to be mapped to a range that is different than 0..1 (makes the output texture darker or lighter).
- out_color_max - Output color max value
- scale - The scale relative to which the curvature is computed
- trace_distance - The maximum distance to search for intersections. Bigger values will decrease the performance, but may produce more correct result.
- threshold - Curvature values below this threshold will be ignored.
Example
The following scene is rendered by using the scene bundle and uncommenting "vrscenes/map_14 TexCurvature.vrscene".
TexDirt
TexDirt is a texture map that can be used to simulate a variety of effects: for example, dirt around the crevices of an object, or to produce an ambient occlusion pass.
Parameters
- radius – Determines the amount of area (in scene units) where the TexDirt effect is produced. You can also use a texture to control the radius. The texture intensity is multiplied by the radius to calculate the final radius at a given surface point. If the texture is white at a given surface point, the full radius value is used. If the texture is black, a radius of 0.0 is used. For more information, see Radius Parameter example or the Texmap Radius example below.
- black_color – Specifies the color that will be returned by the texture for occluded areas. You can also use a texture map for this parameter.
- white_color – Specifies the color that will be returned by the texture for unoccluded areas. You can also use a texture map for this parameter.
- distribution – Forces the rays to gather closer to the surface normal. The effect is that the dirt area is being narrowed closer to the contact edges. For ambient occlusion, set this parameter to 1.0 to get distribution similar to the ambient lighting on a diffuse surface. For more information, see the Distribution Parameter example below.
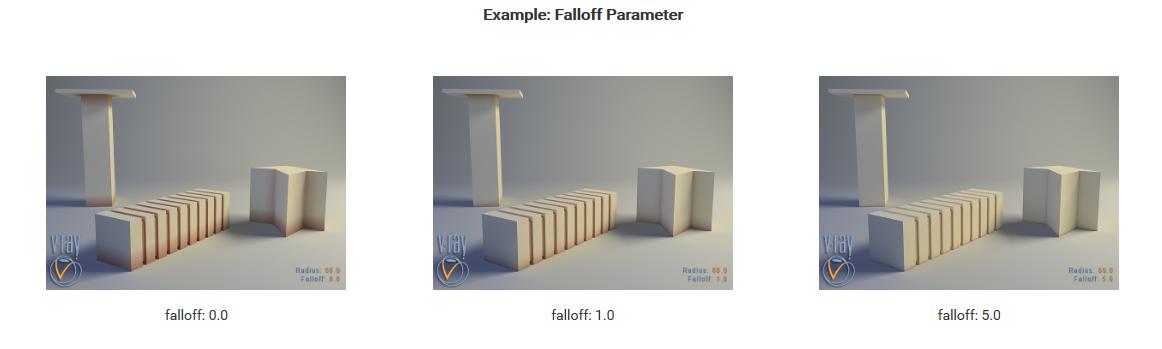
- falloff – Controls the speed of the transition between occluded and unoccluded areas. For more information, see the Falloff Parameter example below.
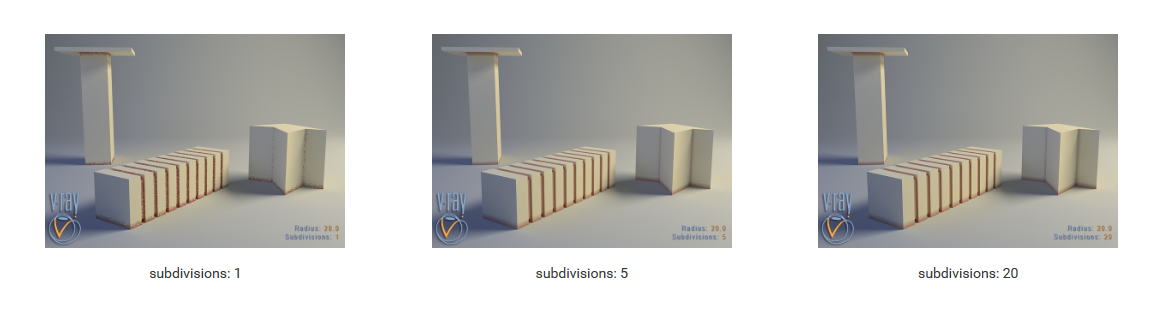
- subdivs – Controls the number of samples that V-Ray takes to calculate the dirt effect. Lower values render faster but produce a more noisy result. For more information, see the Subdivision Parameter example below.
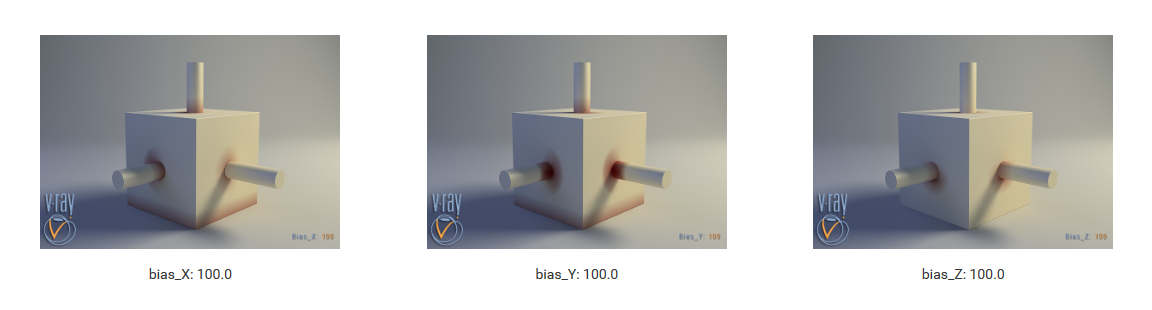
- bias_X, bias_Y, bias_Z – These parameters will bias the normals to the (X, Y, Z) axes, so that the dirt effect is forced to those directions. Consider that these parameter can also take negative values for inverting the direction of the effect. For more information, see the Bias example below.
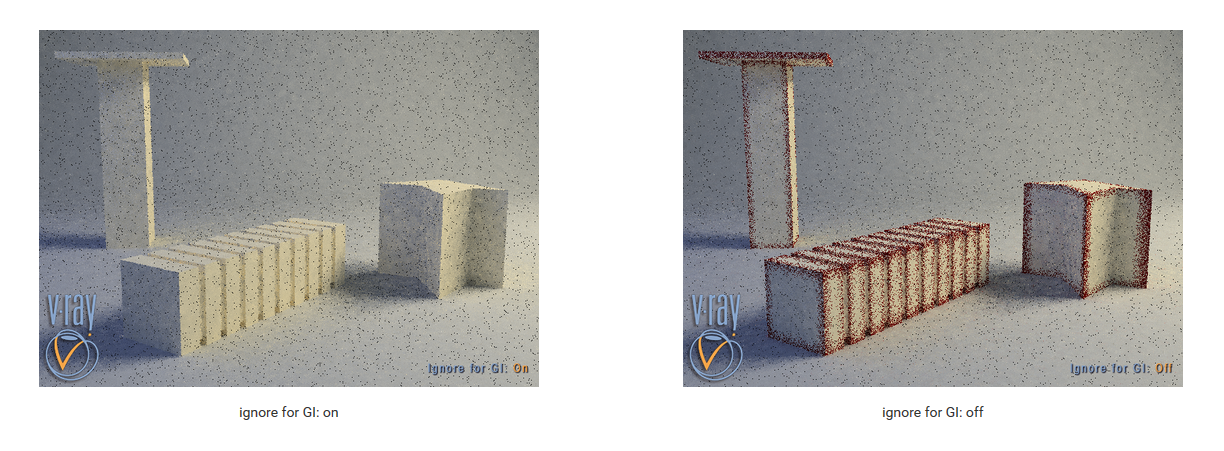
- ignore_for_gi – When enabled, Determines whether the dirt effect will be taken into consideration for GI calculations or not . For more information, see Ignore for GI example below.
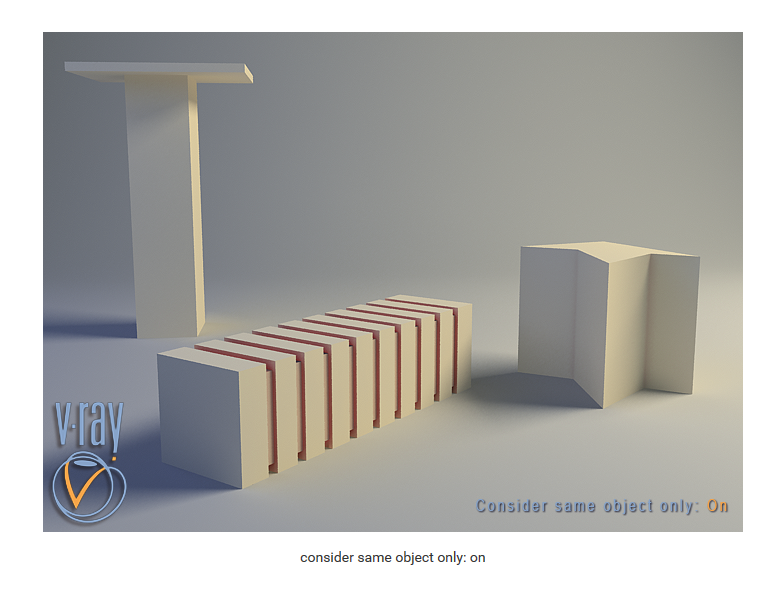
- consider_same_object_only – When enabled, the dirt will affect only the objects themselves, without including contact surfaces and edges. If off, the entire scene geometry is participating for the final result. For more information, see Consider Same Object Only example below.
- double_sided – When enabled, rays will be traced both in the direction of the normal and in the opposite direction. This creates an effect where both crevices and edges are occluded.
- invert_normal – Allows the user to revert the effect with respect to surface normals - e.g. instead of crevices, open corners will be shaded with the occluded color. This parameter will change the direction of tracing the rays. When disabled, the rays are traced outside the surface; when on, they are traced inside the surface. For more information, see Invert Normal example below.
- work_with_transparency – When enabled, TexDirt will take into account the opacity of the occluding objects. This can be used, for example, if you want to calculate ambient occlusion from opacity-mapped trees etc. When disabled (by default), occluding objects are always assumed to be opaque. Note that working with correct opacity is slower, since, in that case, TexDirt must examine and evaluate the material on the occluding objects.
- environment_occlusion – When enabled, V-Ray will use the environment when calculating the occlusion of areas that are not occluded by other objects.
mode – Specifies the mode in which the dirt map is going to be calculated.
- ambient occlusion (0) – Normal ambient occlusion will be calculated
- reflection occlusion (Phong - 1, Blinn - 2, Ward - 3) – Reflection occlusion will be used. The difference between ambient and reflection occlusion is basically in the direction in which rays are traced. With ambient occlusion rays are traced in all directions uniformly while with reflection occlusion the direction depends on the viewing direction (just as when calculating reflections) and the spread of the rays depends on the Reflection glossiness and BRDF type used
glossiness – Controls the spread of the rays traced for reflection occlusion. A value of 1 means that just a single ray is traced (just like when tracing clear reflections), smaller values make the spread of the traced rays.
- render_nodes - Allows you to disable the calculation of the dirt map for specific objects. Excluded objects will not be shaded by the dirt map.
- render_nodes_inclusive - When enabled reverses the meaning of the Exclude list - only objects in the list will be shaded by the dirt map.* **affect_reflection_elements – When enabled, the ambient reflection will affect the reflection render elements. This can be used to create reflection mask.
- use_texture_for_excluded – Allows you to disable the calculation of the TexDirt map for specific objects. Excluded object will not be shaded by the TexDirt map.
- affect_result_nodes – Specifies a list of objects which will affect the calculation of the TexDirt map. Excluded objects will be considered "invisible" for the calculations of the TexDirt map.
- affect_result_nodes_inclusive - This option controls the meaning of the Result Affect option. When on the Result Affect is considered as an "Include list" and when off the the Result Affect is considered as "Exclude list"
- subdivs_as_samples - true to make the subdivs independent of the image sampler quality.
Examples
The following scene is rendered by using the scene bundle and uncommenting "vrscenes/map_15 TexDirt.vrscene".
Radius Parameter
This parameters determines the amount of area (in units) where the VRayDirt effect is produced. Notice that two of the object do not contact any other objects on their tops, so there is no dirt effect.

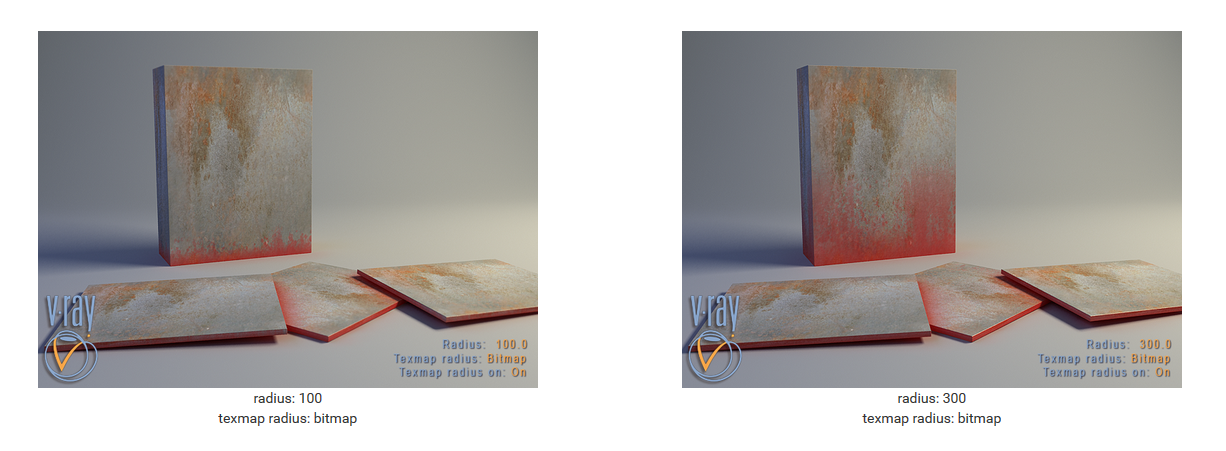
Texmap Radius
In the next example, a bitmap is used in the texmap radius slot. Notice that the main radius parameter still has effect - it determines the amount of area where the texmap radius bitmap would blend.
Distribution Parameter
This parameter will force the rays to gather closer. The effect is that the dirt area is being narrowed closer to the contact edges.
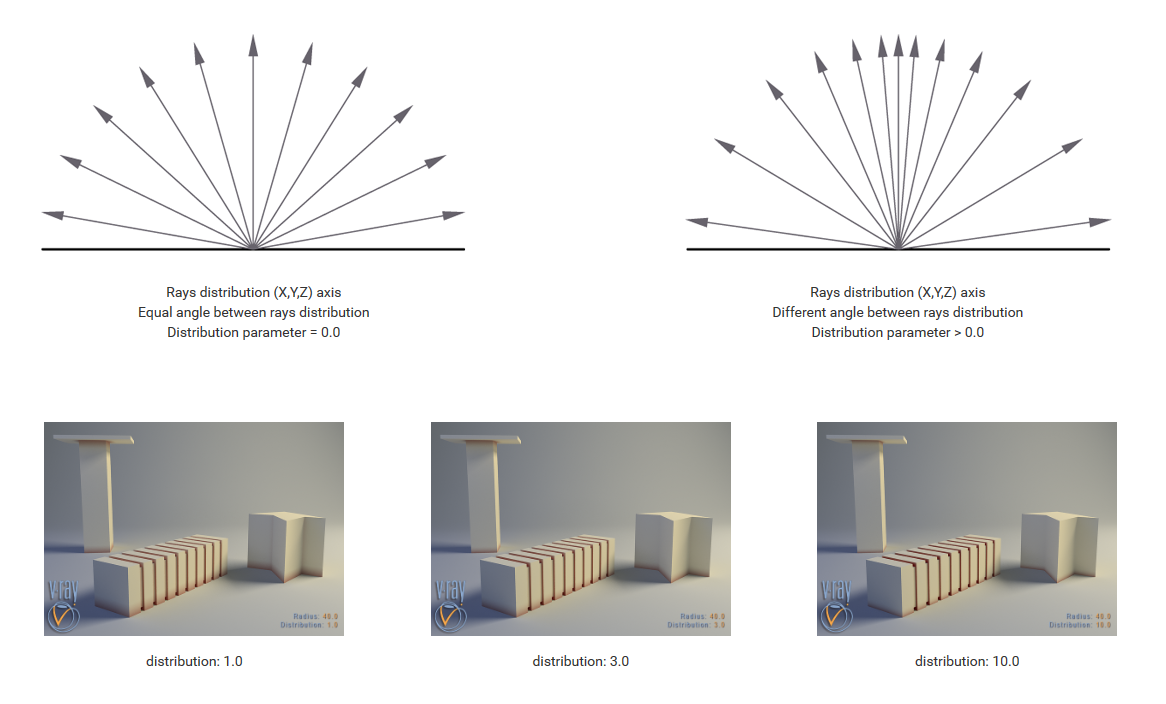
Falloff Parameter
Subdivisions Parameter
Bias
These parameters will bias the normals so that the dirt effect is forced to some of the axis(es).
Ignore for GI
This check-box determines whether the dirt effect is going to be visible during the GI calculation.
Consider Same Object Only
Invert Normal
In the next example, a bitmap is used in the texmap radius slot. Notice that the main radius parameter still has effect - it determines the amount of area where the texmap radius bitmap would blend.

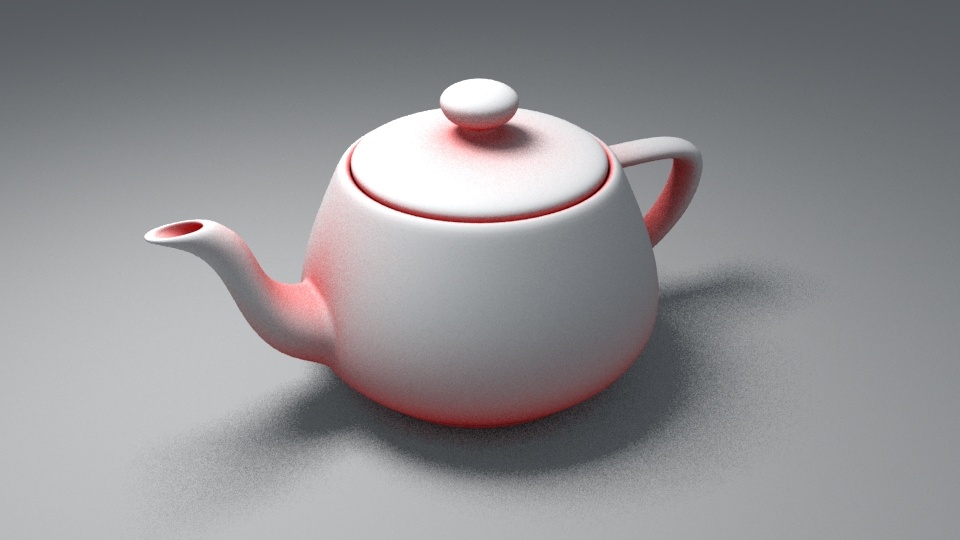
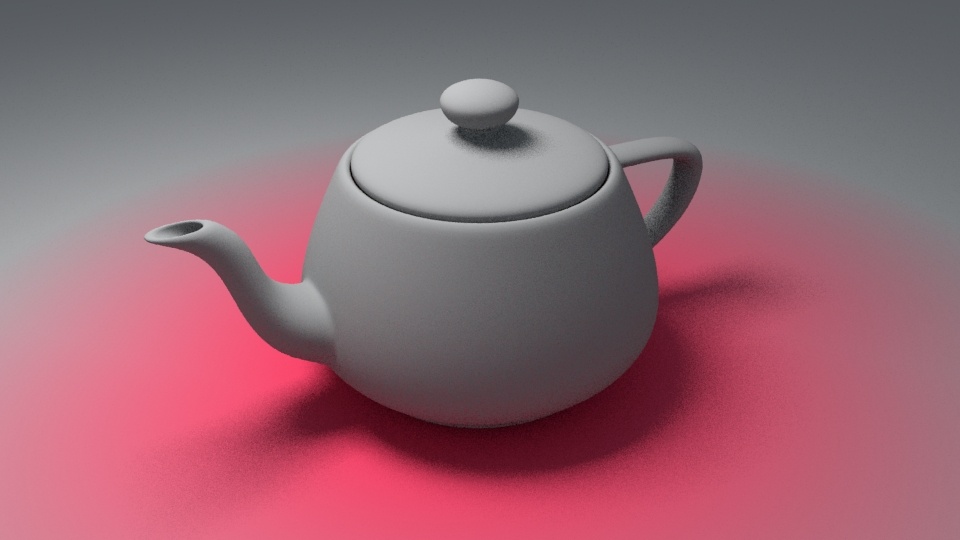
TexDistance
The TexDistance is a V-Ray specific procedural texture that returns a different color based on a point's distance to an object(s) specified in a selection list. In the example image shown below, the far color has been set to red and the near color has been set to green.
Parameters
- distance – Specifies a radius outside which all points will be given the far color.
- far_tex – The color returned by the texture for points that are at a distance greater than the radius parameter from the the objects specified in the list.
- near_tex – The color returned by the texture for points that are right at the edges of the object(s) specified in the list. For points that are outside or inside the objects but not exactly next to the them, the color will be determined by blending between the near color and the far color and the radius will serve as a falloff radius.
- inside_separate – When enabled, the near color value will be overridden by the inside color value for points that are inside the specified geometry.
- inside_solid – When enabled, all the points inside the specified geometry are given the inside color value and no blending is performed.
- inside_tex – The color returned by the texture for points that are right inside the object(s) specified in the list. For points that are inside the objects but not exactly next to them the color will be determined by blending between the inside color and the far color and the radius will serve as a falloff radius.
- outside_separate – When enabled, the near color value will be overridden by the outside color value for points that are outside the specified geometry.
- outside_solid – When enabled, all the points outside the specified geometry are given the outside color value and no blending is performed.
- outside_tex – The color returned by the texture for points that are right inside the object(s) specified in the list. For points that are inside the objects but not exactly next to them, the color will be determined by blending between the inside color and the far color and the radius will serve as a falloff radius.
- objects - List of nodes to measure distance to.
Example
The following scene is rendered by using the scene bundle and uncommenting "vrscenes/map_13 TexDistance.vrscene".
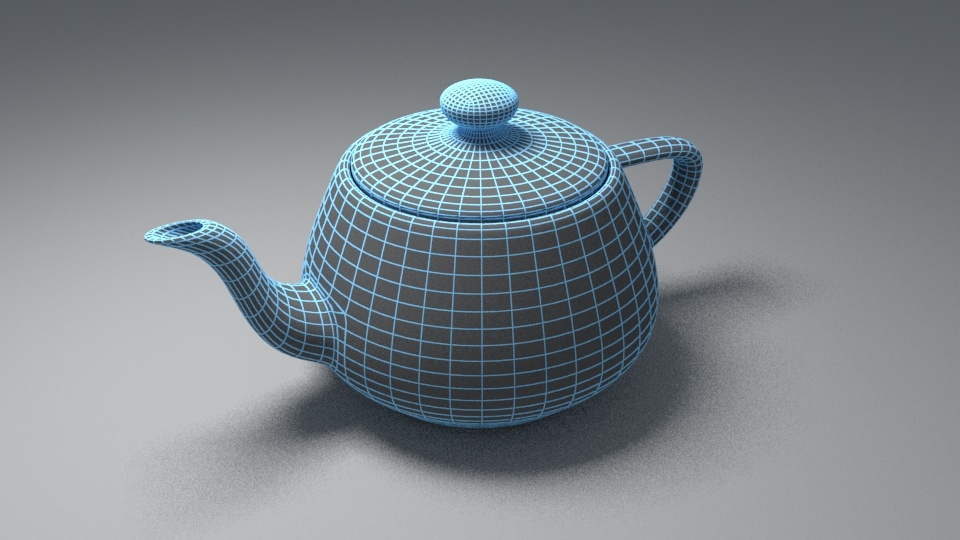
TexEdges
TexEdges allows to achieve an effect similar to the wire frame materials is 3ds Max. Since it is a texture, is allows you to create some interesting effects that are not possible with the standard 3ds Max materials. The texture can also be used as a bump map to produce a "round corners" effect for mesh objects.
Parameters
- edges_tex – Specifies the color of the edges.
- bg_tex – Specifies the color of the background.
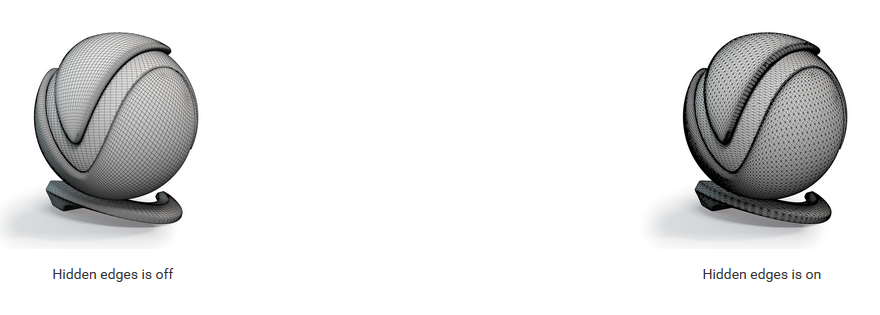
- show_hidden_edges – When enabled, all edges of the object will be rendered. Otherwise, only edges marked as "visible" will be rendered. For more information, see Hidden edges parameter example below.
- show_subtriangles – When enabled, edges generated by displacement mapping or render time subdivision will be visible.
- world_width – Specifies the width of the edges specified in world units.
- pixel_width – Specifies the width of the edges specified in pixels.
- radius – Specifies the radius for the rounded corners effect when the texture is used as a bump map. This is always in world units. For more information, see the Radius example below.
- raytraced_consider_same_object_only – When enabled, the rounded corners will be produced only along edges that belong to the same object which has the map applied. When disabled, rounded corners will be produced along edges formed when the object with the edges map intersects other objects in the scene. For more information, see The Consider same object only parameter example below.
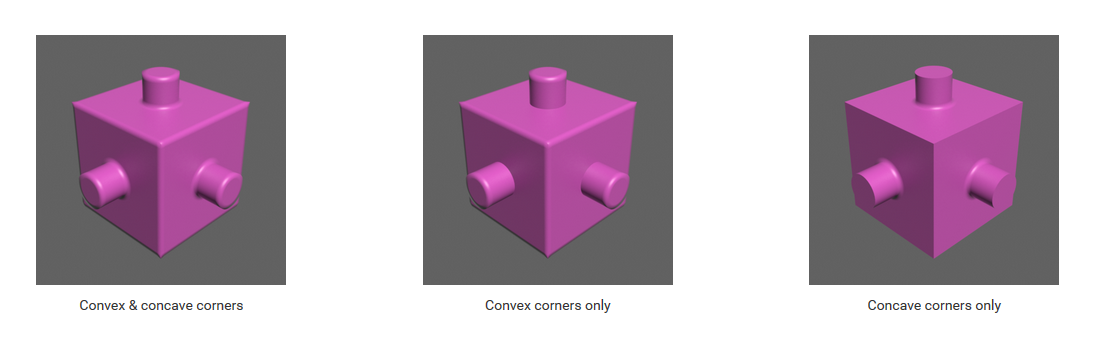
- raytraced_mode – Specifies which corners should have rounded edges applied to them. For more information, see The Corners parameter example below.
- convex & concave (0) – The effect is applied to both convex and concave edges.
- convex only (1) – The effect is applied only to convex edges.
- concave only (2) – The effect is applied only to concave edges.
Examples
The following scene is rendered by using the scene bundle and uncommenting "vrscenes/map_16 TexEdges.vrscene".
Hidden edges parameter
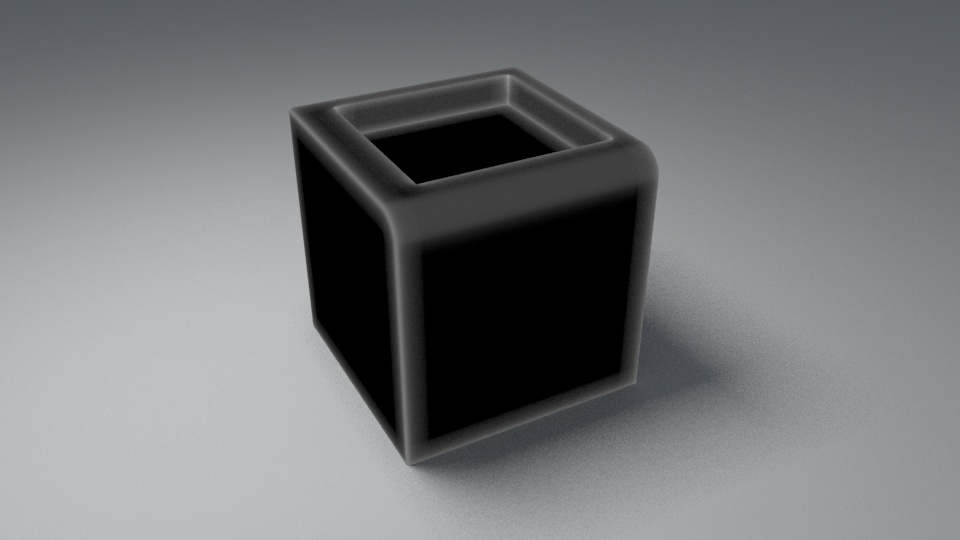
Radius
This example shows the effect of the rounded edges based on the radius. The cube is 50 units in each dimension.

Consider same object only parameter
In this example, the cube and the cylinders are separate objects in the scene.

Corners parameter
Notes
- When applied to displaced or subdivided objects, the TexEdges will normally show the edges of the original mesh
- TexEdges cannot simulate outlines on the objects; you can use Toon Render Effect to add outlines.
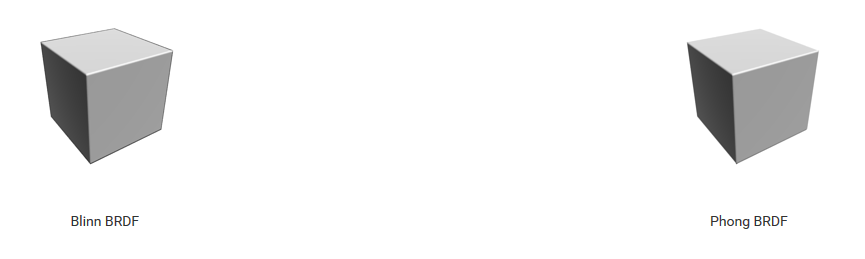
- Currently, when used as a bump map in glossy materials with Blinn or Ward BRDF, TexEdges may lead to dark edges; to avoid this, use the Phong BRDF instead:
TexFalloff
TexFalloff produces a texture with values from white to black, based on the angular falloff of the the surface of the geometry based on the face normals. The example here uses a Type of Towards / Away and a Direction Type of View X.
Parameters
- color1 – Specifies the first color of the falloff map's range.
- color2 – Specifies the second color of the falloff map's range.
type – Specifies the type of falloff.
- Towards/away (0) – The falloff range is based on a 180-degree change in face normal direction.
- Perpendicular/parallel (1) – Sets the falloff range based on a 180-degree change in face normal direction.
- Fresnel (2) – Sets the falloff range based on the IOR (Index of Refraction). The color range is controlled by the IOR.
- Shadow / light (3) – Sets the falloff range based on light and shadow.
- Distance blend (4) – Sets the falloff range based on the distance that is specified from the camera.
direction_type – Specifies the direction for defining falloff.
- View X/Y/Z (0/1/2) – Defines the falloff based on the specified camera viewing direction
- Explicit (3) – Defines the falloff based on a defined position
- Local X/Y/Z (4/5/6) – Defines the falloff based on the specified local axis.
- World X/Y/Z (7/8/9) – Defines the falloff based on the specified world axis.
fresnel_ior - IOR for the Fresnel falloff type
- dist_extrapolate - Extrapolate for the distance blend falloff type
- dist_near - Near distance for the distance blend falloff type
- dist_far - Far distance for the distance blend falloff type
- explicit_dir - Direction for the explicit direction type
- blend_output - The blending amount, based on the parameters
- blend_input - If specified and use_blend_input is true, the final blending amount will be taken from this texture
- use_blend_input
Example
The following scene is rendered by using the scene bundle and uncommenting "vrscenes/map_17 TexFalloff.vrscene".
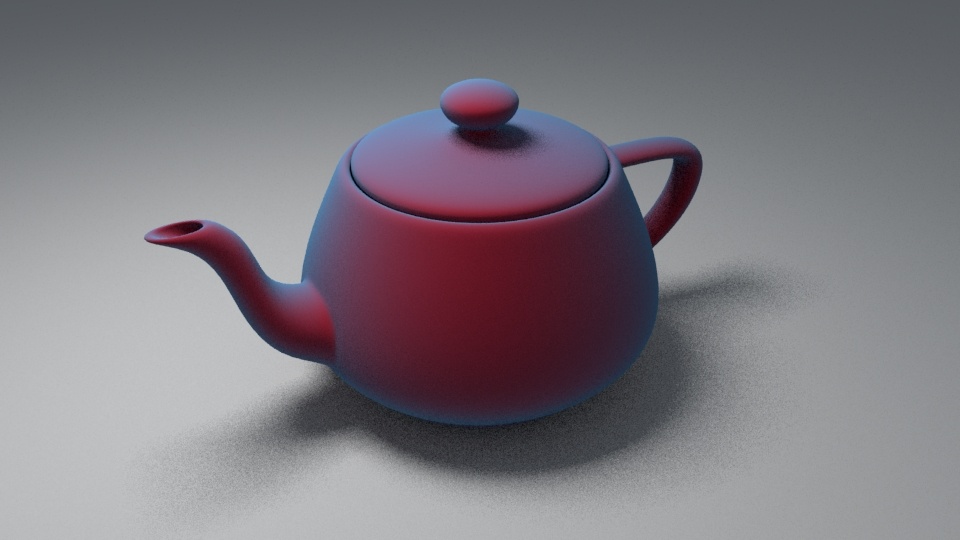
TexFresnel
Used to generate Fresnel reflection color if you're not using BRDFVRayMtl. V-Ray Fresnel is a simple texture map that allows you to blend two colors or maps based on the angle of view and an index of refraction. For example you can connect the TexFresnel texture to the specular color of a normal material in order to create fresnel reflection.
Parameters
- fresnel_lor – Specifies the index of reflection to use when calculating the Fresnel term.
- refract_ior – Specifies the refraction index of refraction for the underlying surface. This is ignored if the surface has a volume shader.
- white_color – The color for the texture when viewed frontally.
- black_color – The color for the texture when viewed at a grazing angle.
Example
The following scene is rendered by using the scene bundle and uncommenting "vrscenes/map_18 TexFresnel.vrscene".

TexLeather
The V-Ray Leather Texture map allows you to generate a procedural leather texture. It uses Two color channels that can be changed or user assigned to texture maps.
Parameters
- cell_color – Controls the color of the cells.
- crease_color – Controls the color of the creases.
- cell_color_tex – Controls the color of the cells.
- crease_color_tex – Controls the color of the creases.
- size – Controls the size of the procedural texture.
- density – Controls how dense the procedural is.
- spottyness – Makes the cells more circular in shape.
- randomness – Controls how randomly the cells will look in relation to each other.
- threshold – Controls the transition between the Cell Color and Crease Color.
- creases – Creates boundaries between cells resembling creases in leather. When disabled, the cells diffuse uniformly into each other (on by default).
Example
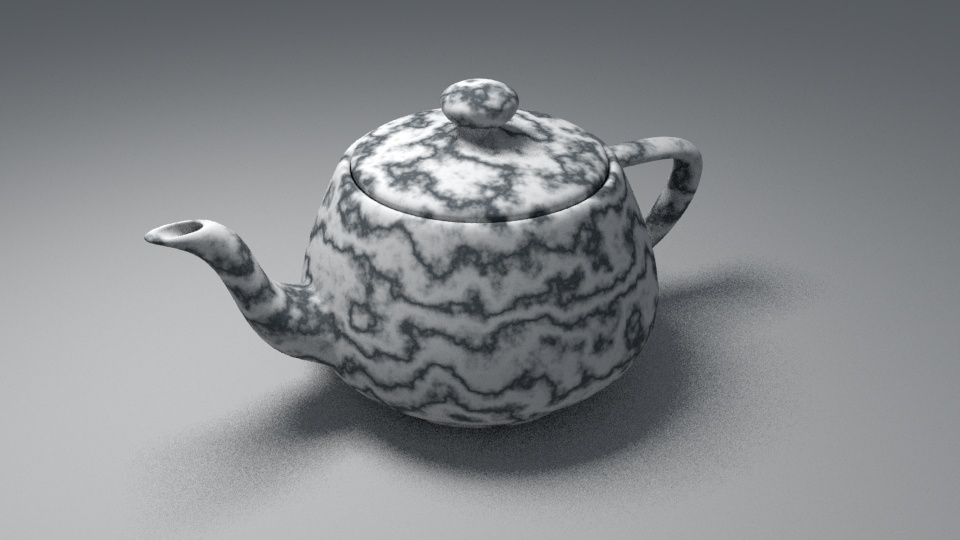
TexMarble, TexMarbleMax
The V-Ray Marble Texture map can be used to generate a procedural marble texture. It uses two colors that can be either changed by the user or have texture maps assigned to them.
Parameters
- filler_color_tex - Controls the color of the filler, this is usually the main color of the marble.
- vein_color_tex – Controls the color of the marbles veins.
- vein_width – Controls the width of the marbles veins.
- diffusion – Controls the amount of blur applied to the veins.
- contrast – Controls the contrast by changing the value.
- amplitude – Controls the amount of distortion in the marbles vein's. A value of 0 will make these a straight line.
- ratio – Controls the amplitude ratio between two consecutive levels of the fractal noise, 0 will make only the first noise level affect the result, 1 will make all of them affect the result with the same weight.
- ripples – Controls the distortion of the marble's veins non-uniformly, red is for x distortion, green is for y distortion, blue is for z distortion.
- depth_min – Minimum level of the fractal noise.
- depth_max – Maximum level of the fractal noise.
Example
The following scene is rendered by using the scene bundle and uncommenting "vrscenes/map_22 TexMarble.vrscene".
The following scene is rendered by uncommenting "vrscenes/map_23 TexMarbleMax.vrscene".

TexNoise, TexNoiseMax
The V-Ray Noise Texture map can be used to generate a procedural noise texture. It uses two colors that can be either changed by the user or have texture maps assigned to them.
Parameters
- color1 – Controls the first of the two colors used by the V-ray Noise procedural.
- color2 – Controls the second of the two colors used by the V-ray Noise procedural.
- uv_noise_size – Controls the scale of the noise function.
- un_noise_phase – Controls the speed of the V-Ray Noise procedural's animation.
uv_noise_levels – Disabled when using a Regular Noise Type.* **noiseType – Allows one of three type of noise to be set by the user to be used by the V-Ray Noise procedural.
- 0: just noise()
- 1: Perlin noise
- 2: inflected Perlin noise
- 3: marble (with Perlin)
persistence - amplitude(i+1) = amplitude(i) / persistence
- amplitude_ratio - amplitude(i+1) = amplitude(i) * amplitude_ratio
- frequency_ratio - frequency(i+1) = frequency(i) * frequency_ratio
- frequency1 - The starting frequency
- amplitude1 - The starting amplitude
- dimensions - Two or Three dimensional noise
- time - The time of the noise, this will act as a third or fourth dimension to the noise generating function
- threshold - Value added to the noise function, noise function values above 1.0 are clamped.
- scale - Scale for the noise UVW coordinates.
- origin - Translation for the noise UVW coordinates.
- implode - Amount of implode performed on the UVW coordinates.
- implode_center - The center of the implode effect
Example
The following scene is rendered by using the scene bundle and uncommenting "vrscenes/map_19 TexNoise.vrscene".
The following scene is rendered by uncommenting "vrscenes/map_21 TexNoiseMax.vrscene".

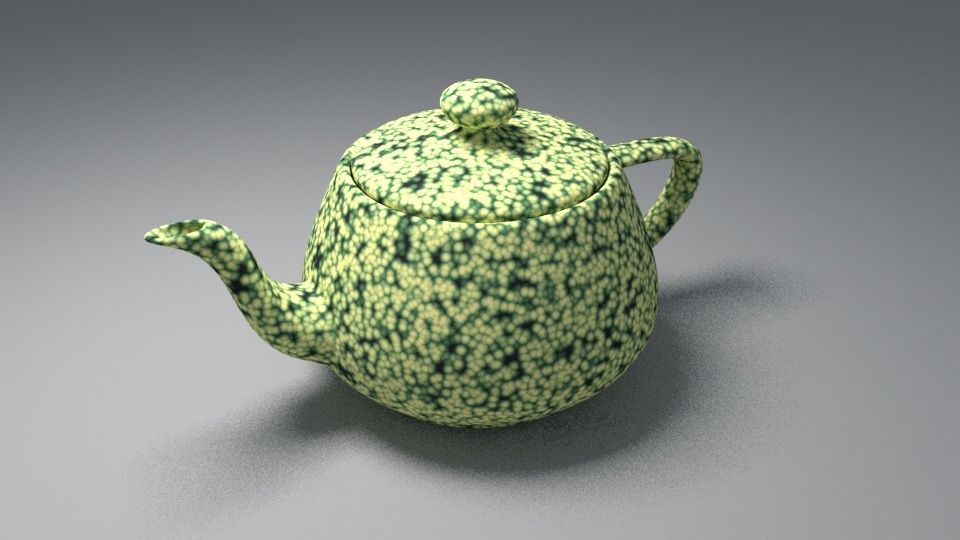
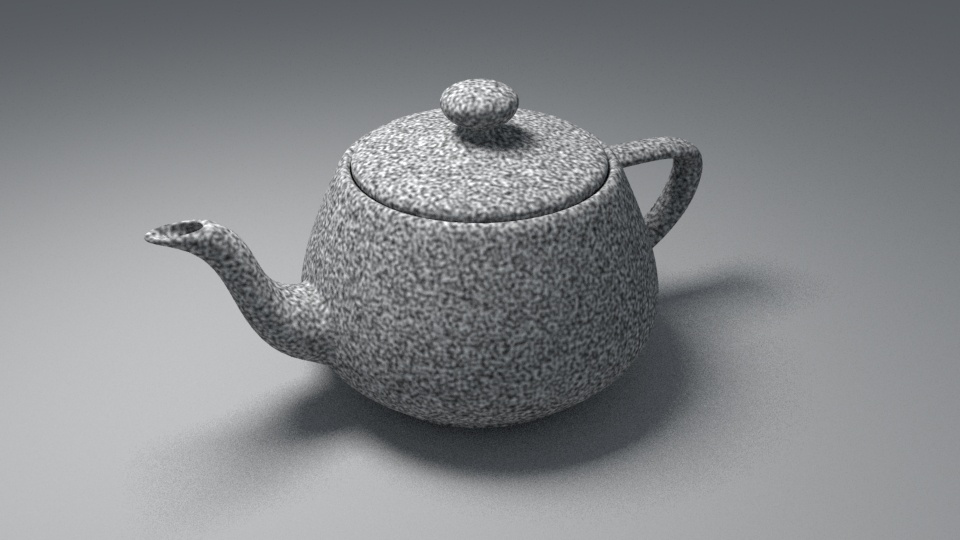
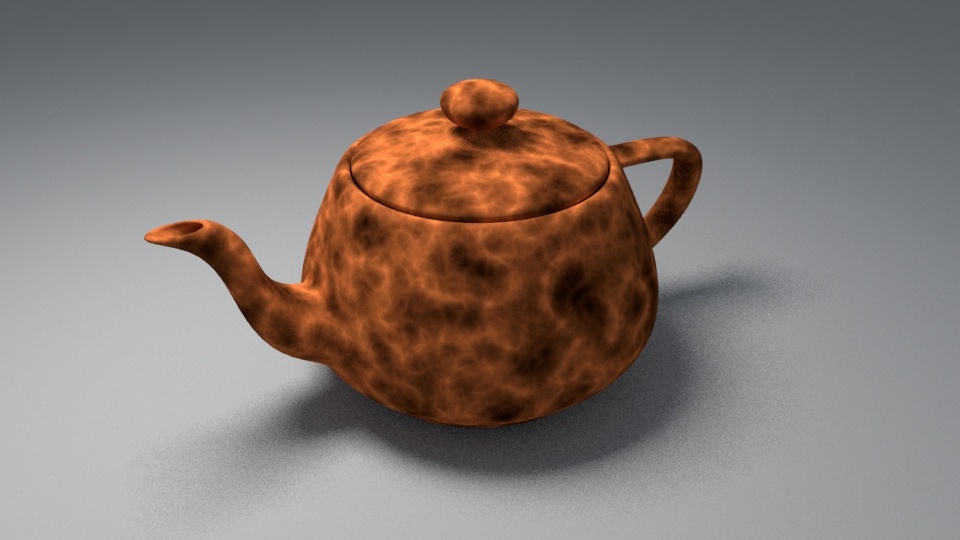
TexRock
The V-Ray Rock Texture map can be used to generate a procedural rock texture. It uses two colors that can be either changed by the user or have texture maps assigned to them.
Parameters
- color1_tex – Controls the first of the two colors used by the V-ray Rock procedural.
- color2_tex – Controls the second of the two colors used by the V-ray Rock procedural.
- grain_size – Controls the size of the fine grain features.
- diffusion – Lower values will make the resulting texture sharper, while higher values will blur the texture details more.
- mix_ratio – Controls the mix between Color 1 and Color 2.
Notes
If V-Ray Rock textures are combined diffusion can be used to provide a large detail coloring in one instance of V-Ray Rock texture and finer details provided with another. If black and white values are used then this could be a great way to generate realistic bump maps.
Example
The following scene is rendered by using the scene bundle and uncommenting "vrscenes/map_29 TexRock.vrscene".
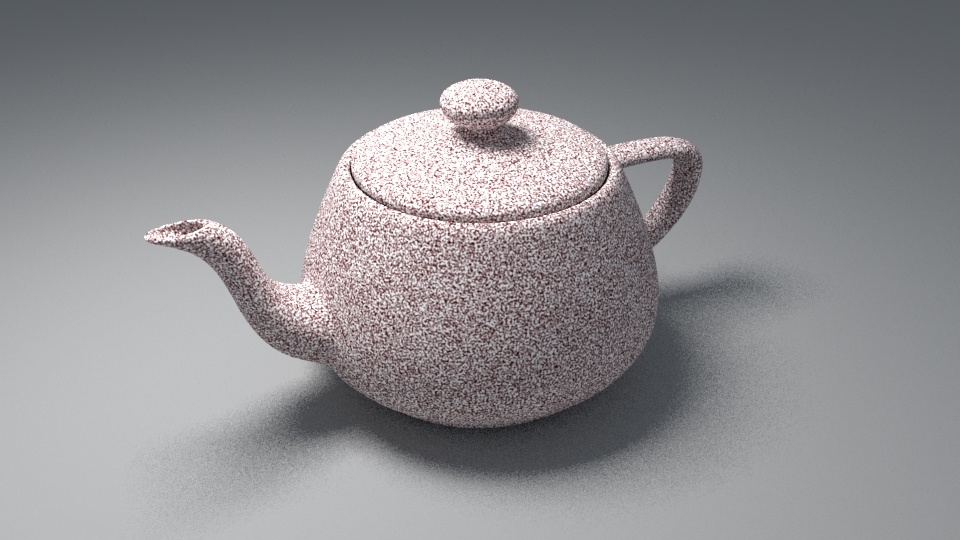
TexSmoke
The V-Ray Smoke Texture map can be used to generate a procedural texture that gives a smoke like effect. It uses two colors that can be either changed by the user or have texture maps assigned to them.
Parameters
- color1 – Controls the first color used in the smoke.
- color2 – Controls the second color used in the smoke.
- size – Controls the scale of the procedural texture.
- iterations – Controls how many times the procedural repeats the process.
- phase – Controls the speed of the V-Ray Noise procedural's animation.
- exponent – Controls the contrast of the smoke texture.
Notes
The billowing effect produced by the V-ray Smoke Texture has a great many uses, one example would be to combine with V-ray Bercon Noise to produce highly detailed procedural terrains by using the resulting combined map as a displacement map.
Example
The following scene is rendered by using the scene bundle and uncommenting "vrscenes/map_27 TexSmoke.vrscene".
TexSnow
The V-Ray Snow Texture map can be used to generate a procedural snow texture effect. It uses two colors that can be either changed by the user or have texture maps assigned to them. Covers surface in snow color down to some normal vector threshold.
Parameters
- snow_tex – Controls the color of the snow, this channel can also have a texture map assigned to it.
- surface_tex – Controls the color of the surface, this channel can also have a texture map assigned to it.
- threshold – Controls which areas that will contain snow color.
- depth_decay – Controls the how deep the snow appears to be. Lower values treat the snow as more transparent as the snow is then a lot less thick.
- thickness – Controls the thickness of the snow.
Notes
The thinner the snow, the more see through it will be, and thus you will see more of the surface color. Both color channels can have texture amps connected to them.
Example
The following scene is rendered by using the scene bundle and uncommenting "vrscenes/map_26 TexSnow.vrscene".
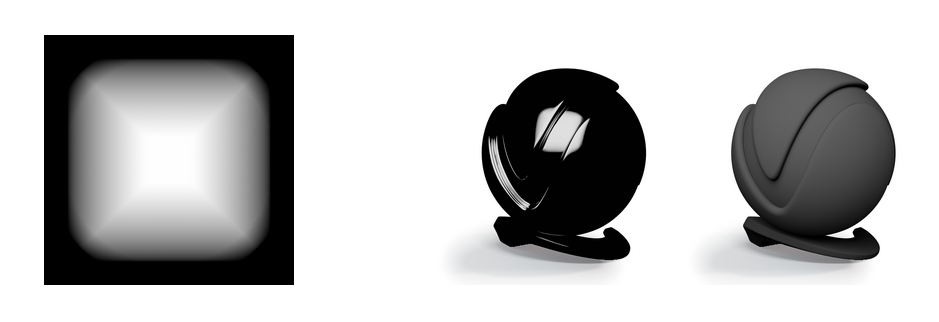
TexSoftbox
The TexSoftbox is a procedural texture that can be used in a V-Ray Area Light to create the illumination coming from a Soft Box light source. In the example shown, both U Vignette and V Vignette are checked. The example shown here uses a TexSoftbox texture on a V-Ray light with both a radial vignette gradient and frame gradient turned on.
Parameters
- base_color – Control the color of the texture.
- base_tint – When enabled, the color in the Base Color parameter is multiplied by the Tint Color parameter.
- base_tint_strength – A multiplier that controls how strong the effect of the Tint Color parameter is.
Processing
- base_mult – A multiplier for the brightness of the texture.
- base_gamma – A gamma correction that is going to be applied to the texture.
Hot Spot/Dark Spot
- spots_on – Enables or disables the hot/dark spot.
- spots_mult – A multiplier for the brightness of the hot/dark spot.
spots_mode - Mode of the spots. Possible values are:
- 0: Add – Color is added to the texture, adding brightness and creating a hot spot.
- 1: Subtract – Color is subtracted from the texture, removing brightness and creating a dark spot.
spots_tint – W hen enabled, allows control of the color of the hot spot.
- spots_tint_strength – A multiplier that controls how strong the effect of the Tint Color parameter is.
Tiling Options
- u/v_offset – Controls the position of the texture along the U or V axis.
- u/v_tiling – When enabled, the options control the tiling of the texture along the U or V axis.
Fading Options
These options control how the hot/dark spot fades out into the base color.
- spots_oradius – The outer radius where the hot spot ends as a fraction of the texture size.
- spots_iradius – The inner radius where the hot spot begins to fade out as a fraction of the texture size.
- spots_exp – Controls the rate at which the hot spot fades out.
Gradients and Frame
The Gradients and Frame options allow you to blend gradient textures on top of the VRaySoftbox texture. You can add a gradient in the U and V direction and place a frame - which is a gradient in both directions. You can also add noise to the frame.
- grad_vert/horiz/rad_on - Turn on vertical/horizontal/radial gradient
- grad_vert/horiz/rad_flip - Flip vertical/horizontal/radial gradient
- grad_vert/horiz/rad_pos - Vertical/horizontal/radial gradient positions
- grad_vert/horiz/rad_col - Vertical/horizontal/radial gradient colors
- grad_vert/horiz/rad - The V/U/Radial Vignette gradient.
Others
- frame_on - Turn on frame
- frame_flip - Flip frame
- frame_pos - Frame positions
- frame_col - Frame colors
- grad_frame - The Frame Vignette gradient.
- frame_tint_on - Turn on frame tint
- frame_tint - Frame tint color
- frame_tint_strength - Frame tint strength
- noise_amount - Frame noise amount
- noise_size - Frame noise size
- noise_phase - Frame noise phase
- noise_fractal - Turn on frame fractal noise
- noise_levels - Frame noise levels
Example
TexTiles
The V-Ray Tiles Texture map can be used to generate a versatile procedural tile texture. It uses two colors that can be either changed by the user or have texture maps assigned to them and allows you to chose from a number of Pattern Types as well.
Specific Parameters
- pattern_type – Allows you to select from certain preset tile patterns. Some channels controls may not be visible in the UI for this texture if the Pattern Type chosen does not support or need it. Possible values are 0-Custom Tiles, 1-Running Bond, 2-Common Flemish Bond, 3-English Bond, 4-1/2 Running Bond, 5-Stack Bond, 6-Fine Running Bond, 7-Fine Stack Bond.
- color_mortar – Controls the color of the mortar. This channel can also be controlled by a texture map.
- color_tiles – Controls the color of the Tiles. This channel can also be controlled by a texture map.
- horizontal_count – Controls the horizontal tile count.
- vertical_count – Controls the vertical tile count.
- color_variance – Controls the amount of color variety in the tiles.
- fade_variance – Controls how faded the color from the Color Variance.
- horizontal_gap – Controls the size of the horizontal gap between the tiles.
- vertical_gap – Controls the size of the vertical gap between the tiles.
- holes - Controls the percentage of tiles that are missing.
- edge_roughness – Controls how rough the edges of each tile.
- random_seed – Used to generate the procedural Tiles Texture. By changing this value you can change the look.
- line_shift – Controls the amount of shift between each line of tiles.
- random_shift – Controls the amount of shift between each of the tiles.
- row_modify – When enabled, the custom parameters will be used.
- per_row - every per_row row is modified by corresponding change value
- row_change - row change value modifying the number of tiles in affected rows
- column_modify – When enabled, the custom parameters will be used.
- per_column - every per_column column is modified by corresponding change value
- column_change - column change value modifying the number of tiles in affected columns
Example
The following scene is rendered by using the scene bundle and uncommenting "vrscenes/map_35 TexTiles.vrscene".
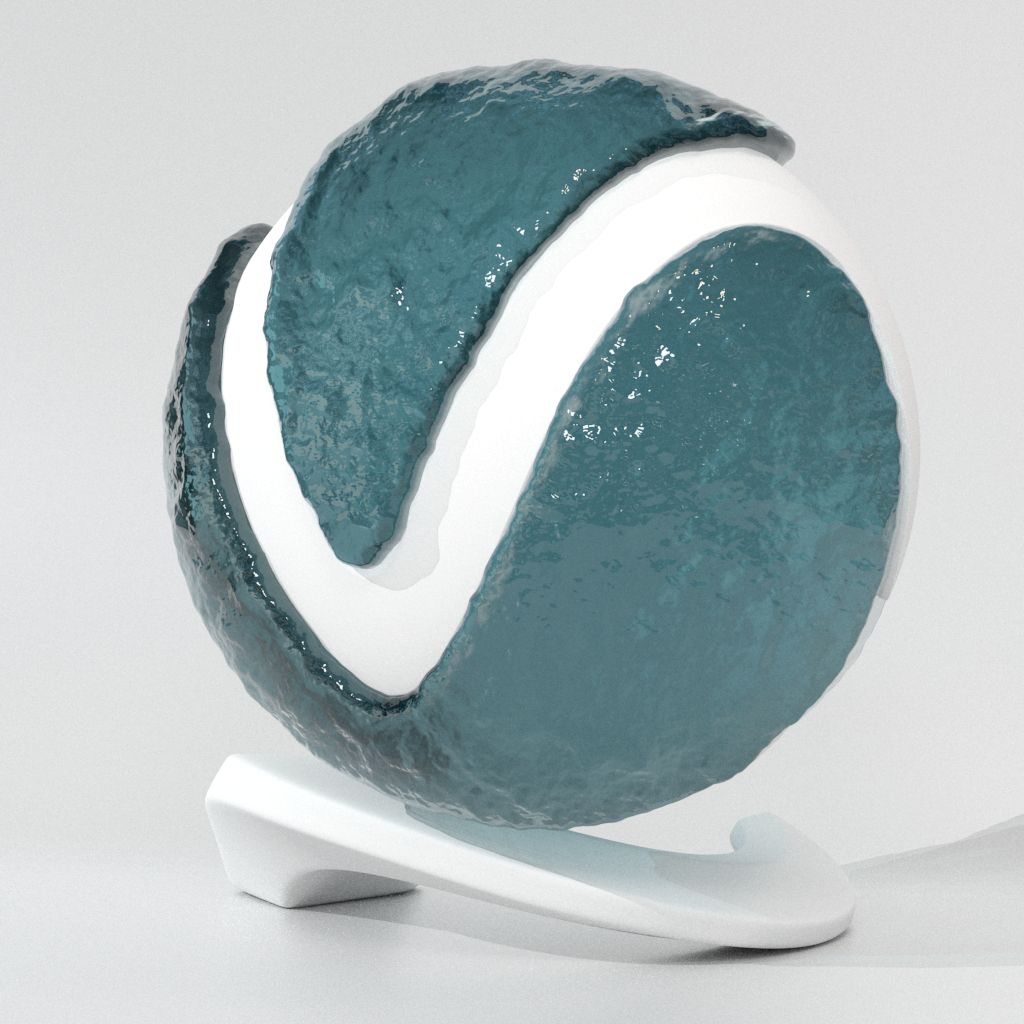
TexWater
The V-Ray Water Texture map can be used to generate a procedural water texture. It uses a number of values that can be either changed by the user or have texture maps assigned to them. Also It allows the user to pick the Resolution used. It can be used along with Vector Displacement (other types of displacement will not work) in order to simulate waves on the surface of water.
Parameters
- height_mult – A scale multiplier for the whole texture.
- use_3d_mapping – When enabled, the V-ray Water procedural will use 3D mapping.
- wind_direction – Specifies the wind direction and thus the direction of the waves.
- wind_magnitude – Specifies the strength of the wind creating the waves. Higher values produce larger waves.
- wind_direction_mult – A multiplier for the importance of the wind direction. Smaller values will produce more variation in the direction of the waves.
- choppy_mult – A multiplier for the choppiness of the waves. Higher values will produce sharper looking waves.
- movement_rate – A multiplier for the choppiness of the waves. Higher values will produce sharper looking waves.
- seed – An integer used to set the starting point for the random generator. Different values produce different waves randomly.
- resolution – Specifies the amount of detail in the generated map, with possible choices being 32, 64, 128, 256, 512, 1024, and 2048.
- patch_size – Specifies the real world size of one patch of the TexWater texture outside of which the surface is perfectly periodic.
Example
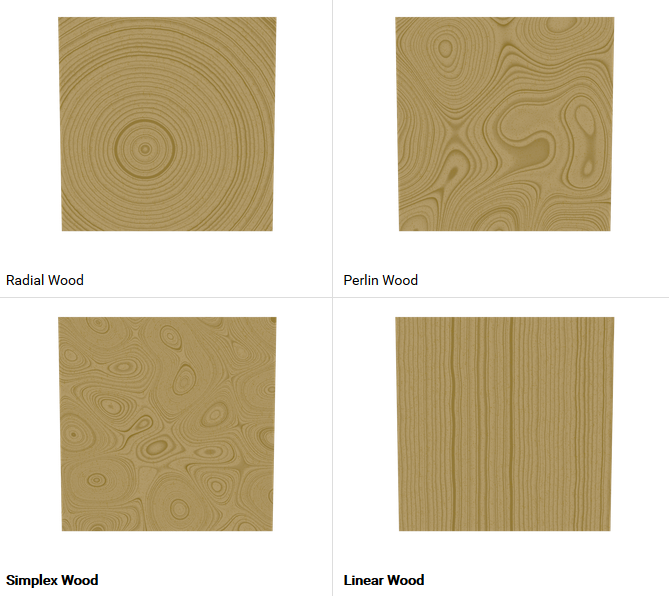
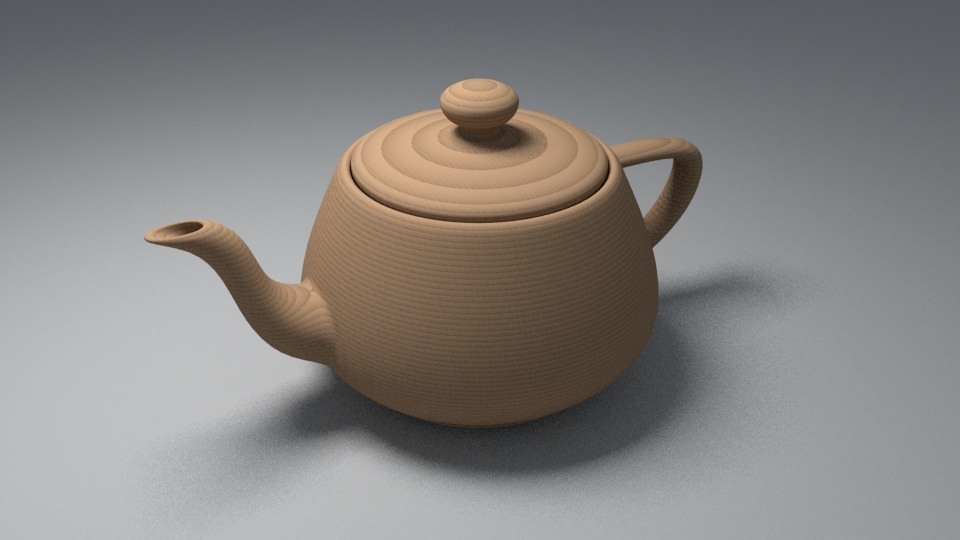
TexBerconWood, TexWood
The V-Ray Bercon Wood Texture map can be used to generate a procedural wood texture. It uses three colors that can be either changed by the user or have texture maps assigned to them. It allows the user to pick between four wood pattern types: Radial Wood, Perlin Wood, Simplex Wood and Linear Wood
Parameters
- noise_color/map1 – Controls the the first of the two main colors of the wood grain produced by the V-ray Wood procedural texture. This channel can be either drive by a value or a texture.
- noise_color/map2 – Controls the the second of the two main colors of the wood grain produced by the V-ray Wood procedural texture. This channel can be either drive by a value or a texture.
- grain_lock – Will set the Grain Color to be the same as Color 2.
- noise_color/map3 – Controls the color of the wood grain produced by the V-ray Wood procedural texture. This channel can be either drive by a value or a texture.
- rand_seed – The seed value used to generate the procedural texture, changing this value will give different variations in the pattern.
- wood_type – Controls the pattern of the wood type that the V-ray Wood procedural produces. The user has a choice of four distinct types of wood; Radial Wood, Perlin Wood, Simplex Wood and Linear Wood.
- wood_size – Controls the the procedural textures size.
- low_tresh – Controls the amount of large feature details.
- high_tresh – Controls the amount of smaller feature details.
- wood_skew – Controls how Color 1 and 2 are blended between different "age rings" of the wood.
- width_var – Controls the amount of width variety in the width of the wood grain.
- gain_var – Controls the amount of gain variety in the width of the wood grain.
Trunk Wobbie
- trunk_str – Controls the strength of the Trunk.
- trunk_freq – Controls the frequency of the Trunk wobble.
Radial noise
- radial_str – Controls the strength of the radial distortion.
- radial_fre – Controls the frequency of the radial distortion.
- radial_z – Controls the radial z frequency of the radial distortion.
Angular Noise
- angle_str – Controls the strength of the angular noise.
- angle_freq – Controls the frequency of the the angular noise.
- angle_rad – Controls the radius of the angular noise produced.
Grain
- grain_str – Controls the amount of grain produced in the texture.
- grain_freq – Controls the frequency of the grain produced in the texture.
Distortion
- use_dist – When checked this will allow a texture map to be used in the Distortion channel to control and produce distortion.
- dist_str - Distortion strength
- dist_map – Channel that a texture can be connected top to add distortion to the produced V-Ray Wood procedural texture.
Super Sampling
- samples – Samples used tor super sampling the produced texture.
Others
- tex_size - texture for the size
- tex_low - texture for low treshhold
- tex_high - texture for high greshhold
- tex_skew - texture for skew
- tex_width_var - texture for width variation
- tex_gain_var - texture for gain variation
- tex_trunk_str - texture for trunk strength
- tex_trunk_freq - texture for trunk frequency
- tex_radial_str - texture for radial strength
- tex_radial_freq - texture for radial frequency
- tex_z_str - texture for radial z strength
- tex_ang_str - texture for angular strength
- tex_ang_freq - texture for angular frequency
- tex_ang_rad - texture for angular radius
- tex_grain_str - texture for grain strength
- tex_grain_freq - texture for grain frequency
- use_curve_input - boolean
- curve_output - Calculated blend amount to be tranformed by the bezier curve!
- curve_input - If curve is used the output value will be taken from this texture
Example
The following scene is rendered by using the scene bundle and uncommenting "vrscenes/map_31 TexWood.vrscene".
Notes
The Bercon Maps were originally developed by Jerry Ylilammi as open-source plug-ins for 3ds Max. Source code ported to V-Ray Standalone by Chaos Software Ltd.