This page provides information on the Image Sampler rollout in the Render Settings.
Overview
In V-Ray, an image sampler refers to an algorithm for calculating a pixel's color based on the colors within and around it.
Each pixel in a rendering can have only one color. To get the color of a pixel, V-Ray calculates it based on the object's material, direct light striking the object, and indirect lighting in the scene. But within a single pixel there might be multiple colors, which may come from multiple objects whose edges intersect at the same pixel, or even difference in brightness on the same object due to changes in object shape or falloff and/or shadowing of light sources.
To determine the right color for such a pixel, V-Ray looks at (or samples) colors from different parts of the pixel itself as well as the pixels around it. This process is called image sampling. V-Ray has two main image samplers, each with its own approach to sampling and its own parameters: Progressive and Bucket.
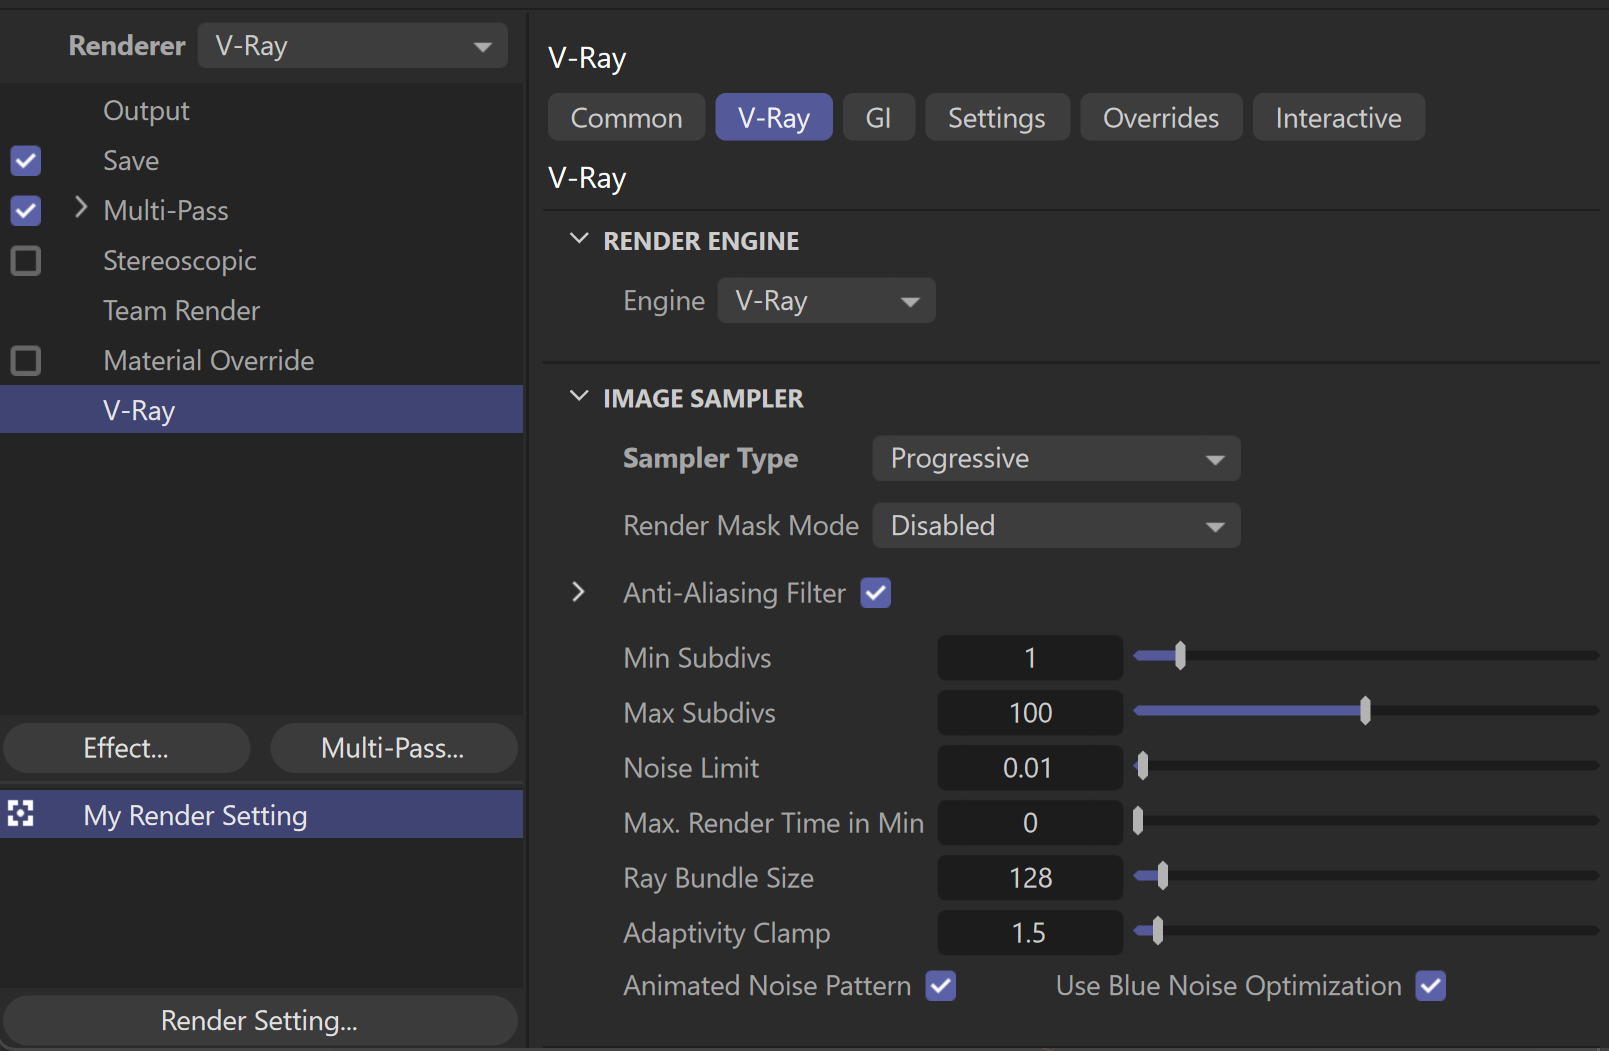
UI Path: ||Render Settings|| > V-Ray > V-Ray tab > Image Sampler rollout
What is Anti-Aliasing?
One of the functions of image sampling is Anti-Aliasing (AA), which is the reduction of jagged edges in a render. The following example shows the basic difference between an image with anti-aliasing, and one without.
If only one sample is taken for the each of the pixels around the edge of the sphere, the choice of pixel color is limited to the dark gray at the edge of the object, or the white background. Using one of these colors (i.e. taking only one sample) makes the image look jagged. This is the equivalent of no anti-aliasing at all.
If two or more samples are taken in each pixel, the colors are averaged, and pixels at the edge of the object end up being a color in between the dark gray of the sphere and the white background. These in-between colors make the object appear smoother in the final render.
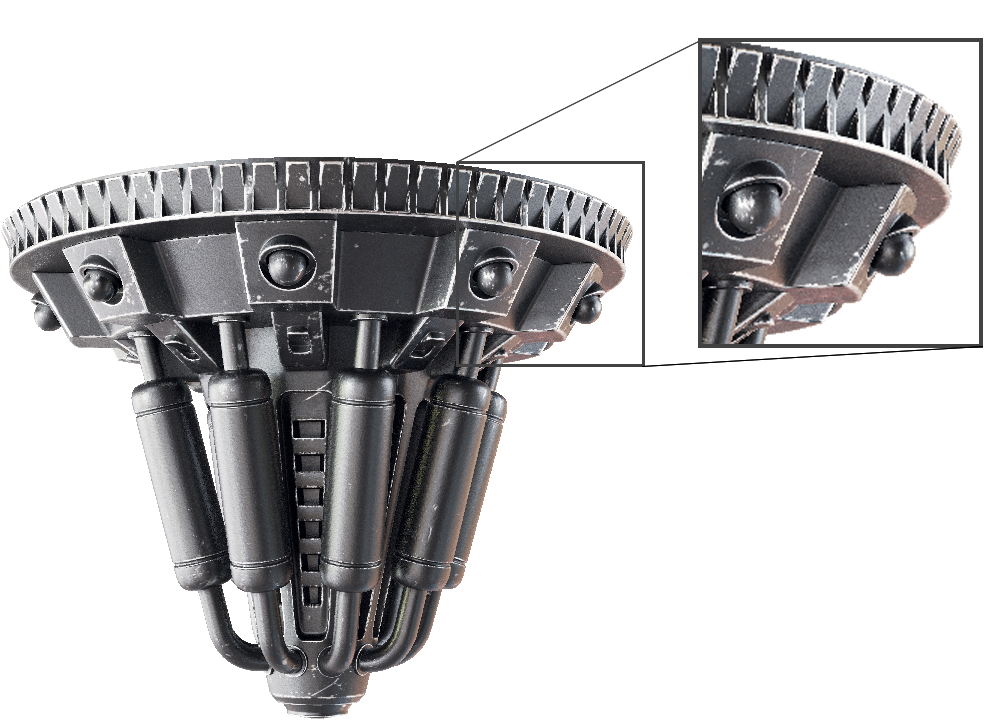
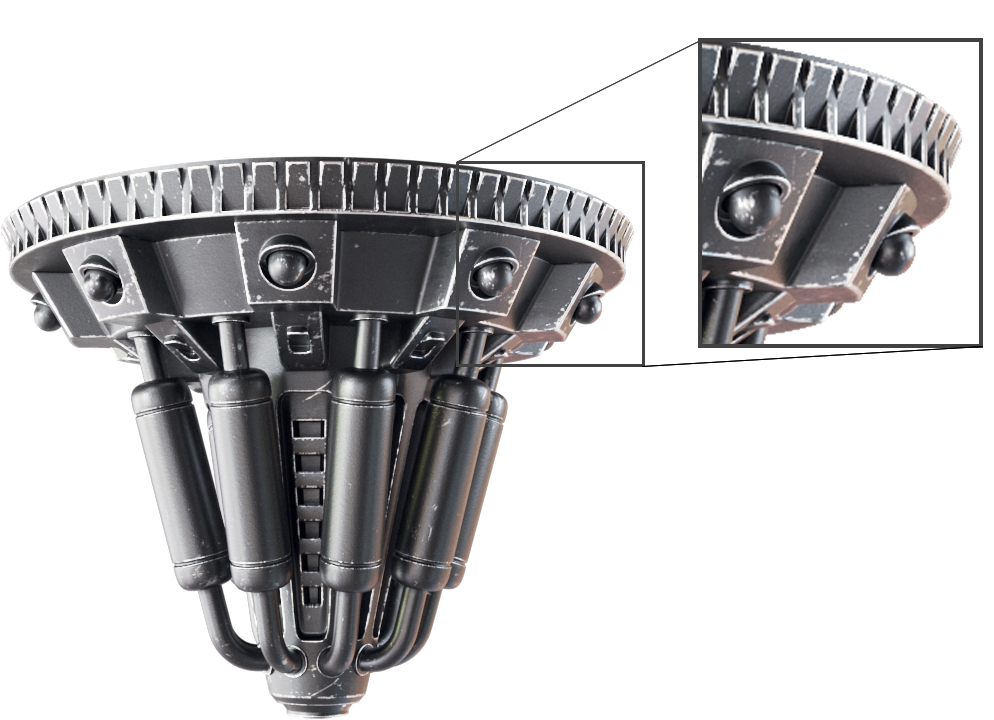
Image Sampler
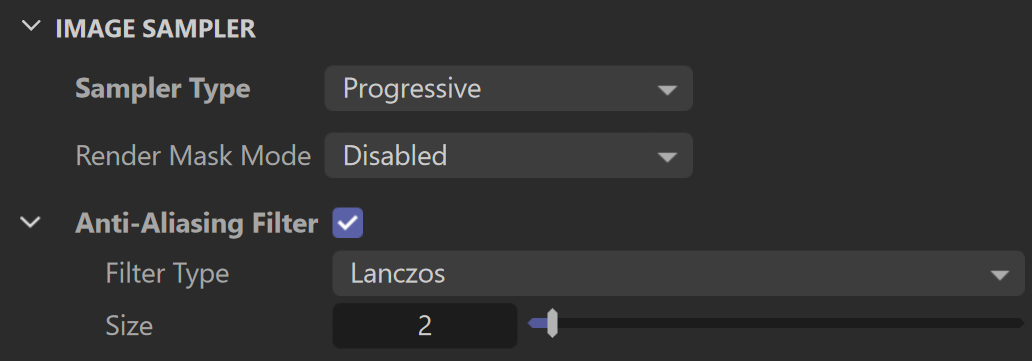
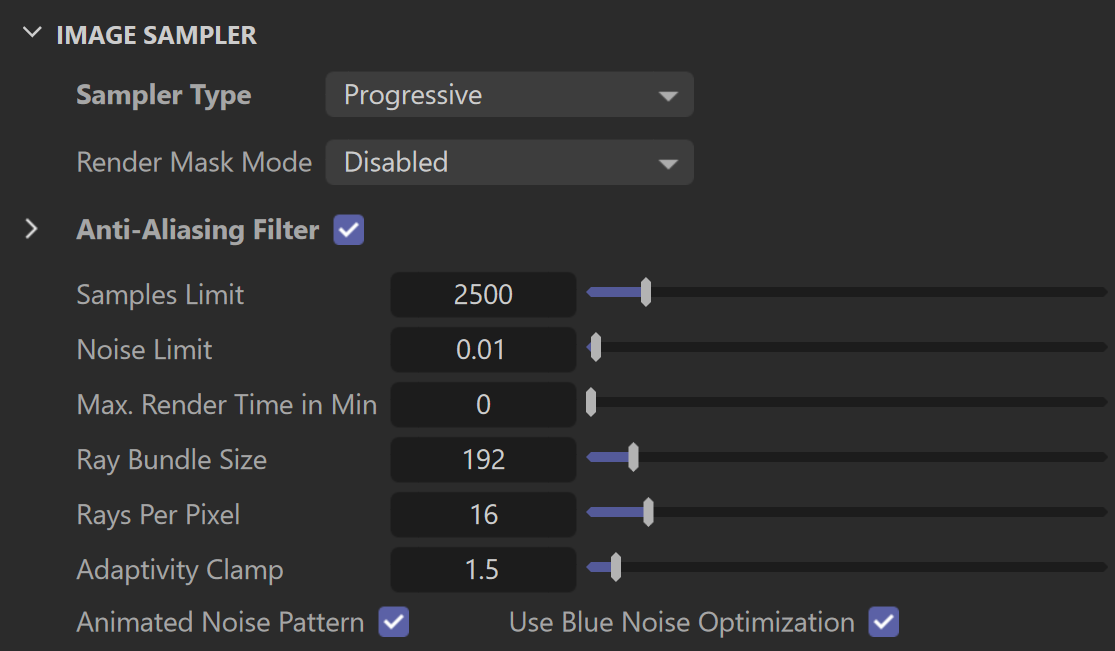
Sampler Type – Specifies the image sampler type. Specific parameters for the selected type appear at the bottom of this rollout.
Progressive – Progressively samples the entire image. See the Progressive Sampler for additional parameters.
Bucket – Takes a variable number of samples per pixel depending on the difference in the intensity of the pixels. See the Bucket Sampler section for additional parameters.
Render Mask Mode – Enables the render mask feature. The render mask allows you to define which pixels of the image are calculated. The rest of the pixels are left intact. This feature works best with the Bucket image sampler. The following types are available:
Disabled – The render mask is not used.
Texture – A texture map is used for the render mask. Black values in the map define pixels which are not rendered. Pixels with any other values are rendered.
Objects – Renders only objects specified in a list.
Object IDs – Renders only objects with specified Object IDs.
Active Selection – Renders only the selected object or objects.
Render Mask Texture – Specifies a texture map according to which V-Ray creates a render mask. This option is available when Render Mask Mode is set to Texture.
Render Mask Objects – A list that specifies which objects to be rendered. Objects part of a hierarchy can also be included. The object's children can be excluded by disabling the hierarchy icon (![]() ). This option is available when Render Mask Mode is set to Objects.
). This option is available when Render Mask Mode is set to Objects.
Render Mask Object Ids – A list that specifies which objects to be rendered based on their object ID. You can use ranges (e.g. 1-5) and separate the numbers with commas (e.g. 1,2,3). This option is available when Render Mask Mode is set to Object IDs.
Render Mask Clear – This option disables the currently selected render mask and clears the render buffer.
Anti-Aliasing Filter – Enables AA filtering in the image. When disabled, V-Ray applies an internal 1x1 pixel box filter.
Filter Type – Specifies the filter type to be used for Anti-Aliasing. V-Ray supplies eight types of Anti-aliasing filters: Box, Area, Triangle, Lanczos, Sinc, CatmullRom, Gaussian and Cook Variable. Each has advantages and disadvantages, which make them useful for different tasks.
Size – Determines the size of the filter in pixels. Higher values yield blurrier results. To produce physically accurate results, the minimum value of this parameter is 1 and the maximum value is 20.
Workflow Example of Render Mask
See how to re-render selected objects only using the Render Mask options.
Using Objects mask mode:
- In the V-Ray section of the Render Settings, go to the Render Mask Mode. Select Object from the dropdown menu.
- Pick specific objects or hierarchies to re-render. You can pick from the Objects Manager or the viewport and they are automatically added to the list.
- Make the desired changes and re-render.
Using Object IDs mask mode:
- To assign an object ID to an object, select the object in the Objects Manager and go to Tags > V-Ray Tags > Object Properties. Alternatively, you can right-click on the object in the viewport and select New Tag > V-Ray Tag > Object Properties.
In the V-Ray section of the Render Settings, go to the Render Mask Mode. Select Object IDs from the dropdown menu.
- In the Render Mask Object Ids field enter the Object IDs of the geometries you want the mask to apply to. This field accepts individual numbers (1, 2, 3), as well as number sequences (1-3, 5-10) which apply the mask to all objects within the given sequence.
Progressive Sampler
The Progressive sampler renders the entire image progressively in passes.
The advantage of this sampler is that you can see an image very quickly, and then let it refine for as long as necessary as additional passes are being computed. This is contrast to the bucket-based image samplers, where the image is not complete until the final bucket is done.
A disadvantage is that more data needs to be kept in memory, especially when working with render elements. Also, when using distributed rendering, because of the continuous refinement, frequent communication between the client machine and the render servers is required, which may reduce the CPU utilization on the render servers. This effect can be controlled to some extent using the Ray bundle size parameter.
Avoid using the Progressive sampler with sharpening image filters (Catmull-Rom, Mitchell-Netravali) as this may slow down the rendering - additional image samples are required to resolve sharpening filters properly. In this case, V-Ray prints a warning in the V-Ray messages window.
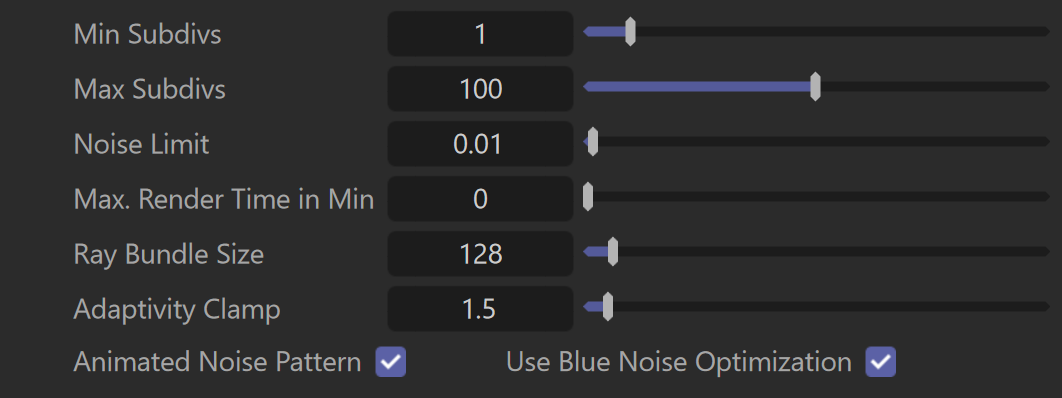
Min Subdivs – Controls the minimum number of samples that each pixel in the image receives. The actual number of the samples is the square of the subdivs.
Max Subdivs – Controls the maximum number of samples that each pixel in the image receives. The actual number of the samples is the square of the subdivs. If zero, the number of samples is not limited.
Noise Threshold – The desired noise level in the image. If this is 0.0, the entire image is sampled uniformly until either the Max. subdivs value is reached or the Max. Render time in Min limit is reached.
Max. Render Time in Min – The maximum render time in minutes. When this number of minutes is reached, the renderer stops. This is the render time for the whole frame; it includes any GI prepasses like light cache, irradiance map, etc. If this is 0.0, the render is not limited in time.
Ray Bundle Size – Useful for distributed rendering to control the size of the chunk of work that is handed to each machine. When using distributed rendering, higher values may help to utilize CPUs on the render servers better.
Adaptivity Clamp – Specifies an intensity limit for the adaptive sampler to avoid excessive sampling of overexposed areas. Lower values mean a lower limit and potentially noisy overexposed areas. Higher values produce more samples in overexposed areas.
Animated Noise Pattern – When enabled, the sampling pattern is the same from frame to frame in an animation. Since this may be undesirable in some cases, you can disable this option to make the sampling pattern change with time. Note that re-rendering the same frame produces the same result in both cases.
Use Blue Noise Optimization – When enabled, reorders the DMC samples in screen space to produce a more pleasing result for low sample counts.
V-Ray GPU Progressive Sampler
V-Ray GPU offers some different controls over the Progressive Image Sampler quality. Below are listed only the parameters that differ from the V-Ray ones.
Samples limit – Determines the maximum number of samples that each pixel in the image receives. V-Ray performs adaptive sampling on the image, trying to put more samples into areas that have more noise. If the Samples limit is set to 0, V-Ray renders with the default value of 2500.
Noise Limit – The desired noise level in the image. If this is 0.0, the entire image is sampled uniformly until either the Samples limit is reached or the Max. Render time is reached.
Max. render time in Min – The maximum render time in minutes. When this number of minutes is reached, the renderer stops. This is the render time for the whole frame; it includes any GI prepasses. If this is 0.0, the render is not limited in time.
Ray Bundle Size – Useful for distributed rendering to control the size of the chunk of work that is handed to each machine. When using distributed rendering, higher values may help to utilize CPUs on the render servers better.
Rays Per Pixel – The number of rays that are traced for each pixel during one image pass. The greater the value, the smoother the picture from the very beginning of the rendering with GI, but interactivity may be significantly diminished. Increasing this value also reduces the amount of data transferred from the render servers back to client machine.
Bucket Sampler
This sampler makes a variable number of samples per pixel based on the difference in intensity between the pixel and its neighbors.
This is the preferred sampler for images with lots of small details (like VRayFur, for example) and/or blurry effects (DOF, motion blur, glossy reflections, etc).
The diagram above shows visually the way V-Ray is placing samples when using the Bucket sampler. The black squares represent the pixels of the image, while the dots represent the individual samples. In the first pass V-Ray always places the minimum number of samples determined by the Min. subdivs parameter. Then the color of the samples is compared, and more are added where needed in the following passes.

Lock Subdivs – Sets a fixed number of samples taken for each pixel.
Min subdivs – Determines the initial (minimum) number of samples taken for each pixel. You rarely need to set this to more than 1, except if you have very thin lines that are not captured correctly, or fast moving objects if you use motion blur. The actual number of samples is the square of this number (e.g., 4 subdivs produce 16 samples per pixel).
Max subdivs – Determines the maximum number of samples for a pixel. The actual maximum number of samples is the square of this number (e.g., 4 subdivs produces a maximum of 16 samples). Note that V-Ray may take less than the maximum number of samples if the difference in intensity of the neighboring pixels is small enough.
Noise Limit – The threshold that is used to determine if a pixel needs more samples.
Adaptivity Clamp – Specifies an intensity limit for the samplers to avoid excessive sampling of overexposed areas. Lower values mean a lower limit and potentially noisy overexposed areas. Higher values produce more samples in overexposed areas.
Enable Firefly Removal – When enabled, removes isolated bright pixels distributed across sections of the image.
Firefly Removal Threshold – Above this threshold, firefly removal stops. Lower values are less aggressive at removing fireflies, while higher values are more effective but can start removing actual parts of the image, such as small bright highlights.
Animated Noise Pattern – When enabled, the sampling pattern is the same from frame to frame in an animation. Since this may be undesirable in some cases, you can disable this option to make the sampling pattern change with time. Note that re-rendering the same frame produces the same result in both cases.
Use Blue Noise Optimization – When enabled, reorders the DMC samples in screen space to produce a more pleasing result for low sample counts.

V-Ray GPU Bucket Image Sampler
V-Ray GPU offers some different controls over the Bucket Image Sampler quality. Below are listed only the parameters that differ from the V-Ray ones.
Samples Limit – Determines the maximum number of samples that each pixel in the image receives. V-Ray performs adaptive sampling on the image, trying to put more samples into areas that have more noise. If the Samples limit is set to 0, V-Ray renders with the default value of 2500.
Noise Limit – The noise threshold that is used to determine if a pixel needs more samples.
Ray Bundle Size – Useful for distributed rendering to control the size of the chunk of work that is handed to each machine. When using distributed rendering, higher values may help to utilize CPUs on the render servers better.
Rays Per Pixel – The number of rays that are traced for each pixel during one image pass. The greater the value, the smoother the picture from the very beginning of the rendering with GI, but interactivity may be significantly diminished. Increasing this value also reduces amount of data transferred from the render servers back to client machine.

