This tutorial explains how to use Maya's Color Management System with V-Ray.
Overview
The V-Ray VFB applies display corrections in the sRGB and gamma 2.2 color spaces.
From the Maya Color Management System, V-Ray supports the Raw, sRGB and ACEScg spaces, and the color spaces that begin with the prefix gamma.
Want to follow along but don’t have a license?
Tutorial Steps
Set up the Scene
- Set up a scene with an object that has a material with a JPG texture connected to it.
- Render the scene.
In the V-Ray VFB, enable and disable the Display colors in sRGB space button and note the difference in the appearance of the rendering. This shows how the texture looks with and without gamma correction. When Display colors in sRGB space is off, the image appears with no gamma correction, and looks as expected. When this option is on, the image is gamma-corrected in the display, and the image looks washed out.

Display colors in sRGB space disabled
Display colors in sRGB space enabled
When Display colors in sRGB space is on, the texture is being double gamma-corrected. The texture is already gamma-corrected when it is applied, and then it is again gamma-corrected as part of the rendering process.
Essentially, the texture does not conform to a linear workflow as it is already gamma-corrected when it comes into the shading node. In a linear workflow, all textures brought into the scene are not gamma corrected (that is, they have a gamma of 1.0), and the only gamma correction is on the final rendering. In order to conform to Linear Workflow, you would need to undo (reverse) the gamma correction on the texture as it comes into the scene.
Use Maya Color Management
To automatically apply reverse gamma correction to all textures coming into the scene without the use of Gamma Correct nodes, we will enable Maya Color Management (available in Maya 2016 and later versions).
- Choose Windows menu > Settings/Preferences > Preferences.
- In the Preferences window, choose the Color Management option.
- Turn on the Enable Color Management option.
- In the Input Color Space Rules section, set the Input Color Space to sRGB. Other Input Color Space types are supported by V-Ray. Although for the purposes of this tutorial sRGB is to be used.
This will automatically reverse the gamma correction before the textures are used in the scene, using the reverse sRGB value of 0.454. If all your textures are JPG or PNG, this will result in true Linear Workflow.

Enable Color Management Example
The example below shows the difference between Enable Color Management being turned on and off. This uses a more complex scene where the use of Gamma correct nodes would be time consuming and turning on the Linear workflow option in the VRay tab of the Render Settings would give an incorrect result.

Enable Color Management turned off. Notice how the textures look washed out.
Enable Color Management turned on. Now all textures shade and light correctly
Color Management Rules Example
V-Ray for Maya fully supports Maya's native Input Color Space Rules. These are set in Maya's Color Management preferences and a rule will determine the input color space that is assigned to begin with based on the file extension, the file naming conventions that are used, or both of these together.

In such a way a rule can be set up so that any texture that contains the text "Diffuse" in its name would then be set to sRGB color space.
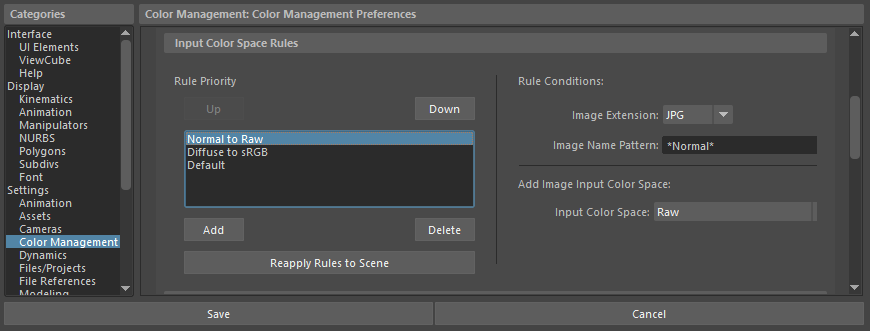
Another rule could be set so that if the file name contains the text "Normal" then its Input Color Space would be set to Raw.
By using rules in the above example, we make sure that all diffuse JPG files will be corrected for the sRGB color space, while our normal textures coming in from JPG files will not be corrected so that normal bump mapping is correctly rendered.
Notes
- Color Management is available in Maya 2016 and later versions
- Currently, V-Ray for Maya only supports the following Input Color Space types
- Raw
- sRGB
- gamma 1.8 Rec 709
- gamma 2.2 Rec 709
- gamma 2.4 Rec 709 (video)
- V-Ray will display a warning when a texture with color corrections is being used as a normal map. This applies to any V-Ray material that can use normal maps in a bump map slot.
- The Gamma Correct nodes within Maya can be used to inverse correct the textures to conform to a linear workflow. This can be done by inserting a Gamma Correct node with a value of 0.454 in between the File Node and the shader. To properly work within a linear workflow, you would have to add a Gamma Correction node to every texture you use in your scene. Alternatively, Texture input gamma attributes can be added to the File node as Extra V-Ray attributes, but again this would yeild adding those attributes to all File nodes in your scene. This can quickly become unwieldy, and is unnecessary when there are easier options available. which is why it is recommended to use the Color Management system available in Maya 2016 and later versions.

The older legacy approach to a linear workflow for when a scene had a lot of texture nodes was to turn on Linear workflow in the VRay tab of the Render Settings. However, this is no longer recommended as that particular workflow will only gamma correct textures in the Diffuse and will fail to gamma correct textures connected to other channels of materials within a scene. Also if a shading network is long or complex, textures can get skipped. For these reasons this method is no longer recommended.