This page offers a tutorial on how to create wax material with V-Ray for Maya.
Overview
In this tutorial we explore some of the properties of V-Ray Fast SSS2 and use it to create a candle wax material. The lesson guides you through the process of setting up a scene that emphasizes the sub-surface scattering properties of your assets and helps you understand the use of colors, phase function and scatter radius.
Want to follow along but don’t have a license?
Prerequisites
When using a V-Ray FastSSS2 material, bear in mind that its appearance depends heavily on the size of the objects and the direction and intensity of light to be scattered.
So let’s start by checking the working units of our scene and the size of the objects. If they are not modeled to scale, later we are able to set a scale value, so the material properties can compensate for that. In the example scene the candles have a diameter of 5 and range in height from 7 to 10. The scene units are centimeters, which makes it a 1:1 scale.
In addition to the correct scale, it also helps if your models have thinner parts or other small details that show the variation in color and translucency characteristic for a sub-surface scattering material.
In this example there is sunlight coming from the windows behind the candles and warm light coming from their flames. Good strong lighting, especially coming from behind the objects helps the wax material exhibit its sub-surface scattering properties. Additionally there is light coming from the left, that is intended to accentuate the candles' shape and their glossiness.
General Settings
We start building our shader by assigning a V-Ray Fast SSS2 material to the candles and naming it Wax_MtlVRayFastSSS2Mtl1. Then set its Scale based on what we defined in the setup (e.g. for a 1:10 model, set a 0.1 scale). For our scene we leave it at 1.
Adjust the Index of refraction using an IOR table. We set it to 1.44. Feel free to experiment with different IOR values for different types of wax once you determine the other material attributes.
Next, make the material show strong forward scattering (somewhat like in the Cream or Potato presets) by changing its Phase function to 0.800.
Choose the Color mode and Single scatter based on the type of material you want to achieve: Sub-surface color and scatter radius in combination with Single Scatter modes: Simple or Raytraced (Solid) for relatively opaque materials like beeswax or paraffin, or Scatter coefficient and fog color with Raytraced (Refractive) for refractive materials like gel wax. The wax we are creating is opaque and with limited sub-surface scattering effect, so we use Color mode: Sub-surface color and scatter radius in combination with the faster Single scatter: Simple.
For more accurate results you can use Raytraced (Solid), but in our scene the approximation renders almost the same and saves time.

Here is how the test render looks like.

Adding Color
VRayFastSSS2 material uses a number of color attributes to represent sub-surface scattering materials with complex color properties:
A Diffuse color for the outmost (non-scattering) parts. Activate, if necessary, by increasing the Diffuse Amount above 0. It can be used to simulate dust, paint or other surface layer;
A Sub-surface color for the immediate underlying layer. It acts as outer and often predominant color if the Diffuse is not activated;
A Scatter Color that is filtered through the Sub-Surface Color and defines the inside layer, visible in thinner, well-lit parts of the geometry and also on the border between the illuminated and shaded regions;
An Overall Color that acts as a filter for all of the above. Can be used to apply a common texture.
V-Ray Fast SSS2 material blends between those colors depending on the other material properties, e.g. Phase function. That means that changing them might leаd to the need to adjust the colors again. For example, brighter scatter color causes the material to scatter more light and appear translucent, so you might want to decrease the scatter radius.
Keeping that in mind, let’s add a Sub-surface color. Choose a pale yellow with a tint of orange (e.g. RGB 227, 154, 60). That gives us the overall color, but notice how parts of the candles still appear gray.
To fix that, continue with the addition of a Scatter Color. Begin with one similar to the Sub-surface color and then tweak both if necessary. We settle for dull orange (RGB 197, 56, 10).
Scattering Depth
Adding colors gives us a nice warm look, but the material doesn’t seem to scatter enough light and the Scatter color isn’t showing as much as we want it to. One way to fix that would be to brighten the lights in the scene - check out the candle, located just in front of the well-lit back window. That way the material receives and respectively scatters more light, but other parts of the scene might become overexposed.
Let’s increase the Scatter radius value instead. The larger scatter radius gives us a deeper scattering effect with more rubbery looking material and less distinct surface details. Beware not to increase the Scatter radius too much or use the wrong Scale, otherwise the thinnest parts of the geometry become tinted in opposing colors or blown out. For this scene and candles model we choose a value of 3.3 cm.

Here is how the test render looks like.

Scatter GI
To further enhance the scattering effect, we can enable the Scatter GI option1. That increases the render time, but give us more accurate colors.

Here is how the test render with enabled Scatter GI option looks like.

Specular Layer
Let’s continue with the specular properties of the material. Wax shows a lot of specular reflections, so we use the default values for Specular color - white and Specular amount - 1.0.
Depending on the finish of our candles, the Specular glossiness might differ a lot. If we were making rough handmade candles, we would choose smaller values, e.g. 0.3 or 0.4. For glossier look, let’s increase the Specular glossiness to 0.65.

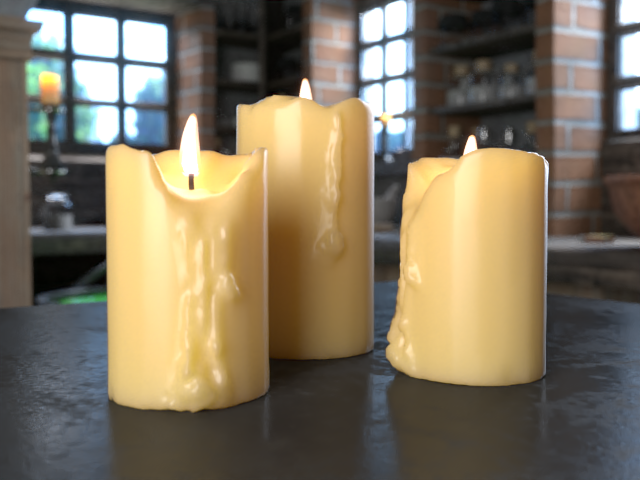
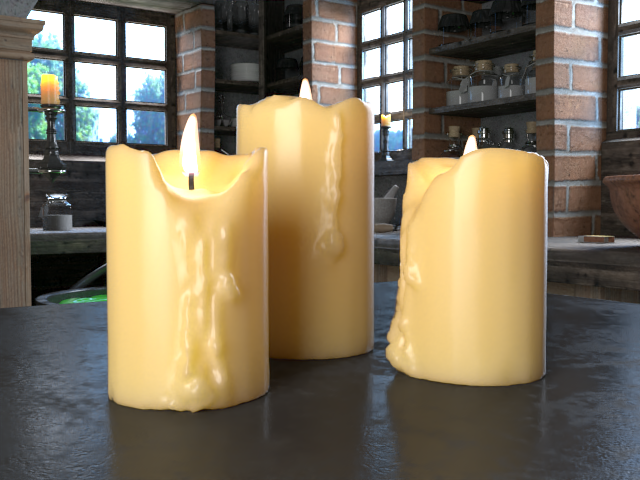
Specular Glossiness
The specular glossiness of the image on the left is set to 0.4, whereas the specular glossiness of the image on the right is set to 0.65.

Final Touches
Finally, you can choose to add a Bloom/Glare Lens effect to introduce some interesting light effects on the windows and candle flames.