This page shows a tutorial on using a Mudbox texture for displacement in V-Ray.
Overview
This tutorial shows how to export a vector displacement map from Autodesk Mudbox and then use it with V-Ray for Maya.
The object is first prepared in Mudbox and a low poly mesh is exported for use in Maya. A vector displacement map is exported as well, which is then used as a displacement texture map.
Then, in Maya we show the steps of setting the vector displacement map and prepare the object for render with V-Ray.
Want to follow along but don’t have a license?

Preparing the Object in Mudbox
There are a few things to keep in mind when painting your object in Mudbox:
– Make sure that the object has UV coordinates;
– Make sure that you have as few UV seams as possible (best if there are no UV seams);
To the right is an example of an object sculpted in Mudbox:

Exporting the Base Object from Mudbox
Go to the 0-level resolution of the object, select it and export it to an .obj file from File > Export Selection...
This way you will have the base mesh to import later in Maya.

Exporting the Vector Displacement Map from Mudbox
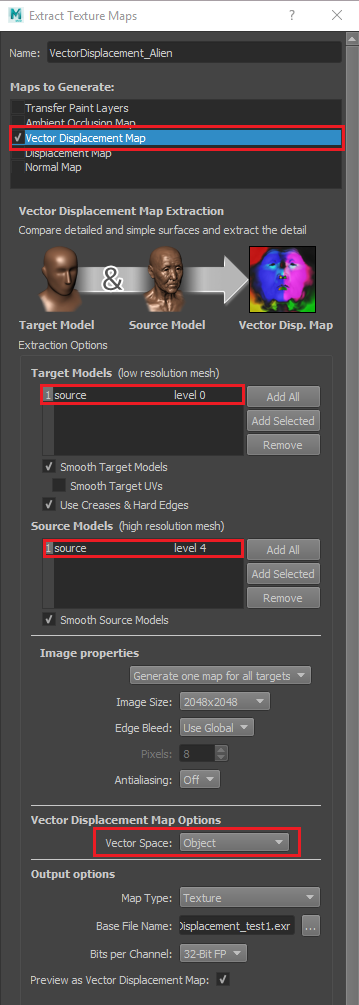
Go to UVs & Maps > Extract Texture Maps > New operation... and in the following dialog select Vector Displacement Map.
For Target Models select the 0-level resolution of the object. For Source Models select the resolution that you want to bake (typically the highest resolution) - in this case, level 4.
Here, we enable the Smooth Target Models and Use Creases & Hard Edges options and disable the Smooth Target UVs. Whether to choose these options depends on the model you are exporting. With this particular model, we want to keep the hard edges in order to keep the "edgy" look at the alien's neck.
Similar to that, we enable the Smooth Source Models option, which affects the polygonal faces of the highest res mesh (level 4) .
Set the desired resolution of the displacement map. A resolution of 2048x2048 works in our case.
Set the Vector Space to Object.
It is important to choose the same Vector Space mode as the Displacement type used later in V-Ray for Maya.
Select an OpenEXR file as the output vector displacement file, that is the Base File Name. V-Ray supports 32-bit maps, so it is better to keep the Bits per Channel to 32-Bit FP.
Once ready with all the settings, press the Extract button to create the vector displacement map.
Here is how the extracted map looks like:

Prepare the Object for Render in Maya
In Maya, import the .obj file with the 0-level resolution mesh for your object (File > Import...).
With the object selected, navigate to the V-Ray shelf and assign a VRay Displacement node.
While at the VRay Displacement node, navigate to the Attribute Editor > Attributes > V-Ray and choose Displacement Control and Subdivision and Displacement Quality (optional) extra attributes.
Then, choose a File texture as a Displacement mat.

In the Image Name of the File texture, load the exported vector map.

Now let's prepare the V-Ray displacement for render - navigate to the vrayDisplacement node in the Attribute Editor.
Go to Displacement control panel and make sure to select the same Displacement type as in the exported .exr (that is the Vector Space mode in Mudbox). Here, we set it to Vector displacement (object).
Enable the Keep Continuity option and make sure to disable the Filter texture one.
Set the Displacement bounds to Explicit.
Here you can also control the Displacement Amount.

Once you set the Displacement bounds to Explicit, select the Min value.
Set the Color Space to RGB 0 to 1. Then set the R, B and G to a value of -1.000.
This allows V-Ray to consider negative values for render from the map, otherwise they will be clipped.

Optionally, you can go to the Subdivision and displacement quality group of attributes to control the quality of the displacement result.
The default Edge length is set to 4.000. You can lower this value, which increases the render quality, but is on the expense of render time. You can also tweak the Max subdivs to reach the desired subdivision of the mesh.
This short example shows the difference between the base low poly mesh (Displacement is disabled) and the displacement details (Displacement enabled) during render time. For this model, we set the Edge Length to 2.
