This page provides an advanced production workflow for rendering with V-Ray Environment Fog.
Introduction
In this advanced workflow tutorial we are going to be covering V-Ray environment fog for basic volumetric rendering.
To follow this tutorial, you will need to have the V-Ray for Nuke plugin installed. This tutorial is a companion to go along with the Advanced Production Workflow video posted on our YouTube channel.
This tutorial is made using V-Ray for Nuke v3.0
Tutorial Assets
To download the files used in this tutorial, please click on the button below.

Tutorial Steps
1) Setting up VRayEnvironmentFog
The scene that you'll be starting with has a ball and a basic VrayLightRect. We'll be creating a basic god ray using the ball as a hold-out vs the LightRect, and demonstrate techniques to speed up your workflow using expressions and python scripts.
First we'll create a VRayEnvironmentFog from the V-Ray dropdown menu.

Connect it to a scene node in our tree.

The first thing you'll notice is that the volumetric fog appears to be a plane.

To fix this we'll have to look at the Fog Height, Fog Distance, and Fog Density.
Bear in mind that Height and Distance values inversely effect the fog density. You'll have to fine tune these parameters with each change.

First we'll raise the Fog Height value to 2500 so that the fog fills up frame.

The image has gone black because our camera and our objects are inside of the VRayEnvFog and density is very very thick.
If we change out Fog Distance to 1250 the density will decrease but the scene is still quite black.
We'll need to lower the Fog Density value to 0.5 so we can see our object and the light casting through.

2) LightRect directionality
The effect of the god ray can be pronounced by changing the Directionality parameter value of the LightRect. To illustrate this we'll change the value to 0.6.


You'll notice that the noise has been increased as the light is now less evenly distributed. However, the god ray effect is much clearer.
3) Reducing noise
What we have now is a very noisy image. There are two primary parameters that we can use to clean up the noise. First of all we can go ahead and increase the subdivisions parameter in the VRayEnvironmentFog node to 32 which will eliminate much majority of the noise.

To decrease the noise near the light we can also increase the Subdivisions in the VRayLightRect to 64.

A general rule of thumb when reducing noise in VRayEnvironmentFog is if the noise is surrounding the light source than the Lights Subdivisions go up, but if the noise is far from a light source than the subdivisions of the environment fog should go up.
4) $gui Expression
We now have a good clean render that takes a fair amount of time to complete. We'll want to create a good workflow to be able to make quick adjustments and still get the clean output when we render. There's two ways to go about this.
The first option is to create an expression in the subdivision parameters to use a preview value when working in Nuke and our production value when rendering.

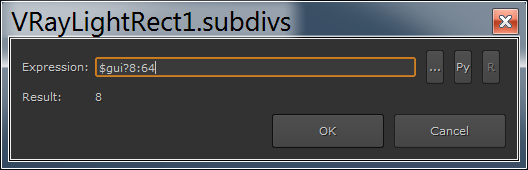
$gui?8:64
The $gui? expression allows you to pick a value to observe in your viewport as you work. Here we'll use 8 subdivisions. When you hit render it will automatically use our production value we found of 64 subdivisions.
With this technique is that you'll have to apply the expression to every node.
5) Post Translate Script
Your second option is to use the Post Translate Script function in the VRayRender node's python tab. This calls any functions to do any global overrides you want to do to V-Ray.
![]()
We'll use this function which calls the DMC multiplier.
from vray.utils import *

mult = findByType("SettingsDMCSampler")
print mult[0]

mult[0].set("subdivs_mult", 0.01)
mult[0].set("div_shade_subdivs", 1)
This script, internally inside V-Ray, multiplies all the subdivisions of the materials by 0.01. This will automatically decrease the subdivisions multipliers while you work.
![]()

Because this is a global modifier you can even use it to increase the subdivisions by an equal factor by setting it to 2 to double the value globally.


When using the post translate script you will need to adjust the subdivisions multiplier to production settings before you render.
In this tutorial, we have covered how to set up a V-Ray Environment Volume and optimizing our workflow for quick previews while still attaining detailed renders.