This page provides details on the V-Ray for Unreal Render Settings.
Overview
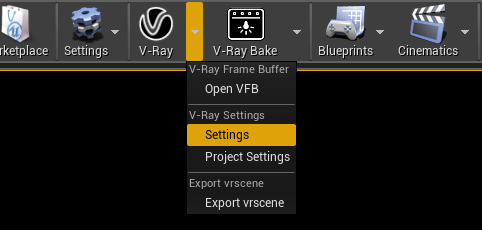
UI Paths
The V-Ray Settings tab is accessible through the drop down menu on the right side of the V-Ray Render button.
||Toolbar|| > V-Ray Settings dropdown > Settings
Common
Interactive – Toggles between interactive and production rendering. Features such as Light cache and on-demand mipmapping are not supported in interactive mode. When Interactive is disabled an .exr and .png file (when Enable Viewport rendering is enabled) will be saved in <Project_Path> Saved\VRayOutput\Rendered when the rendering is complete.
Lock Render Camera/View – When enabled, locks the render camera from Render from Camera/View.
Render from Camera/View – Specifies the view to render from when the V-Ray render button is clicked.
Viewport Renderer Settings
Enable Viewport rendering – Toggles the render to be outputed in Unreal's viewport or in the VFB. Unreal's tone mapper post process effects and post process materials will be applied to the rendered image in the viewport.
Min samples per pixel – Minimum number of path per pixels to be reached before displaying the current render output.
Min renders pass –Minimum number of passes to be reached before displaying the current render output.
Max update time – maximum period of time before the current render output is displayed. This may be used to force image update if the number of samples or number of renders pass takes too long to get up to a predefined threshold.
Resolution – Sets the output resolution for rendering.
Presets: 640 x 480 (4:3); SD 540 (16:9); HD 720 (16:9); FullHD 1080 (16:9); QuadHD 1440 (16:9); UltraHD 4k (16:9); 1k Square (1:1); 2k Square (1:1); 3k Square (1:1); 4k Square (1:1); A4 150dpi; A3 150dpi; Custom
If Enable Viewport rendering is checked the active viewport resolution will override the Resolution values. When Track Active Render View is enabled the resolution preset will automatically switch to Custom and the Width and Height values will be adjusted according to the active view.
Track Active Render View - When checked, tracks the current render view (perspective viewport or locked camera actor) and automatically update the Resolution and aspect ratio to match.
Locked Aspect Ratio – When enabled, locks the Height value and scales it proportionally according to the Width and the Aspect Ratio values.

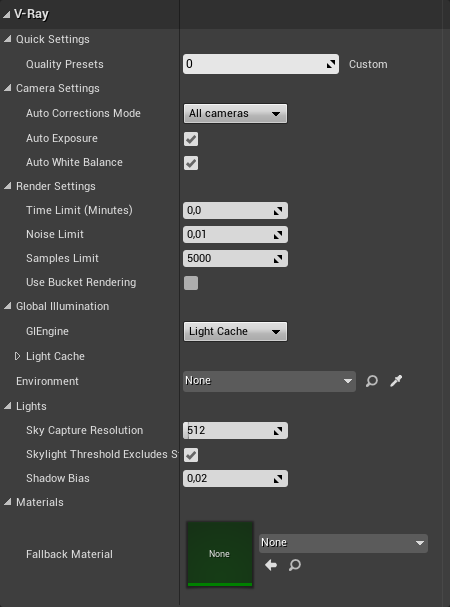
V-Ray
Quick Settings
Quality Presets – A slider for a set of presets. When changing the preset from the drop-down menu, the values of the overall settings also change.
0 - Custom – User setup
1 - Draft – Progressive Image Sampler; Sample Limit - 500; Noise threshold - 0.3; Light Cache subdivs - 300; Retrace - 2; Denoiser - NVidia AI Denoiser; Rays Per Pixel - 1; Undersampling - 4.
2 - Fast – Progressive Image Sampler; Sample Limit - 1000; Noise threshold - 0.1; Light Cache subdivs - 500; Retrace - 3; Denoiser - NVidia AI Denoiser; Rays Per Pixel - 1; Undersampling - 3.
3 - Balanced – Progressive Image Sampler; Sample Limit - 2000; Noise threshold - 0.01; Light Cache subdivs - 1200; Retrace - 4; Denoiser - None; Rays Per Pixel - 4; Undersampling - 1.
4 - Pretty – Progressive Image Sampler; Sample Limit - 5000; Noise threshold - 0.005; Light Cache subdivs - 2000; Retrace - 8; Denoiser - None; Rays Per Pixel - 16; Undersampling - 0.
5 - Ultra – Progressive Image Sampler; Sample Limit - 5000; Noise threshold - 0.001; Light Cache subdivs - 3000; Retrace - 8; Denoiser - None; Rays Per Pixel - 16; Undersampling - 0.
Camera Settings
Auto Correction Mode – Specifies which camera to use the automatic exposure and white balance setting.
All cameras - Auto correction will be applied to all cameras in the scene.
Cameras without exposure only - Auto correction will be applied to all Unreal cameras (Camera and CineCamera) and only VRayPhysicalCamera actors in the scene with Enable Exposure disabled.
Auto Exposure – Automatically determines an appropriate exposure value for the render. It requires Light Cache to be set as a GI engine and Interactive turned off.
Auto White Balance – Automatically determines a suitable white balance value for the image. It requires Light Cache to be set as a GI engine and Interactive turned off.
Auto Exposure and Auto White Balance work only when using Light Cache as GI solution.
Auto White Balance and Auto Exposure options do not take into account pixels with zero Alpha value.
Render Settings
Time Limit (Minutes) – Specifies the maximum time (in minutes) for refining the image.
Noise Limit – A threshold that determines when to stop refining a pixel. Higher values allow more noise in the image, but the render is faster. Lower values help reduce the noise, but take more time to render. A value of 0.0 traces the entire image unconditionally.
Samples Limit – Specifies the maximum number of samples per pixel for refining the image. V-Ray performs adaptive sampling on the image, trying to put more samples into areas with more noise.
Use Bucket Rendering – Sets the image sampler to use "Buckets" for rendering which takes a variable number of samples per pixel depending on the difference in the intensity of the pixels.
Bucket rendering can be used only when Interactive and Enable Viewport Rendering are disabled.
Global Illumination
GI Engine – Specifies the type of secondary engine. Note that Brute force is always used as a primary engine.
None – Disables calculations of GI. Only direct illumination will be calculated.
Brute Force
GI Depth – The number of bounces for indirect illumination.
Light Cache
Subdivs – Determines how many paths are traced from the camera. The actual number of paths is the square of the subdivs (the default 500 subdivs mean that 250,000 paths will be traced from the camera).
Sample Size – Controls the size of the individual light cache samples.
Retrace – Enables retracing of GI near corners. This helps prevent light leaks and flickering. The value specifies the extent to which GI near corners is retraced instead of being read from the light cache. A value of 0.0 disables retracing. A value of 2.0 is good for still images. Higher values will result in more rays traces at render time.
Environment – Specifies which VRaySettingsEnvironment blueprint will be used at render time for environment overrides. Blueprint must be picked from the level and assigned using either the drop-down list or the picker.
Lights
Sky Capture Resolution – Specifies the resolution at which the scene will be captured and used for lighting by Unreal's Sky light if one is present in the level.
Skylight Threshold Excludes Static Meshes – When enabled static mesh actors will not be captured and will not contribute to the lighting of the scene. Only Sky Atmosphere, Atmospheric fog and Exponential Height fog will be captured.
Shadow Bias – A global parameter for lights. This value moves the shadow toward or away from the shadow-casting object (or objects). Higher values move the shadow toward the object(s) while lower values move it away. If this value is too extreme, shadows can "leak" through places they shouldn't or "detach" from an object.
Materials
Fallback Material – Specifies what material to be used at render time for unsupported materials. If the slot is empty actors that have unsupported materials assigned will be rendered transparent.
Fallback Material only works with VRayMaterialInstances, VRayMtl, VRayPBRMtl, VRayCarpaintUberMtl.
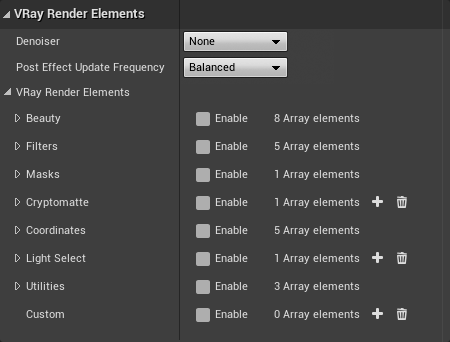
VRay Render Elements
Denoiser – A render element that progressively applies a denoising operation to the image. The denoising operation detects areas where noise is present and smooths them out. Will be applied to the image if Enable Viewport Rendering is On.
None – No render element will be generated.
V-Ray Denoiser – V-Ray's denoising algorithm.
NVIDIA AI Denoiser – V-Ray's integration of NVIDIA's AI-based denoising algorithm. The NVIDIA AI denoiser requires an NVIDIA GPU to work.![]() NEW - Intel Open Image Denoise – V-Ray's integration of Intel Open Image Denoise. The Intel Open Image Denoise works with your CPU device and does not use hardware acceleration.
NEW - Intel Open Image Denoise – V-Ray's integration of Intel Open Image Denoise. The Intel Open Image Denoise works with your CPU device and does not use hardware acceleration.
Post Effect Update Frequency –Sets the frequency at which the denoiser and/or lens effects will be calculated and applied.
As often as possible; Moderate; Balanced; On render completed
VRay Render Elements
Beauty – The Beauty Render Elements are the primary render elements that form V-Ray's pre-composited final render Beauty (RGB_Color).
Filters – Shows only the selected set of channels in the render, disregarding any backgrounds, textures, etc.
Masks – Provides a variety of Render Elements to be used as masks in the compositing process.
Cryptomatte –Uses the Cryptomatte convention by Psypop to encode mattes (Node Names, Material names) into multichannel OpenEXRs.
Coordinates – The Coordinates Render Elements are based on the scene geometry, but serve different purposes.
Light Select – Stores direct lighting information from user-selected lights in the scene; can also be limited to the light's raw, diffuse, or specular contribution.
Utilities –This group of Render Elements can be used for troubleshooting purposes.
Custom – You can add any of the render channels again from the Custom option, allowing you to use it with a different setup.
For more information on the V-Ray Render Elements, see the Render Elements page.
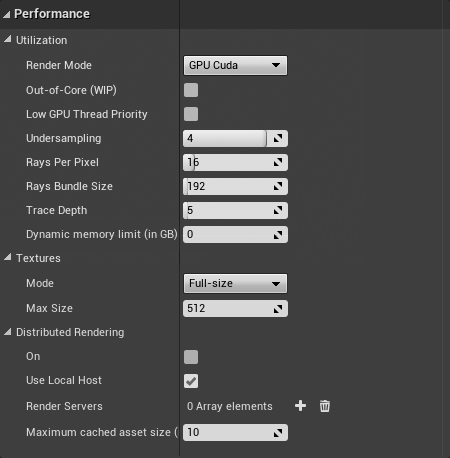
Performance
Utilization
Render Mode –Sets the renderer mode used by the GPU engine to perform the raytracing calculations.
GPU Cuda – Enables the renderer to utilize the CUDA cores of NVidia graphic cards.
RTX [Experimental] – Enables the renderer to utilize the CUDA cores and the additional compute capabilities of RTX graphic cards.
![]() NEW - Out-of-Core(WIP) – Enables an experimental feature for evicting vrmeshes (V-Ray Proxies) out of the GPU memory when they are no longer needed in order to make room for other resources, once the renderer has run out of memory. This option is available only for CUDA and is not yet supported for RTX.
NEW - Out-of-Core(WIP) – Enables an experimental feature for evicting vrmeshes (V-Ray Proxies) out of the GPU memory when they are no longer needed in order to make room for other resources, once the renderer has run out of memory. This option is available only for CUDA and is not yet supported for RTX.
Low GPU Thread Priority – When enabled, V-Ray will try to lessen the load on GPUs working on displaying graphics to the monitor(s). This frees more resources to complete other processes and tasks for the OS. This is done by internally using a lower value for Ray bundle size for those GPUs with attached displays (Rays per pixel is still the same for all GPUs). This can affect the overall performance, and the render speed might be reduced. It is recommended to utilize a separate GPU for the display, if possible.
Undersampling – When enabled, IPR starts rendering the image at a lower resolution in order to speed up the initial preview. Later the image is rendered at its final resolution. The higher the value the lower resolution will be the initial preview.
Rays Per Pixel – The number of rays that are traced for each pixel during one image pass. The greater the value, the smoother the picture from the very beginning of the rendering with GI, but interactivity might be significantly diminished. Increasing this value also reduces the amount of data transferred from the render servers back to the client machine.
Rays Bundle Size – Controls the number of rays that are sent to the V-Ray render servers for processing. When using distributed rendering, smaller sizes cause more frequent client-server communication with smaller network packets, thus decreasing the speed of the renderer but increasing the interactivity. Conversely, larger values increase the render speed, but decrease interactivity. Note that this number is not the exact amount of rays, but is proportional to it. It is not recommended to increase this value beyond 512.
Trace Depth – The maximum number of bounces that will be computed for reflections and refractions. The individual material reflection/refraction depth settings are still considered, as long as they don't exceed the value specified here.
Dynamic Memory Limit (in GB)– The total RAM limit in GB for the dynamic raycasters which store dynamic geometry like displacement, VRayProxy objects. Note that the memory pool is shared between the different rendering threads. Therefore, if geometry needs to be unloaded and loaded too often, the threads must wait for each other and the rendering performance suffers. This is set to 0 by default to remove any limit, allowing V-Ray to work with as much memory as needed.
Textures
Mode – Determines how texture resolution and size will be handled to help optimize memory usage.
Full-size – Textures are loaded at their original size.
Resize – Adjusts the size of high-resolution textures to a smaller resolution in order to optimize render performance.
On-demand – Instead of loading all the texture files at their default resolution (original or resized), V-Ray will load the textures as needed and will automatically create mip-map tiles for them (regardless of their texture type). As a result, the GPU memory consumption could be decreased; textures that are not visible will not be loaded, and textures that are further away from the camera will be loaded with lower resolution.
Max Size – When the Mode parameter is set to Resize, this value specifies the resolution to which textures will be resized.
Distributed Rendering
On – Enables or disables distributed rendering for V-Ray for Unreal. Use the Render Servers list to specify the machines that will be used for distributed rendering.
Use Local Host – When enabled, the client machine (the one from which the user initiates the DR render) will also take part in the rendering calculations. If disabled, the client machine only organizes the DR process, sends rendering tasks to the render servers and displays the final result.
Render Servers – Specifies the render servers. Click the + button to manually add a server by entering its IP address or network name followed by its port number (default is 20207) (e.g. 127.0.0.1:20207)
Maximum cached asset size (in GB) – This option specifies the maximum assets cache size limit in GB on the render machines. When the size of the assets on a render server exceeds the specified amount, least recently used assets are automatically deleted at the end of each render until the folder size is less than the limit.
We recommend to enable Low GPU Thread Priority if you have only one graphics card. The render time will increase but you will have a more responsive viewport.