This page provides information on V-Ray Decal for SketchUp.
Overview
V-Ray Decal provides an easy way to project one material on top of another regardless of the target UV set. The projected material is placed in an adjustable V-Ray Decal projection box that controls its size, placement and projection limits in the Viewport. Multiple V-Ray Decals can be stacked on top of each other and their overlapping is controlled by the parameters in each V-Ray Decal object. The V-Ray Decal’s effect is visible at render time only.
The material is projected only on the surfaces within the projection box.
UI Paths
||V-Ray Asset Editor|| > Geometries (right-click) > Decal
||V-Ray Asset Editor|| > Create Asset (left-click) > Geometries > Decal

||V-Ray Objects Toolbar|| > Decal

SketchUp Menus Ribbon
||Extensions|| > V-Ray > Objects > Decal
Creating V-Ray Decal
Select the Decal button from the V-Ray toolbar or form the Extensions menu > V-Ray > V-Ray objects > Decal and create the Decal projection box on top of the surface you wish to project on.
After creating the Decal projection box, go to the parameters section in the Asset Editor and assign a material that will be projected on the surface.
You can adjust the size of the projection window from the decal parameters section.
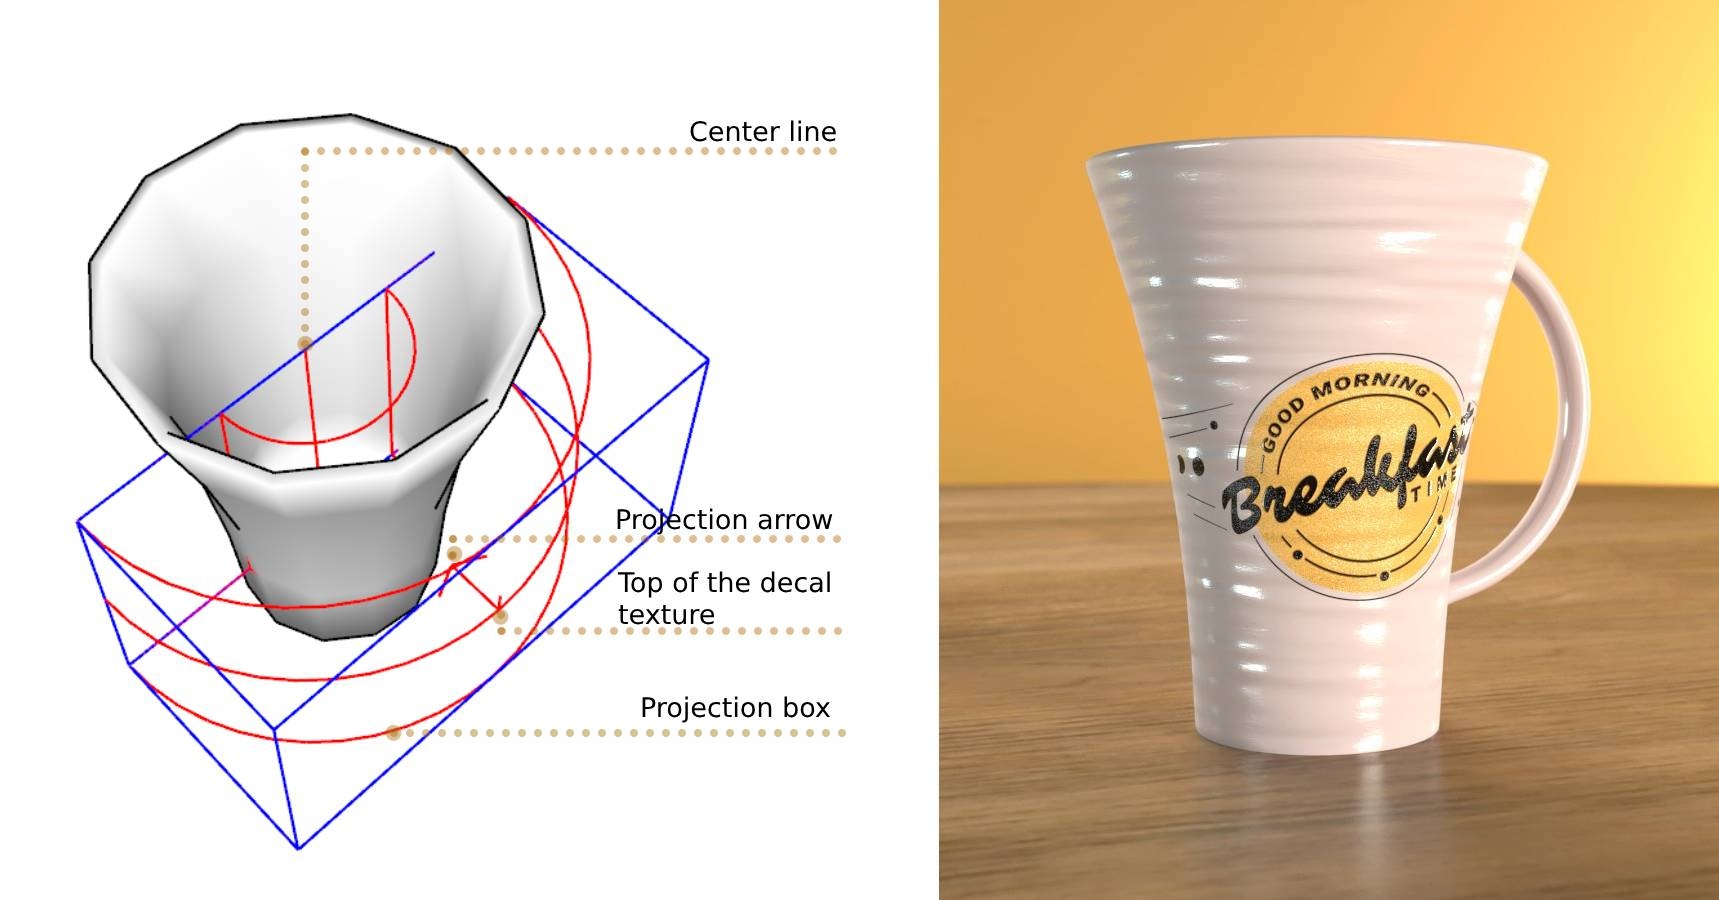
The line next to the arrow points to the top of the decal texture.
The Decals created in the Asset Editor are not imported directly in the scene. They are added in the SketchUp components tray/window and should be added in the scene manually (similar to most Decals imported from Cosmos).
This image shows how the orientation arrow works with the Decal projection box. The line marked in red has different positions corresponding with the Decal orientation.

Parameters
Decal – Enables or disables the V-Ray Decal.
Material – Specifies the Decal material. The input slot ( ) of the Material has a context menu available when you right-click on it. You can also drag-and-drop materials into the slot.

Mask – A texture that controls the transparency of the projected material. Switch it on and off using the checkbox.
Z Order – Sets the order of the selected Decal in case multiple overlapping Decals are present.

Example: Material Preview

Width – Defines the width of the projection box.
Length – Defines the length of the projection box.
Auto Resize – Resizes the V-Ray Decal to match the aspect ratio of the first eligible Bitmap texture (image file) in the assigned material, decal mask or external file, depending on one of the selected options. Note that procedural textures are not included.
Fit to Mask – Matches the aspect ratio of the Decal mask texture.
Fit to Material – Matches the aspect ratio of the first eligible Bitmap texture (image file) in the assigned material. (See the list of eligible Bitmap's priority below.)
Fit to Bitmap – Matches the aspect ratio of an external image file.
When the option "Fit to Material" is selected for each material, the first eligible Bitmap will be selected from top to bottom from the eligible Bitmap's priority listed below:
Depth – Defines the Depth of the projection box.
Projection Offset (%) – Specifies the offset of the Decal projection in percentages. Positive values move the projection towards the target while negative ones move it away. This parameter can take values below 0 and above 100.
Bend Angle – Specifies the bend angle of the Decal projection pane in degrees. Its shape can curve between a flat surface at 0 degrees and an enclosed cylinder at 360. Note that increasing Decal width when its bend angle is 360 degrees may alter the Decal width when its bend angle is 360 degrees may alter the Decal widget's center.

Example: Bend Angle
Normal Angle – Limits the Decal effect based on the angle between the target surface and the projection direction.
Fade Out – Enables fade out angle.
Fade Out Angle – Specifies the minimum value of the fade out angle, e.g. if set to 44, the minimum fade out angle value is 44 and the maximum fade out angle value is up to 180. By default it equals the Normal Angle value.
Backside Projection – Enables projection on the back face. Note that if the result from the Decal is not immediately visible, further adjusting of the Normal Angle parameter is needed.
Decal Bump Only – When enabled the Decal material's bump effect overrides any bump effect of the surfaces it is projected onto.
Surface Bump – Controls what amount of bump effect from the surface material is blended with the Decal projection bump effect.


Example: Decal Bump Only


Displacement
Displacement – Enables a displacement effect applied through the V-Ray Decal. It adds detail to the surfaces affected by the Decal projection by modifying their topology based on a texture map. The Decal displacement quality is predefined, so displacement amount higher than the default one can lead to unwanted effect. Adjustments to the quality are only manually set by applying V-Ray Displacement on the object(s) affected by the Decal projection. The Decal displacement effect then individually adopts the quality parameters of each object's Decal. This allows a single Decal to project varying displacement effects on multiple objects.
Map – Controls the surface detail produced by the displacement effect via a texture map. If no texture is used, the displacement effects each surface under the decal projection.
Amount Multiplier – Multiplies the displacement effect. Higher values produce a greater displacement effect. Negative values currently inverted the displacement map.
Blend Displacement – Blends the Decal Displacement effect with any displacement from objects affected by the Decal projection. Keeping this option disabled forces Decal displacement to override any other displacement effects.
The V-Ray Decal Displacement is not shown when a 2D Displacement is applied to an object. The Normal (3D) Displacement can not be mixed with 2D Displacement.

Notes
- The Width, Length and Depth parameters are measured in inches.