Versions Compared

Key

  • This line was added.
  • This line was removed.
  • Formatting was changed.

This page provides information about the Anima UI. 


Introduction to the UI

...

Section
Column
width50%

Chaos Anima has an easy-to-learn and clean interface that is designed to guide you through the process of creating complex animations in record time.

To do this, it separates the creation process into two modes:

Draw Mode

...

– Provides sophisticated tools to place characters in the scene, including creating paths or areas, placing seated characters, animating escalators, or controlling where people stay using socialization areas and traffic lights.

Edit Mode

...

Provides tools to manage the library, fine-tune the pose of the actors, import new ones, or motion clips, organize content, create color variations, and much more.

Each mode has a set of dedicated panels that allow you to focus on the task at hand, and you can easily switch between them using the mode selector in the upper left corner

...

.

But before we go into more detail and start working with

...

Anima, we recommend taking a few minutes to get used to the application’s user interface, so let’s start at the beginning.

Column
width5%


Column
width45%
Image Added


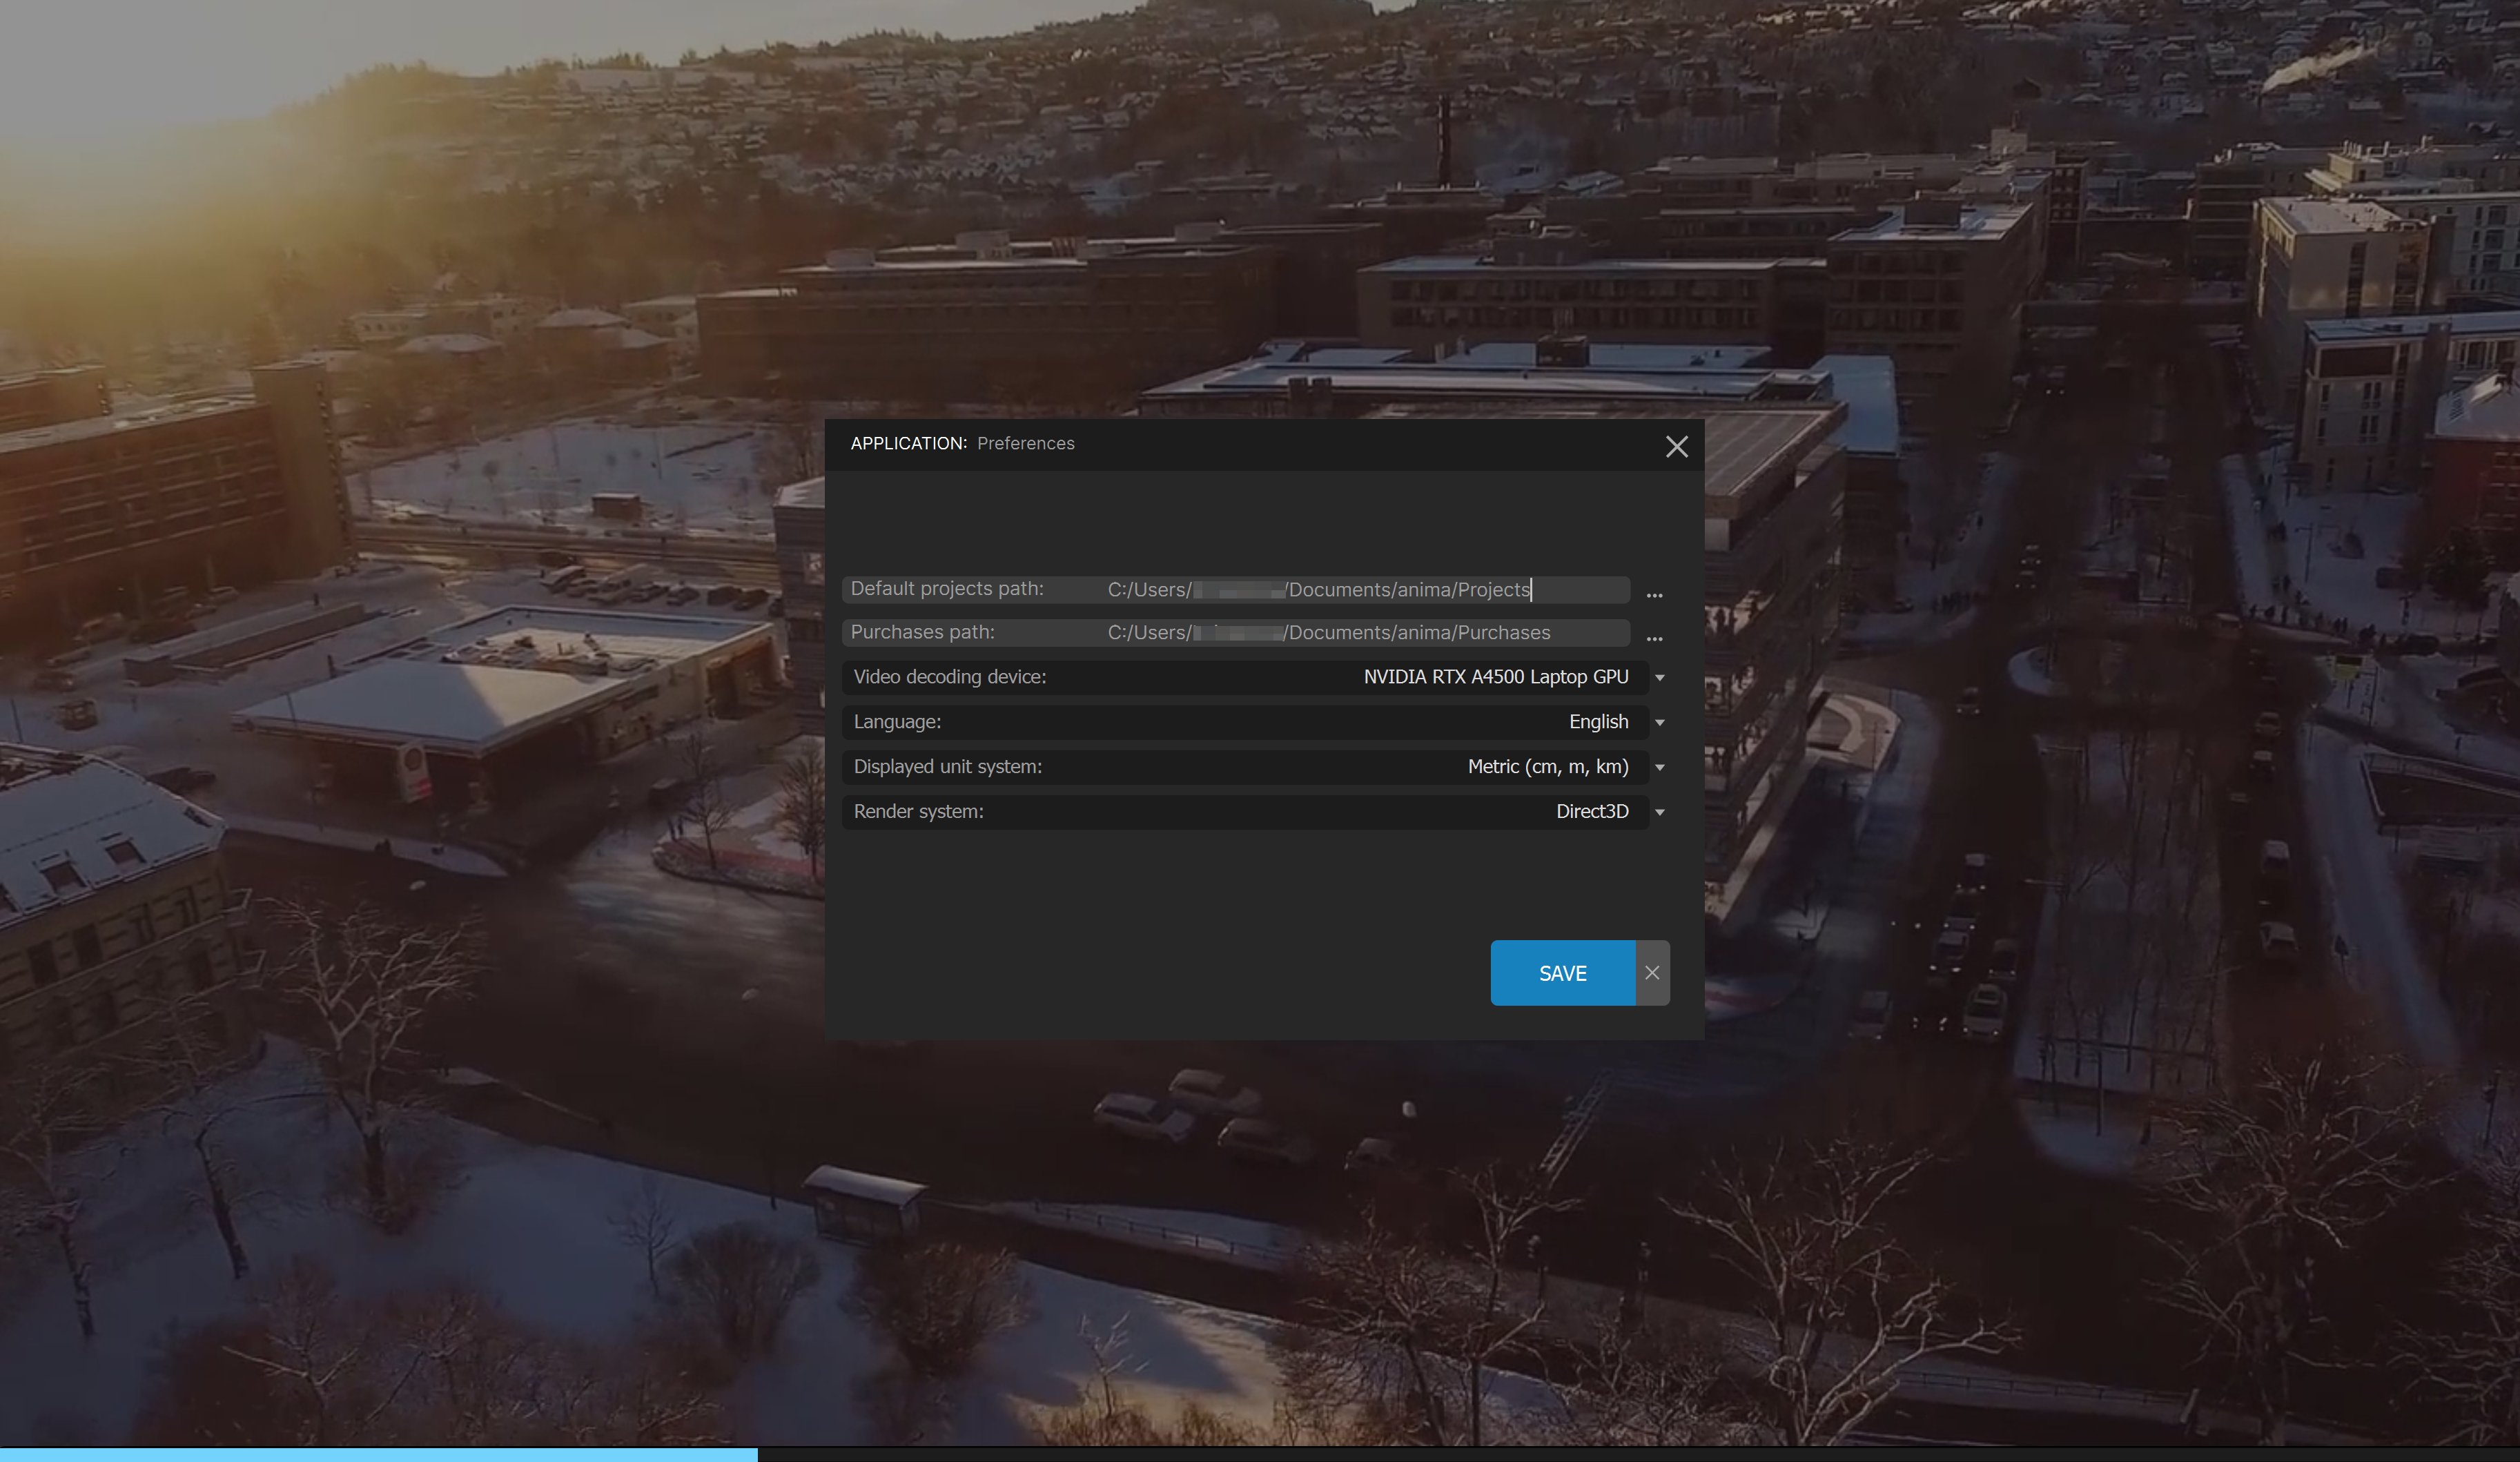
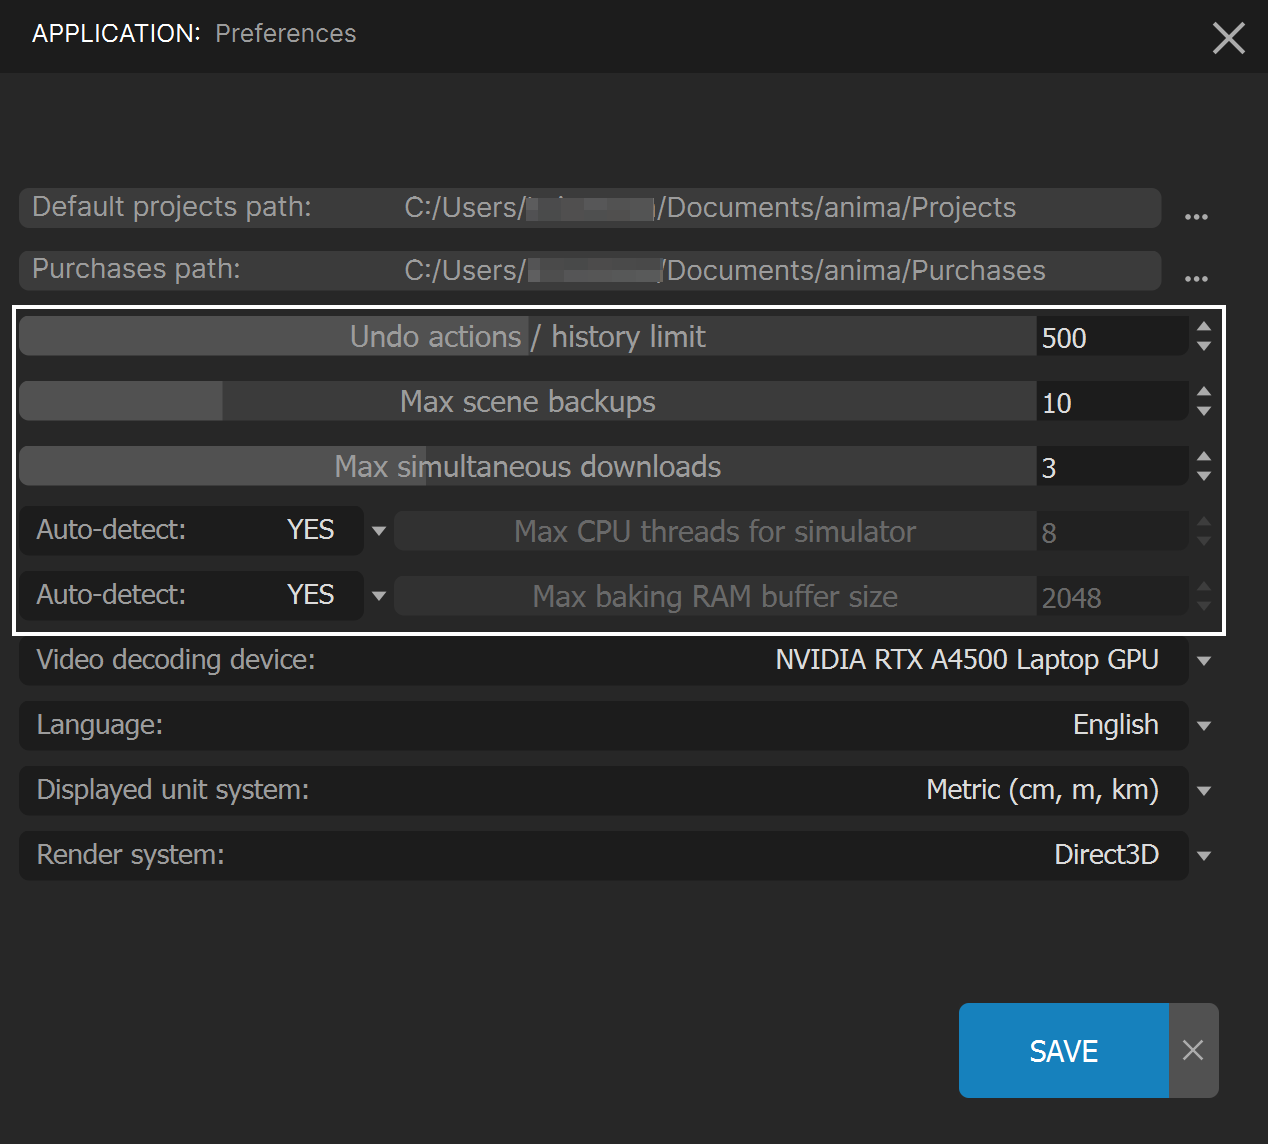
First boot: Preferences

...

Section
Column
width40%

When Anima is started for the first time, the first window shown right after the splash screen is a reduced version of

...

the Preferences

...

dialog

...

.

In

...

Image Removed

...

that first boot preferences dialog, you can define the following options:

...

circle
Fancy Bullets
type

Default projects path

: This

–  This is the path where the projects you create will be stored by default. You will be able to define a different one in

the Create New Project dialog

the Create New Project dialog too, but the path you set here will be used as

the root

the root path of your

projects by

projects by default.

Purchases path

:

This is the path where all the


downloaded models


from

anima®

Anima will be placed.

Video decoding device

Defines the device that will be


decoding the video streams


of the 4D actors. The options will be


CPU


or any of the


GPUs supporting NVDEC


that you may have installed in your system. (It might happen that some of your GPUs do not have hardware decoding capabilities yet. If that happens,

anima®

Anima will detect it automatically and fall back to using the CPU as the decoding device.)

Language

:

Sets the language of the interface. Currently, only


English


and


Spanish


are supported.

Displayed unit system

:

Sets the displayed units (Metric


or


Imperial).

Render system

:

Sets the Graphic Drivers used by the 3D viewport (OpenGL


or


Direct3D). If

anima®

Anima shows an error right on start and closes, it is a good idea to try switching

this setting to the alternative one.

this setting to the alternative one.

Column
width5%


Column
width55%
Image Added


...


Section
Column
width50%

In a normal situation, this dialog should be shown only once, the first time you start Anima on the machine. However, you can also force it to appear again by using the “Anima Safe Mode” shortcut icon available in the Windows Start menu:

Column
width5%


Column
width45%

Image Added


...


Section
Column
width50%

All these settings can be changed anytime

...

from the

...

 Preferences dialog

...

available in Anima Menu > Edit > Preferences.

Column
width5%


Column
width45%
Image Added


...


Section
Column
width50%

...

Which will show the following dialog with a few extra options

...

Image Removed

circle
Fancy Bullets
type

.

Undo actions | history limit

:

Sets the maximum number of actions that can be undone.

Max scene backups

:

Sets the maximum number of scene backups that will be kept (learn more about this in the Scenes article).

Max simultaneous downloads

: Sets

– Sets the number of actors that can be downloaded simultaneously. The maximum is 6, but you can choose a lower number if you want (learn more about how to download models from the library in the Installing Actors article).

Max CPU threads for simulator

:

Configures the number of CPU threads dedicated to calculating the simulation. In most cases, the default Auto setting provides optimum results, but you can disable this and define the number of threads manually.

Max baking RAM buffer size

:

Configures the amount of RAM used for baking animations before saving them to disk. Again,

 the

the default Auto setting provides optimum results in most cases, but you can disable this and define the RAM manually.

UI Text Box
typenote

If you don’t understand the need for some of those settings, don’t worry and bare with us,  keep reading and you will understand them all soon.

When all the options are defined, click the SAVE button to continue.

Column
width5%

...


Column
width45%
Image Added

The Welcome Screen

...

Section
Column
width50%

After the

...

initial boot, the first dialog that

...

appears when

...

Anima is launched is the

...

Welcome Screen

...

.


This window gives instant access to most of the things you will probably want to do when you start working.

In the center of the window (

...

RECENT), you will find a brief list of the 

...

recently modified projects on your machine,

...

with the most recent at the top of the list.

At the upper center

...

, you can see a preview of the last scene that was saved from that project.  Above the preview, there are 4 shortcuts to quickly manage the projects: 

Create New (

...

Image Added), Browse (

...

Image Added), Open

...

and Close Window (

...

Image Added).

Below the recent projects, a list of the 

...

DEMO files is displayed

...

, which is handy if you want to check some of the examples provided

...

by the installer.

On the left side, a column with

...

five links is displayed to let you quickly access useful

...

Anima resources that are available online:

the 

...

Chaos Anima website (

...

Image Added), this

...

Anima documentation (

...

Image Added), the 

...

Chaos Anima Youtube channel (

...

Image Added) where you will find a lot of sample videos and tutorials, the Frequently Asked Questions

...

and direct contact to our

...

great Support Service

...

(

...

Image Added) where we will be happy to give you any assistance you may need

...

.

At the bottom center

...

, you can choose whether you want to see this Welcome Screen or not when

...

Anima is started. If you choose not to

...

show it automatically, you can always show it manually by going to

...

Anima Menu >

...

View > Welcome screen

...

.

Column
width5%


Column
width50%
Image Added

...


...

This is the complete list of items described:

Create a New Project

...

Create a new project.

Browse Project

...

Opens the browser to manually select the path of the project that you want to open (that is not in the recent projects list).

Open Selected Project

...

Opens the scene selected in the Project Scenes list.

Close Welcome Screen

...

Click to close the welcome screen.

Preview

...

Shows a preview of the scene selected in the Project Scenes list. These are generated by Anima automatically

...

.

Recent Projects

...

Lists the 5 most recently used projects.

Demo Scenes

...

Open any of those scenes to see sample files that

...

show Anima‘s key features.

View Website

...

Click here to open the 

...

Chaos website.

Open Documentation

...

Click here to go to the

...

Anima online documentation.

View Video Tutorials

...

Click here to access

...

Anima tutorials.

FAQ

...

Click here to see frequently asked questions about

...

Anima.

Contact Support

...

If you have a question that’s not answered in our documentation, in the tutorials or in our Facebook User Group, click this button to contact our 

...

Support service and open a ticket.

Open at Startup

...

Choose whether you want the welcome screen to appear when

...

Anima starts.


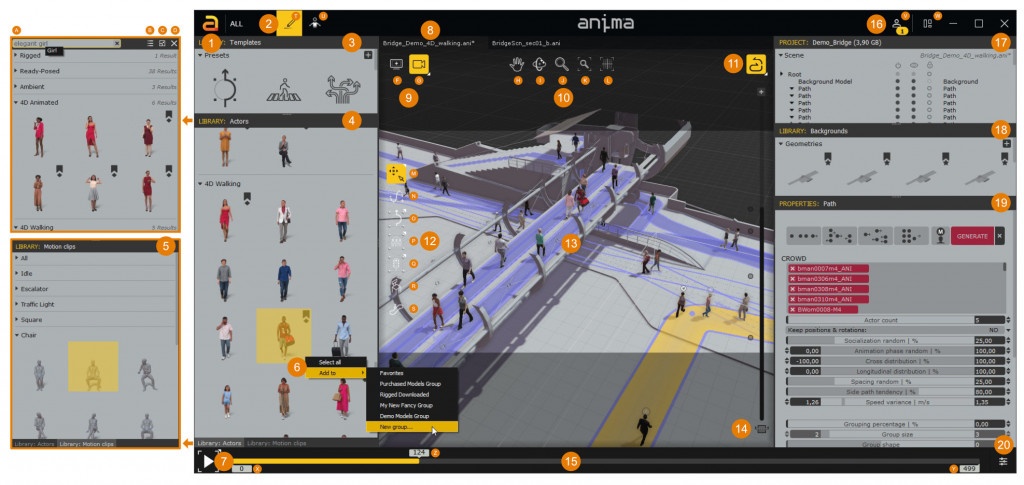
The Draw Mode Interface

...

Section
Column
width50%

The place to design, organize, and simulate your animations is

...

the Anima Draw mode.

This mode is arranged into logical panels to help you focus on different aspects of your work, such as

...

selecting actors, drawing paths and areas, synchronizing the scene with your 3D app with 

...

Aliveapplying motion clips, editing the properties of the nodes,  or managing their hierarchy in the node tree.

Image Removed

Main Menu

...

This is the core of the application, where you get access to all the other submenus (

...

File, Scenes, Edit,

...

View, Help).

...

Right next to it, you can see

...

the license that is currently activated

...

on this machine: ALL, PROor LITE.

Mode

...

The mode switch is used to toggle the workspace between Draw [T] and Edit [U] modes.

Column
width5%


Column
width45%
Image Added


...


Section
Column
width50%

Templates Library

...

The Templates library contains system-wide and user-defined area presets. Drag these into the 3d Viewport to quickly populate scenes.

Column
width5%


Column
width45%
Image Added


...


Section
Column
width50%

Actors Library

...

Contains a list of all the actors available in the current project: the ones from the Purchases folder and

...

all the available actors online in the current user account.

Drag them over characters in the

...

3D Viewport

...

or into the Crowd field of the Properties panel to assign characters to paths, 4D pathsareas, or chairs.

The following options will appear when you hover the mouse

...

over the title of all the Library panels (Templates, Actors, Motion Clips, and Backgrounds) and also in the Project properties panel (except the thumbnail option):


Image Added

...


Filter search box

...

Thumbnail or List view toggle

...

Floating panel toggle

...

Hide panel ( use the Panel button [

...

Image Added] to show it again)

Column
width5%


Column
width45%
Image Added


...


Section
Column
width50%

...

Motion Clips Library

...

Contains a list of all the motion clips and categories available in the current project. Drag these onto the Motion Clip/Category property of an area to assign to all its characters. Assign it to individual characters by dragging to their Actor Clip properties

...

or directly over a specific actor in the 3d Viewport.

Column
width5%


Column
width45%
Image Added


...


Section
Column
width50%

Actor submenu

...

Right-click on any actor to access the library item sub-menu and organize them as you please.

Column
width5%


Column
width45%
Image Added


...


Playback controls

...

Use these controls to play back animations. There are

...

three playback modes: Simulate and play (showing the tool nodes), Simulate and play preview (hiding the tool nodes), and Generate Preview Video (

...

*.avi).


Image Added


...


Section
Column
width50%

Scene Tabs

...

Each opened scene

...

is displayed in a different tab. You can open multiple scenes from the same project at the same time.

Column
width5%


Column
width45%
Image Added


...


Section
Column
width50%

Display Buttons

...

Display Preferences. Use this button to

...

set up the viewport quality settings and preferred interaction preset (

...

Anima,

...

3dsMax,

...

Cinema 4D, Unreal

...

Engine, Maya,

...

or

...

Blender).

...

Camera Preview.

...

Choose between the

...

 cameras synchronized with Alive here.

Column
width5%


Column
width45%
Image Added


...


Section
Column
width50%

Viewport Navigation tools.

...

Let you control the viewport point of view by:

...


Orbit

...


...

Pan
Zoom
Zoom Extents
Top View

Column
width5%


Column
width45%
Image Added


...


Section
Column
width50%

Alive Synchronization button

...

Use this button to connect with the

...

Anima plugin and synchronize scenes, cameras, and backgrounds.

Column
width5%


Column

...

width45%
Image Added


...


Section
Column
width50%

Toolbar This toolbar contains all the tools needed to create or edit the scenes

...

.

...

Select and transform tool

...

Use this tool to select objects and actors from the viewport.

...

Path tools (For 4D walking and Rigged models)

...

Use

...

this tool to draw walkways (paths) over the collision backgrounds and make the models walk and run over them.

...

Avoid area tool

...

Use this tool to define obstacle areas that the actors must avoid.

...

Area Tool

...

Creates Area objects that provide a simple way to place groups of static actors.

...

Traffic light tool

...

Creates a special area that

...

lets you stop and/or start the actors.

...

Chair tool

...

Creates seated people individually or in groups.

...

Escalator tool

...

Lets you create fully animated escalators

...

and moving walkways.

Column
width5%


Column
width45%
Image Added


...


Section
Column
width50%

3D Viewport

...

Shows a real-time preview of your animation project and enables you to design, create, and edit areas as well as move actors, assign motion clips, import background models, and create your scenes.

Column
width5%


Column
width45%
Image Added


...


Section
Column
width50%

Clipping Tool

...

Drag up and down to reveal different levels of

...

height

...

for the background model. Or click the [+] icon to create more height shortcuts.

Column
width5%


Column
width45%


...


Timeline bar

...

Use this bar to set the current frame

...

or the animation range.


Image Added


...


Section
Column
width50%

User Account | Panels

...

...

Use the Account button to sign in/out of your user account and access your models and notifications.

...

Use the Panels button to show or hide the panels available in Draw mode (Actor library, Clip library, Background library, Template library, Project properties, and Node properties).

Column
width5%


Column
width45%
Image Added


...


Section
Column
width50%

Project node tree

...

This window shows a hierarchical view of all the areas and actors in your scene and allows for an at-a-glance understanding of the project. From here, you can create, select, and edit all the elements in the animation.

...

Column
width5%


Column
width45%
Image Added


...


Section
Column
width50%

Backgrounds Library Contains a list of all the backgrounds available for this project.

...

Column
width5%


Column
width45%
Image Added


...


Section
Column
width50%

Node Properties Shows the properties for the currently selected object. This panel is dynamic, and its contents will be different depending on the type of object selected.

Column
width5%


Column
width45%
Image Added


...


Section
Column
width50%

Playback settings

...

Adjust the frames, time, playback speed, fps, format

...

, and quality of the video.

Column
width5%


Column
width45%
Image Added


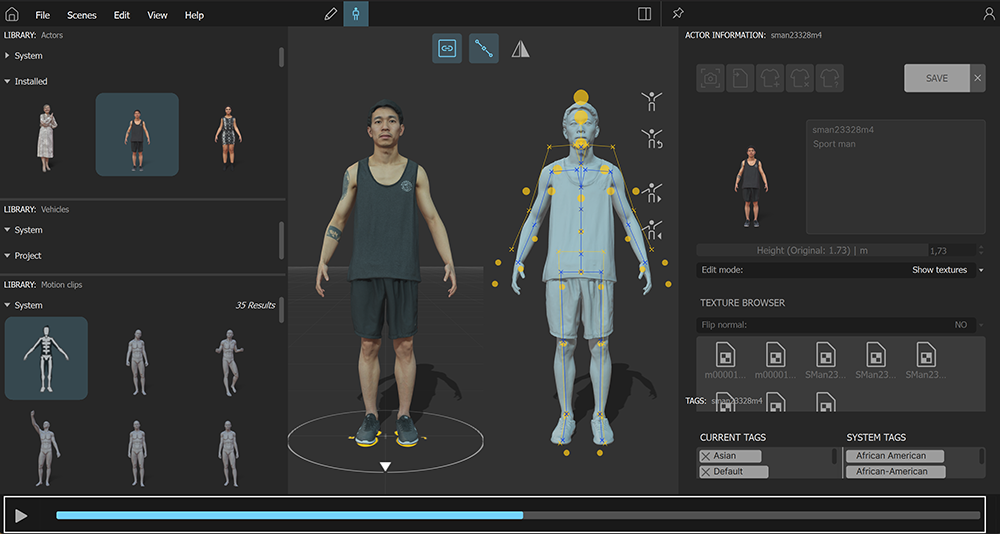
The Edit Mode Interface

...

The Edit Mode is the place to adjust, fine-tune and preview the animations of the actors. It is also the place to import new models and motion clips from external files in FBX format.

...

The base pose of the Motion Clips can also be adjusted, both in the ones provided in the default library and in the ones that you might have imported from third-party providers. It is also possible to edit the TAGs and Categories of the motion clips to organize them as you wish.Image Removed


Section
Column
width50%

Main Menu

This is the core of the application, where you get access to all the other submenus ((

...

File, Scenes, Edit,

...

View, Help).

Right next to it you can see the currently activated license on this machine: ALL, PROor LITE.


Mode

The mode switch is used to toggle the workspace between Draw and 

...

Edit modes.

Column
width5%


Column
width45%
Image Added


...


Section
Column
width50%

Actors Library

Contains a list of all the actors available in the current project and the ones from the library that have already been downloaded to the Purchases folder.

Please note that all the Library Panels have filters available in their titles (see number 4 from the previous Drawing Mode scheme)

...

Import Model

...

(Image Added) button. Use it to import new actors in FBX format.

Column
width5%


Column
width45%
Image Added


...


Section
Column
width50%

Motion Clips Library

Contains a list of all the motion clips and categories available in the current project and allows you to import additional motion clips.

...

Import Motion clip (Image Added) button. Use it to import new animations in FBX format

...

.

Column
width5%


Column
width45%
Image Added


...


Section
Column
width50%

Preview window

Displays a preview of the character selected in the Actors Library with the animation selected in the Motion Clips Library. Any edits to the pose or textures are updated live in this window.

Column
width5%


Column
width45%
Image Added


...


Section
Column
width50%

Pose Editor Window

Use the pose editor to adjust the Actor’s pose for the currently selected motion clip. This can be used to correct individual actors for each individual motion clip (with one clip selected) or apply changes to the main pose of this actor (with the Rest-Pose selected).

...

Joints Click hold and drag them to change the angle or the

...

position to adjust the pose.

...

Current Actor bones (yellow).

...

Reference Actor bones (blue).

Column
width5%


Column
width45%
Image Added


...


Section
Column
width50%

Preview Viewport Controls

...

Synchronize Viewports

...

Links the rotation of both viewports.

...

Reference Pose

...

Shows the

...

Anima default standard actor and both bone structures ( blue -> default actor & yellow -> current actor) to use it as a reference pose for adjustments. Only is available when the Rest-Pose is selected.

...

Symmetrical pose edit

...

Lets you edit the left and right sides of the actor at the same time.


Pose Edit Tools

Tools that can help you edit the pose

...

:

...

Pose Reset Image Added

...

Undo last saved pose Image Added

...

Copy pose Image Added

...

Paste pose Image Added

Column
width5%


Column
width45%
Image Added


...


Section
Column
width50%

User Account | Panels

...

...

Use the Account button to sign in/out of your user account and access your models and notifications.

...

Use the Panels button to show or hide the panels available in Draw mode (Actor library, Clip library, Actor Information, and Tags).

Column
width5%


Column
width45%
Image Added


...


Section
Column
width50%

Actor / Clip Information

Displays settings and components for the currently selected Actor or motion clip.

Column
width5%


Column
width45%
Image Added


...


Section
Column
width50%

Tags / Categories

Tags and categories help you to organize your resources and allow the system to match the correct motion clip to the characters.

Column
width5%


Column
width45%
Image Added


...


Playback

Plays the motion clip and the character selected.


Image Added


Customizing the Workspace

...

The anima® interface has been designed Anima interface is designed to be extremely flexible. All the panels can be freely moved around, detached, and docked again in a different position, to let you set up the window layout that better fits into your workflow.

...

Multimedia
namemanage_panels.mp4
width720
height398


To Show / Hide Panels

...

Section
Column
width50%

Click the Panel’s Icon from the right side of the title bar of the main

...

Anima window to manage the visibility of the panels.

The ones that are visible are highlighted in blue and have a

...

check on the left side of their name. Click on one of them to toggle its visibility

...

.


Panels can also be closed by directly clicking on the X button found in the right-hand corner.

...


Image Added

Column
width5%


Column
width45%
Image Added

...


To Re-arrange, Re-size, and Tear Off Panels

...

Section
Column
width50%
Fancy Bullets
typecircle
  • To resize a panel, drag their top or bottom. To resize the column or add/remove more thumbnail columns (in the libraries), drag the sides in and out.
  • To move a panel, click and drag on the title bar. Once in the Drag mode, the valid areas where the panel can be docked again will be highlighted in yellow as you hover your mouse over them. Drag in between panels to change the position, or drag on top of another panel to create a new Tab in a tabbed group.
  • Drag a panel to an empty part of the screen or click the
 detach button
  • detach button in the top right-hand corner to tear off a panel. This is ideal for users with multiple monitors as it allows them to place the panels on one monitor and keep the 3d viewport on another one.

...

Column
width5%


Column
width45%
Image Added

To Create Tabbed Panels

...

Section
Column
width50%

To combine a panel with another to form a tabbed dock, drag it by its title bar on to the target panel.

...

Column
width5%


Column
width45%
Image Added

...


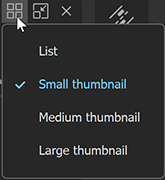
To Toggle Between Thumbnail and List Views

...

Click the Image Removed Image Added icon for thumbnails for lists and the Image Removed icon for thumbnails.more options, such as lists.

Image Added


To Reset the Workspace

...

Section
Column
width50%

To restore the layout to the previous settings, go to the Panel List and select Use last workspace.

To reset the layout to the system default go to the Panel List and select Use default workspace.

...

Column
width5%


Column
width45%
Image Added


Related Topics

...