Versions Compared

Key

  • This line was added.
  • This line was removed.
  • Formatting was changed.

...

Parameters

...

Section
Column
width50%

Expand – Opens a floating dialog that contains the selected rollout and automatically folds the command panel rollout.

? – Opens up the help documents for the Liquid Input.

Anchor
CachePath
CachePath
Preview & Render Cache Path | rendinput – This is the path to the cache sequence to shown in the preview and rendered. The default is $(same_as_output), meaning the preview and render would show the caches created by the simulation, reading them from the path specified in the Output rollout. Use the button to select the path or type it manually. Phoenix has some keywords that can be used for more flexibility:

Column
width5%


Column
width45%

Image RemovedImage Added


UI Expand
titleClick Here to expand additional $(VARIABLE) and Channel Mapping information

$(same_as_output) [nodeName] – The same path that is set in the Output rollout would be used for loading the preview and render caches. When a node name is specified, its output is passed to the current input.
$(simoutput) – A synonym for $(same_as_output).
$(dir) – The scene directory.
$(data_dir) – The default directory where cache files are written. By default this is $(dir), meaning that the cache files are written next to the scene file, but it can be overridden with a custom directory from the Phoenix Global Preferences.
$(scene) – The scene file name.
$(handle) – A unique number of the node.
$(nodename) – The name of the node.
$env(<variable_name>) – An environment variable. See Using Environment Variables.

# signs can be used to specify the cache frame number with at least as many digits as the pound signs. If the number of frame digits is less than the number of pound signs, the number is padded with zeroes to the left. For example:

Align
aligncenter
 Result
Frame Number#######
11010001
1010100010
1000100010001000

...

UI Text Box
typeinfo

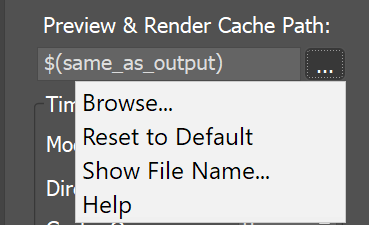
Clicking the "..." button will open a menu with the following options:


Section
Column
width5%


Column
width40%

Default

Column
width50%

Image Modified

With .f3d or .vdb cache loaded

Column
width5%


Browse – Opens a dialog for choosing one of several cache file types. Phoenix can import *.f3d and *.vdb files from other fluid simulator software products. See How to import and render simulations from FumeFX, Houdini and Maya.

  • Phoenix *.aur 
  • Field3D *.f3d
  • OpenVDB *.vdb
  • Krakatoa *.prt

Reset to Default – Resets the cache path to the default value of $(same_as_output).

Show File Name... – Evaluates the full disk path provided to the Simulation Cache Save Path parameter.

3rd Party Channel Mappings... – This option is available when a .f3d or .vdb cache is loaded. It launches the Channel Mappings dialog for mapping 3rd party cache channels. See the Channel Mappings section below for more information.

Help - Opens this Help page.

...

Section

Example: Timeline Origin


Section
Column
width40%
UI Text Box
typeinfo

The following example demonstrates how the Timeline Origin parameter can be used to specify which frame on the timeline is treated as the first frame when reading the Input Path cache files.

The files go from simulationFrame_000 to simulationFrame_030. When the Timeline Origin is set to 10, they are read as if they were saved as simulationFrame_010 to simulationFrame_040.

Column
width60%

...

Section

Example: Cache Origin and Play Speed


Section
Column
width40%
UI Text Box
typeinfo

The following example demonstrates how the Cache Origin and Play Speed can be used to offset and speed up the input cache files.

The files go from simulationFrame_000 to simulationFrame_030. When the Timeline Origin is set to 100, they are read as if they were saved as simulationFrame_100 to simulationFrame_130.

The Cache Origin is then used to specify which simulation Frame will be placed on Timeline Origin = 100. Because Cache Origin is set to 10, the whole sequence is shifted 10 frames back such that simulationFrame_000 is placed at frame 90. Thus, the sequence now goes from frame 90 to frame 120.

The Play Speed is then set to 2.0. Those thirty frames are now reduced to fifteen. The Cache Origin frame is treated as the middle point when shrinking the sequence.

Column
width60%

...

Section

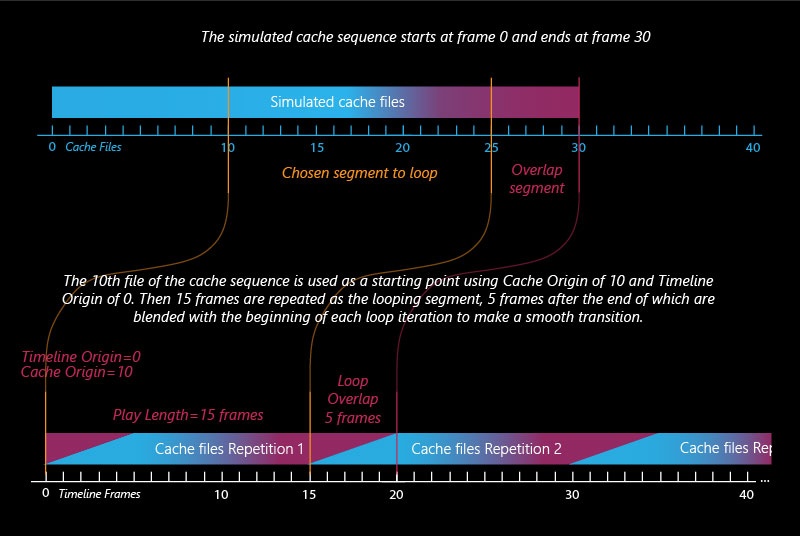
Example: Looping a Simulation


Section
Column
width40%
UI Text Box
typeinfo

The following example demonstrates how the Input rollout parameters can be used to loop a simulation.

The Timeline Origin parameter is set to 0 - this will be the first frame of the timeline which the Input Path files read into the scene by the Simulator will be placed on.

The Cache Origin is set to 10 so simulationFrame_010 will be read and placed at Timeline Origin = 0.

The Play Length is set to 15 so the sequence now repeats itself every 15 frames when played back (those are actually simulationFrame_010 to simulationFrame_025).

Finally, the Loop Overlap parameter is set to 5 to provide a few extra frames for blending the start and end of the loop together in a smooth transition.

Column
width60%

...

Section
Column
width50%

Channel | sm_ch – Controls which channel is affected by changes made to the settings below. The following channels can be smoothed:

Liquid
Smoke
RGB
Fuel
Velocity 

Smooth this channel | enablesmoothsmoke, enablesmoothtemp, enablesmoothuvw, enablesmoothfuel – If checked the channel will be filtered.

Threshold | smoothtemp.x, smoothsmoke.x,smoothuvw.x,smoothfuel.x –  If this value is 0, the entire grid will be smoothed evenly. The higher the threshold is raised, the less voxels will be affected and only the sharpest gradients will be smoothed. The highest value you could use here depends on the range of the values of the smoothed channel - for Liquid it's usually in the [0,1] range, while for Velocity it could go as high as several hundred. If you set this value too high, no voxels will be smoothed at all.

Similarity | smoothtemp.y, smoothsmoke.y,smoothuvw.y,smoothfuel.y –  Increasing this value will allow you to smooth only the finer small-scale noise without changing the areas of the fluid which are already smooth. Note that just like the Threshold option, this value also depends on the range of the selected channel. If you want to remove only some sharp fine disturbances from the simulation without blurring other areas, set the Threshold to 0, increase the Similarity to the highest values the selected channel can take and then start reducing it until the small-scale noise is removed, while the larger fluid shapes are retained. This option won't take effect if the Threshold parameter is raised to the maximum. 

Random Variation | smoothtemp.z, smoothsmoke.z,smoothuvw.z,smoothfuel.z – This parameter introduces noise of uniform scale in the channel before smoothing is applied. This can be useful if you want to give the fluid a more homogeneous pattern and this way it can also help hide grid artifacts. Note that just like the Threshold option, this value also depends on the range of the selected channel. You can use this option to only add noise to the channel without smoothing it - in order to do this, set both Threshold and Similarity to the highest values of the selected channel and this way they will not take effect.

Column
width5%


Column
width45%

...

Channels Mapping

...

Different applications use different channels and might have different names for them. When loading f3d/vdb files, Phoenix tries to automatically make the conversion to the supported channels. If a channel is not mapped by default, a channel can be manually set from the dropdown menu. It can be accessed from the Cache Path menu when a 3rd party cache is loaded (e.g. .f3d or .vdb files).

...