Versions Compared

Key

  • This line was added.
  • This line was removed.
  • Formatting was changed.

This page provides information about animated people in Chaos Anima.

Path Tools

...

Section
Column
width40%55%

One of anima®’s Anima’s greatest strengths is the ability to place animated people in any 3D environment very quickly and easily, and that’s largely thanks to thePath tools.

The Path provides  provides an easy-to-use and intuitive method to add moving actors to your 3D scenes. It works by defining a series of path points that the actors will follow, using advanced collision and avoidance simulation algorithms to create believable interactions. It gives you exceptional control to get the exact distribution of characters you need for your scene. Each actor can also be adjusted individually to fine-tune the distribution and help you get a perfect result.

UI Text Box
typenote

We recommend to check the sample demo scenes from the Welcome Screen to see examples of the features discussed in this section.

There are 2 different types of Path tools:

CROWD PATH: 

.

Crowd Path Creates a walkway powered by our new neural network animation engine for Rigged actors. A large number of people can be easily generated on them in a procedural way. Meant to be used at mid-long distances from the camera.

4D

PATH: 

Path – Creates a walkway that can be used by our new 4D walking actors. Each actor must be individually placed in it. Meant to be used at short-mid distances from the camera.

Both can be accessed directly from the left toolbar of the 3D viewport.

Column
width5%


Column
width55%
Multimedia
namechange_path_tool.mp4
width720
height398
40%

Image Added


Choosing the Right Path Type

...

Each type of path is meant to be used by a different type of actor (Rigged – 4D walking) to create a different density of people (low – high) for a different type of camera shot (short – long). So, depending on your needs, you should decide if you need to use one or the other before you start drawing it because both types of paths are fundamentally incompatible with each other and it is not possible to convert them after they are created.

We recommend using 4D PathsPaths to create actors that will be seen from a short-mid distance from the camera to  to take advantage of the amazing realism that the new 4D Digital Humans have made possible. The downside of using them is that they take a lot more resources than the Rigged actors. That is the reason why we force the user to place each one of them manually, to prevent potential problems that can be caused by a massive usage of them (poor real-time playback performance, high use of disk space and RAM, etc.).

Also, due to the technology behind the creation of the 4D models, their animation is fixed and cannot be modified. That means that it is technically impossible to combine these models with other crowd tools and make them stop to socialize or climbing stairs and escalators. Also, 4D paths are very sensitive to the slopes and steps of the terrain because it is just not possible to adapt them to none planar surfaces.

...

In short, the 4D Paths have one big advantage (state-of-the-art realism) but also the following significant functionality limitations compared to the Crowds Path:

...

.

  • Placed individually

...

  • vs

...

  • Generated in large numbers
  • Expensive Resources

...

  • vs

...

  • Highly optimized
  • Only planar surfaces

...

  • vs

...

  • Perfect adaptation to slopes and steps
  • Very little interaction

...

  • vs

...

  • Compatible with all the Crowd tools (socialization areas, stairs, escalators)


Common

...

Features (Crowd & 4D)

...


Section
Column
width40%55%

Both tools have the most basic and intuitive workflows in common, like the creation and and edition of the path points, segments, and the definition of their respective widths.

Let’s see in more detail the process behind those basic workflow procedures.

Column
width5%


name

Image Added

Column
width55%40%
Multimedia


Create

...

Create a New Path

...

Choose

...

the Path Tool

...

you need from the toolbar:

...

Image Added or

...

Image Added.

Click in the 3d viewport to define the starting point of the path.

Keep clicking to add additional points. Note that corners are curved automatically and will snap in 45-degree increments (this can be disabled in the Display Properties).

Right-click to finish drawing.


Extend or Refine an Existing Path

...

Section
Column
width40%55%

To add additional path segments to thestart, end, or or in-between points of an existing path:

Using the Select tool

Image Removed

Image Added, click on an existing path by clicking it in the 3d viewport or selecting it from the Project Properties

 panel.
Image Removed

 panel.

Column
width5%


Column
width40%
Image Added


...


Section
Column
width55%

Click or select any Path Point at the start,

 end, or interior

 end, or interior of the path.


Image Removed

Column
width5%


Column
width40%
Image Added


...


Section
Column
width55%

Select the Path Tool 

PathTool again and notice that it has a little + now: Image Removed (it appears only when a path is selected)

again Image Added.

Click in the 3d viewport to add new Path Points.

Image Removed

Right-click to finish drawing.


Image Removed

Column
width5%


Column
55%
width40%
Image Added


Adjust the Width of a Path

...

Section
Column
width55%

To adjust the width of the entire walkway, either:

Without

...

 anything selected, move the mouse pointer over the light blue edge of a path until the cursor changes to resize mode and the border is highlighted in yellow.

...

Click and drag to adjust the width of the path.

...

Or:

...

Column
width5%


Column
width40%
Image Added


...


Section
Column
width55%

As an alternative, select the path in the 3d viewport or from the Project Properties panel.

Go to the Node Properties 

...

panel and, in the Path Properties

...

 section, enter a new Width of all path points value or drag the slider bar.

...

Column
width5%


Column
width40%
Image Added


...


Section
Column
width55%

To adjust the width of individual path points to create a path with varying widths, either:

Select the path in the 3d viewport or from the Project Properties

...

 panel.

...

 With the path selected, move the mouse pointer over the light blue edge of a path section that you want to modify, until the cursor changes to resize mode and the border and segment are highlighted.

...

Click and drag to adjust the width of the path at the selected path point. Each segment can be adjusted individually to create paths of nearly any shape.

...

Column
width5%


Column
width40%
Image Added


...


Section
Column
width55%

Or to edit the width of Path Point

...

 from the Node Properties panel:

Select the walkway in the 3d viewport or from the Project Properties panel.

Click the path point you wish to resize.

Go to the Node Properties panel 

...

and, in the Path Properties section, select the path point that you want to modify and enter a new Width value or drag the slider bar.

...

Column
width5%


Column
width40%
Image Added


Path Loops (Closed Paths)

...

Section
Column
width40%55%

When creating a path, after a few points are made, if you click on the initial point of the path and it will automatically become a loop (closed path).

As you can see in that video, it is also possible to open or close a path after it is created with a right-mouse click over a path while having it selected:


Image RemovedImage Added


Or by simply dragging one extreme of the path over the other extreme.

Another alternative is using the “Path loop mode” parameter of the Path Properties panel:

Image Removed

Column
width5%


Column
width40%

Image Added


...


Section
Column
width5%
Column
width55%
Multimedia
nameLOOPS__2022-06-09_11-59-46.mp4
width720
height389

4D Paths

As explained above, a 4D path is a walkway that our new 4D walking actors can use. Each actor must be individually placed in it and is meant to be used to showcase actors that will appear in mid-short range shots.

Create 4D Paths

There are 2 ways to start a new  4D path, from the 4D Path tool or by simply dropping a 4D walking actor directly from the library to the 3D viewport.

As the 4D walking actors must be always placed individually, this drop method becomes very handy to quickly start the process. If you want to have a bit more control over the creation process, you can use the 4D Path tool whenever you want either to create the paths directly or to adjust one that has been already created.

Add Actors to a 4D Path

Adding 4D walking actors to paths is extremely easy. You can do it with a single drag-and-drop gesture, from the library to any 4D Path that has been already created.

Depending on where the actors are dropped, they will be automatically oriented towards the part of the path that has its end at a longer distance. However, you can easily change the direction of the actor by rotating it.

Multimedia
name4D_path_demo.mp4
width720
height389

Slopes and Steps Limitations

...

Image Removed

When this happens, it means that in that segment anima® has detected a significant height in the collision background that happens in a relatively short space (a step or a pronounced slope). You can leave it there if you want but we don’t recommend it because you will probably see a strange glitch in the simulation where the 4D model moves vertically in a visible, quick and unnatural way.

To avoid that problem, we would recommend finding an alternative path with a lower slope or modifying your collision background (in your original 3D app) to create a new one, and then synch back the new background with alive™.

Multimedia
name4D_path_creation.mp4
width720
height389

Crowd Paths

The Crowd Paths are walkways powered by our new neural network animation engine. They must be populated with Rigged actors only. With them, a large number of people can be easily generated in a controlled and procedural way. They are meant to be used for mid-long shots.

Add Actors to Crowd Path

As you can see in the following video, it is possible to add actors to a Crowd path either manually or by generating them with the tools available in the Path Properties:

To add the models manually, follow these steps:

  1. Select an Actor from the Library: Actors panel.
  2. Click and drag the actor into the 3d viewport and release the mouse. Move the character over the walkway until the mouse pointer change into a link icon and click to place the actor.

To add multiple actors automatically and distribute them along the Path, follow these steps:

  1. Select a walkway in the 3d viewport.
  2. Go to the Properties Panel.
  3. Select multiple actors from the library (using Ctrl or Shift) and drop them into the Crowd List of the Path.
  4. Use the Actors Count property to enter the number of characters you’d like to create on the selected walkway.
  5. Click Generate to create the characters.
UI Text Box
typenote

If the list empty when the Generate button is pressed, the path will be filled with random models that have already been downloaded and are available in the Purchases folder.

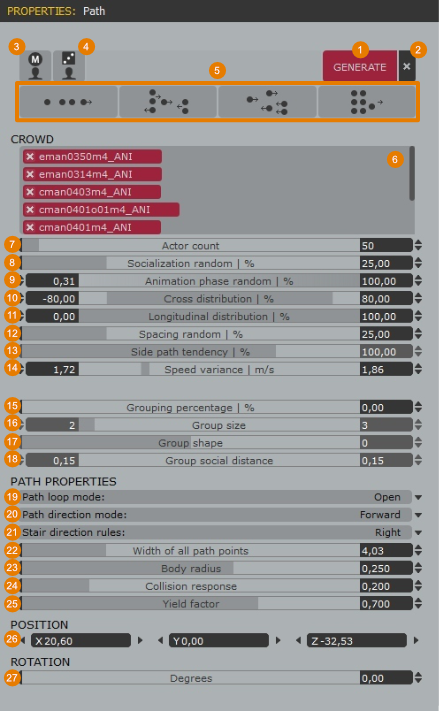
Control the Placement of Actors

Anima gives you precise control over how your characters are distributed on a walkway either using presets or by creating your own placement patterns using the Cross Distribution, Longitudinal distribution, and Actor spacing range parameters. These are accessed in the Properties panel when a walkway is selected.

Image Removed

To use a built-in preset to control the placement of characters, select the walkway and click the buttons at the top of the Properties Panel.

...

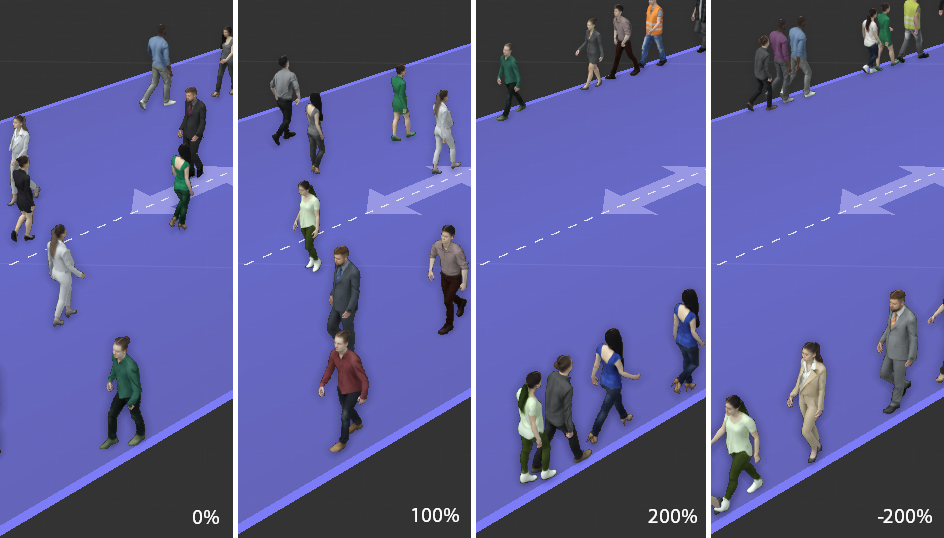
To control the lateral placement of characters, use the Cross Distribution parameter.

Image Removed

...

To control the starting point of the characters along the length of the walkway, use the Longitudinal Distribution parameter. The range starts at 0% at the beginning of the path to 100% at the end.

...

Column
width45%

Image Removed

...

width10%
Column
width45%

Image Removed

Set the Direction of Motion

The direction in that characters move on walkways is set using one of 3 modes, either forward, backward, or both. To change the mode:

...

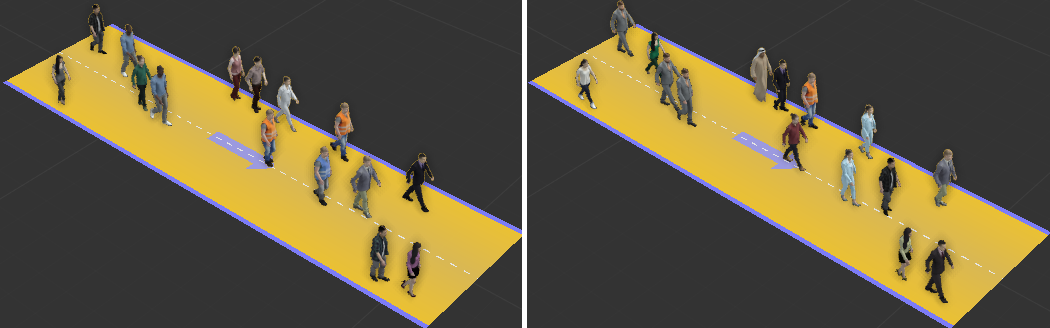
Randomize Motion Phase and Speed

It is possible to randomize both the phase and the speed of the motions of the actors. By default, the Phase range is set to full random (0-100) and the speed range is set to walk (1,10 – 2,00 Km/s).

The following image shows the same model using a very small range on both, phase and speed:

Image Removed

As you can see, all the models start their walk animation at almost the same position. On the other hand, by setting a full range of randomness on both parameters, you can see much more diversity in the movements:

Image Removed

To change those parameters follow these steps:

...

Create Cluster of Characters

AUTOMATIC GROUPING

To create a distribution pattern that automatically groups actors together.

Image Removed

...

MANUAL GROUPING

It is also possible to manually group characters together to create nearly any possible distribution pattern. To manually align characters:

...

Another alternative is using the Path loop mode parameter of the Path Properties panel.

Column
width5%


Column
width40%
Image Added

...

Stairs, Slopes, and Uneven Terrains

The neural engine that drives the crowds does not require a special object to make the actors move seamlessly through slopes, stairs, or uneven terrains. You just need to draw the path over your geometry background and the simulation will generate the motion that best adapts to each type of environment.

CREATE PATHS ON STAIRS

...

CREATE PATHS ON A SLOPE OR UNEVEN TERRAIN

...


UI Path Properties Reference

...


Section
Column
width40%55%

4D Path Properties

To access the the 4D Path properties, select it in the 3d viewport and open the Node Properties panel.

Path Loop mode


Controls whether the walkway should have open edges or a closed shape making a loop.

Path direction mode


Defines the direction that the actors travel on the walkway.

Stair direction rules


Controls the side-direction rules for actors climbing stairs

Width of all path points


Defines the width of all the path points of the selected path.

Body radius


Defines the minimum distance the actors will be from each other during the simulation.

Collision response


Defines how quickly an actor will be pushed when it enters another actor’s body radius.

Yield factor


Defines how much the actors will slow down when colliding with other actors.

Transform


Position, and rotation in the world space of the path.

Column
width5%


Column
width55%40%
Image Removed

Image Added


...


Section
40%
Column
width40%55%
Column
width

Crowd Path Properties

To access the Crowd Path properties, select it in the 3d viewport and open the Node Properties panel.

Generate actors

.

Click Generate or update actors using the current distribution settings. If characters have already been generated, clicking this button again will create a new random distribution.

Delete actors

.

Click this button to delete all the automatically generated actors, the ones with an (A) above them. The manually positioned actors (M) will be kept.

Convert to Manual

.

This button will convert all the models autogenerated (A) into manual mode (M).

Keep positions and Rotations


When this is set to No, clicking Generate will create a completely new distribution. When set to Yes the Position and Rotation of current actors will be retained but motions, color variations, and phase control will be randomized.


Image Removed
Column
width5%
Column
width55%
Image Removed
Section


5. Crowd Presets
Click the buttons to use the built-in crowd placement presets. Options include (from left to right): one group in single file formation, multiple small groups, evenly distributed actors, and one group in marching formation.

6. Crowd List
Contains a list of all the actors to be distributed on the path. Drag selected characters from the library panel and panel and drop them into the list. If left empty, random models will be used.

7. Actor Count
The number of actors to create.

8. Socialization Random
Used when square areas and walkways intersect. This value determines the likelihood that an actor will leave the walkway and socialize with other characters in the square area. At 100% nearly all the characters move the square area, at 0% none of them do.

9. Animation Phase Random
Defines the range of motion clip phase offset that will be randomly applied to each actor.

10. Cross Distribution
Defines the position range in which characters can be placed on the lateral axis of the walkway.

11. Longitudinal Distribution
Defines the position range in which characters can be placed on the longitudinal axis of the walkway.

12. Spacing Random
Determines the distance that characters socializing in square areas will stand to one another. Larger values create a sparse distribution, low values create a dense distribution.

13. Side Path Tendency
When the walkway Path Direction Mode is set to Both, this parameter controls how many walks are on the sides. At 0% of characters walking in both directions use the full width of the walkway. At 100%  forward and backward walking characters use half the walkway each. At 200% characters walk only along opposing outer edges of the walkway. Using negative values reverses the sides.

Speed Variance – Defines the range of random speed variation applied to characters.

Column
width5%


Column
width55%40%
Image Removed

Image Added


...


Section
Column
width40%55%

Grouping percentage –

14. Speed Variance
Defines the range of random speed variation applied to characters.

15. Grouping percentage
Defines the tendency for characters to form into groups. The higher the percentage the higher the number of groups created with respect to the non-grouped actors. At 100%, all actors walk in groups.

16. Group size
The number of people in each group is controlled by the Groups size range. In the example above, the range was between 2 and 4 members.

17. Group shape
Controls the distribution shape of characters grouped together using the clustering feature.  Negative values create distributions that stretch longitudinally, positive values create distributions that stretch laterally.

18. Group social distance
When using the clustering feature this range controls the randomized distance between characters in groups. Large values create groups that are dispersed and small values create groups that are tight-knit.

19. Path loop mode .
Opens or closes the path.

20. Path Direction Mode
Defines the direction the characters travel on the walkway, options include Forward, Backward, or Both. The direction is represented by a blue preview arrow on the walkway so that you can easily see which way the characters will travel.
Image Removed
Image Added


21. Stair Direction Rules
Controls the side-path rules for characters climbing stairs. Options are left down/right up, light down/left up, or no stair rules.

22. Width of all Path Points
Defines the width of all path points in the selected path.

23. Body radius .
Defines the minimum distance the actors will be from each other during the simulation.
24

. Collision response .
Defines how quickly an actor will be pushed when it enters another actor’s body radius.

25. Yield factor .
Defines how much the actors will slow down when colliding with other actors.

26. Position
Position of the pivot of the path in world space coords.

27. Rotation
Rotation of the pivot of the path in world space coords.

Column
width5%


Column
55%
width40%

Image Added


Path Point Properties

...


Section
Column
width40%55%

To access a Path Point’s properties, first, select a walkway in the 3d viewport and then click a path point and open the Properties panel.

Width


The width of the walkway at the selected Path Point.

Position


Position of the pivot of the path point in world space coords.

Column
width5%


Column
width55%40%
Image Removed

Image Added

Related Topics