![]()
Page History
This page provides information about V-Ray's standalone Denoise Tool.
Floatingpagetoc
Overview
...
The V-Ray installation includes a standalone denoising tool called vdenoise that can be used to denoise still images or animations outside of the V-Ray host application. This is especially useful for animations because the standalone tool can look at multiple frames at once and produce a better denoising result.
...
The vdenoise tool requires certain render elements in order to work correctly. These render elements can be generated easily with the VRayDenoiser Render Element.
Location
...
To open vdenoise, go to Start Menu > Chaos Group host application > Denoiser tool. This opens up the vdenoise GUI along with its associated command prompt window. If you prefer not to use the vdenoise GUI, you can navigate to the vdenoise executable through any command-line interface and run it with one of the possible commands listed below.
The folder to which the Denoiser Tool navigates to, by default, is: C:\Program Files\Chaos Group\V-Ray\[host_application]/\tools or or C:\Program Files\Chaos Group\V-Ray\[host_application]/bins, depending \vray\bin, depending on the platform being used.
| Excerpt | ||||||||||||
|---|---|---|---|---|---|---|---|---|---|---|---|---|
Required Render ElementsThe required render elements are listed below. Add the VRayDenoiser or Denoiser Render Element to your scene to generate the necessary render elements automatically.The standalone denoiser will still run when some or all of these render elements are missing, but results might be too blurry. For single pass RGB denoising:
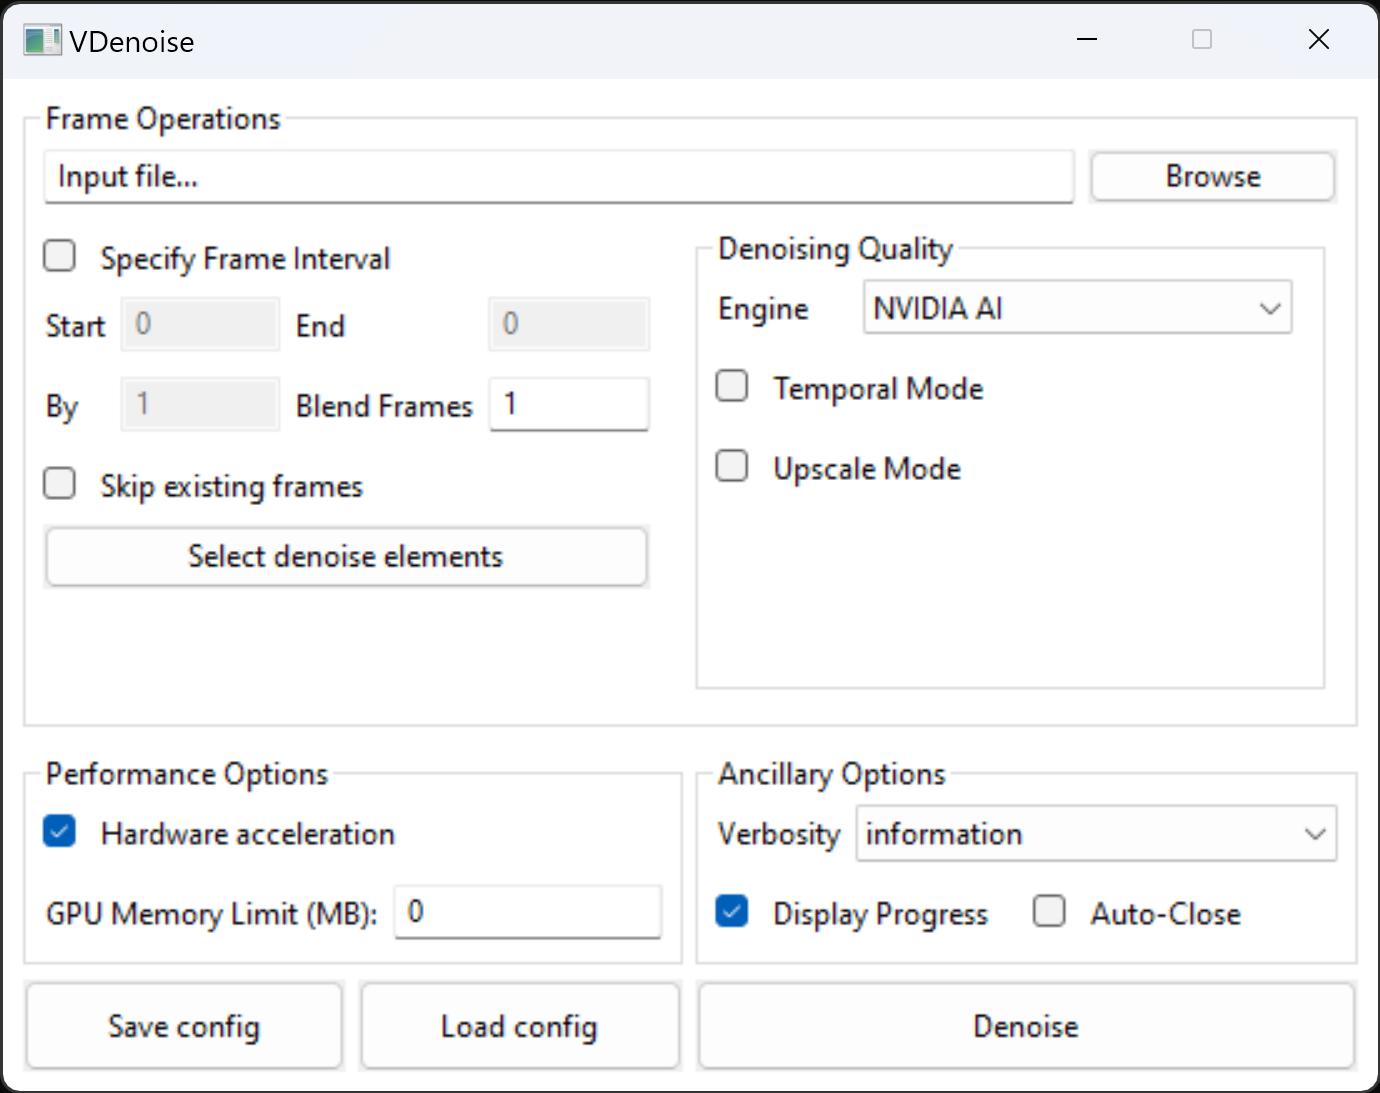
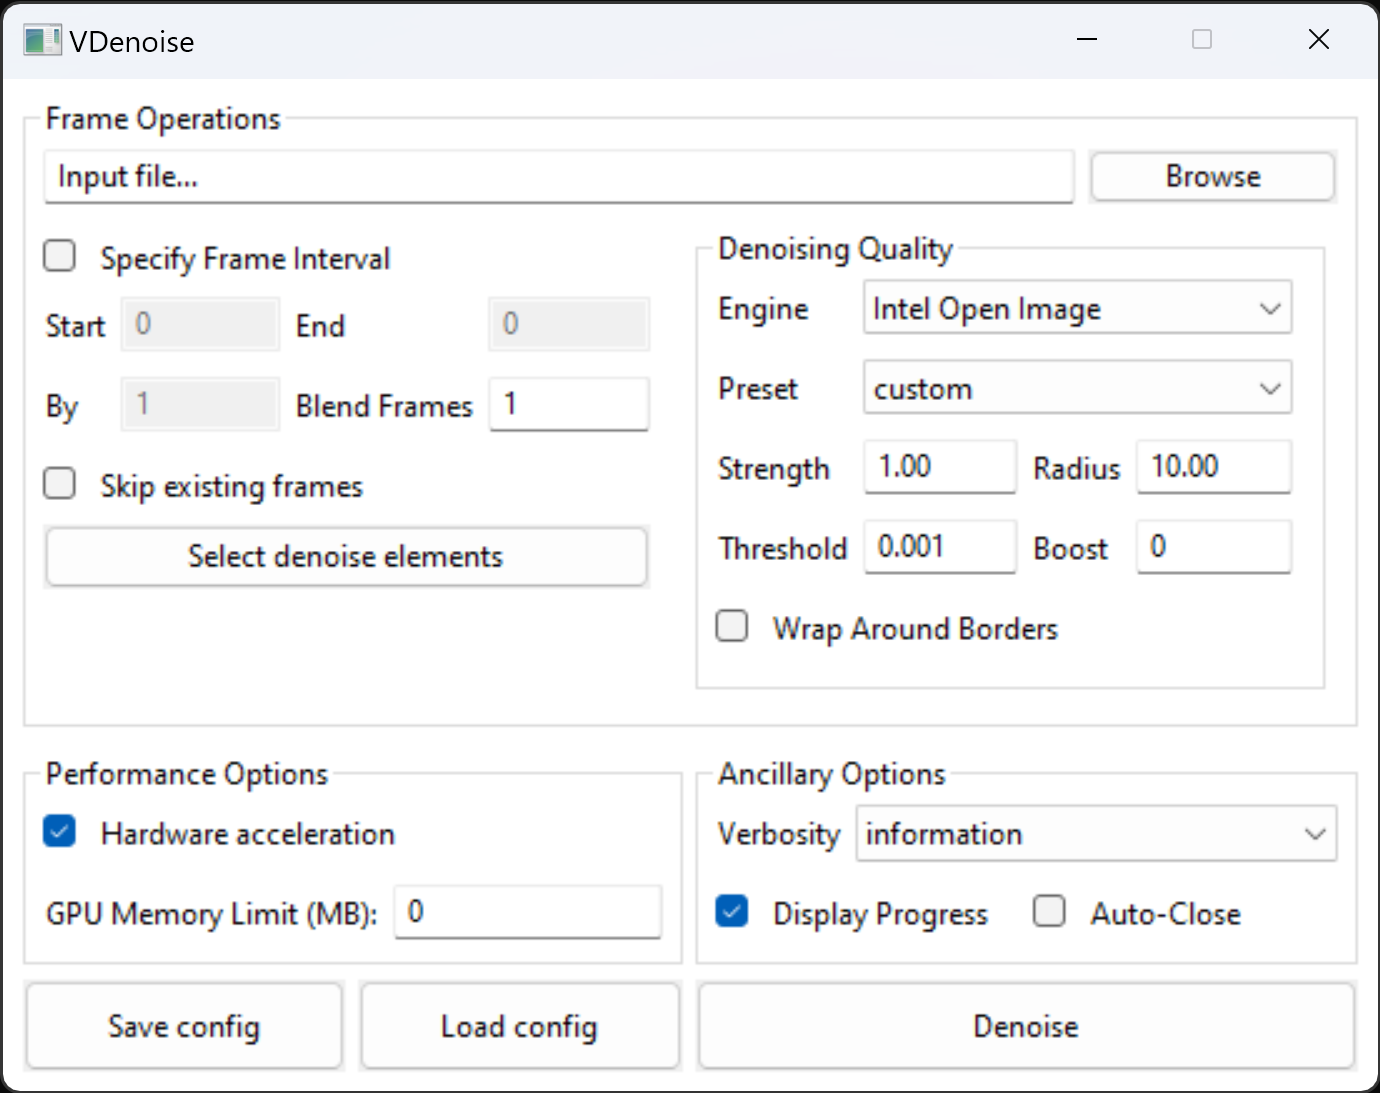
GUI Usage
|
...

|
...
|
...
|
...
|
...
|
...
|
...
|
...
|
...
|
...
|
...
Preset – Selects a preset for the strength of the denoiser.
...
Radius – Specifies the pixel radius for denoising when Preset is set to custom. Large values slow down the denoiser, but may produce smoother results.
Threshold – Specifies threshold for denoising when the noise levels render element is missing. Typically, this is equal to the noise threshold for anti-aliasing in V-Ray.
Boost – Boosts the effect of the selected preset.
Hardware acceleration – When enabled, the denoiser attempts to use all suitable OpenCL (GPU) devices, and fall back to the CPU if unsuccessful.
GPU Memory Limit (MB) – Sets a maximum GPU memory usage limit when Hardware acceleration is enabled. The default 0 uses all available memory.
Verbosity – Specifies the type of information that is printed upon denoising.
Display Progress – When enabled, the denoising result is displayed in a preview window.
Auto-Close – Automatically closes the preview window after the denoising is complete.
Save config – Saves the current denoise configuration into an .xml file.
Load config – Loads a previously saved .xml denoiser configuration.
Denoise – Denoises the selected frame(s).
Select Denoise Elements Dialog

Choose preset – Allows you to select the color elements for denoising:
all – Denoises all color elements based on RGB color as the main element.
marked – Denoises all color elements that are marked for denoising in the host application (before the image is rendered) based on RGB color as the main element.
custom – Allows you to manually select the color elements for denoising.
Main element – The main element on which the denoising of all elements is based.
The denoising Render Elements workflow with the GUI version of the Denoiser Tool is as follows:
...
Command Line Usage
The denoiser can also be used as a command-line utility without GUI display. Simply run the executable with one of the following commands to denoise an image or a sequence of images from within your command-line interface. You can also change the settings and behavior of the denoiser through CLI. To do so, please refer to the Denoiser Options tables below for a list of all available options.
Denoising Still Images
To denoise a single .vrimg or .exr image, use the following format for the command:
vdenoise -inputFile="path\to\image.exr"
where path\to\image.ext is the path and file name of the .vrimg or .exr file that you want to denoise.
For example, if the file you want to denoise is called render.exr and is located in the folder c:\renderoutput, the full command will be
vdenoise -inputFile="c:\renderoutput\render.exr"
Denoising Animations
To denoise a sequence of images, you must have all frames already rendered, as the denoiser needs to look at several frames at the same time. Use the following format for the command:
vdenoise -inputFile="path\to\sequence_????.exr"
where the question mark (?) replaces the digits in the sequence's file names.
For example, if the images in the sequence are named anim_0001.exr, anim_0002.exr, etc. and are located in the folder c:\renderoutput, the full command will be
vdenoise -inputFile="c:\renderoutput\anim_????.exr"
Denoiser Options
You can control the denoiser through optional switches on the command line. To list all available options in the command prompt window, run the denoiser without any arguments (vdenoise command) or use the -help switch:
vdenoise -help
The table below shows the optional switches, which are also displayed by the vdenoise -help command. To use a switch, precede the switch with a hyphen (-) and follow it with an equals sign (=) and the desired parameter, as shown in the table.
...
Specifies the input . vrimg or .exr file. Can contain paths and wildcards such as a question mark (?) to indicate digits in file names. Examples:
...
Select Denoise Elements Dialog
Choose preset – Allows you to select the color elements for denoising: all – Denoises all color elements based on RGB color as the main element. Main element – The main element on which the denoising of all elements is based. The denoising Render Elements workflow with the GUI version of the Denoiser Tool is as follows:
Command Line UsageThe denoiser can also be used as a command-line utility without GUI display. Simply run the executable with one of the following commands to denoise an image or a sequence of images from within your command-line interface. You can also change the settings and behavior of the denoiser through CLI. To do so, please refer to the Denoiser Options tables below for a list of all available options. Denoising Still ImagesTo denoise a single .vrimg or .exr image, use the following format for the command: vdenoise -inputFile="path\to\image.exr" where path\to\image.ext is the path and file name of the .vrimg or .exr file that you want to denoise. For example, if the file you want to denoise is called render.exr and is located in the folder c:\renderoutput, the full command will be vdenoise -inputFile="c:\renderoutput\render.exr" Denoising AnimationsTo denoise a sequence of images, you must have all frames already rendered, as the denoiser needs to look at several frames at the same time. Use the following format for the command: vdenoise -inputFile="path\to\sequence_????.exr" where the question mark (?) replaces the digits in the sequence's file names. For example, if the images in the sequence are named anim_0001.exr, anim_0002.exr, etc. and are located in the folder c:\renderoutput, the full command will be |

...
vdenoise -inputFile="c:\renderoutput\anim_????.exr" |
...
Denoiser OptionsYou can control the denoiser through optional switches on the command line. To list all available options in the command prompt window, run the denoiser without any arguments (vdenoise command) or use the -help switch: vdenoise -help The table below shows the optional switches, which are also displayed by the vdenoise -help command. To use a switch, precede the switch with a hyphen (-) and follow it with an equals sign (=) and the desired parameter, as shown in the table.
Advanced Options
|
...
Note that in order to denoise a sequence of images you must have all frames already rendered, as the denoiser needs to look at several frames at the same time.
...
Specifies the full or relative path to an output directory for the denoised files. If the directory does not exist, it is created. If no output directory is specified, the output directory is the directory of the input files.
...
-denoiseElements="elementName{;elementName}"
-denoiseElements=all
...
When used with <elementName>, specifies the render element(s) that should be denoised. The element names can contain wildcards and are not case sensitive.
If not specified, the RGB Color element, Alpha, and all color elements that are marked for denoising in the input file are denoised.
The first matched render element specifies the main element on which the denoising of all elements will be based.
For example, "rgb color;vrayreflection;*lightselect*" will denoise the RGB Color, VRayReflection, and all light select elements, based on the RGB Color element.
When used with "all", denoises all color elements in the input file based on the RGB Color element.
...
Boosts the effect of the selected preset.
0 - No boost. (default)
1 - Moderate boost.
2 - Large boost.
...
Specifies the frames and/or frame intervals to process.
N - denotes start frame.
Na - denotes end frame.
Nb - denotes single frame.
Nc - denotes frame increment. If not specified, all frames in the sequence are processed.
Example:
"-frames= 1-100; 160-180; 200;201" - the denoiser works with frames 1 to 100 and 160 to 180 as well as frames 200 and 201 from the animation.
"-frames= 1-200, 2" - the denoiser works with every second frame from 1 to 200.
...
Specifies the config file from which all lens effects parameters are set. With this option you can apply Lens Effects to the denoised image, the settings of which are taken from the .vrscene file.
Advanced Options
...
|
...
|
...
|
...
OutputWhen the standalone Denoise tool is run, it outputs information about the process, including settings, warnings, progress, and files written in the command prompt window. |
...
|
