Versions Compared

Key

  • This line was added.
  • This line was removed.
  • Formatting was changed.

This page provides information on the BRDFAlSurface material node.


Overview

...

Section
Column
width55%

The V-Ray Al Surface shader is V-Ray's implementation of Anders Langland's alShader, which is designed to reproduce the appearance of skin. The current version takes into account diffuse reflection, two levels of reflection, and sub-surface scattering. 

UI Path: ||mat Network|| > V-Ray > Material > V-Ray alSurface

Column
width5%


Column
width40%

Overall

...

Section
Column
width55%

This section allows you to control the swatch for the VRayAlSurface material.

Strength – A multiplier for the diffuse color.

Color – The color of the material. Note: The actual diffuse color of the surface also depends on the reflection and refraction colors.

Diffuse Bump Type – Defines how the bump input is read by the material.

Bump Map – Uses a bump map to determine the bump effect on the material.
Normal map in tangent space – Uses a tangent normal map to determine the bump effect on the material.
Normal map in object space – Uses an object space normal map to determine the bump effect on the material.
Normal map in screen space – Uses a screen space normal map to determine the bump effect on the material.
Normal map in world space – Uses a world space normal map to determine the bump effect on the material.
From texture bump output – Uses the texture bump output to determine the bump effect on the material.
Explicit normal – Uses the mesh's set normal to determine the bump effect on the material.

Bump Type – Defines how the bump input is read by the material.

Bump Map – Uses a bump map to determine the bump effect on the material.
Normal map in tangent space – Uses a tangent normal map to determine the bump effect on the material.
Normal map in object space – Uses an object space normal map to determine the bump effect on the material.
Normal map in screen space – Uses a screen space normal map to determine the bump effect on the material.
Normal map in world space – Uses a world space normal map to determine the bump effect on the material.
From texture bump output – Uses the texture bump output to determine the bump effect on the material.
Explicit normal – Uses the mesh's set normal to determine the bump effect on the material.

Bump Strength – The maximum amount of bump.

Opacity – Assigns transparent properties to the material where 1.0 is completely opaque and 0.0 is completely transparent. Maps can also be assigned to create a material that has a non-uniform opacity. When a map is used, white is completely opaque and black is completely transparent.

Reflect Max Depth – Specifies the maximum depth for reflections. Set the value to -1 to use the global depth.

 
Column
width5%


Column
width40%


SSS

...

Section
Column
width55%

The AL Surface Material has three SSS rollouts with identical parameters for precise control over three types of sub-surface scattering.

SSS Mix – Mixes between the Diffuse component and the SSS component. See the Sub-Surface Scattering Mix example below.

SSS Mode – Sets the algorithm for calculating Sub-surface scattering.

Diffusion – The default mode that preserves details well.
Directional – Similar to Diffusion, but includes single-scattering approximation for additional realism and detail.

SSS Density Scale – Additionally scales the SSS Radius parameters. Normally, the material takes the scene scale into account when calculating the sub-surface scattering effect. However, if the scene was not modeled to scale, this parameter can be used to adjust the effect.

Weight – The relative contribution of the shallow scattering layer to the material.

Color – The color for the shallow scattering layer. See the Sub-surface Scattering Color example below.

Radius – The distance that light is scattered within the shallow layer.

Column
width5%


Column
width40%

...


Reflection

...

Section
Column
width55%

The AL Surface Material has two reflection rollouts with identical parameters for precise control over two types of reflection. See the Reflection Layers example below.

Strength – A multiplier for the reflection color.

Color – The reflection color. Note that the reflection color dims the diffuse surface color.

Roughness – Used to simulate rough surfaces or surfaces covered with dust.

BRDF – Determines the type of BRDF (the shape of the highlight):

Beckmann – Uses a Beckmann distribution for the reflection.
GGX – Uses GGX distribution for the reflection. The GGX distribution has a longer "tail" compared to Beckmann distribution.

Index of Refraction – The IOR to use when calculating Fresnel reflections. Normally this is locked to the Refraction IOR parameter, but you can unlock it for finer control.

Bump Type – Defines how the bump input is read by the material.

Bump Map – Uses a bump map to determine the bump effect on the material.
Normal map in tangent space – Uses a tangent normal map to determine the bump effect on the material.
Normal map in object space – Uses an object space normal map to determine the bump effect on the material.
Normal map in screen space – Uses a screen space normal map to determine the bump effect on the material.
Normal map in world space – Uses a world space normal map to determine the bump effect on the material.
From texture bump output – Uses the texture bump output to determine the bump effect on the material.
Explicit normal – Uses the mesh's set normal to determine the bump effect on the material.

Bump Strength– A multiplier for the bump map effect on the reflection.

 
Column
width5%


Column
width40%


...


Anchor
reflectionLayers
reflectionLayers


...


Example: Reflection Layers


This example demonstrates the effect of the Reflection 2 layer. Diffuse and Reflective Colors are set to middle gray. SSS Mix is set to 0. For the Reflection 1 layer, Strength is lowered to 0.8, Roughness is 0.55, Index of Refraction is raised to 1.6, and GGX is set as a BRDF type.

...

When just the Reflection 1 layer is modified, the skin looks dryer and does not have the oily layer that is typical for human skin. When Reflection 2 layer is modified, the skin acquires a natural glossy look.


Section
 
Column
width25%


Column
width50%
Before after
afterLabelwith
beforeLabelwithout
Panel
borderStylenone

Panel
borderStylenone

Column
width25%


In this second set of images, SSS Mix is set to 1 and all SSS layers parameters are kept at their default values. A skin texture is linked to the Diffuse Color, and Reflection 1 parameters have the same values as those in the images above.

Again the first image shows just Reflection 1 layer parameters tweaked, while Reflection 2 layer has default values. In the second image, Reflection 2 Strength is lowered to 0.4, Roughness - to 0.3, Index of Refraction is set to 1.6, and GGX is selected as the BRDF type. 


Section
Column
width25%


Column
width50%
Before after
afterLabelwith
beforeLabelwithout
Panel
borderStylenone

Panel
borderStylenone

Column
width25%


Anchor
SSSmix
SSSmix
 

...


Example: Sub-Surface Scattering Mix

...


This example demonstrates the effect of the SSS Mix parameter. Diffuse and Reflective Colors are set to middle gray. The SSS layers parameters are kept at their default values.

In the first image, SSS Mix is set to 0 and has no effect on the image. In the second image, its value is 1. Thus, it controls how much the skin is affected by the sub-surface scattering and the diffuse components.


Section
Column
width25%


Column
width50%
Before after
afterLabelon
beforeLabeloff
Panel
borderStylenone

Panel
borderStylenone

Column
width25%


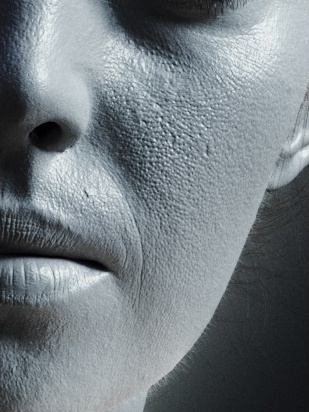
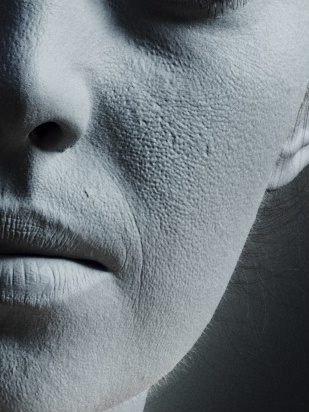
In this second set of images, a skin texture is linked to the Diffuse Color. The SSS layers parameters are still kept at their default values.

Notice that the skin pores are much more defined in the first image, where SSS Mix is 0. An overdone makeup look is achieved. In the second image where SSS Mix is enabled and set to 1, the skin pores are refined and more natural. Also we get a sense of the skin thickness in different areas, especially in the thinner parts such as around the nostrils. 


Section
 
Column
width25%


Column
width50%
Before after
afterLabelon
beforeLabeloff
Panel
borderStylenone

Panel
borderStylenone

 
Column
width25%


Anchor
SSScolor
SSScolor
 

...


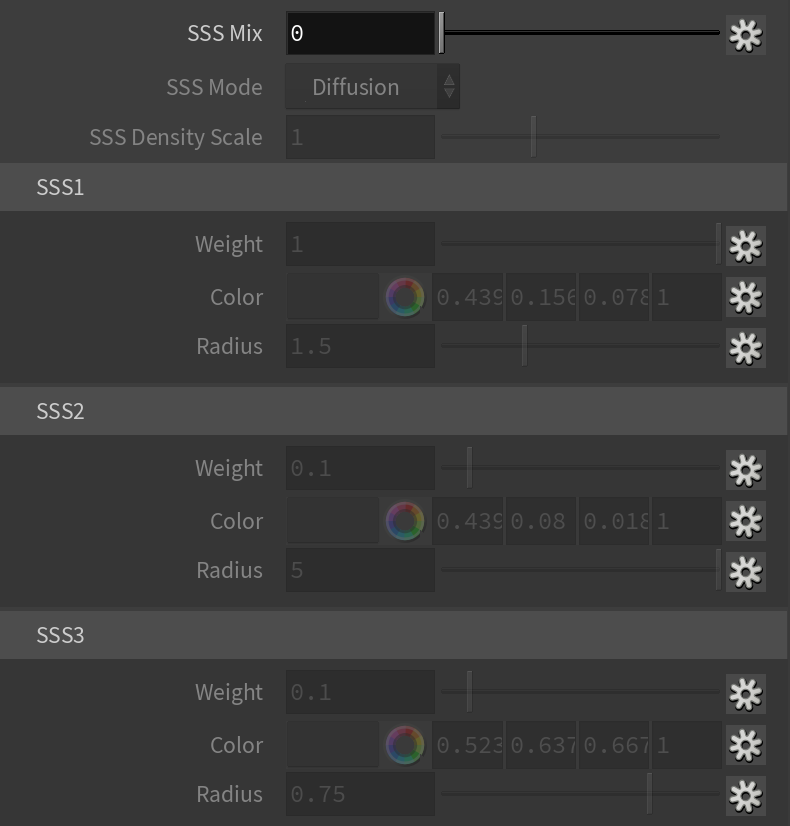
Example: Sub-surface Scattering Color

...


This example demonstrates the effect of the SSS Color parameters. Diffuse and Reflective Colors have been set to a middle gray. The first image uses default SSS values which are good enough to achieve a realistic look skin. In the second image, SSS Colors are changed to green and pink.

...


Section
 
Column
width25%


Column
width50%
Before after
afterLabelGreen
beforeLabeldefault
Panel
borderStylenone

Panel
borderStylenone

Column
width25%


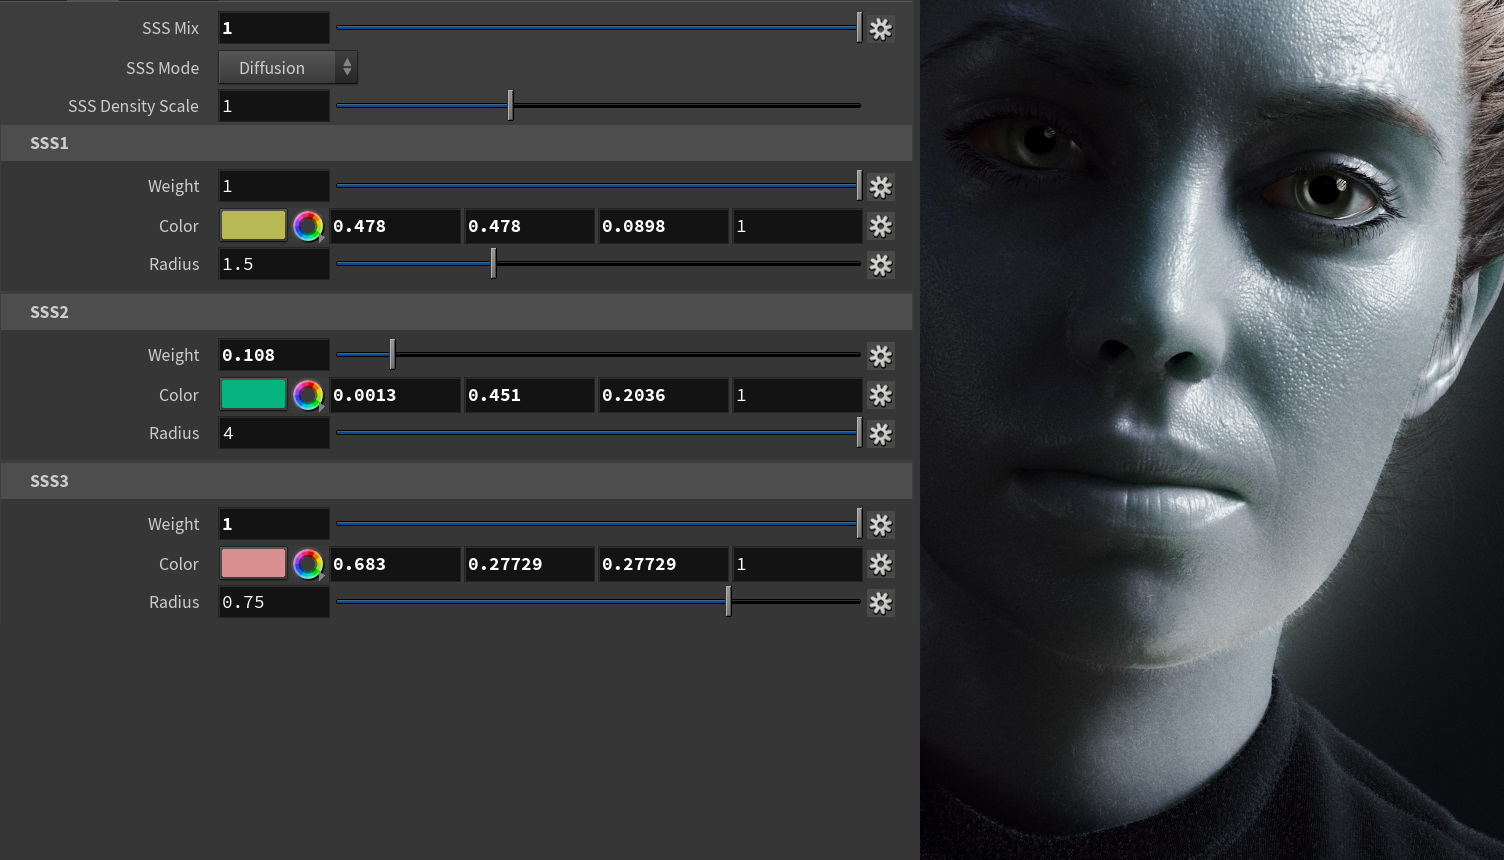
And in this second set of images, a skin texture is linked to the Diffuse Color.


Section
 
Column
width25%


Column
width50%
Before after
afterLabelGreen
beforeLabeldefault
Panel
borderStylenone

Panel
borderStylenone

 
Column
width25%