![]()
Page History
...
| Section | |||||||||||||||
|---|---|---|---|---|---|---|---|---|---|---|---|---|---|---|---|
|
...
|
...
|
...
|
Still Image Render Settings
...
Step 1. First Render
| Section | ||||||||||
|---|---|---|---|---|---|---|---|---|---|---|
|
...
|
...
|

...

The first render is quite dark. Let's see how to brighten it up, while aiming at a quick preview render.
...
Step 2: Quick Preview
| Section | |||||||||||||||
|---|---|---|---|---|---|---|---|---|---|---|---|---|---|---|---|
|
...

We You still have the same amount of light entering the scene, but it is bounced around more and this increases the overall brightness of the scene.
...
3.3. Let's try to lower the Noise threshold even more and see how this will affect the render time. We can try with two different values: 0.01 and 0.005 (the default V-Ray Next 6 value) and 0.005.
| Section | ||||||||||
|---|---|---|---|---|---|---|---|---|---|---|
|


| UI Text Box | ||
|---|---|---|
| ||
As a rule of thumb, decreasing the Noise threshold in half will result results in doubled render time. Be cautious with the amount of zeros after the point in the Noise threshold value! The default value of 0.005 will work very well for most of the scenes. |
...
Step 4: Rendering with materials
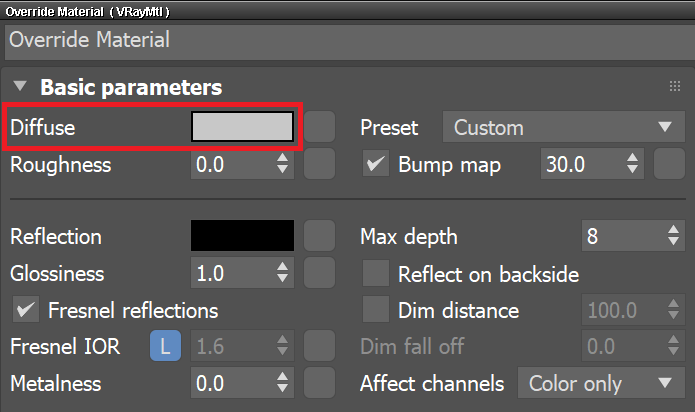
4.1. Turn the Override mtl option in the Global switches rollout off. We set Leave the Noise threshold value to 0.01 here in order to preview the scene.
...
Step 5. Final Adjustments for a Production Image
We see that the The default V-Ray settings work quite well for this interior scene.
5.1 The 1 The only thing we you need to do is to set the Noise threshold back to its default value of 0.005 for even less visible noise.
5.2 For the final render, we set the resolution to 1280x720 pixels.
...
Recommended Animation Settings
...
Traditionally, rendering of sequences could produce unwanted flickering between frames, also referred to as "bubbling" or "boiling". That is because low frequency noise changes across frames.
V-Ray Next 6 solves those issues with only two tweaks to the default settings: Light Cache Subdivs, and Retrace amount. While the suggested settings work for most cases (interior, exterior, environments, pack shots, simulations), we suggest you to test them across a set of representative frames before committing to the final sequence rendering.
Should some visual artifact still be present, continue increasing the two settings with small steps until they are resolved.
...
- Make sure you start with the default V-Ray render settings. You can reset them easily by changing the render engine to another and then changing it back to V-Ray
...
- 6.
12. 2 Set the image sampler to Bucket. Go to Render SettingsSetup > V-Ray tab > Image sampler (Antialiasing) > Type > Bucket. This is the preferred sampler type for final renders, as it's marginally quicker than progressive, and works more comprehensively with a number of ancillary technologies.
13. 3 Choose the Noise Threshold that best suits your needs. A value of 0.005 will get gets rid of visible noise without the need of post-render denoising. To compare the two, see the difference between the default value of 0.01 and 0.005 in the example above.
| UI Text Box | ||
|---|---|---|
| ||
Notice that depending on a number of factors (scene type, lighting, shaders, geometry), the same noise threshold may produce marginally different results on a scene-by-scene basis. Good A good tip is to always test before committing to final. |
1.4. Go to the Light Cache settings of the GI tab and change the Subdivs to 3000. Increasing Light Cache Subdivs ensures that the Light Cache is well sampled, and stable across frames. The impact on render time of the higher subdivs is negligible compared to the rendering of the actual frame, so this is a good general practice without any particular drawbacks.
| UI Text Box | ||
|---|---|---|
| ||
Please note, the calculation method of the Light Cache needs to be "per frame" (the default) instead of a path-driven method, such as "camera path". | ||
For Light Cache, there's an Animation preset that uses a Raytrace value of 8, as well as a Subdivs value of 3000, which is generally recommended in most cases. |
5. Increasing the retrace value 1.5 Next, set the Retrace parameter to 8.0. This parameter helps trace further rays where the Light Cache solution wouldn't be good enough on its own. Higher values make V-Ray trace more rays in the final rendering of the image. It will prevent "splotching" at the expense of some render time.
6. 1.6 The changes are all done. Test the values with a representative set of frames (ideally, the most complex ones), and if no issue is present, you can commit to the final render.
17.7 Should there still be visual artifacts within a single frame, raise the Retrace Value value. In case you spot small changes to the GI solution across frames ("bubbling"), raise the number of LC subdivs. A value of 10 for Retrace, and 5000 for the Light Cache Subdivs should be the highest values you would ever need to go.