Introduction
In this chapter we'll cover the V-Ray textures that load and present in various ways different file formats. The BRDFs (and some lights) have many Color, AColor and Float parameter slots that can be textured. You will usually just load texture files, but V-Ray also offers many procedural textures, as well as texture plugins that serve as modifiers (i.e. apply some simple function, combine textures, extract data from one of the channels etc.). There are over 200 texture plugins, so we will only look at the most important ones. Many of the plugins are made for specific host applications. Apart from the texture data itself, V-Ray uses UVW generator plugins to generate UVW mapping coordinates or modify the original data from the geometry source. Using a UVWGen plugin is not obligatory.
TexBitmap
This texture uses the data from a bitmap buffer (see the next two points) with some additional parameters, like color multipliers, tiling etc.
Parameters
- compatibility_with - This is used to differentiate between textures exported from different applications. The value means : 0 - 3ds Max (this is also the default), 1 - Maya, ...
- alpha_from_intensity - If 2 - the alpha is forced to 1.0f; 1 - the resulting alpha is the color intensity (if compatibility_with is 0) or the color luminance (if compatibility_with is 1); 0 - the alpha is taken from the bitmap alpha
- invert - If true, the resulting texture color will be inverted
- invert_alpha - If true and invert is on, the resulting texture alpha will be inverted too. If false, just the color will be inverted
- color_mult - A multiplier for the texture color
- color_offset - An additional offset for the texture color
- alpha_mult - A multiplier for the texture alpha
- alpha_offset - An additional offset for the texture alpha
- nouvw_color - The color when there are no valid uvw coordinates
- color - The resulting color
- out_transparency - The resulting transparency
- out_alpha - The resulting alpha
- out_intensity - The resulting intensity
- uvwgen - The uvw generator for the texture
- tile - 0: not tiling; 1: tile in UV; 2: tile in U; 3: tile in V; 4: tile in UV, but not filter tiling;
placement_type - The way the valid portion of the texture is applied. This parameter lets you crop the texture or reduce its size for custom placement. Cropping and placement settings affect the texture only as it's used for this map and any instances of the map. They have no effect on the texture file itself. Possible values are:
- default (0) - the whole texture is valid
- crop (1) - Cropping a texture means reducing it to a smaller rectangular area than it originally had. Cropping doesn't change the scale of the texture.
- place (2) - Placing a texture lets you scale the map and place it anywhere within its tile. Placing can change the texture's scale, but shows the entire texture. The four values that specify the placement and size of the cropping or placement region are all animatable.
u - U coordinate of the valid texture sector
- v - V coordinate of the valid texture sector
- w - Width of the valid texture sector
- h - Height of the valid texture sector
- jitter - Amount of random placement variation
- tile_u - If true there is horizontal tiling
- tile_v - If true there is vertical tiling
- uv_noise_on - If true the noise is enabled.
- uv_noise_animate - If true the noise is animated. Use "UV noise phase" to animate the noise.
- uv_noise_amount - UV noise amount
- uv_noise_levels - UV noise iterations
- uv_noise_size - UV noise size
- un_noise_phase - UV noise phase
- bitmap - The BitmapBuffer for the texture
Examples
All following examples are rendered using the scene bundle, by uncommenting the following #include in the main .vrscene file.
Simple bitmap texture
The scene is "vrscenes/map_01 TexBitmap.vrscene".

Texture color-corrected using gain and lift
The scene is "vrscenes/map_02 TexBitmap corrections.vrscene".
Texture gamma-corrected using BitmapBuffer
The scene is "vrscenes/map_03 TexBitmap & BitmapBuffer gamma.vrscene".
Texture gamma-corrected using MayaGamma
The scene is "vrscenes/map_04 TexBitmap & MayaGamma.vrscene".
BitmapBuffer
This plugin loads an image file. A large number of formats are supported - lossy/lossless, from 8-bit to 32-bit. This is not a texture plugin and its only purpose is to feed data to TexBitmap. It has some options for filtering and gamma. Currently supported formats are HDR, EXR, PNG, BMP, TGA, SGI, JPG, PIC, TIF, PSD, VRIMG. Image file lists in the form of IFL files are also supported.
Parameters
- filter_type - 1 - nearest; 0 - no filtering; 1 - mip-map filtering; 2 - summed area table filtering
- filter_blur - blur parameter used for filtering
color_space - Specifies the color space of the .hdr image so that the inverse curve can be applied to make the image in a linear color space. Possible values are:
- linear (0) - No correction is applied.
- gamma corrected (1) - The color space is controlled through the Gamma parameter.
- sRGB (2) - The .hdr image is in sRGB color space.
gamma - A gamma–correction value for the image. For example, if the bitmap was saved to disk with a 2.2 gamma correction, you need to enter 0.4545 to remove that correction for the rendering.
- allow_negative_colors - if false negative colors will be clamped
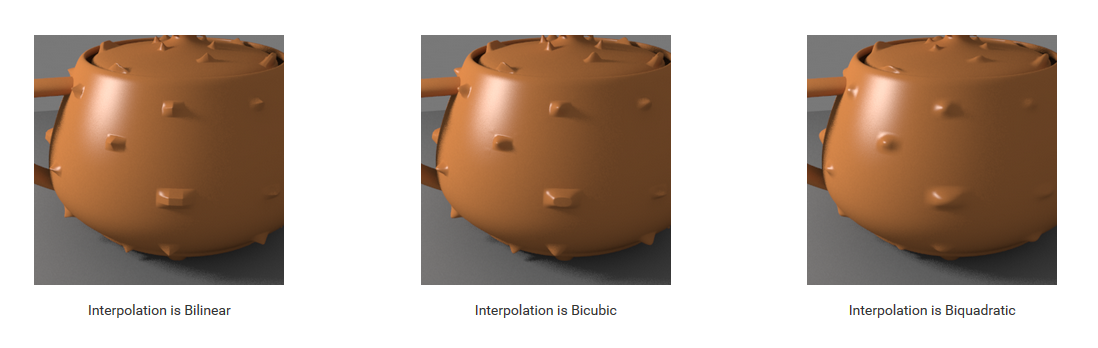
interpolation - Interpolation method for the mip-map filtering. See the example below. Possible values are:
- bilinear (0) - Image values are interpolated from four pixels in the bitmap. This is the fastest interpolation method, but the result is not continuous (non-smooth) and may produce artifacts when the map is used for displacement or bump mapping.
- bicubic (1) - Image values are interpolated from sixteen pixels in the bitmap. This is the slowest method, but the results are smooth without too much blur.
- biquadratic (2) - Image values are interpolated from nine pixels in the bitmap. This method is faster than the Bicubic interpolation, but may smooth the image too much.
file - The file name; can contain or tags for Mari or Mudbox tiles respectively,or $nU and $nV for explicit tiles; lower-case tags consider the tiles as starting from 0 whereas upper-case tags start from 1
- load_file - if set to false, the file would not be loaded
- frame_sequence -
- frame_number -
- frame_offset -
- use_data_window - true to use the data window information in e.g. OpenEXR files; otherwise false
- psd_group_name -
- psd_alpha_name -
- ifl_start_frame - Specifies the beginning of the texture animation. The frame number specified here will be played at the first frame of the scene animation
- ifl_playback_rate - Controls the animation speed of the texture as fraction of the actual animation speed. A value of 1 means that the texture animation will run at regular speed. A value of 2 means that the texture animation will run twice as fast as the scene animation.
ifl_end_condition - Image file list (IFL) end condition. This option allows you to control what happens when the last frame of the animated texture is reached. The available options are:
- Loop (0) - The animation will start again from the frame specified in the Start Frame option
- Ping Pong (1) - The animation will be played backwards until it reaches the the frame specified in the Start Frame option and then play forward again
- Hold (2) - The animation will stop at the last frame and it will be displayed until the end of the scene animation.
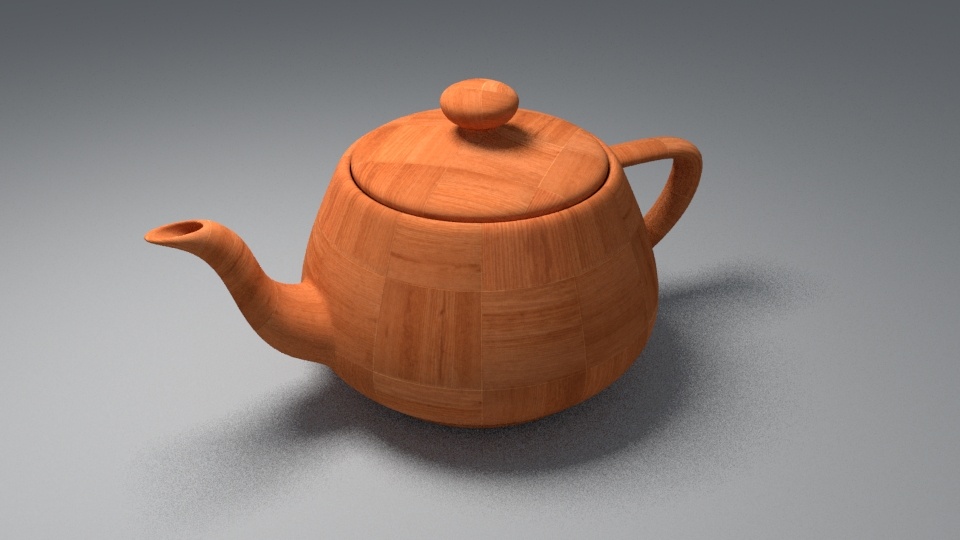
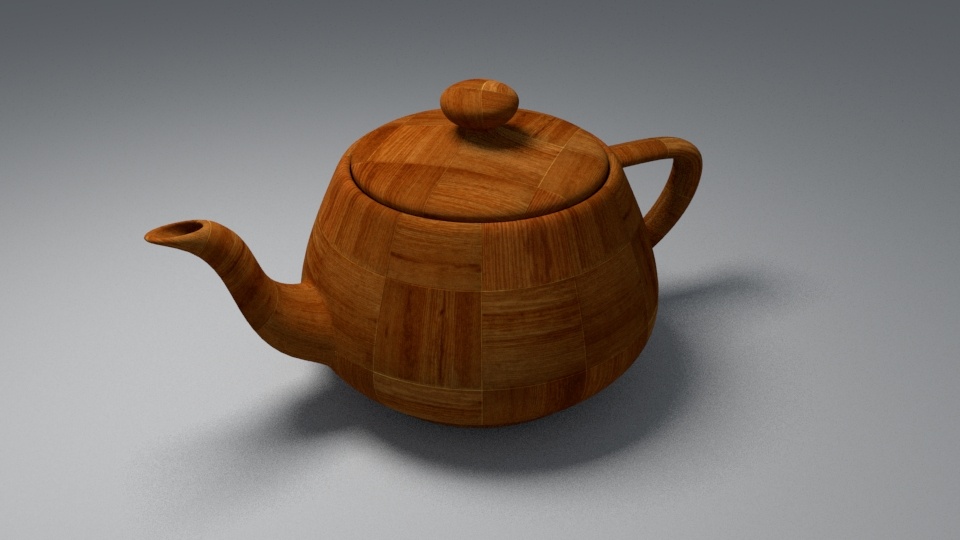
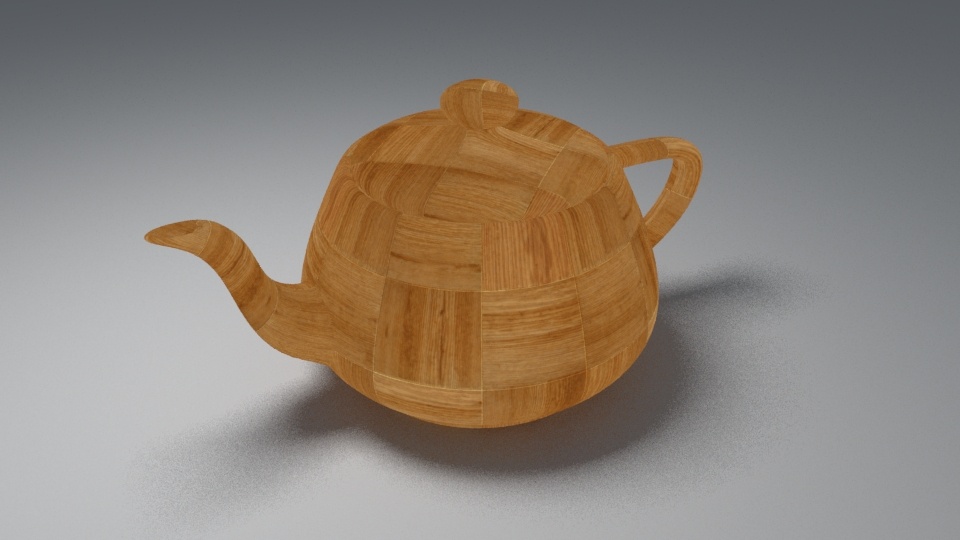
Example - The Interpolation Parameter
This example shows the effect of the different interpolation methods. The images below show a teapot displaced with this texture:
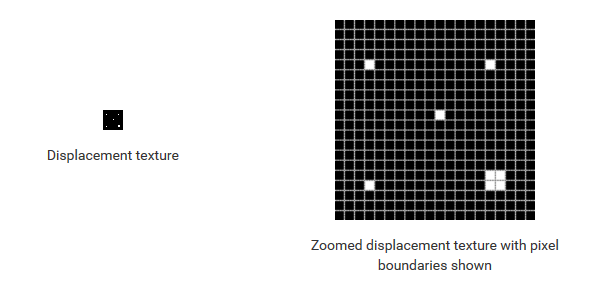
Notice how the different interpolation methods produce slightly different results with different smoothness.
Code Example for TexBitmap and BitmapBuffer
# Load scene from a file.
renderer.load(os.path.join(SCENE_PATH, 'material.vrscene'))

# Create a bitmap buffer which can load data from a file
newBitmap = renderer.classes.BitmapBuffer()
newBitmap.file = os.path.join('assets', 'bricks01.jpg')

# TexBitmap is used for file-based texturing. Other Tex{*} plugins offer procedural and combination textures
newTexture = renderer.classes.TexBitmap()
# Set the texture to use the loaded buffer
newTexture.bitmap = newBitmap

brdf = renderer.classes.BRDFDiffuse()
# Attach the texture as input to the brdf.
brdf.color_tex = newTexture
newMaterial = renderer.classes.MtlSingleBRDF()
newMaterial.brdf = brdf

newNode = renderer.classes.Node()
newNode.material = newMaterial
newNode.geometry = renderer.plugins['CubeShape@mesh2']
newNode.transform = vray.Transform(vray.Matrix(1), vray.Vector(-15, 0, 0))
// Load scene from a file.
renderer.load("material.vrscene");

// Create a bitmap buffer which can load data from a file
BitmapBuffer newBitmap = renderer.newPlugin<BitmapBuffer>();
newBitmap.set_file("assets" PATH_DELIMITER "bricks01.jpg");

// TexBitmap is used for file-based texturing. Other Tex{*} plugins offer procedural and combination textures
TexBitmap newTexture = renderer.newPlugin<TexBitmap>();
// Set the texture to use the loaded buffer
newTexture.set_bitmap(newBitmap);

BRDFDiffuse brdf = renderer.newPlugin<BRDFDiffuse>();
// Attach the texture as input to the brdf
brdf.set_color_tex(newTexture);
MtlSingleBRDF newMaterial = renderer.newPlugin<MtlSingleBRDF>();
newMaterial.set_brdf(brdf);

Node newNode = renderer.newPlugin<Node>();
newNode.set_material(newMaterial);
newNode.set_geometry(renderer.getPlugin("CubeShape@mesh2"));
newNode.set_transform(Transform(Matrix(1), Vector(-15, 0, 0)));
// Load scene from a file.
renderer.Load("material.vrscene");

// Create a bitmap buffer which can load data from a file
BitmapBuffer newBitmap = renderer.NewPlugin<BitmapBuffer>();
newBitmap.File = Path.Combine("assets", "bricks01.jpg");

// TexBitmap is used for file-based texturing. Other Tex{*} plugins offer procedural and combination textures
TexBitmap newTexture = renderer.NewPlugin<TexBitmap>();
// Set the texture to use the loaded buffer
newTexture.Bitmap = newBitmap;

BRDFDiffuse brdf = renderer.NewPlugin<BRDFDiffuse>();
// Attach the texture as input to the brdf.
brdf.ColorTex = newTexture;
MtlSingleBRDF newMaterial = renderer.NewPlugin<MtlSingleBRDF>();
newMaterial.Brdf = brdf;

Node newNode = renderer.NewPlugin<Node>();
newNode.Material = newMaterial;
newNode.Geometry = renderer.GetPlugin("CubeShape@mesh2");
newNode.Transform = new Transform(new Matrix(1), new Vector(-15, 0, 0));
// Load scene from a file synchronously.
renderer.loadSync("material.vrscene");

// Create a bitmap buffer which can load data from a file
var newBitmap = renderer.classes.BitmapBuffer();
newBitmap.file = path.join("assets", "bricks01.jpg");

// TexBitmap is used for file-based texturing. Other Tex{*} plugins offer procedural and combination textures
var newTexture = renderer.classes.TexBitmap();
// Set the texture to use the loaded buffer
newTexture.bitmap = newBitmap;

var brdf = renderer.classes.BRDFDiffuse();
// Attach the texture as input to the brdf.
brdf.color_tex = newTexture;
var newMaterial = renderer.classes.MtlSingleBRDF();
newMaterial.brdf = brdf;

var newNode = renderer.classes.Node();
newNode.material = newMaterial;
newNode.geometry = renderer.plugins["CubeShape@mesh2"];
newNode.transform = vray.Transform(vray.Matrix(1), vray.Vector(-15, 0, 0));
RawBitmapBuffer
Same as BitmapBuffer, but uses uncompressed data from memory, instead of a file on disk.
Parameters
- filter_type - 1 - nearest; 0 - no filtering; 1 - mip-map filtering; 2 - summed area table filtering
- filter_blur - blur parameter used for filtering
- color_space - 0 - linear, 1 - gamma corrected, 2 - sRGB
- gamma - A gamma–correction value for the image. For example, if the bitmap was saved to disk with a 2.2 gamma correction, you need to enter 0.4545 to remove that correction for the rendering.
- allow_negative_colors - if false negative colors will be clamped
- interpolation - Interpolation method for the mip-map filtering (0 - bilinear, 1 - bicubic, 2 - biquadratic)
- pixels - The raw pixels used in the bitmap
- pixels_type - 0: 8-bit RGBA, 1: float RGBA, 2: 8-bit RGBE, 3: 16-bit RGBA, 4: float RGBA
- width - The width of the raw bitmap
- height - The height of the raw bitmap
TexPtex
Texture loaded from a PTex file. This doesn't use BitmapBuffer. PTex is a mapping system that applies a separate texture to each face of a subdivision or polygon mesh and therefore requires no UV assignment. A PTex file can store an arbitrary number of textures along with mipmaps and adjacency data used for filtering across face boundaries. For more information on the PTex concept, see the Notes section below.
Parameters
- ptex_file - The Ptex texture file
- use_image_sequence -
- image_number -
- image_offset -
- ifl_start_frame - The following 3 parameters are the same as in BitmapBuffer
- ifl_playback_rate -
- ifl_end_condition -
- filter_type - Type of filter used for the texture
- width - width parameter used for filtering
- blur - blur parameter used for filtering
- sharpness - This option is only available when the Filter Type is set to Bicubic and controls the amount of sharpening applied by the filter.
- lerp - Interpolation between mipmap levels. A ptex texture may have several mipmap levels which are basically versions of the texture at different resolutions. This allows a higher resolution texture to be applied to parts of the object closer to the camera and a lower resolution version to be applied to parts of the object that are far away. When this option is enabled V-Ray will interpolate between different mipmap levels to create a smooth seamless texture in the end.
- anisotropic_filtering - Enables anisotropic filtering which improves the rendering of textures when viewed at sharp angles.
- reverse_vertices - Reverses the order of vertices. A ptex is generated for a specific mesh. Sometimes the program generating the ptex numbers the vertices of the mesh in the reverse order. When this happens the object is not properly textured and enabling this option fixes the issue.
- cache_size - The information in a PTex file is compressed for storage. In order to be used, it has to be uncompressed and stored in the RAM. This parameter controls how much memory (in MB) is available for the current texture. If the value is large enough for the whole texture, the information is extracted only once and is stored during the entire rendering. Otherwise the information is constantly read from the hard drive, extracted, and used when necessary. Low value for this parameter may cause large PTex files to render slowly.
- auto_color - Use automatic color channel selection. A ptex may have an arbitrary number of channels and there is no sure way to determine which channel contains which information. When this option is enabled V-Ray tries to select the correct channel for Red, Green and Blue. When this option is off the user manually specifies which channel contains which information.
- r_channel - The index of the channel which will be used as a red channel.
- g_channel - The index of the channel which will be used as a green channel.
- b_channel - The index of the channel which will be used as a blue channel.
- auto_alpha - Use automatic alpha channel selection.
- a_channel - The index of the channel which will be used as a alpha channel.
- alpha_type - Where to take the alpha from.
- color_space - 0 - linear, 1 - gamma corrected, 2 - sRGB
- gamma - A gamma–correction value for the image. For example, if the bitmap was saved to disk with a 2.2 gamma correction, you need to enter 0.4545 to remove that correction for the rendering.
- color - The final texture color
- color_gain - A multiplier for the texture color
- color_offset - An additional offset for the texture color
Notes
- More information about PTex is available here
- PTex files are strongly connected to the topology of an objects's mesh. Therefore any modifiers which change the topology (including TurboSmooth and MeshSmooth) will break the rendering of the PTex texture. If you want to smooth the object, you can use the Displacement Modifier | GeomDisplacedMesh modifier with Subdivision Type and 0.0 for Displacement amount.
- When using PTex textures for displacement, small cracks might appear along polygon edges because of slightly different filtering applied to the PTex texture on adjacent polygons. Setting the filter width to 0.0 will improve the situation, but will cause the most detailed mip-map level of the PTex file to be loaded thus increasing the required memory.
- When using PTex textures for displacement, it might be necessary to adjust the
min_boundandmax_boundparameters of the GeomDisplacedMesh modifier, especially if the texture has negative colors. Otherwise the texture values might be clipped away.