This page provides information on the V-Ray Sphere Light.
Overview
The VRayLightSphere is a VRay Light object in the shape of a sphere. It is a good general-purpose V-Ray light for illuminating scenes to simulate real-world point light sources such as lamp bulbs.
The sphere can be scaled to any size and emits light outward in all directions.

Image courtesy of Daniel Kho
UI Paths
||V-Ray Shelf|| > VRayLightSphere button
Create menu > Lights > V-Ray Sphere Light
Basic Parameters
Enabled – Enables the VRayLightSphere.
Color Mode – Chooses the mode in which the color of the light will be specified.
Light Color – When Color Mode is set to Color, this parameter controls the color of the light. When using photometric units, this color is normalized so that only the color hue is used, whereas the light intensity is determined by the Intensity multiplier parameter.
Temperature – When Color Mode is set to Temperature, this parameter controls the color of the light in degrees Kelvin.
Intensity multiplier – Multiplier for the light color; this is also the light intensity in the units chosen by the intensity Units parameter.
Units – Dropdown to select light units. Using correct units is essential when you are using the VRayPhysicalCamera. The light will automatically take the scene units scale into consideration to produce the correct result for the scale you are working with.
default – The color and multiplier directly determine the visible color of the light without any conversion. The light surface will appear with the given color in the final image when seen directly by the camera (assuming there is no color mapping involved).
Lumens – Total emitted visible light power measured in lumens. When this setting is used, the intensity of the light will not depend on its size. A typical 100W electric bulb emits about 1500 lumens of light.
lm/m/m/sr – Visible light surface power measured in lumens per square meter per steradian. When this setting is used, the intensity of the light depends on its size.
Watts – Total emitted visible light power measured in watts. When using this setting, the intensity of the light does not depend on its size. Keep in mind that this is not the same as the electric power consumed by a light bulb for example. A typical 100W light bulb only emits between 2 and 3 watts as visible light.
w/m/m/sr – Visible light surface power measured in watts per square meter per steradian. When this setting is used, the intensity of the light depends on its size.

Size
Radius – The radius of the light source, measured in scene units.
Sphere segments – Controls the quality of the light object when it is visible either directly or in reflections. A bigger number makes the sphere smoother.

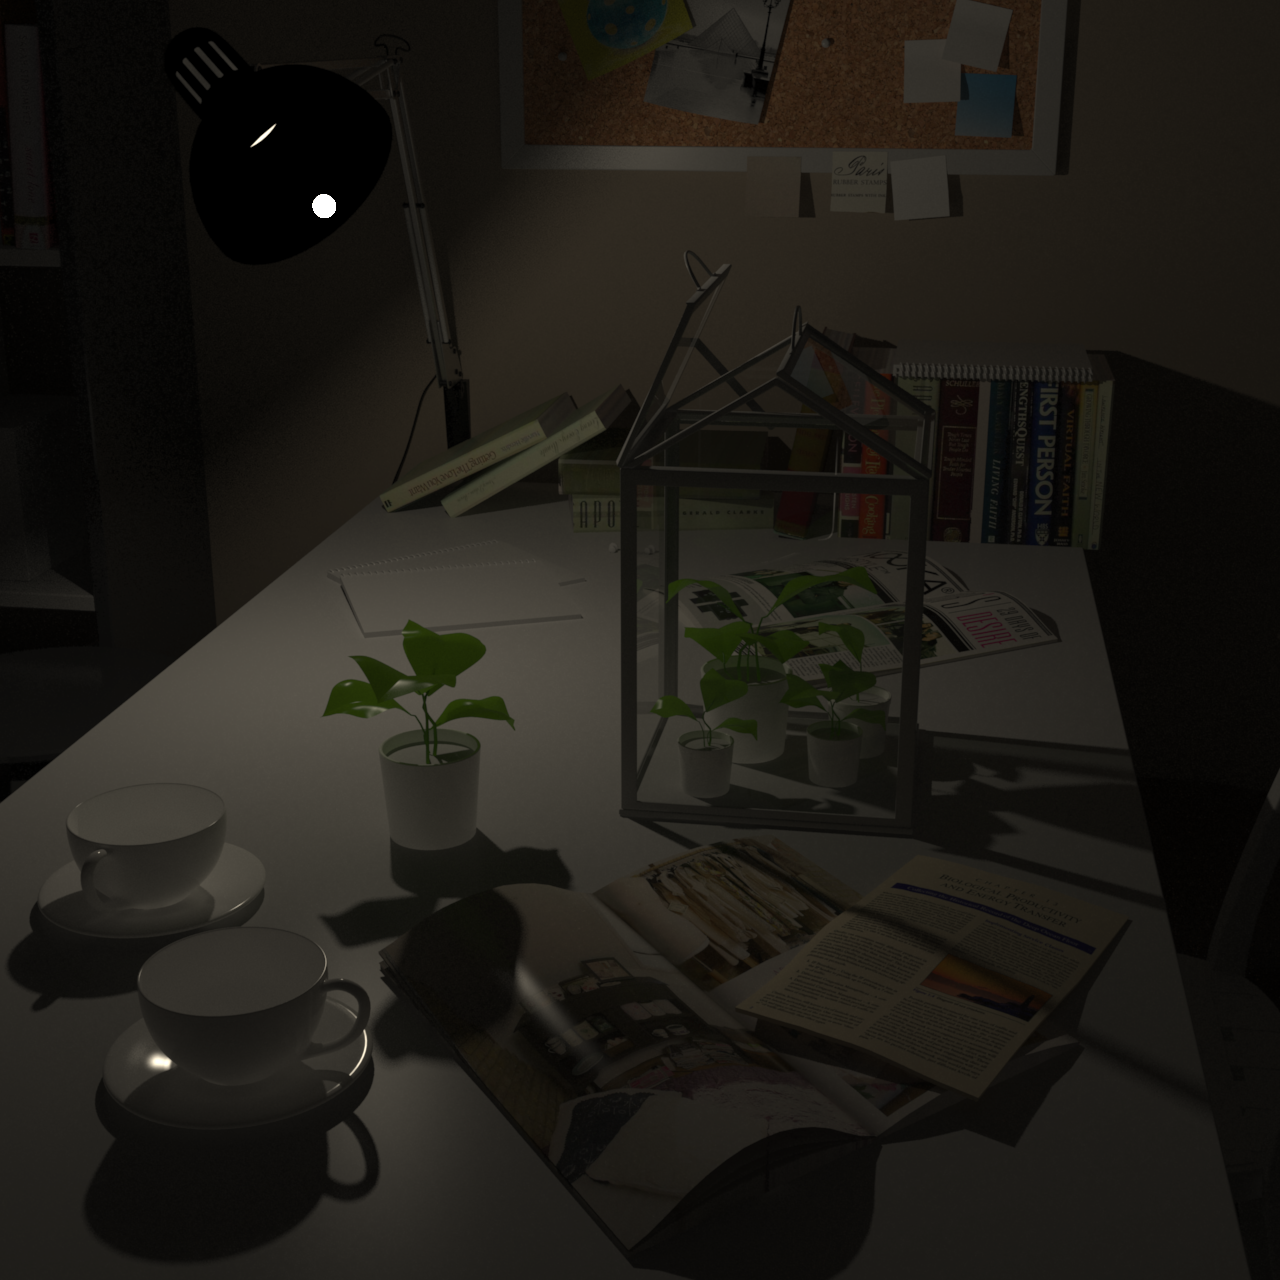
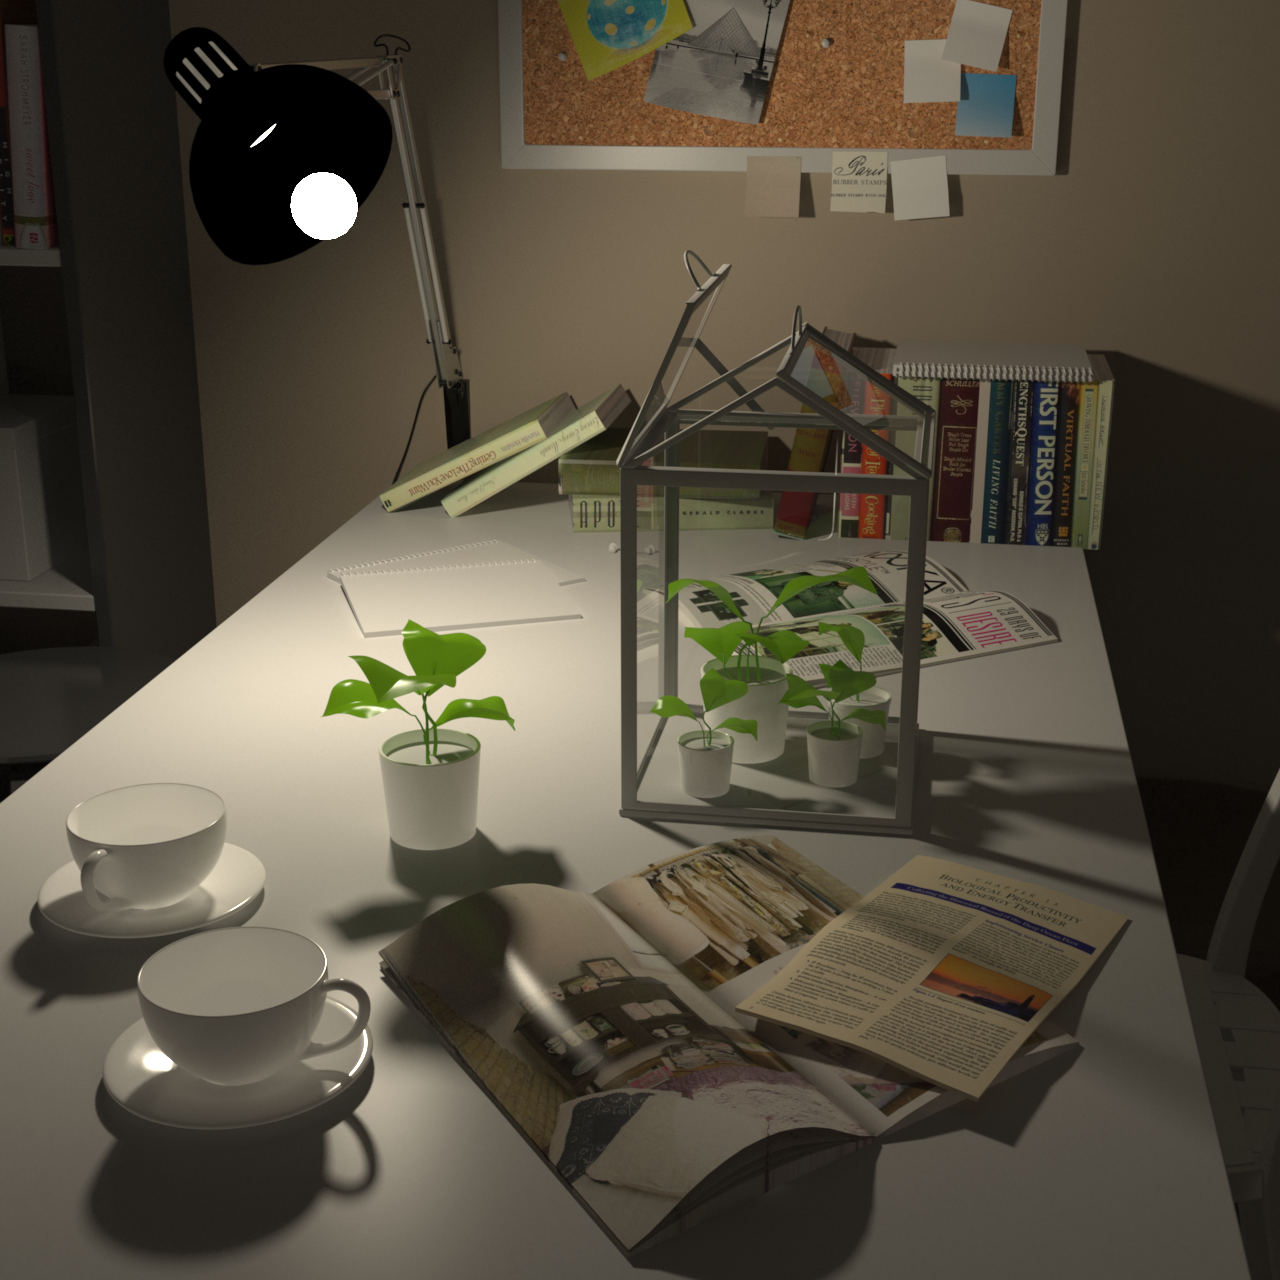
Example: Size of Lights, Shadows and Intensity
The following images show how the size of a light affects shadows. Bigger lights produce blurrier shadows, while smaller lights produce sharper shadows:
Radius = 1
 Units = default
Intensity multiplier = 100
 Units = Lumens
Intensity multiplier = 800
 Units = lm/m/m/sr
Intensity multiplier = 4500
 Units = Watts
Intensity multiplier = 2
 Units = W/m/m/sr
Intensity multiplier = 50
Radius = 3
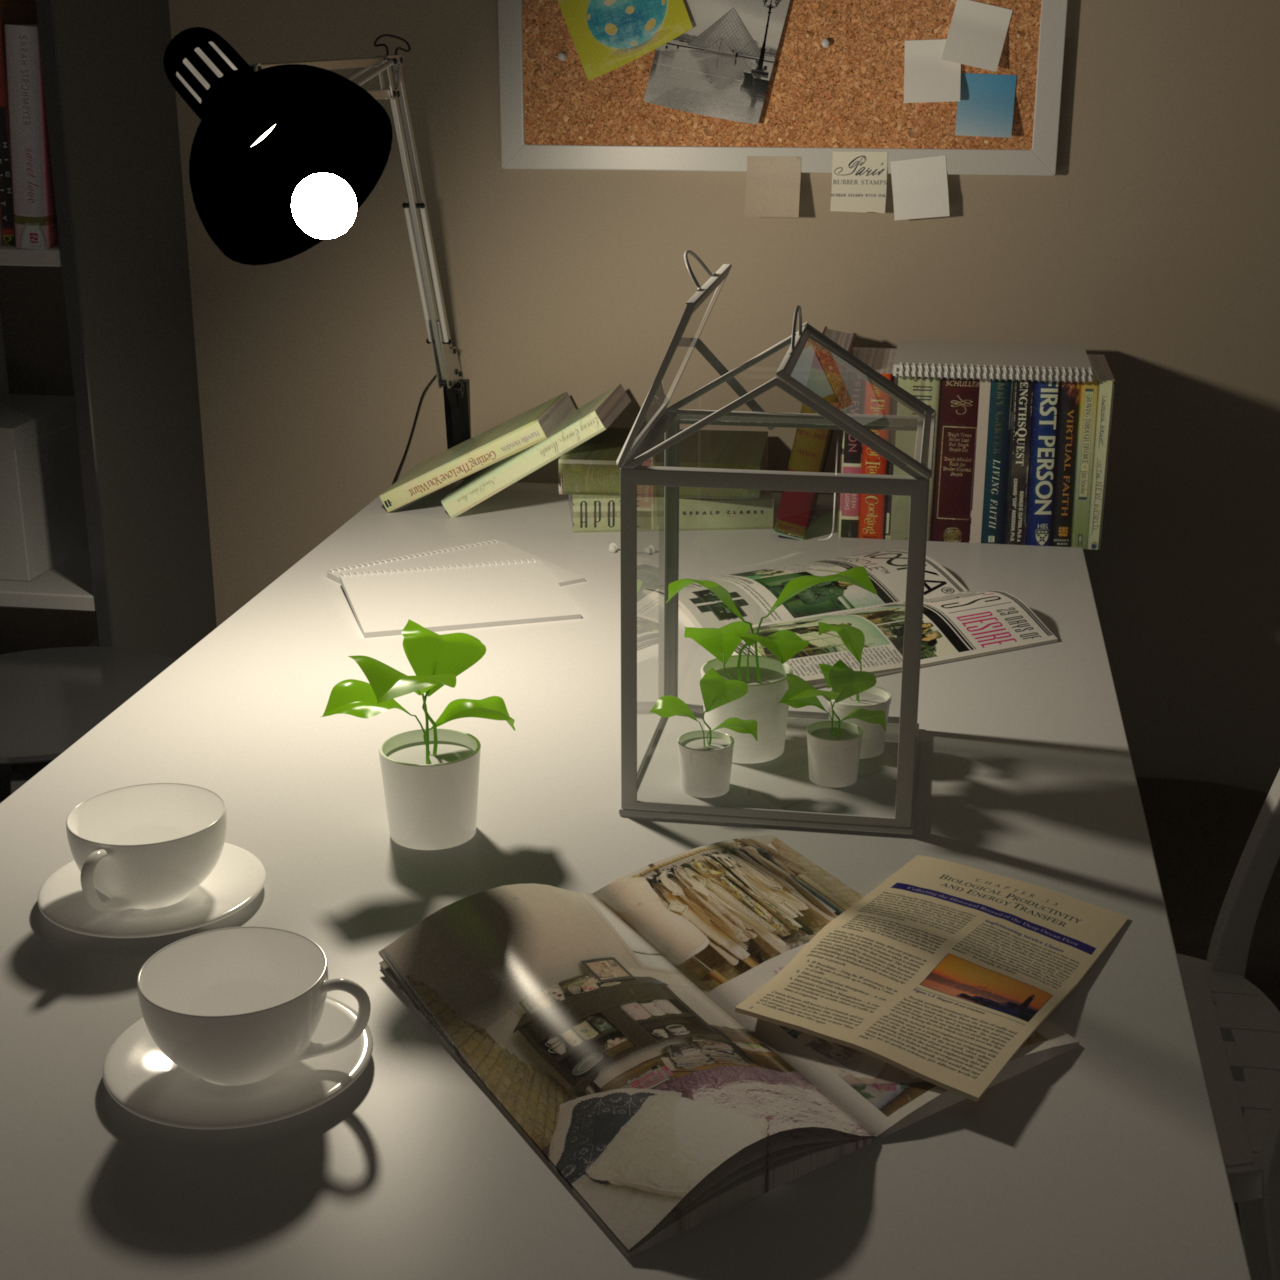 Units = default
Intensity multiplier = 100
 Units = Lumens
Intensity multiplier = 1600
 Units = lm/m/m/sr
Intensity multiplier = 4500
 Units = Watts
Intensity multiplier = 2
 Units = W/m/m/sr
Intensity multiplier = 0.50
Radius = 6
 Units = default
Intensity multiplier = 100
 Units = Lumens
Intensity multiplier = 1600
 Units = lm/m/m/sr
Intensity multiplier = 4500
 Units = Watts
Intensity multiplier = 2
 Units = W/m/m/sr
Intensity multiplier = 50
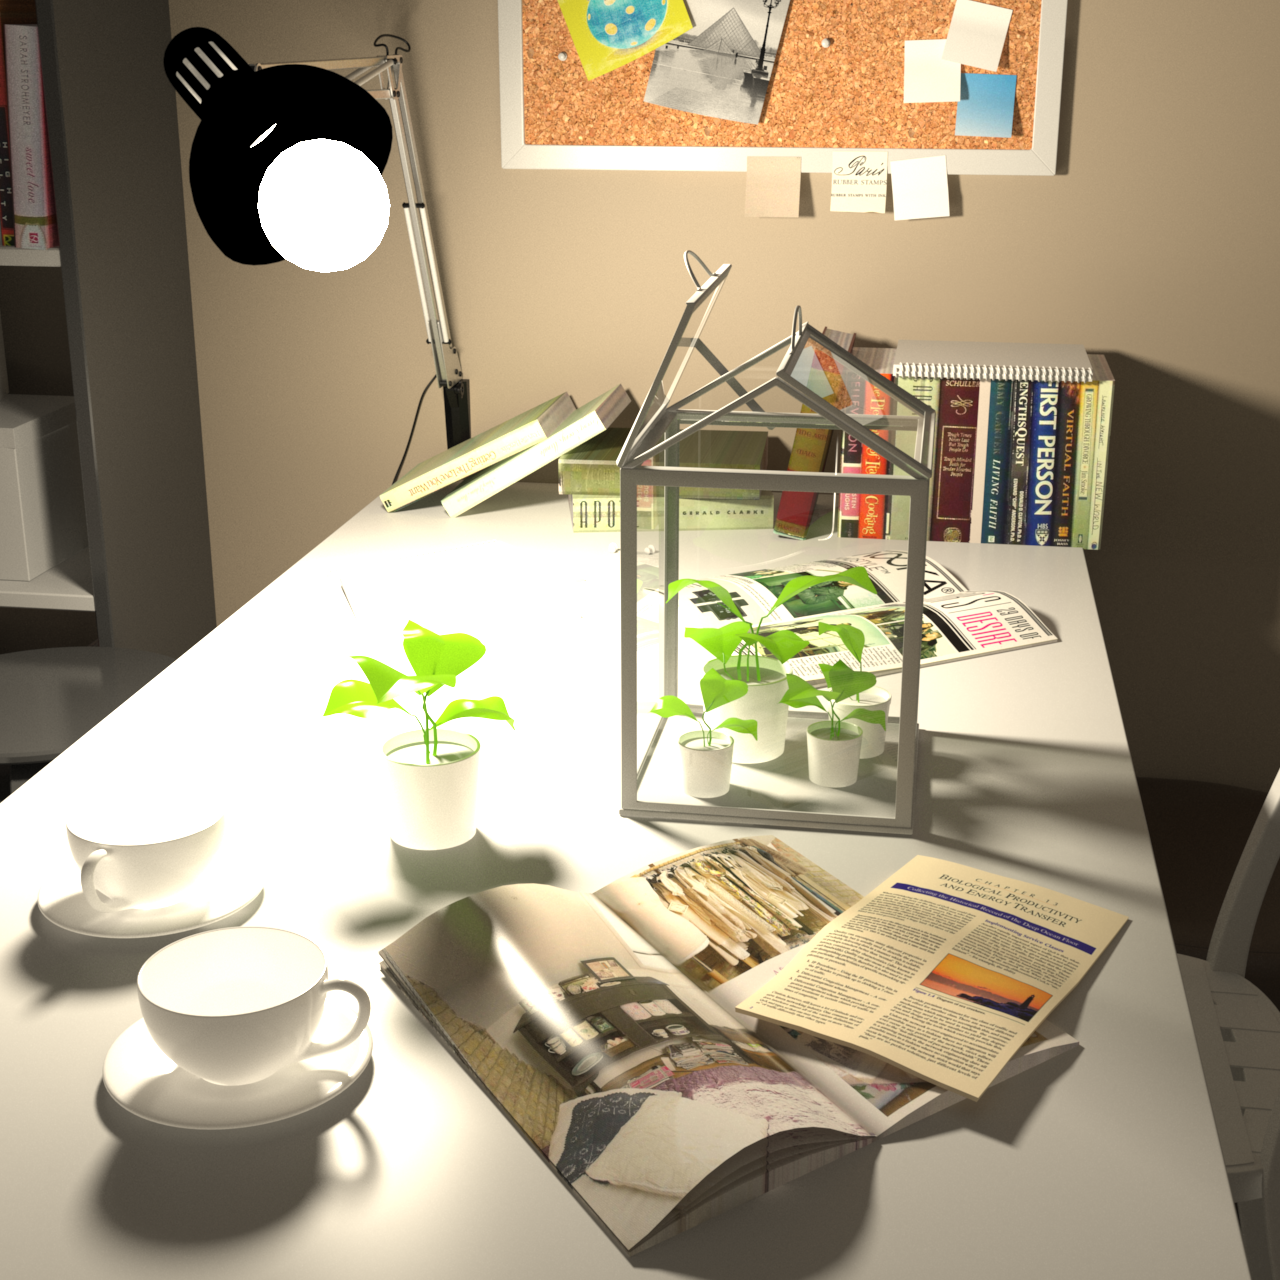
Notice that when we set the Units to Watts and Lumens the light appears to be of the same intensity. This is because the emitted light does not depend on the size of the light. The other three units depend on the size of the light - larger surfaces emit more light, that is why the intensity of the light increases with the radius of the light source. Note that the Intensity multiplier had to be adjusted for the different units in order to produce similar light intensity in the first images. However the multiplier is the same for each set of three images.
Options
Invisible – Controls whether the shape of the VRayLight source is visible in the render result. When disabled, the source is rendered in the current light color. Otherwise it is not visible in the scene. Note that this option only affects the visibility of the light when seen directly by the camera or through refractions. The visibility of the light with respect to reflections is controlled by the Affect specular and Affect Reflections options.
No Decay – Normally the light intensity is inversely proportional to the square of the distance from the light (i.e. surfaces that are farther from the light are darker than surfaces which are closer to the light). When this option is enabled, the intensity will not decay with distance. For more information, see the Real-World Lights and Inverse Square Falloff example below. This option is inactive when using the V-Ray CUDA engine.
Affect Diffuse – Determines whether the light is affecting the diffuse properties of the materials.
Affect Specular – Determines whether the light is affecting the specular of the materials. This means glossy reflections.
Affect Reflections – Determines whether the light will appear in reflections of materials. This means both perfect and glossy reflections.
Diffuse contribution – A multiplier for the effect of the light on the diffuse.
Specular contribution – A multiplier for the effect of the light on the specular.
Example: Real-World Lights and Inverse Square Falloff
The following images demonstrate the No Decay parameter. In the real world (within the earth's atmosphere), light energy attenuates with the inverse square of the distance from the light to the shaded surface. However, you can disable light decay to achieve a light with constant intensity.
No Decay is disabled (the default)
Intensity multiplier = 12000
No Decay is enabled
Intensity multiplier = 3
Sampling
Subdivs – This parameter is disabled by default since most users will not need local control of subdivs, however this parameter controls the number of samples V-Ray takes to compute lighting locally for this light. Lower values create more noise, but render faster. Higher values produce smoother results but take more time to render. Note that the actual number of samples also depends on the Sampler settings. By default, this parameter is controlled by the Min Shading Rate in the image sampler. This parameter is not available when the renderer is set to CUDA.
To activate this parameter and specify a value, use the Use Local Subdivs parameter under the V-Ray > DMC Sampler tab in the Render Settings window.
Light cutoff threshold – Specifies a threshold for the light intensity, below which the light will not be computed. This can be useful in scenes with many lights, where you want to limit the effect of the lights to some distance around them. Larger values cut away more from the light; lower values make the light range larger. If you specify 0.0, the light will be calculated for all surfaces. This parameter is not available when the renderer is set to CUDA.
Override motion blur samples – Overrides the default number of samples that will be used to sample the current light for motion blur.
Motion blur samples – When Override motion blur samples is enabled, determines the samples the motion blur created by the current light.
Shadows
Shadows – When enabled (the default), the light casts shadows. Disable to turn off shadow casting for the light. For more information, see the Size of Lights, Shadows and Intensity example earlier in this page.
Shadow bias – Moves the shadow toward or away from the shadow-casting object (or objects). Higher values move the shadow toward the object(s) while lower values move it away. If this value is too extreme, shadows can "leak" through places they shouldn't or "detach" from an object. Other effects from extreme values include moire patterns, out-of-place dark areas on surfaces, and shadows not appearing at all in the rendering.
Shadow Color – Controls the color of shadows for this light. Note that anything different from black is not physically correct. This option is inactive when using the V-Ray CUDA engine.

Photon Emission
This rollout is inactive when using the V-Ray CUDA engine.
Caustics subdivs – Used when calculating Caustics. Lower values mean more noisy results, but will render faster. Higher values produce smoother results but take more time.
Caustics multiplier – A multiplier for the generated caustics by the selected light. Note that this multiplier is cumulative - it does not override the multiplier in the Caustics rollout of the render settings.
Photon Subdivs and Diffuse Multiplier parameters no longer show in the UI, as they are related to the Photon Map GI engine, which is deprecated. They are still accessible through script, if needed.

UI
Locator scale – Multiplies the size of the locator in the viewport. This does not effect the render.
