
Crowd Paths
The Crowd Paths are walkways powered by our new neural network animation engine. They must be populated with Rigged actors only. With them, a large number of people can be easily generated in a controlled and procedural way. They are meant to be used for mid-long shots.
Add Actors to Crowd Path
It is possible to add actors to a Crowd path either manually or by generating them with the tools available in the Path Properties.
To add the models manually, follow these steps:
- Select an Actor from the Library: Actors panel.
- Click and drag the actor into the 3d viewport and release the mouse. Move the character over the walkway until the mouse pointer change into a link icon and click to place the actor.
To add multiple actors automatically and distribute them along the Path, follow these steps:
- Select a walkway in the 3d viewport.
- Go to the Properties Panel.
- Select multiple actors from the library (using Ctrl or Shift) and drop them into the Crowd List of the Path.
- Use the Actors Count property to enter the number of characters you’d like to create on the selected walkway.
- Click Generate to create the characters.
If the list empty when the Generate button is pressed, the path will be filled with random models that have already been downloaded and are available in the Purchases folder.
Control the Placement of Actors
Anima gives you precise control over how your characters are distributed on a walkway either using presets or by creating your own placement patterns using the Cross Distribution, Longitudinal distribution, and Actor spacing range parameters. These are accessed in the Properties panel when a walkway is selected.

To use a built-in preset to control the placement of characters, select the walkway and click the buttons at the top of the Properties Panel.

Options include (from left to right): one group in single file formation, multiple small groups, even distribution, one group in squad formation.


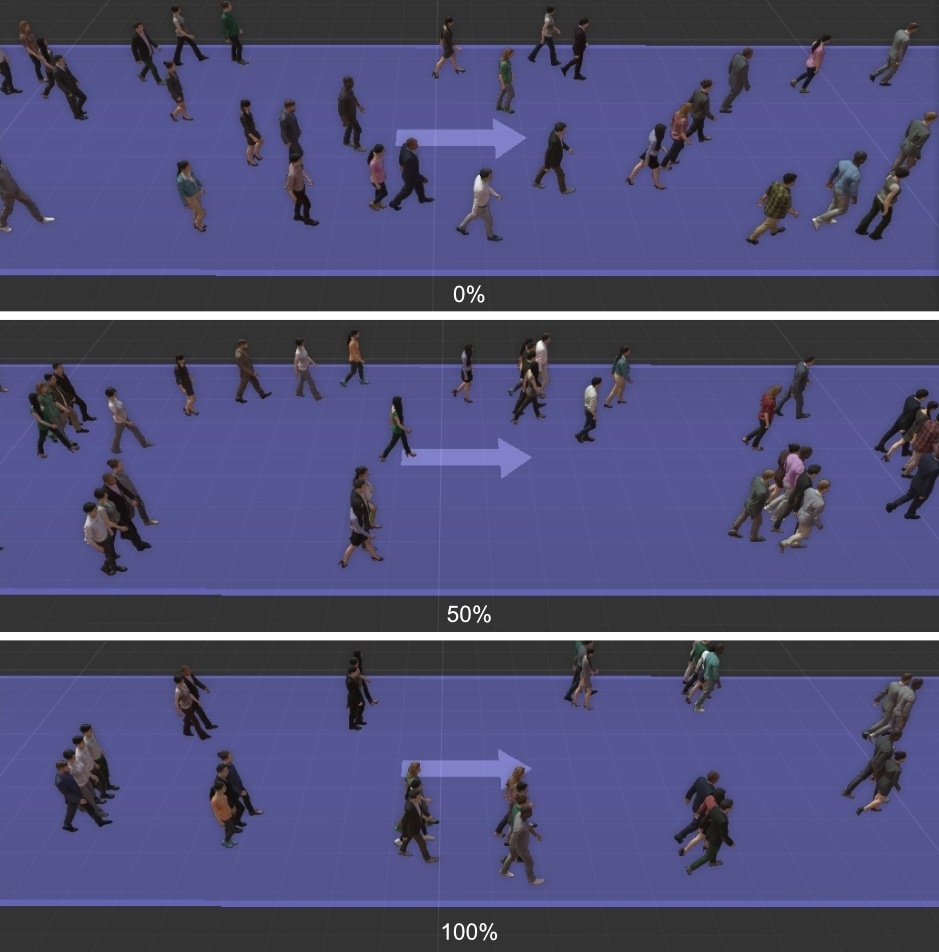
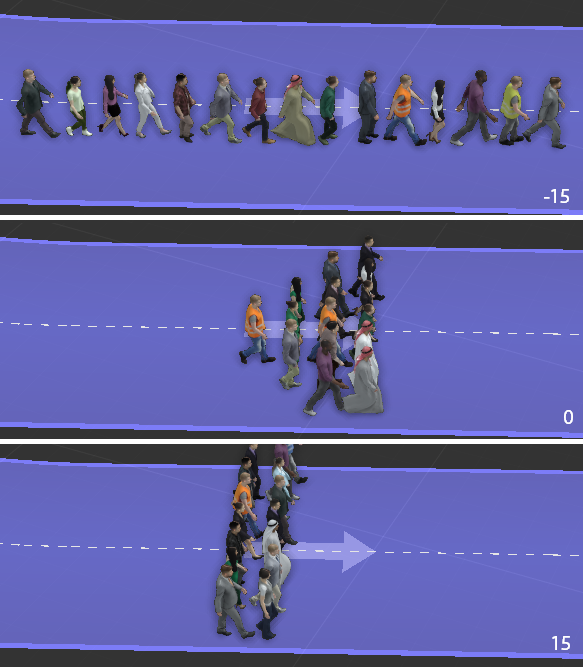
To control the lateral placement of characters, use the Cross Distribution parameter.

The range starts at 0% in the center and moves outwards to -100% on one side of the walkway and 100% to the opposite side of the walkway.
To control the starting point of the characters along the length of the walkway, use the Longitudinal Distribution parameter. The range starts at 0% at the beginning of the path to 100% at the end.


Set the Direction of Motion
The direction in that characters move on walkways is set using one of 3 modes, either forward, backward, or both. To change the mode:
Select the walkway in the 3d viewport or use the Project Panel.
Go to the Properties panel and change the mode using the Path Properties > Path Direction Mode dropdown list.
Click Generate.

Randomize Motion Phase and Speed
It is possible to randomize both the phase and the speed of the motions of the actors. By default, the Phase range is set to full random (0-100) and the speed range is set to walk (1,10 – 2,00 Km/s).
The following image shows the same model using a very small range on both, phase and speed.

As you can see, all the models start their walk animation at almost the same position. On the other hand, by setting a full range of randomness on both parameters, you can see much more diversity in the movements.
To change those parameters follow these steps:
- Select the path in the 3d viewport or from the Project Panel.
- Each character’s motion can be randomly offset to create a more realistic variation. To set the range for the offset values go to the Properties panel and use the Actor Animation Phase Random minimum and maximum properties.
- To randomize the animation speed, set the range using the Actor Speed Variance minimum and maximum properties.

Create Cluster of Characters
Automatic Grouping
To create a distribution pattern that automatically groups actors together.
- Select a Crowd Path from the 3d viewport of the Project Panel.
- Go to the Properties Panel.
- Increase the Grouping percentage property. The higher the percentage the higher the number of groups created with respect to the non-grouped actors. At 100%, all actors walk in groups.

The number of people in each group is controlled by the Groups size range. In the example above, the range was between 2 and 4 members.
To control the distribution shape of grouped characters use the Group shape property. Negative values create distributions that stretch longitudinally and positive values create distributions that stretch laterally.
Finally, you can control the spacing between grouped characters using Group social distance parameter. Low values will place characters close together and large values will spread them apart. This is a range slider with a minimum and maximum value and the spacing is calculated by randomly selecting a value from within the range for each character.
Manual Grouping
It is also possible to manually group characters together to create nearly any possible distribution pattern. To manually align characters, follow the steps.
In the 3d viewport, select the character you wish to be the follower. This character’s position will be linked to another character’s location on the walkway. If you want to add a follower from the library, you first need to add it to the path by dropping it near to the leader.
Click and drag the follower actor over the lead character to which you wish it to be linked. While grabbing the follower and hovering over the Path, the icon changes to the chain icon ![]() , but this is not what you need. This is used to place the actor somewhere in the path. In order to be considered a follower, the drop must be done near the feet, inside the “move” circle with the arrows. When you drag over that place you will see how the cursor will change, adding a man icon
, but this is not what you need. This is used to place the actor somewhere in the path. In order to be considered a follower, the drop must be done near the feet, inside the “move” circle with the arrows. When you drag over that place you will see how the cursor will change, adding a man icon ![]() to indicate that you are creating a group.
to indicate that you are creating a group.

Release the mouse, your character will have moved and it will display an M and character icon to indicate that it is aligned to another actor.

If you locate the character in the Project Panel you will see that it shows the group as a hierarchy. In fact, you can also group characters directly in the Project panel by simply dragging them onto one another to create a hierarchy.
If you want to change the layout of the group, just move the characters as normal. Moving the person to whom the others are linked will move the whole group, moving the linked characters will allow you to position them individually.

Stairs, Slopes, and Uneven Terrains
The neural engine that drives the crowds does not require a special object to make the actors move seamlessly through slopes, stairs, or uneven terrains. You just need to draw the path over your geometry background and the simulation will generate the motion that best adapts to each type of environment.
Create Paths on Stairs
Add those stairs to your geometry background.

Select the Crowd Path tool and draw a new path over the stairs. To get better results, we highly recommend creating a path point at the top and bottom of each staircase.
Go to the Node Properties panel and change the Stair Direction Rules if necessary. These determine which side of the walkway actors will use depending on if they are ascending or descending. Options are Left Down/Right Up, Right Down/ Left Up, or No Rules in which case actors will use any side irrespective of their direction.
Click Generate to create the actors.

Create Paths on a Slope or Uneven Terrain
- Add a geometry background that includes uneven terrain or ramps.
- To create characters on ramps of uneven terrain you would use exactly the same procedure to draw a path over them and start selecting the Crowd Path tool.
- Then click on the 3d viewport to define the starting point of the path and keep clicking to add additional points.
- For complex terrains, you may find that adding additional points might give you a more accurate projection of the walkway onto the surface.
- Right-click / ESC to finish the drawing.
