This page provides information on the Corona Physical Material, its settings, and its usage.
Overview
The new Physical Material is introduced in Corona Renderer 7 for 3ds Max and Cinema 4D. This material has been designed from the ground up and is intended to replace the previously default Corona Material, which in version 7 is called Corona Legacy Material. Some of the benefits of the Physical Material are its ease of use and its ability to achieve realistic results, ensuring you can't accidentally create unrealistic "fake" materials that break energy conservation and other laws of physics regardless of the settings you use. The result will always be (and look) realistic.
The Physical Material also includes presets that you can easily select from a dropdown menu. These include materials such as Aluminium, Brass, Chrome, Copper, Diamond, Glass, Gold, Iron, Mirror, Plastic, Plexiglass, Satin, and even Velvet.
Why it was added?
The Corona Physical Material was added as the replacement of the old Corona Material. Some of the benefits of the Physical Material include:
- The ability to get more realistic and physically plausible results easier;
- Better and easier layering system without the need to set up complex Layered Material networks (clearcoat, sheen);
- Compatibility with other software following the physically-based (PBR) guidelines.
How it is better than the old Corona Material (now called Legacy Material)?
There are many benefits over the old CoronaMaterial. For starters, Corona Physical Material offers a natural way to set up realistic materials, making various workflows much more intuitive and simpler in the long run. Its diffuse calculations have been switched from Lambertian to the Oren-Nayar model, so even the simplest of materials will now look better and be rendered more physically correct.
In addition, fake and non-physically plausible material properties are not possible anymore; the current material parameters are designed in a way to prevent such cases.
When to use the Corona Physical Material?
The Physical Material should primarily be used as the new default for any newly created materials, unless it is absolutely necessary to use the Corona Legacy Material (e.g., in case of re-rendering older scenes in Corona Renderer 7 or newer).
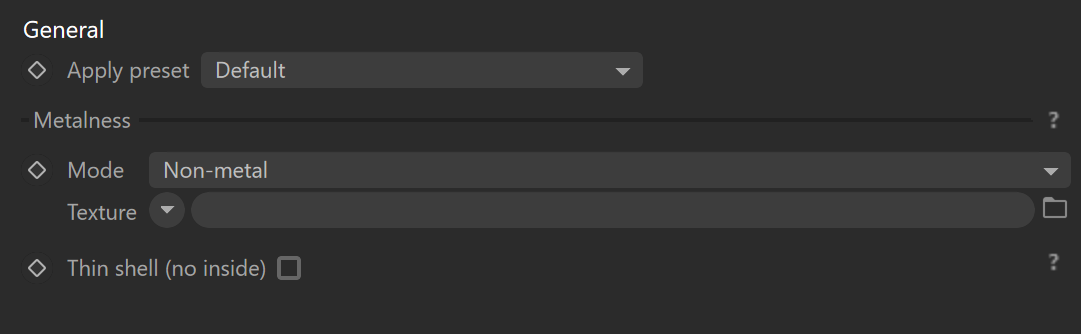
General
Apply preset – Sets the material parameters to the selected preset. Changing the preset does not modify the attached texture maps or shaders.
Metalness
Mode – Allows to select the overall material behavior. Available modes are:
Non-metal – Non-metals (dielectrics) are usually defined mostly by their diffuse color and may be transparent to represent materials like glass or plastic (depending on the refraction amount). When using texture, value 0 represents non-metal, and value 1 represents metal. The value in between represents a mixture of metal and non-metal material.
Metals – Metals (conductors) are defined mostly by their reflection color.
Texture – Defines the texture map or shader that will be used to control the metalness.
Thin shell (no inside) – Simulates a thin shell with no internal volume. Such material has no refraction, no volume scattering, and no subsurface scattering. Refraction is replaced by opacity and volume absorption by Absorption color, while subsurface scattering is replaced by diffuse reflection and translucency. For example, use this to create windows or leaves with a single plane.
Base Layer
Level – The constant color, texture map, or shader will be multiplied by this number. Settings 50% and using pure white color is equal to using 50% gray color or using a texture map or color shader with an output level of 50%.
Color – Defines reflection color for metals (conductors) or diffuse color for non-metals (dielectrics).
Texture – Defines the texture map or shader that will be used for the material's base layer.
Mix mode – Controls the blending mode of the texture map or shader over the color.
Mix strength – Controls the intensity of the texture map or shader that is being used.
If the Mix strength is set to 100%, the texture map or shader will completely override the color unless the Mix mode is set to a different blending mode than Normal.
Roughness
Value – Controls the smoothness of the base layer surface. A value of 0% (black if a map is used) fives a completely smooth surface, which leads to sharp reflections (and possibly refractions) from the base layer. On the other hand, a value of 100% (white if a map is used) gives completely rough surfaces leading to blurred reflections. The smoothness of the surface also influences the diffuse reflections, where the smooth surface gives the perfect Lambert reflection, and the rough surface leads to a more flat-like appearance.
If the roughness mode (in the Advanced options section) is set to Glossiness, the value of this parameter is treated as glossiness.
Texture – Defines the texture map or shader that will be used for the base layer's roughness.
IOR
Value – Sets the Index of Refraction (IOR) for a non-metal (dielectric) object, which controls how much a ray is bent when entering the object and the amount of reflection in a physically plausible way. A value of 1 gives a non-bending of the ray and non-reflection, while a value of 1.52 is good for a generic glass. Precise values for the IOR of different non-metal (dielectric) materials can be found in various online references and guides.
If the IOR mode (in the Advanced options section) is set to Disney Specular, the value of this parameter is treated as a Disney Specular value.
Texture – Defines the texture map or shader that will be used for the base layer's IOR.
Edge color
Level – Specifies the intensity of the edge color.
Color – Determines metal reflection color for rays hitting the object at the grazing angle.
Texture – Defines the texture map or shader that will be used for the base layer's edge color.
Mix mode – Controls the blending mode of the texture map or shader over the edge color.
Mix strength – Controls the intensity of the texture map or shader that is being used.
Base Color determines metal reflection for normal-incident rays.
The edge color parameters can be used only when the Metalness mode is set to Metal.
If the Mix strength is set to 100%, the texture map or shader will completely override the color unless the Mix mode is set to a different blending mode than Normal.
Bump
Enable – This enables the use of bump parameters.
Value – The missing coefficient between the texture and constant color. 100% means only the constant color is used, and the value in-between blend the texture with the constant color.
Texture – Defines the texture map or shader that will be used for the base layer's bump.
Anisotropy
Value – This is the anisotropy of the glossy reflection highlights. A zero value disables anisotropy (creates a perfectly isotropic highlight). A value of -1 creates a maximally anisotropic highlight on one axis, and a value of 1 creates a maximally anisotropic highlight on the perpendicular axis. The anisotropy reference frame can be defined in the Advanced options tab.
Texture – Defines the texture map or shader that will be used for the base layer's anisotropy.
Rotation of the anisotropic highlights
Value – Rotates the direction of the anisotropic highlights. Value is provided in degrees.
Texture – Defines the texture map or shader that will be used for the base layer's anisotropic highlights rotation.

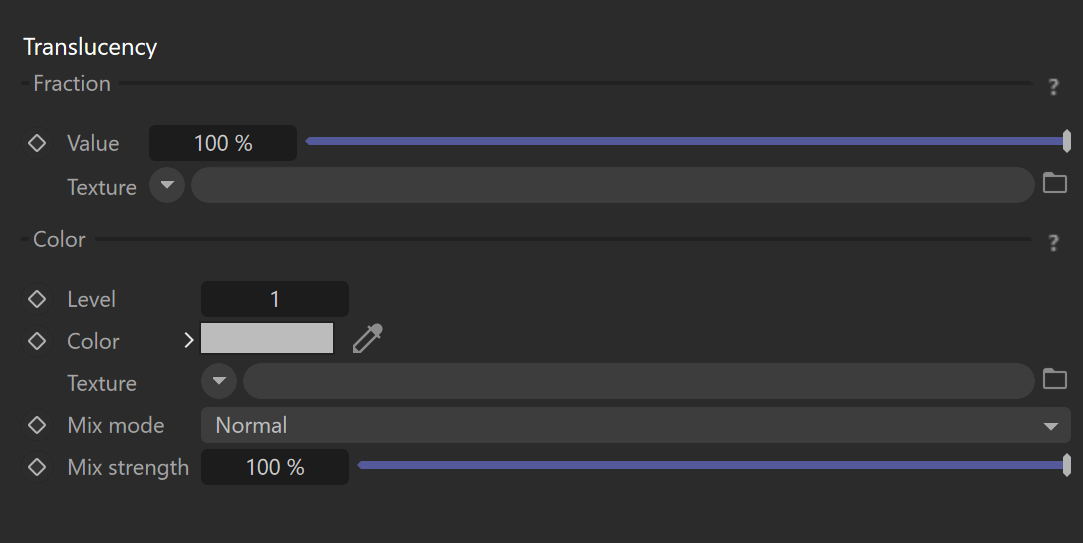
Translucency
Fraction
Value – A fraction of diffuse reflection that is reflected on the other side of the material using the Thin mode. A value of 100% leads to a full translucency effect and zero diffuse reflection, while a value of 0% disables translucency.
Texture – Defines the texture map or shader that will be used for the translucency fraction.
Color
Level – Specifies the intensity of the translucency color.
Color – Determines the color of the translucency effect-diffuse reflection on another side of the material using Thin mode.
Texture –Defines the texture map or shader that will be used for the translucency color.
Mix mode – Controls the blending mode of the texture map or shader over the translucency color.
Mix strength – Controls the intensity of the texture map or shader that is being used.
If the Mix strength is set to 100%, the texture map or shader will completely override the color unless the Mix mode is set to a different blending mode than Normal.
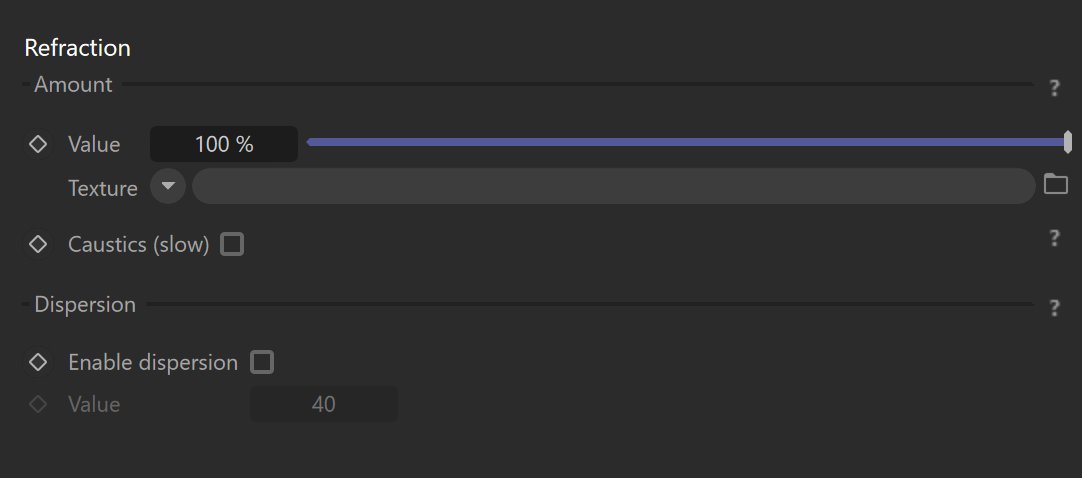
Refraction
Amount
Value – Sets the amount of refraction in the non-metal (dielectric) object. The value of 0% leads to a plastic-like appearance with a diffuse reflection defined by the base color. The value of 100% leads to a glass-like appearance. the values in between result in a mixture of plastic and glass material.
Texture – Дefines the texture map or shader that will be used for the refraction.
Caustics (slow) – Enables physically correct unbiased caustics. When off, faster, transparent shadows are used.
Dispersion
Enable dispersion – This enables the material's light dispersion.
Value – The Abbe number is a measure of the dispersion of the material, with lower values indicating greater dispersion. For most materials, a value between 30 and 60 should be used. Values lower than 10 lead to highly unrealistic dispersion.
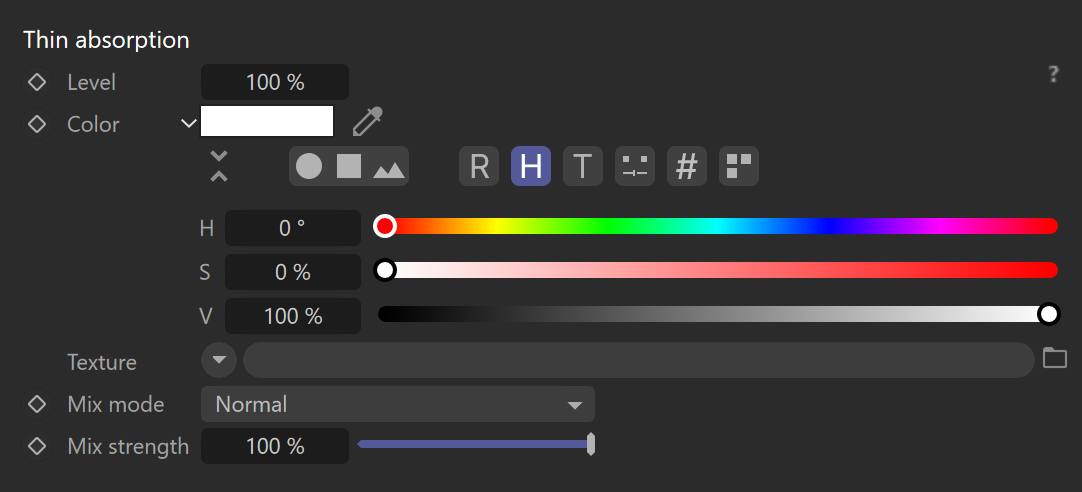
Thin absorption
Level – Specifies the intensity of the thin absorption.
Color – Simulates a volumetric absorption in a glass using the Thin shell mode.
Texture – Defines the texture map or shader that will be used for the thin absorption.
Mix mode – Controls the blending mode of the texture map or shader over the thin absorption's color.
Mix strength – Controls the intensity of the texture map or shader that is being used.
If the Mix strength is set to 100%, the texture map or shader will completely override the color unless the Mix mode is set to a different blending mode than Normal.
Opacity
Level –Specifies the opacity level. Both the opacity constant color and texture map are multiplied by this number. Setting 50% and using white color is equal to using 50% gray color or using a texture map with output level of 50%.
Color – Specifies the opacity of the material. It can be set as a constant color or mapped by a texture map.
Texture – Defines the texture map or shader that will be used for the opacity.
Mix mode – Controls the blending mode of the texture map or shader over the opacity color.
Mix strength – Controls the intensity of the texture map or shader that is being used.
Clip – When enabled, this applies a threshold to the opacity map so that everything below 50% gray is completely opaque. This can speed up rendering significantly.
If the Mix strength is set to 100%, the texture map or shader will completely override the color unless the Mix mode is set to a different blending mode than Normal.

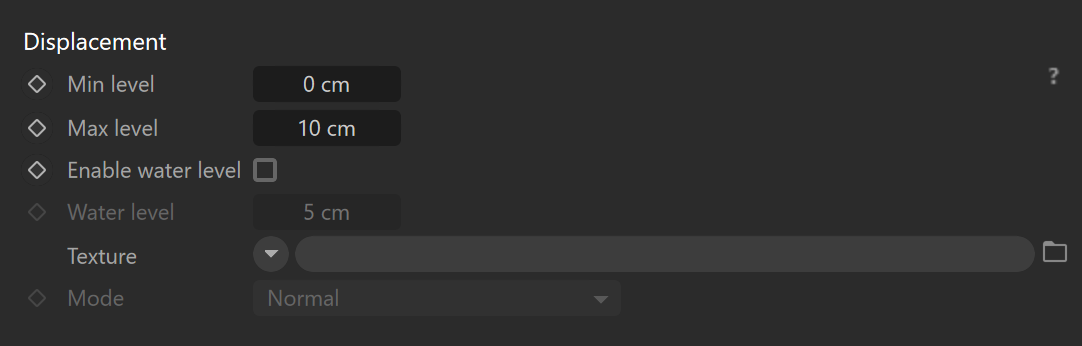
Displacement
Min level – Sets the displacement distance applied to areas with black (0.0) texture. Measured in world space units.
Max level – Defines the strength of the displacement effect. It is the world space displacement distance applied to the areas with white (1.0) textures.
Enable water level – When enabled, this option enables the clipping of the displacement starting from the 0.0 values or black areas of the texture map or shader.
Water level – Sets the clipping distance in world space units.
Texture – Defines the texture map or shader that will be used for the displacement.
Mode – Defines the mode used to calculate the displacement. Available modes are:
The displacement can also be manually adjusted for specific objects by using a Corona Displacement Tag.
Clearcoat layer
Amount
Value – Sets the strength of the clearcoat layer. A value of 100% leads to a full clearcoat effect, while a value of 0% disables clearcoat.
Texture – Defines the texture map or shader that will be used for the clearcoat layer.
IOR
Value – Sets the Index of refraction (IOR) of clearcoat layers, which controls the amount of reflection in a physically plausible way.
Texture – Defines the texture map or shader that will be used for the clearcoat layer's IOR.
Roughness
Value – Controls how sharp or blurred the reflection of the clearcoat layer is.
Texture – Defines the texture map or shader that will be used for the clearcoat layer's roughness.
Absorption
Level – Specifies the intensity of the clearcoat layer's absorption.
Value – Allows choosing the clearcoat layer's absorption color.
Texture – Defines the texture map or shader that will be used for the clearcoat layer's absorption.
Mix mode – Controls the blending mode of the texture map or shader over the absorption's color.
Mix strength – Controls the intensity of the texture map or shader that is being used.
If the Mix strength is set to 100%, the texture map or shader will completely override the color unless the Mix mode is set to a different blending mode than Normal.
Bump
Enable – This enables the bump for the clearcoat layer.
Value – Sets the intensity of the clearcoat layer's bump effect.
Texture – Defines the texture map or shader that will be used for the clearcoat layer's bump.

Sheen layer
Amount
Value – Sets the strength of the sheen layer. A value of 100% leads to a full sheen effect, while a value of 0% disables sheen.
Texture – Defines the texture map or shader that will be used for the sheen layer.
Color
Level – Specifies the intensity of the sheen layer's color.
Value – Sets the color of the front reflection of the sheen layer.
The sheen layer has a Fresnel factor applied to it, and thus it will have a white color when approaching grazing angles. This also means that setting the black color here does not disable the sheen effect.
Texture – Defines the texture map or shader that will be used for the sheen layer's color.
Mix mode – Controls the blending mode of the texture map or shader over the sheen layer's color.
Mix strength – Controls the intensity of the texture map or shader that is being used.
If the Mix strength is set to 100%, the texture map or shader will completely override the color unless the Mix mode is set to a different blending mode than Normal.
Roughness
Value – Sets the roughness of the sheen surface. Low roughness keeps the specular highlight at the grazing angles, and as it increases, the sheen reflection dominates.
Texture – Defines the texture map or shader that will be used for the sheen layer's roughness.

Volumetrics
Absorption color
Level – Specifies the intensity of the volumetric's absorption color.
Color – Absorption is controlled by setting the color that an originally white ray has after traveling the specified distance in the medium. A lower distance value makes the effect stronger. Distance 0 is a special value that disables the effect completely.
Texture – Defines the texture map or shader that will be used for the volumetric's absorption color.
Mix mode – Controls the blending mode of the texture map or shader over the absorption's color.
Mix strength – Controls the intensity of the texture map or shader that is being used.
If the Mix strength is set to 100%, the texture map or shader will completely override the color unless the Mix mode is set to a different blending mode than Normal.
Scattering color
Level – Specifies the intensity of the volumetric's scattering color.
Color – Strength and color tint of the volumetric scattering inside the material. Setting a non-black value enables volumetric scattering/SSS effects for this material; it gets multiplied by this value.
Texture – Defines the texture map or shader that will be used for the volumetric's scattering color.
Mix mode – Controls the blending mode of the texture map or shader over the scattering color.
Mix strength – Controls the intensity of the texture map or shader that is being used.
If the Mix strength is set to 100%, the texture map or shader will completely override the color unless the Mix mode is set to a different blending mode than Normal.
Additional
Directionality – Directionality of scattering. A value of 0 produces isotropic (diffuse) scattering, positive values produce forward scattering, and negative values produce backward scattering. A default value of 0 is suitable for most media, with the exception of clouds, where a higher positive number produces the effect of a silver lining. Values close to 1 or -1 increase the amount of image noise.
Distance – Absorption is controlled by setting the color that an originally white ray has after traveling the specified distance in the medium. Lower distance values make the effect stronger. Distance 0 is a special value that disables the effect completely.
Single bounce only – When enabled, only a single bounce(direct lighting) is scattered in the medium. This results in a biased (darker) but fast rendering. Useful e.g., for rendering god rays.

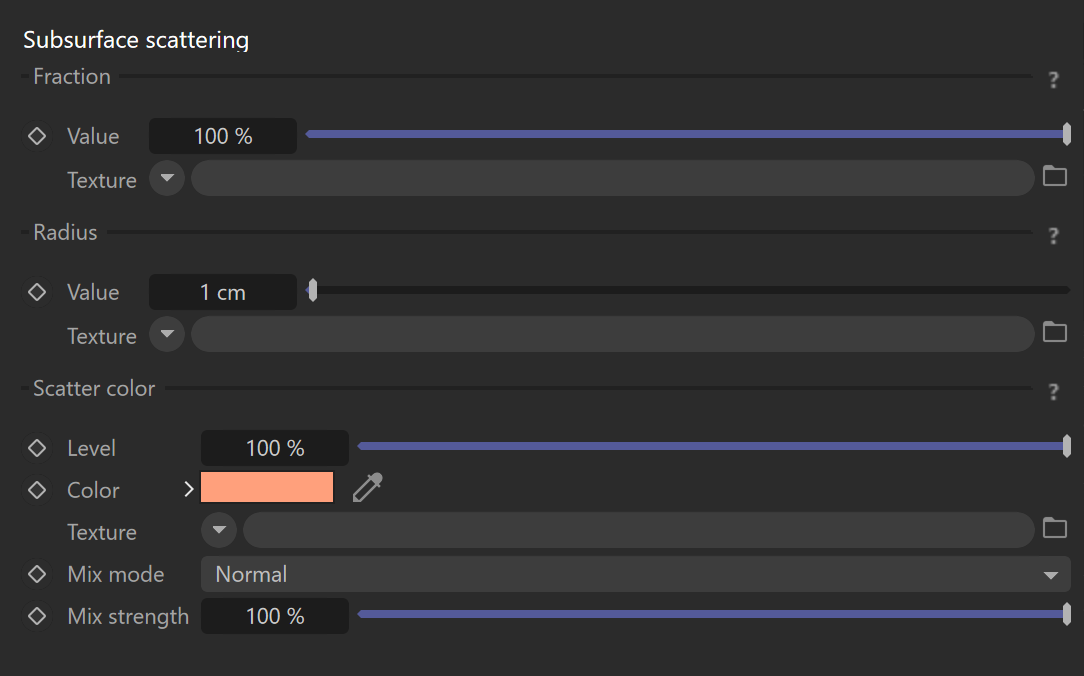
SSS
Fraction
Value – Controls how much the material color is defined by subsurface scattering as opposed to diffuse reflection. A value of 0% results in no subsurface scattering, while a value of 100% results in full subsurface scattering and no diffuse component. It can be set as a numeric value or mapped by a texture map.
Texture – Defines the texture map or shader that will be used for the SSS fraction.
Radius
Value – Defines the subsurface scattering radius, i.e., how far the color scatters from a place that was hit by a light beam. It can be set as a numeric value or mapped by a texture map.
Texture – Defines the texture map or shader that will be used for the SSS radius.
Scatter color
Level – Specifies the intensity of the SSS color.
Color – Defines the scatter color of subsurface scattering, i.e. the color that can be observed in the shadowed parts of the material.
Texture – Defines the texture map or shader that will be used for the SSS color.
Mix mode – Controls the blending mode of the texture map or shader over the scatter color.
Mix strength – Controls the intensity of the texture map or shader that is being used.
If the Mix strength is set to 100%, the texture map or shader will completely override the color unless the Mix mode is set to a different blending mode than Normal.
Self-illumination
Multiplier – Controls the emission property of the material. Useful to create emissive surfaces like LED text, cellphone displays, etc.
It is better not to use the Self-illumination channel as the main light source in a scene. Use a Corona Light material instead.
Color – Specifies the emissive color of the material. It can be set as a constant color or mapped by a texture map.
Texture – Defines the texture map or shader that will be used for self-illumination.
Mix mode – Controls the blending mode of the texture map or shader over the self-illumination color.
Mix strength – Controls the intensity of the texture map or shader that is being used.
If the Mix strength is set to 100%, the texture map or shader will completely override the color unless the Mix mode is set to a different blending mode than Normal.

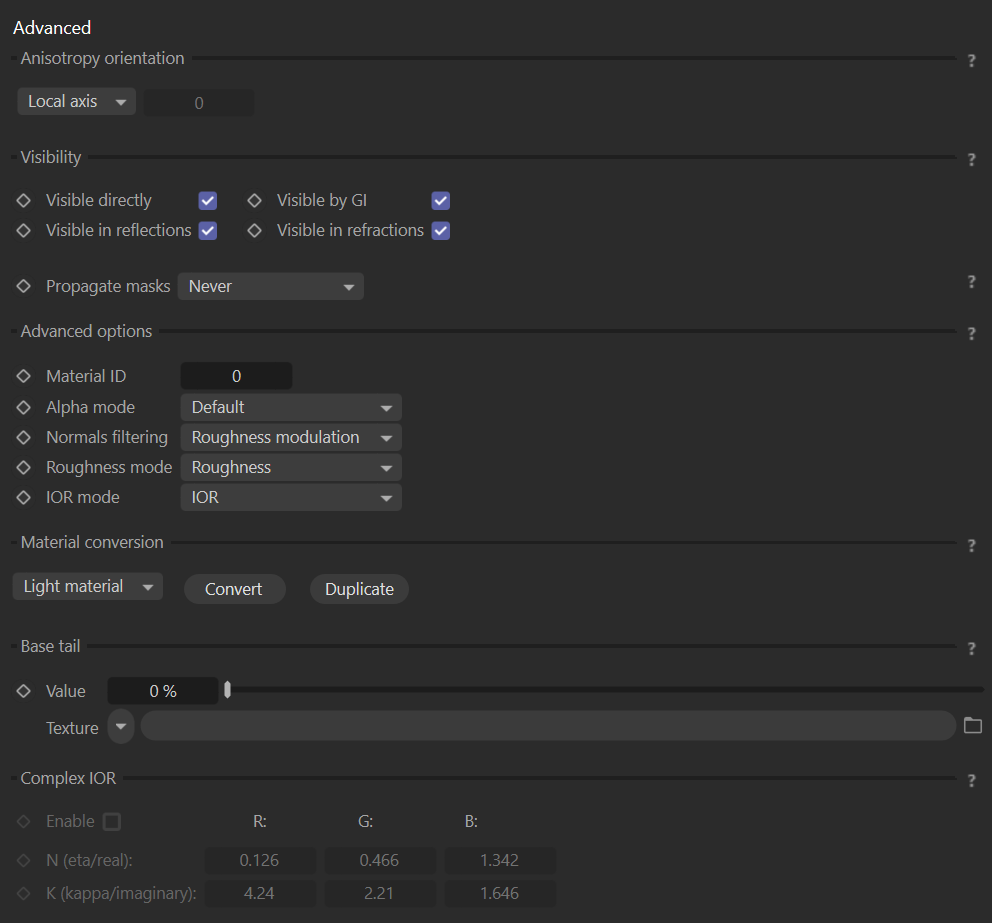
Advanced
Anisotropy orientation
This parameter defines the orientation of the anisotropy highlights. Available modes are:
Local axis – When using this mode, the highlight direction rotates around the local object Z-axis. It sticks with the object when it is rotated/moved.
UVW – When using this mode, the highlight direction follows the direction of the U or V mapping coordinate on the object surface. The mapping channel used for this is explicitly specified.
Visibility
Visible directly – When enabled, this makes the Corona Legacy material directly visible to the camera.
Visible in reflections – When enabled, this makes the Corona Legacy material directly visible in reflections.
Visible in GI – When enabled, this makes the Corona Legacy material directly visible for GI calculation.
Visible in refractions – When enabled, this makes the Corona Legacy material directly visible in refractions.
Propagate masks – Specifies the propagation of non-shading render elements (masks) after interaction with the material. Available modes are:
Never – Mask passes are never propagated through the material, i.e. the material is always visible in masks.
Through reflection – Mask passes are propagated through the material if reflection occurs.
Through refraction – Mask passes are propagated through the material if refraction occurs.
Always – Mask passes are always propagated through the material, i.e. the material is never visible in masks.
Invisible in masks – This mode makes the material invisible in masks.
Advanced options
Material ID – Defines an ID for the material that can be used in the Corona Compositing tag or in the Corona Data shader.
Alpha mode – Specifies how the objects with the material are visible in the alpha channel. Available modes are:
Default – This is the default mode. In this mode, the material alpha value is derived from its opacity and refract components.
Always black – In this mode, the material alpha value is black (material shows as transparent).
Always white – In this mode, the material alpha value is white (material shows as opaque).
Normals filtering – Determines how normal and bump maps are filtered:
None – No filtering is applied to normal and bump maps, providing high accuracy but potential noise and flickering.
Linear – Normal and bump maps are filtered linearly, just like other map types, potentially affecting material appearance with varying camera distance and render resolution.
Roughness Modulation – Utilizes linear filtering for normal and bump maps while also adjusting material roughness to maintain consistent material appearance regardless of camera distance and render resolution. Default filtering method in Corona 11 and newer.
Roughness mode – Allows choosing mode between roughness and glossiness.
IOR mode – Selects whether the index of refraction (IOR) of the base layer and clearcoat layer is set directly as IOR or whether it is calculated from input Disney Specular value.
Material conversion
These options allow converting the current material into a new Corona Light material if the self-illumination channel is enabled.
Available options are:
Convert – Using this option converts and replaces the current material.
Duplicate – Using this option creates a new converted material without replacing the current one.
Base Tail
Increases the tail of the base layer BSDF. The default value of 0% corresponds to the standard GGX BSDF. Increasing the value leads to longer tails (i.e. stronger reflection outside of the reflection peak).
Complex IOR
When enabled, the metal reflection is no longer specified by the base and edge color. Instead of refraction, which is given by n(eta) and k (kappa) values. The complex index of refraction is specified per color channel.