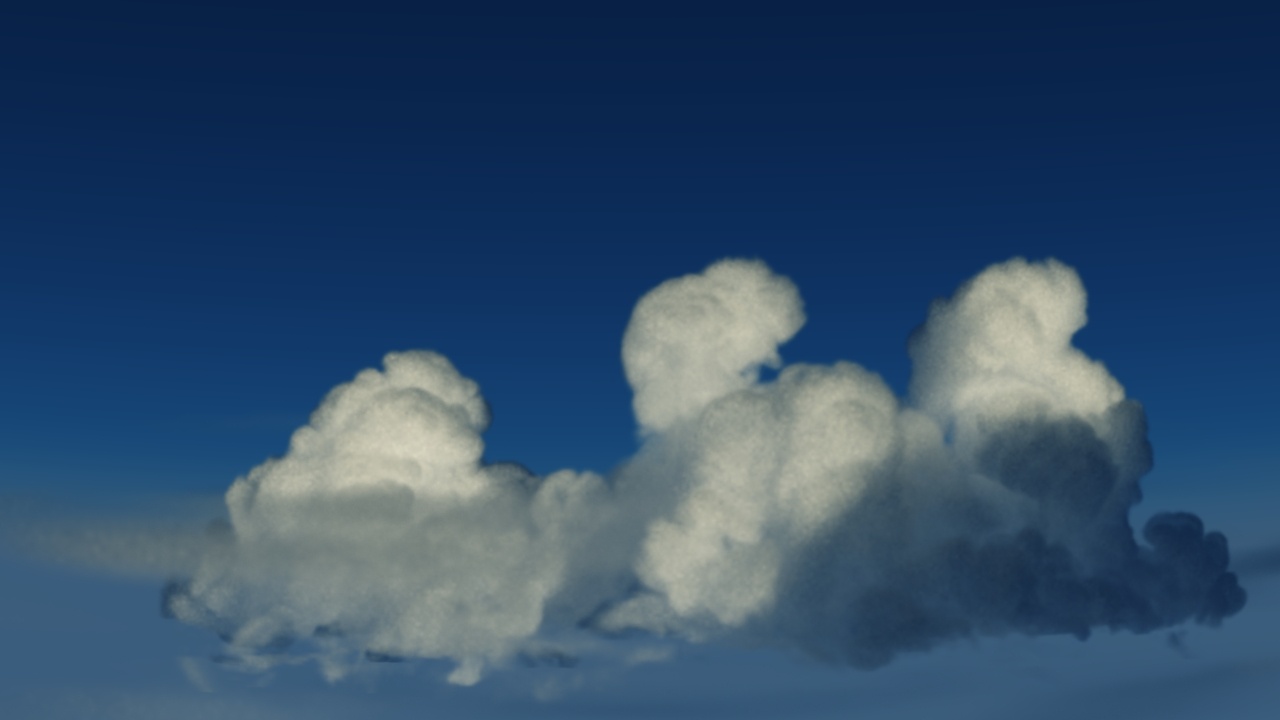
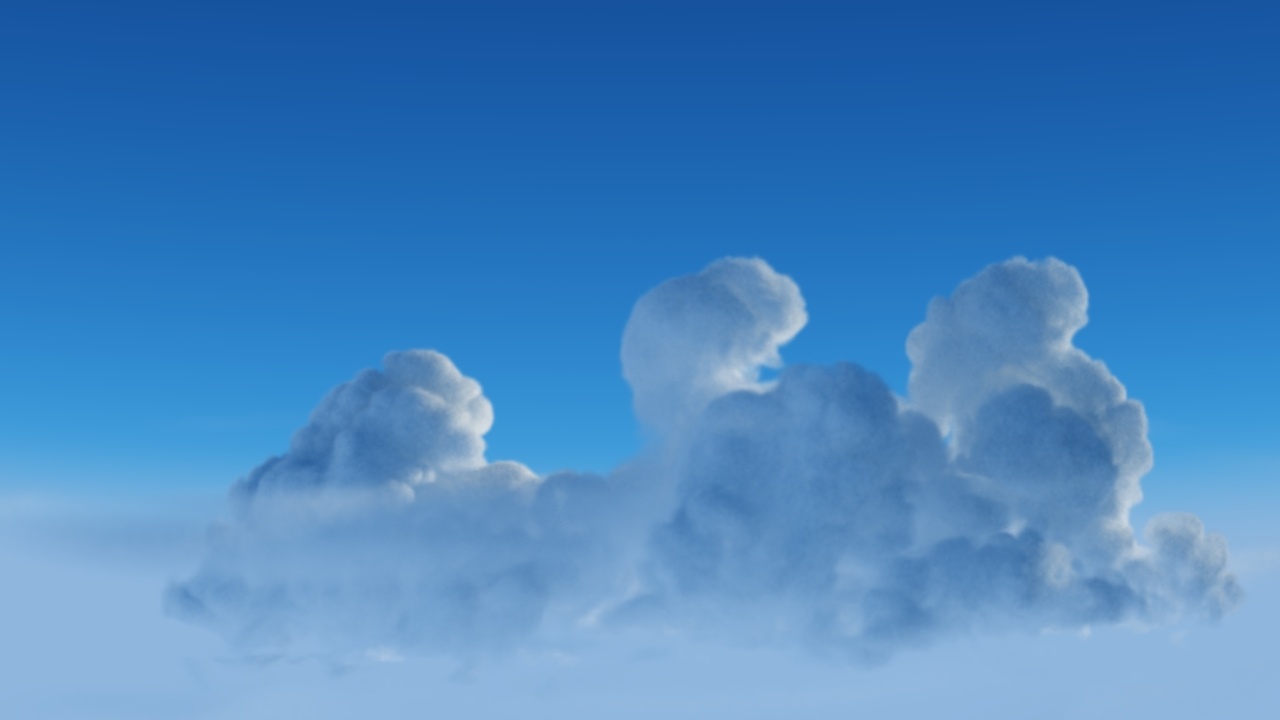
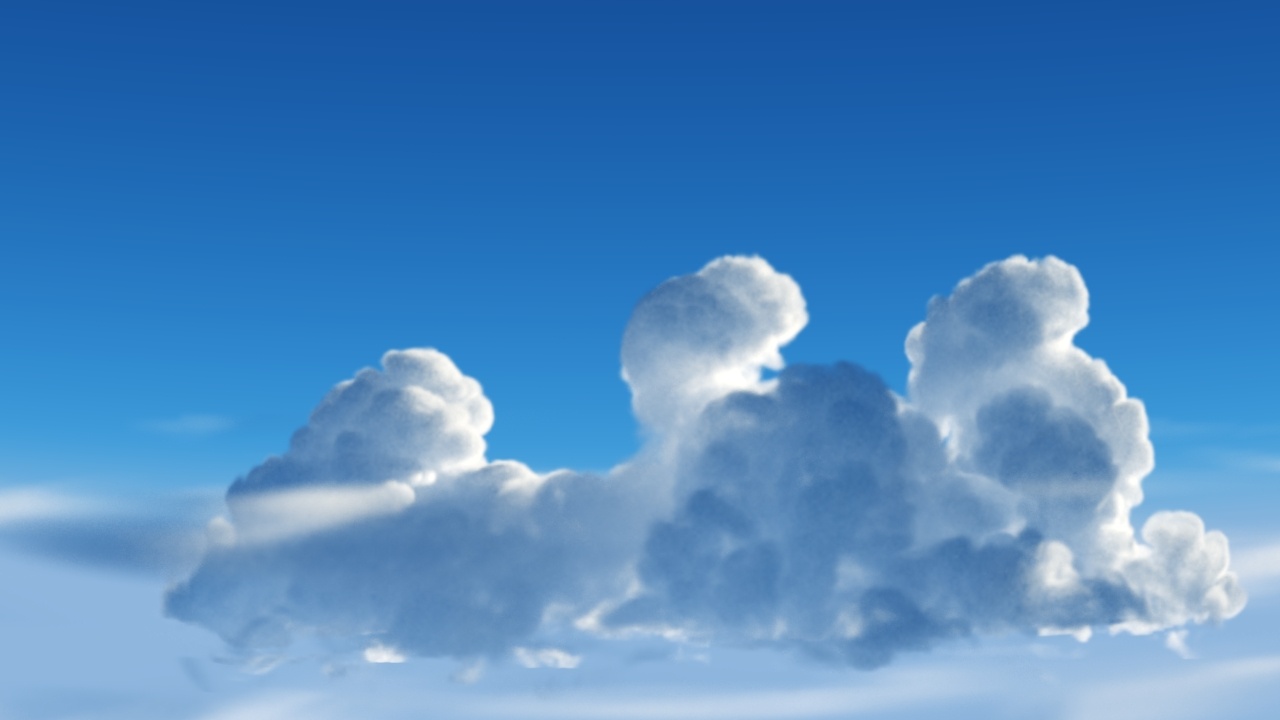
This page provides a tutorial on creating Animated Clouds with Phoenix for 3ds Max.
Overview
This Advanced Level tutorial shows you how to create Animated Clouds using Phoenix. It's recommended that you have at least basic knowledge in lighting, materials, and the Phoenix simulation.
This simulation requires Phoenix 5.01.00 and V-Ray 5 for 3ds Max 2020 or newer. You can download official Phoenix and V-Ray from https://download.chaos.com. If you notice a major difference between the results shown here and the behavior of your setup, please reach us using the Support Form.
This tutorial guides you through the process of creating animated volumetric clouds. The method shown simulates clouds that are more realistic than clouds created from a static geometry with volumetric displacement. Moreover, as opposed to the previous tutorial Static clouds, this one demonstrates creating moving clouds.
The final render is comprised of two different types of clouds: Cumulus and Stratus. They have different appearances and ways of movement. This tutorial shows two separate methods to generate and animate each type of cloud.
For realistic shading in the clouds, we will tweak the value for the Phase Function of the simulators.
At the end of the tutorial, we color correct the image with V-Ray Frame Buffer, and we make the shot more cinematic by using Light Mix. It allows us to adjust the key-to-fill light ratio without rendering the image again.
To download project files: Download Project Files
Want to follow along but don’t have a license?: Download Free Trial
Units Setup
Scale is crucial for the behavior of any simulation. Large-scale simulations appear to move slower, while medium and small-scale simulations display lots of vigorous movement. When you create your Simulator, have a look at the Grid rollout where the real-world size of the Simulator is shown. If it cannot be changed, you can cheat the solver into working as if the scale is larger or smaller by changing the Scene Scale option in the Grid rollout.
The Phoenix solver is not affected by how you choose to view the Display Unit Scale - it is just a matter of convenience.
The size of Cumulus clouds is 1 to 5 km, so in this example, we set the Scene Scale to Metric Meters.
- Go to Customize > Units Setup and set the Display Unit Scale to Metric Meters
- Set the System Units to 1 Unit = 1 Meter
Scene Layout
The final scene contains the following elements:
- Three Planes (Plane_Cumulus001, Plane_Cumulus002 and Plane_Cumulus003) as Cumulus emitters.
- Three Fire/Smoke sources: PHXSource_Cumulus001~003, each using the Plane_Cumulus001~003 as emitters, respectively.
- PlainForce_Cumulus as a wind force in the scene to blow the Cumulus clouds.
- PHXTurbulence_Cumulus Force to disturb the Cumulus clouds.
- GeoSphere_Stratus as a Stratus emitter.
- PHXSource_Stratus using the GeoSphere_Stratus as an emitter.
- Two Fire/Smoke Simulators: PhoenixFD_Cumulus and PhoenixFD_Stratus.
- VRayCam_Final for rendering.
- VRayCam_RnD for scene development.
- V-Ray Sun & Sky setup for lighting.
- GeoSphere_cast_shadow for casting shadow over the clouds.
Scene Setup
Click on the Time Configuration icon ( ) and set the Animation Length to 120 so that the Time Slider goes from 0 to 120.
This tutorial involves two simulators and a lot of steps. Here we focus on the Phoenix-related steps only. Feel free to use the camera and light settings in the provided sample scene.
For reference, you can find the camera and light settings below.
Anatomy of the Animated Clouds
We have two different clouds in the scene: the fluffy-looking Cumulus and the flat shaped Stratus. They both move from right to left. Giant shadows are cast on the clouds as if something is approaching, making the shot more interesting in terms of lighting and shading.
Mixing two types of clouds makes the render more photorealistic.
Comparison of Cumulus and Stratus Clouds
Because of the different nature of the clouds, we create them using two separate simulators.
Note that for simulating the Cumulus clouds we use a very fast smoke emission in only 21 frames in the base simulation. Then we slow down the animation to 121 frames by Resimulation.
On the other hand, the Stratus simulation is more straightforward and does not require Resimulation.
Cumulus | Stratus | |
|---|---|---|
Morphology | have flat bases and are often described as "puffy" in appearance | are characterized by horizontal layering with a uniform base, as opposed to cumuliform clouds |
Emitted from | Planes with Shell Modifier (Plane_Cumulus001~003) | GeoSphere_Stratus |
Source Emit mode | Surface Force | Volume Brush |
How they animate | Push by a Plainforce | By animating the Mask texture (Noise_Stratus) X offset in source |
| Animation length extension | By Resimulation | No Resimulation needed |
Fire/Smoke Simulation for Cumulus
Let's create a simulator now. Go to Create Panel > Create > Geometry > PhoenixFD > FireSmokeSim. Rename the simulator to PhoenixFDFire_Cumulus.
The exact position of the Phoenix Simulator in the scene is: XYZ[0.0, 0.0, 0.0].
Open the Grid rollout and set the following values:
- Cell Size: 0.63 m
- Size:
X: 240
Y: 184
Z: 13
- Expand the Container Walls, so that they match the sizes of the Grid's X, Y and Z parameters
- Set Adaptive Grid to Smoke. The Adaptive Grid algorithm allows the bounding box of the simulation to dynamically expand on-demand
- Set the Threshold to 0.02. This allows the Simulator to expand when the Cells near the corners of the simulation bounding box reach a Smoke value of 0.02 or greater
- Enable Maximum Expansion and set its parameters accordingly:
X: (0, 0)
Y: (196, 0)
Z: (0, 236)
This saves memory and simulation time by limiting the Maximum Size of the simulation grid.
At this stage, do not set Max Expansion high enough to cover all the emissions. Allow the fluid to be cropped a bit to save some simulation time.
Output Settings
Select the Output rollout and enable the output of Grid Smoke and Grid Velocity Channels.
Any channel used after the simulation is done, needs to be cached to disk. Such as:
- Velocity, which is required at render time for Motion Blur
- Wavelet, which is used for Wavelet Turbulence when performing a Resimulation
Cumulus Source Geometry Setup
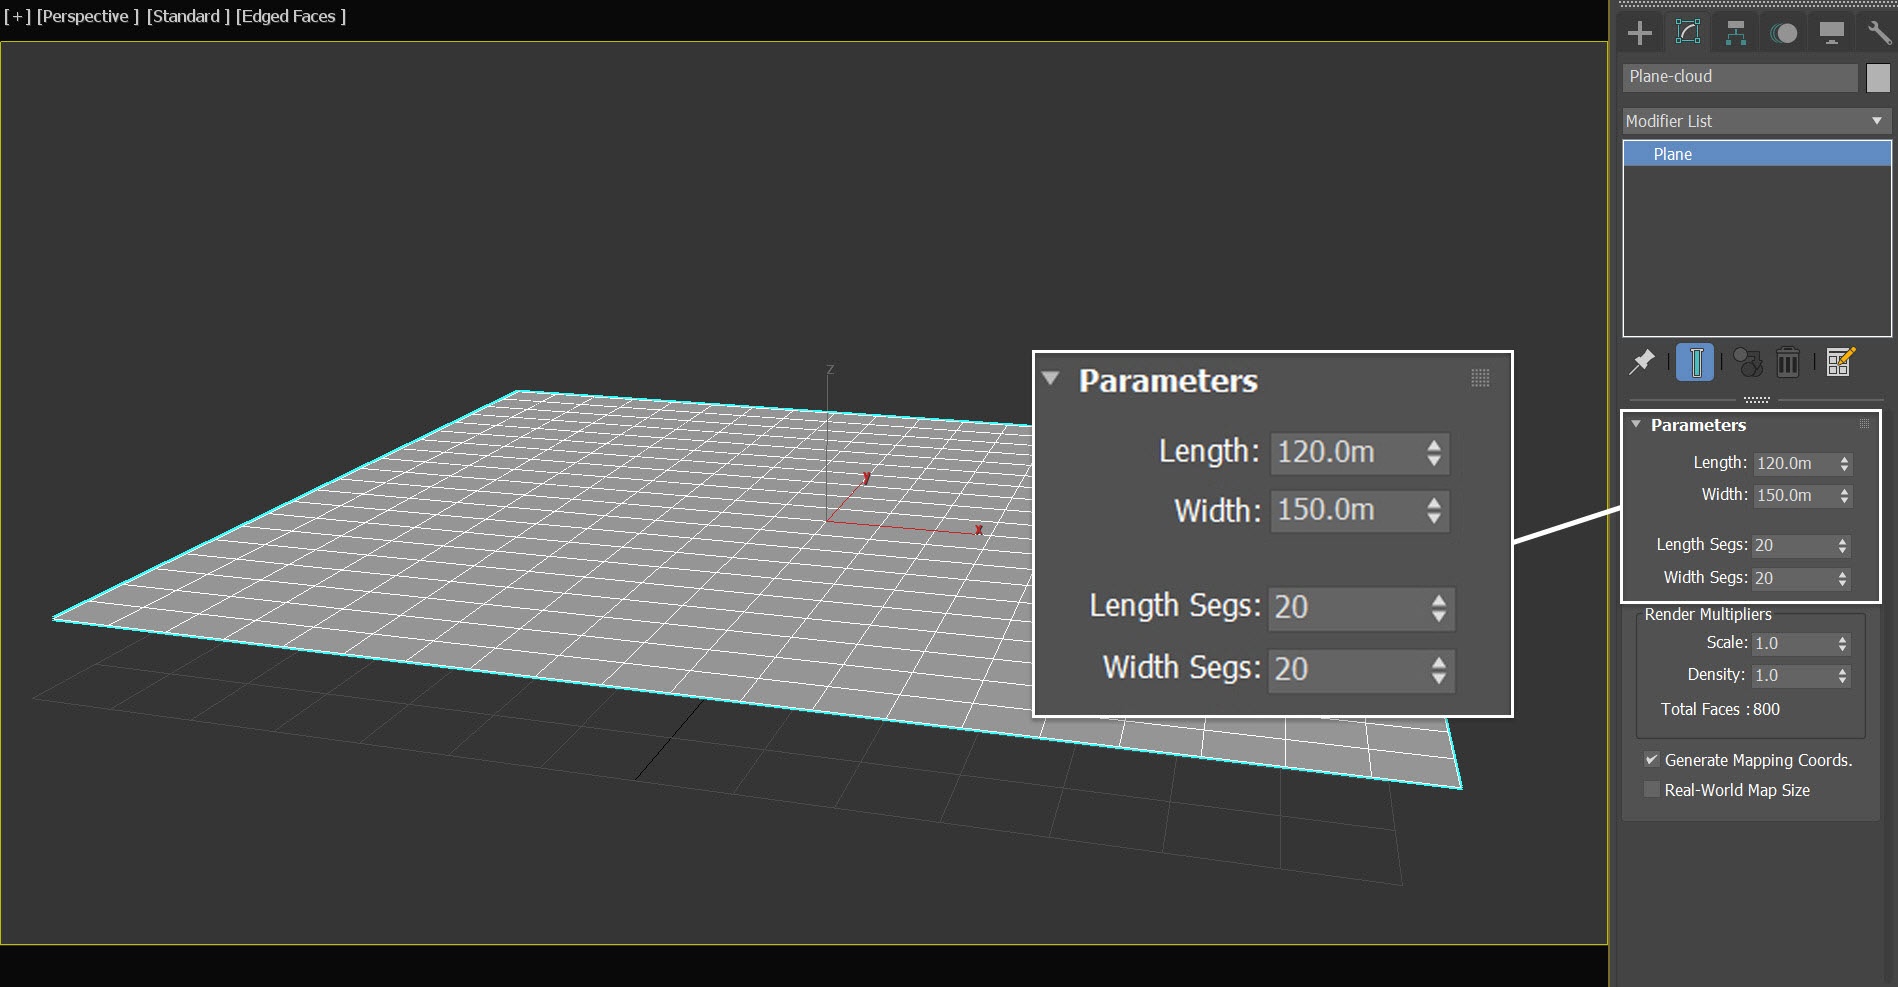
Create a plane from the Standard Primitives menu and rename it to Plane_Cumulus001.
Set its Length parameter to 120.0m and its Width to 150.0m
Set its Length Segs and Width Segs to 20
- Position it at: XYZ[0.0, 0.0, 5.0]
Alternatively, you can use the plane in the provided scene to save some time.
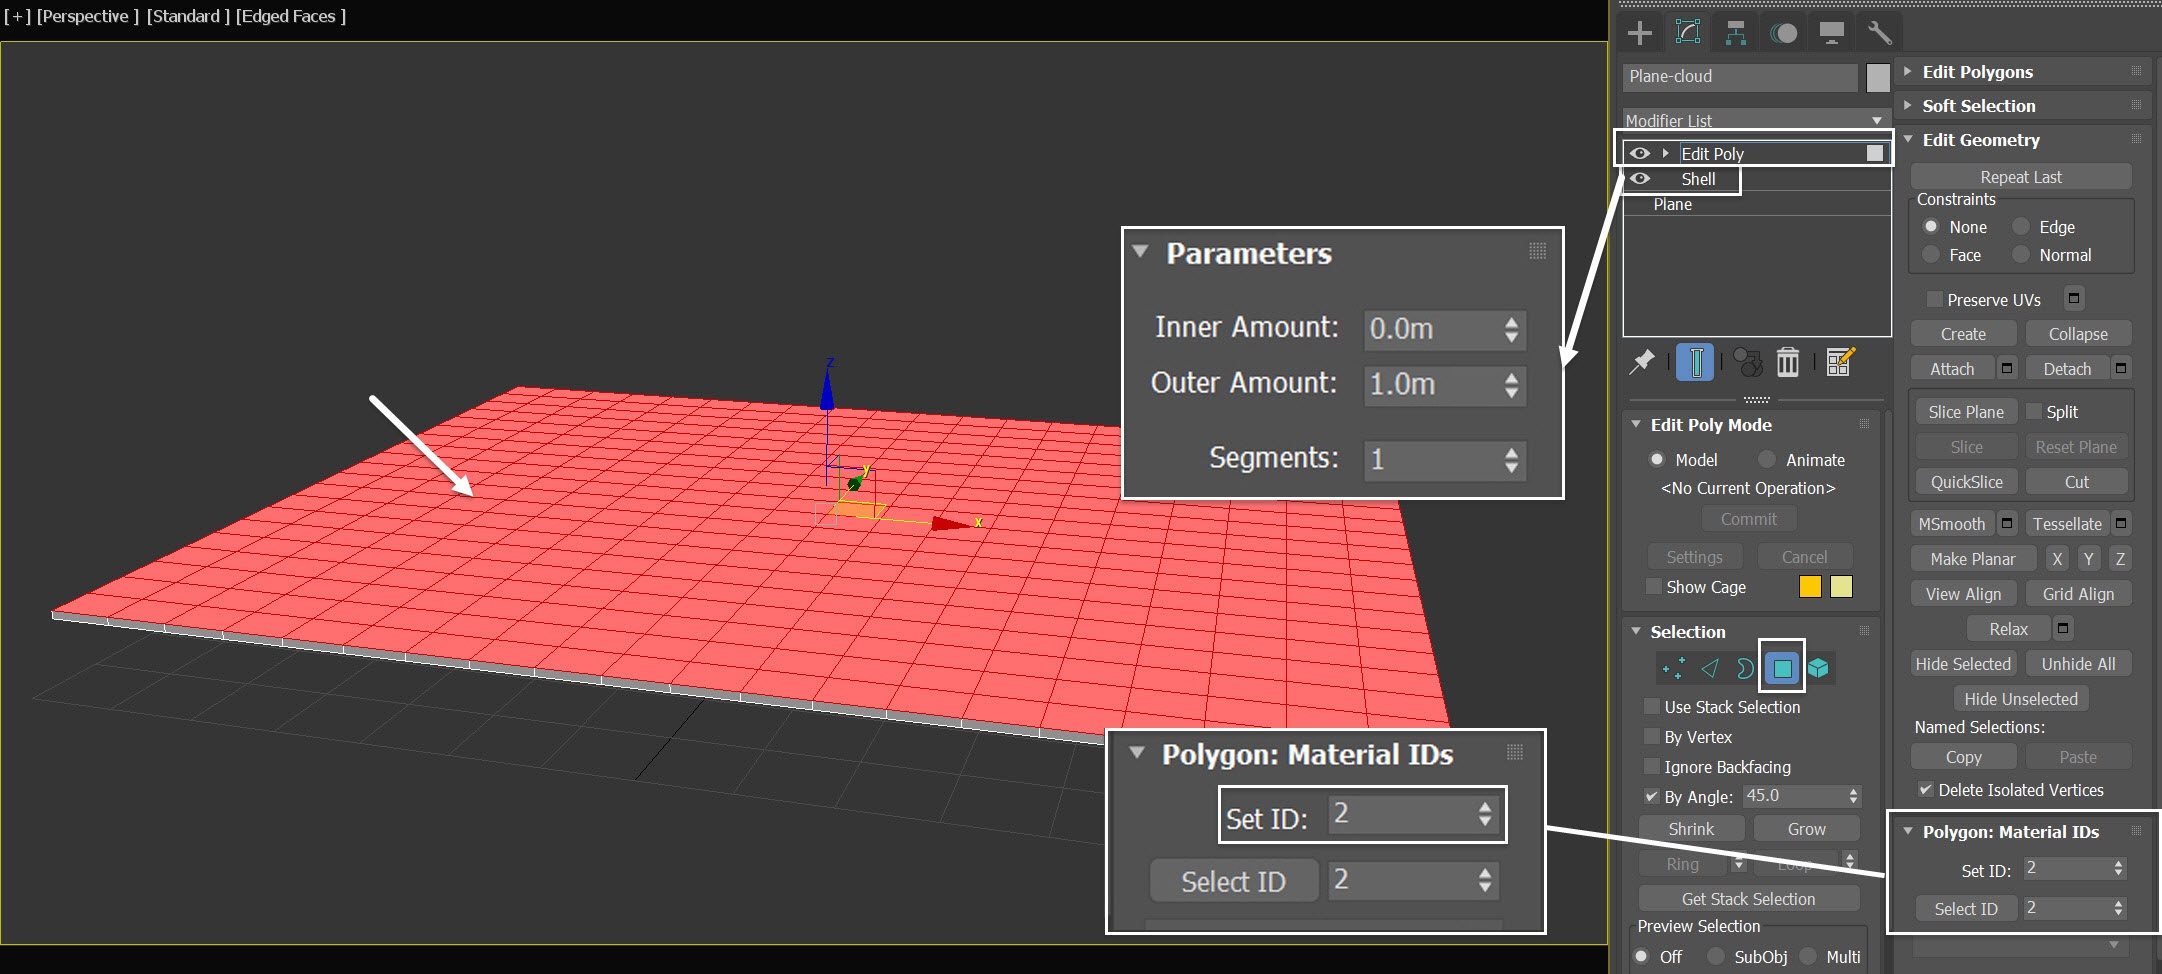
Apply a Shell modifier to the plane and set the Outer Amount to a low value. In this example, it is set to 1.0m.
- Add an Edit Poly modifier on top
- Select the top faces and set their Polygon IDs to 2
The Shell modifier is applied to give thickness to the geometry. This allows Phoenix to properly calculate the volume of the object used for the emission. For this tutorial, we later limit the emission to only happen at the top of the shelled plane.
Apply a Noise Modifier to the plane.
- Set the Noise Scale to 30.0
- Enable the Fractal options
- Under Noise Strength, set its Z parameter to 9.0m
- Enable the Animate Noise option
- Set the Frequency to 0.25
Apply a TurboSmooth Modifier on top and set the Iterations to 1.
Right click on the Plane_Cumulus001 in the viewport and select Object Properties.
- Enable the Display as Box option
- Disable the Renderable option
Creating and Animating a Phoenix Fire/Smoke Source in the Scene
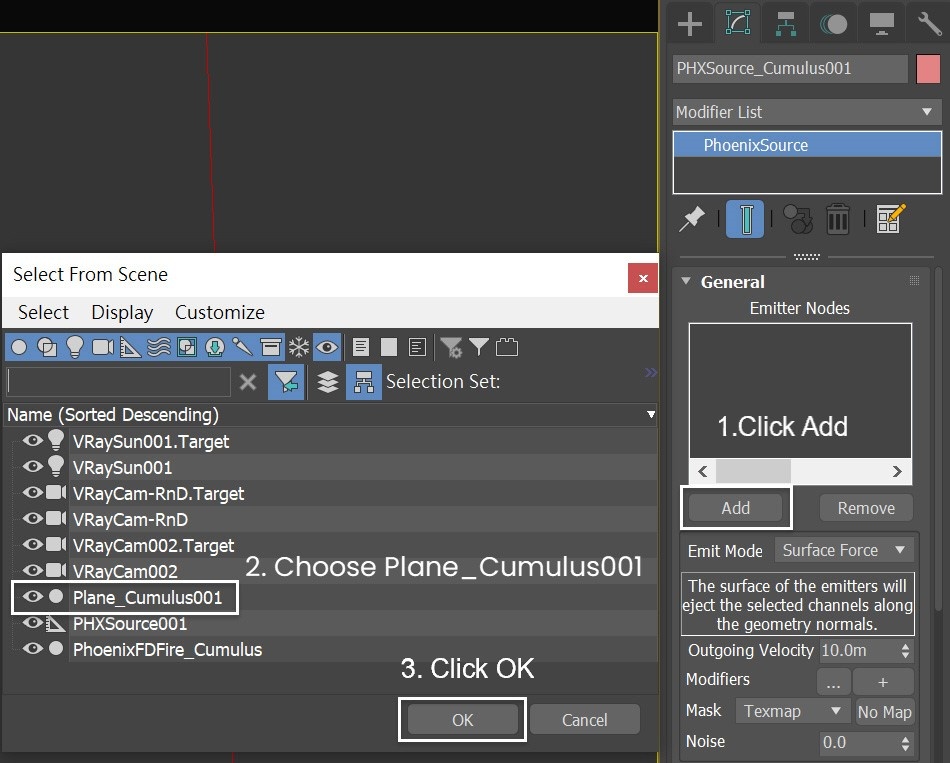
Go to Create Panel > Create > Helpers > PhoenixFD > PHXSource. Rename it to PHXSource_Cumulus001.
Press the Add button and select the Plane_Cumulus001 plane geometry directly from the viewport or from the Scene Explorer.
Set up the PHXSource_Cumulus001's properties:
Set the Emit Mode to Surface Force
Disable the Temperature
Set the Smoke to 0.5
- Set the Outgoing Velocity's Mask type to Texmap
Set Polygon ID to 2. This limits the emission only to faces with an ID of 2
Create a Gradient Ramp:
- Plug the map into the Outgoing Velocity's Texmap slot
- Rename it to Gradient_Cumulus
- Set Gradient Type to Radial. This produces a circular texture ideal for the base of the cloud
- Set the Noise parameters:
Set Noise Amount to 1.0
Set Size to 5.0
Set Noise type to Turbulence
Animate the Phase of the Noise in the Gradient Ramp texture (As pointed by an arrow). This gives you a randomized texture suitable for representing the shape of the cloud
There are two Phase parameters in the Gradient Ramp map. The phase of the Noise in the Gradient Ramp texture is the one we intend to animate, don't confuse it with the other Phase parameter.
- Add 2 extra flags to the gradient bar, so that you have a total of 4
- Set the Interpolation to Ease Out
- Edit the positions of the four flags on the gradient map using the table
Flag | Position | RGB | Interpolation |
|---|---|---|---|
1 | 0 | 255,255,255 | Ease Out |
2 | 42 | 68,68,68 | Ease Out |
3 | 94 | 0,0,0 | Ease Out |
4 | 100 | 0,0,0 | Ease Out |
Table of four flags on the gradient bar of the Gradient_Cumulus . From left (start point) to right (end point).
Changes to the Noise parameters greatly influence the simulated cloud. It is recommended that you experiment with different settings once you've completed this tutorial. If you want to recreate the same result as shown here, follow the instructions exactly. The clouds we want to simulate are quite transparent objects. This is why the smoke amount is set to 0.5. If it is too high, the clouds will appear too opaque in the render.
Animate the PHXSource_Cumulus001 Outgoing Velocity
- Go to Graph Editors > Track View - Curve Editor.
- Set keyframes for the Outgoing Velocity, so it can change over time. Each frame and value is shown in the screenshot and the table
Frame | Value | Tangent type |
|---|---|---|
0 | 3000.0 | Fast |
20 | 0.0 | Slow |
Keyframes for the FIre/Smoke Source's Outgoing Velocity
Keyframes for Outgoing Velocity screenshot
- In the Curve Editor, set keys to the curve of the Noise Phase of the Gradient_Cumulus map, so it can change over time. Each frame and value are shown in the screenshot and the table.
Frame | Value | Tangent type |
|---|---|---|
0 | 0.0 | Linear |
20 | 0.2 | Linear |
Keyframes for the Phase parameter of the Gradient_Cumulus texture map.
Keyframes for Noise Phase screenshot
Initial Simulation
Select the Simulation rollout of the PhoenixFDFire_Cumulus Simulator. Since we extend the simulated cache through Resimulation, a total of 21 frames is enough, so set the Stop Frame to 20.
Press the Start button to simulate.
This is the current animation from VRayCam_RnD.
To enable the GPU Preview as seen in the video, go to the Simulator > Preview rollout > GPU Preview and turn on the Enable in Viewport option.
Switch to PCG Solver
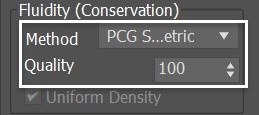
Select the PhoenixFDFire_Cumulus Simulator and in the Dynamics rollout change the Fluidity Method to PCG Symmetric, with a Quality of 100.
The PCG Symmetric option is the best method for smoke or explosions in general, preserving both detail and symmetry. The high Conservation Quality allows the smoke to swirl better. For more information, visit the Conservation documentation.
Run the simulation again.
This is a preview animation of the simulation with the new Conservation Method from the VRayCam_RnD.
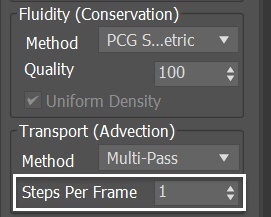
In the Dynamics rollout of the Simulator, increase the Steps Per Frame to 5.
Run the simulation again.
This is a preview animation of the simulation with the increased number of Steps per frame from the VRayCam_RnD. There are more details in the smoke now and it grows taller.
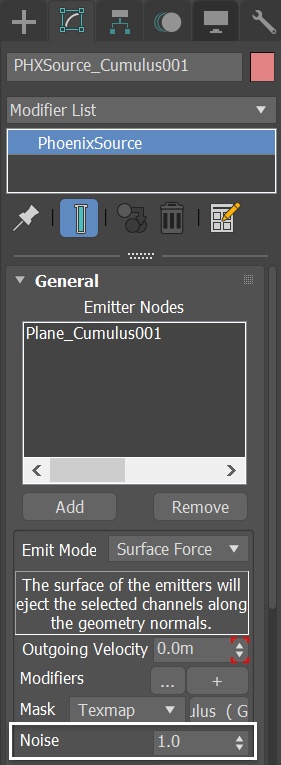
With the PHX_Source_Cumulus001 selected, set the Noise to 1.0.
Run the simulation again. This is a preview animation of the simulation with the new Noise settings from the VRayCam_RnD.
Adding Phoenix Turbulence for Smoke Swirls
To create a Phoenix Turbulence, go to the Create menu > Helpers > PhoenixFD and click on PHXTurbulence.
- Set its position to: XYZ[ 240.0, 1200.0, 410.0]
- Set its Strength to 5.0
- Set its Size to 50.0m
- Reduce the Fractal Depth to 0
- Reduce the Rate of Change to 0.2
Run the simulation again. This is a preview animation of the simulation with the added Turbulence from VRayCam_RnD. This way we get more swirls in our clouds.
Set up Two More Sources for Cumulus
Select the Plane_Cumulus001 in the scene, duplicate it to produce two copies. Rename them to Plane_Cumulus002 and Plane_Cumulus003, respectively.
- Adjustments for the Plane_Cumulus002:
Set its X and Y scale to 70% of the original size
Rotate its Z axis to -27.0 °
Position is at XYZ[49.0, 15.0, 5.0]
- Adjustments for the Plane_Cumulus003
Set its X and Y scale to 83% of the original size
Rotate its Z axis to 93.0°
Position it at XYZ[-53.0, 18.0, 5.0]
So now we have Plane_Cumulus001, -002 and -003 in the scene, overlapping each other. The geometries are overlapped deliberately, so when each source emits fluid, they create interesting secondary effects.
Different position, scale and rotation of these emitter geometries create different appearances of the clouds. Play around with the settings to meet your project requirements.
Duplicate the PHXSource_Cumulus001 to create two more copies of it. Rename them to PHXSource_Cumulus002 and PHXSource_Cumulus003, respectively.
In the PHXSource_Cumulus002's Emitter Nodes list add the Plane_Cumulus002 to assign it to that geometry.
In the PHXSource_Cumulus003's Emitter Nodes list add the Plane_Cumulus003 to assign it to that geometry.
Now, let's go to the Curve Editor and set keyframes to the curve of PHXSource_Cumulus002's Outgoing Velocity, so it can change over time.
Each frame and value is shown in the screenshot and the table.
Frame | Value | Tangent type |
|---|---|---|
0 | 4000.0 | Fast |
26 | 0.0 | Slow |
Table with keyframes for the PHXSource_Cumulus002's Outgoing Velocity.
PHXSource_Cumulus002's Outgoing Velocity keyframes screenshot
Again, in the Curve Editor, set keys to the curve of PHXSource_Cumulus003's Outgoing Velocity, so it can change over time.
Each frame and value is shown in the screenshot and the table.
Frame | Value | Tangent type |
|---|---|---|
0 | 2200.0 | Fast |
38 | 0.0 | Slow |
Table with keyframes for the PHXSource_Cumulus003's Outgoing Velocity.
PHXSource_Cumulus003's Outgoing Velocity keyframes screenshot
Since we have two more sources across a larger area, let's expand the PhoenixFDFire_Cumulus simulator's size to XYZ[ 346, 237, 13]. With the new settings, simulate again.
This is how the animation of the simulation looks so far from VRayCam_RnD.
Adding Plain Force
For additional realism of the simulation, we use Phoenix Plain Force, a simple directional force, to simulate the effect of wind.
Go to Create Panel > the Helpers tab > Phenix and add a Phoenix Plain Force.
The exact Position of the Plain Force in the scene is: XYZ[185.0, 0.0, 115.0]
Rotate the Plain Force to XYZ[180.0, 90.0, 0.0]. Set its Strength to 60.0m
Set the Drag to 0.1
Enable the Apply Force Behind Icon option
Final Simulation for the Cumulus
Now we have everything all set, let's increase the resolution of the simulation grid by increasing its Maximum Expansion for the final simulation.
Open the Grid rollout and set the following values:
Cell Size: 0.5 m
Size: XYZ[ 432, 296, 17]
Adjust the Maximum Expansion to X: (400, 400), Y: (350, 350), Z: (0, 295) - so the fluid isn't cropped at the simulator's boundaries.
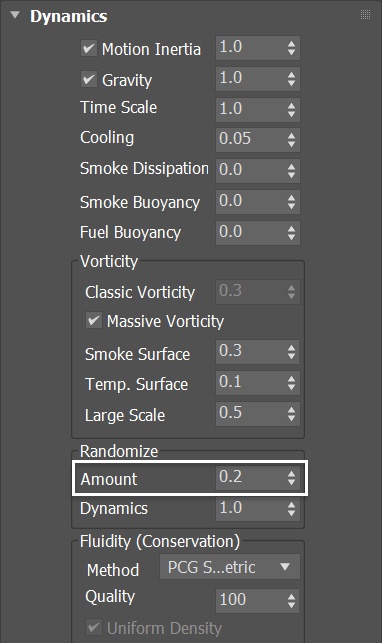
With the PhoenixFDFire_Cumulus selected go to its Dynamics rollout. Increase the Randomize Amount to 0.2. This will add a bit more variation in the cloud movement.
Press the Start button to run the final simulation for the Cumulus clouds.
So far, we have set Noise in the Fire/Smoke sources, added Phoenix Turbulence force in the scene, and introduced a randomized Amount in the simulator. Each parameter has a subtle effect, but when put together, all these settings ensure a natural-looking simulation of clouds.
This is a preview animation of the final simulation from VRayCam_RnD.
Retime for the sources and textures
Since we're going to extend the base simulation by Resimulation with the Slow Down method, we need to stretch existing keyframed animation in the fluid sources and textures. If you don't, you might get flickering in the fluid emission after resimulation. You can find more information in the Tips and Tricks page, regarding Slowing Down a Simulation.
Go to Time Configuration → Re-scale Time. In the Re-scale Time windows, change the Length from 120 to 800 and hit OK. This will stretch the entire animation in the scene. Including keyframes for every fluid sources in the scene and animated texture maps.
Let's do a little math. We will make the Output Play Speed to 0.15 in the next step. The original animation length is 120. And 120 divided by 0.15 equal 800. Therefore, we set the animation length to 800.
Alternatively, you can use 3ds Max's Scale time option to stretch the animations. But this might be more time-consuming cause you have to retime them one by one.
Now the keyframed animation has been stretched. However, we only need the animation ranging from frame 0 to frame 120. So let's open up the Time Configuration again. Set the End Time to 120.
The Re-scale Time procedure sets different times for every keyframe in the scene. However, we don't want the animation for the Camera_Final, Camera_Final.Target and GeoSphere_cast_shadow to be retimed. We have to manually revert their keyframes to their original states.
With Camera_Final, Camera_Final.Target and GeoSphere_cast_shadow selected, go to the Curve Editor. Revert the first and second keyframes to their original frames as shown in the Keyframes table.
The first keyframes for the Camera_Final, Camera_Final.Target and GeoSphere_cast_shadow were at frame 266, let's move them to frame 40. The second keyframes were at frame 800, let's move them to frame 120.
Keyframes table | Keyframe for the Camera_Final, Camera_Final.Target and GeoSphere_cast_shadow after Re-scale Time process | The original keyframes for Camera_Final, Camera_Final.Target and GeoSphere_cast_shadow |
|---|---|---|
First keyframe's frame number | 266 | 40 |
Second keyframe's frame number | 800 | 120 |
Resimulation for the Cumulus
- Open the PhoenixFDFire_Cumulus Simulator > Resimulation rollout and enable Grid Resimulation.
When you enable Resimulation, Phoenix reads the cache files for preview and rendering from the Resimulation Output Path, instead of the 'regular' output path. Don't worry if the Viewport goes blank and the preview disappears - you can always go back to the original cache files by disabling the Resimulation.
- Set the Amp.Resolution to 0.0
- Enable the Use Time Blend Controls. Choose Slow Down method
- In the Input rollout, lower the Play Speed to 0.15
During resimulation, the two Grid Blending options: Velocity and Precise Tracing will be ignored. In other words, setting it to the other two options will have no effect. Therefore, we leave the Grid Blend to the default: Interpolation.
With the PhoenixFDFire_Cumulus Simulator selected, go to its Dynamics rollout. Lower the Steps Per Frame to 1.
This step is crucial for achieving a smooth simulation, otherwise an SPF of more than 1 might blur the details inside the fluid of the base simulation.
In the base simulation, currently, we have simulated from frame 0 to 20. The Play Speed when running the Resimulation is set to 0.15. Therefore 21 divided by 0.15 equals 140. So after Resimulation, there are enough caches to cover the whole animation.
Now we are all set to resimulate. Go to the Simulation rollout, enable Timeline for both the Start Frame and Stop Frame. Press Start to run the Resimulation.
This is a preview (from frame60 ~ frame120) animation of the simulation so far from VRayCam_Final.
Scene Interaction
Now the simulation for Cumulus is complete. As a precaution, go to PhoenixFDFire_Cumulus Simulator's Scene Interaction rollout.
- Switch the mode to Include List
- Use the Add button to add PHXSource_Cumulus001~003, PHXTurbulence_Cumulus, PlainForce_Cumulus, and Plane_Cumulus001~003 to the list
This way we make sure that only the objects in the Include list will interact with the PhoenixFDFire_Cumulus Simulator. If you want to change the simulation for the Cumulus after creating the simulation setup for Stratus, the two components will not interfere with each other.
Then, we hide the PhoenixFDFire_Cumulus Simulator in the scene and proceed to the next step.
Fire/Smoke Simulation for Stratus
Go to Create Panel > Create > Geometry > PhoenixFD and click on FireSmokeSim. Rename the simulator to PhoenixFDFire_Stratus.
Position it in the scene at XYZ[0.0, 0.0, -15.0]
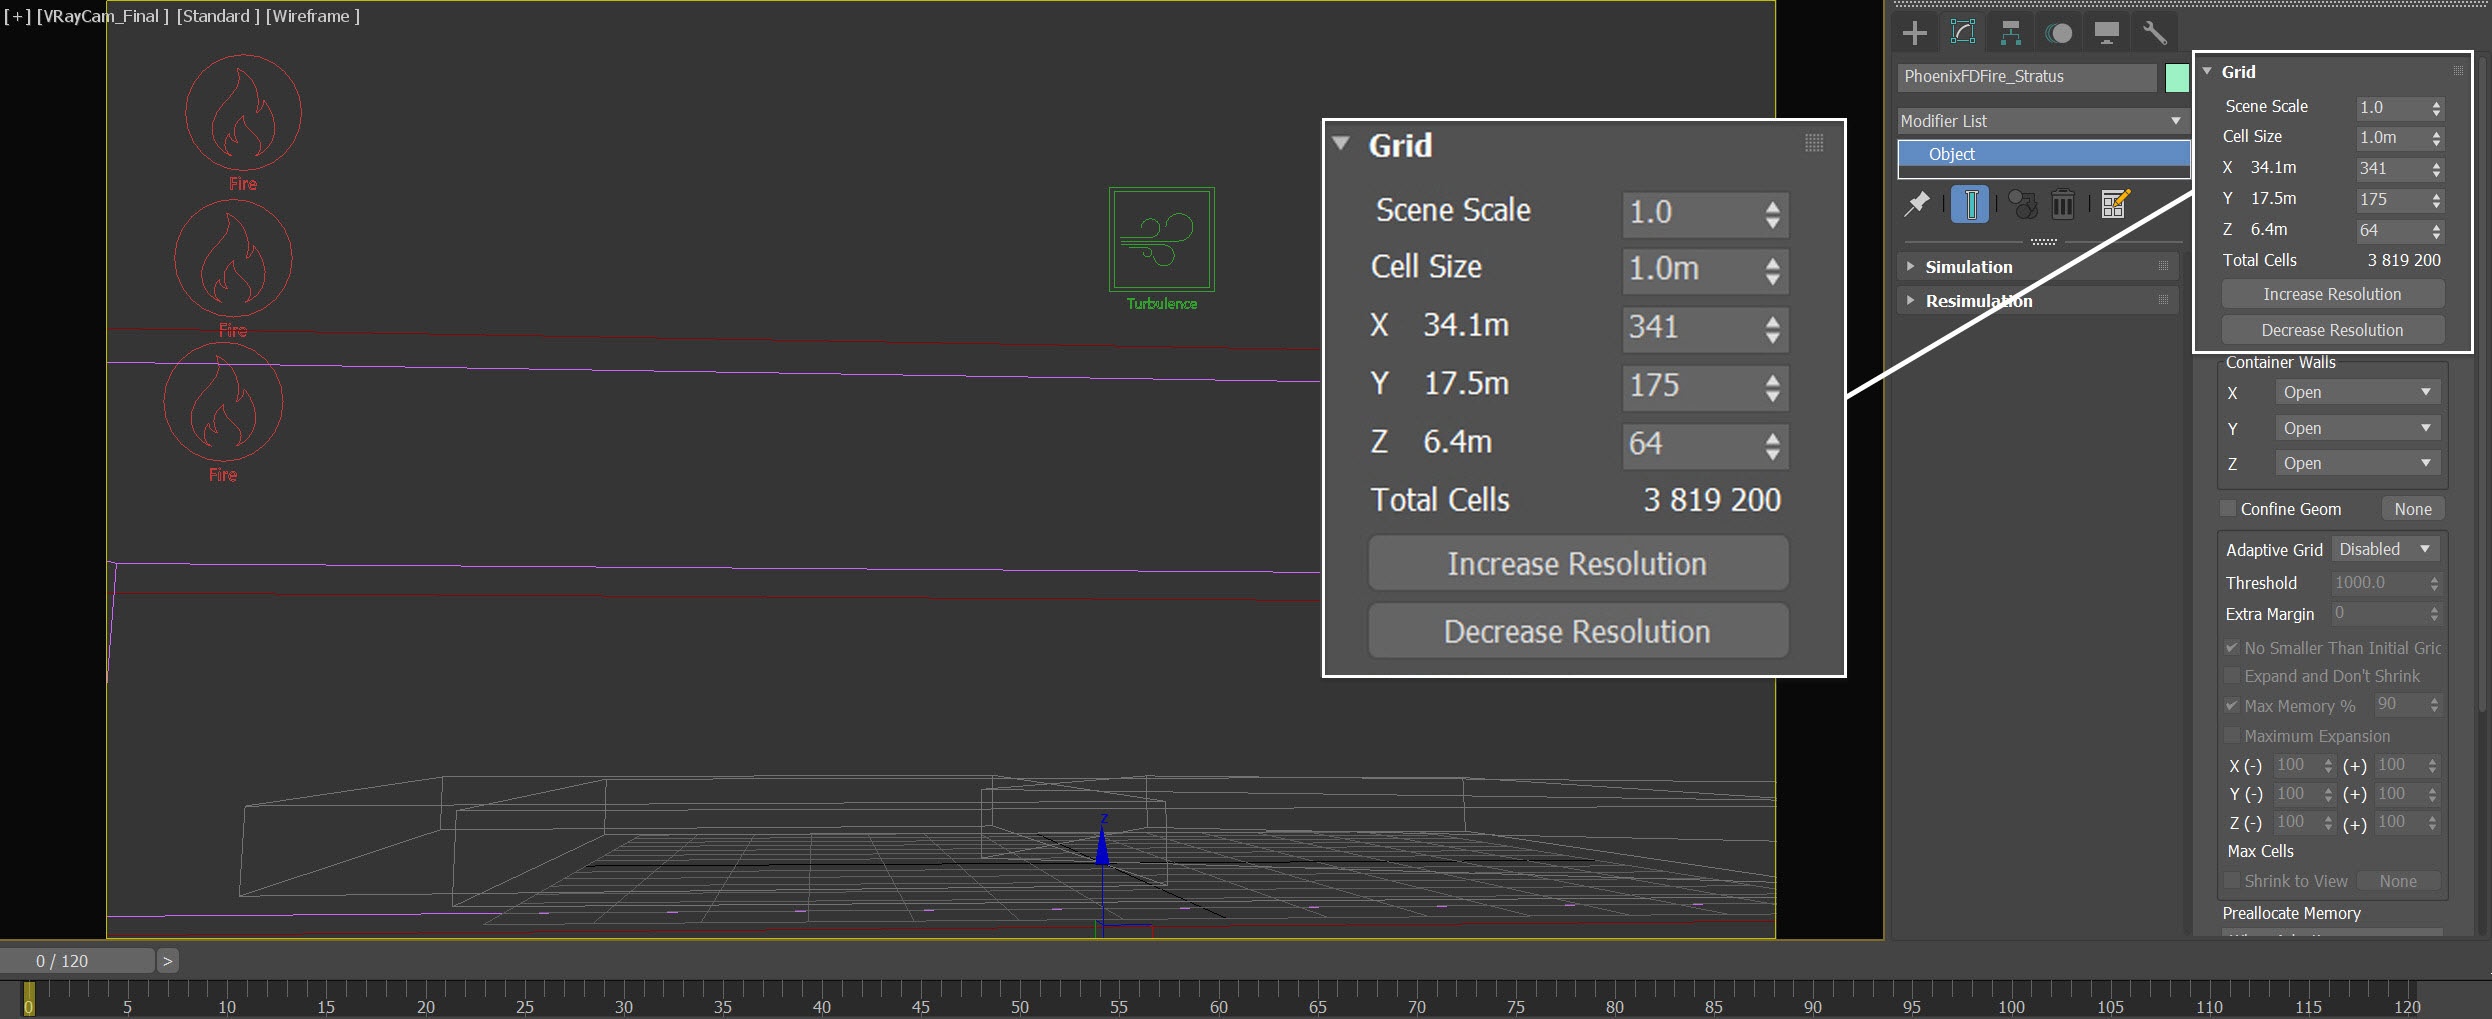
Open its Grid rollout and set the following values:
Cell Size: 1.0 m
- Size: XYZ[ 341, 175, 64 ]
- Container Walls: Open them to match the X, Y and Z of the Grid Size
Open the PhoenixFDFire_Stratus's Output rollout and enable the output of the Smoke and Velocity Grid channels.
If you would like increase the simulation's detail using a Resimulation with Wavelet Turbulence, enable the Wavelet Grid Channel output as well.
Create a Geosphere Geometry
Go to the Create Panel > Create > Geometry > Standard Primitives and create a Geosphere. Rename it to GeoSphere_Stratus.
Set its Radius to 180.0
Set its position in the scene to: XYZ[9.2, 14.8, 11.8]
Click on the Select and Uniform Scale tool ( ) in the 3ds Max toolbar, to scale the GeoSphere_Stratus. Rescale it to a flattened sphere as shown in the viewport previews. This affects the appearance of the clouds. If the sphere is not flat enough, the simulated smoke does not get the flattened appearance of a Stratus cloud.
The exact scaling is: XYZ[125%, 67%, 20%]
Viewport Previews
Right click on the GeoSphere_Stratus and go to its Object Properties.
- Enable the Display as Box option
- Disable the Renderable option
Adding a Fire/Smoke Source for Stratus
Go to the Create Panel > Create > Helpers > PhoenixFD and create a PHXSource. Rename it to PHXSource_Stratus.
Press the Add button to choose which geometry to emit from and select the GeoSphere_Stratus in the Scene Explorer.
PHXSource_Stratus Settings:
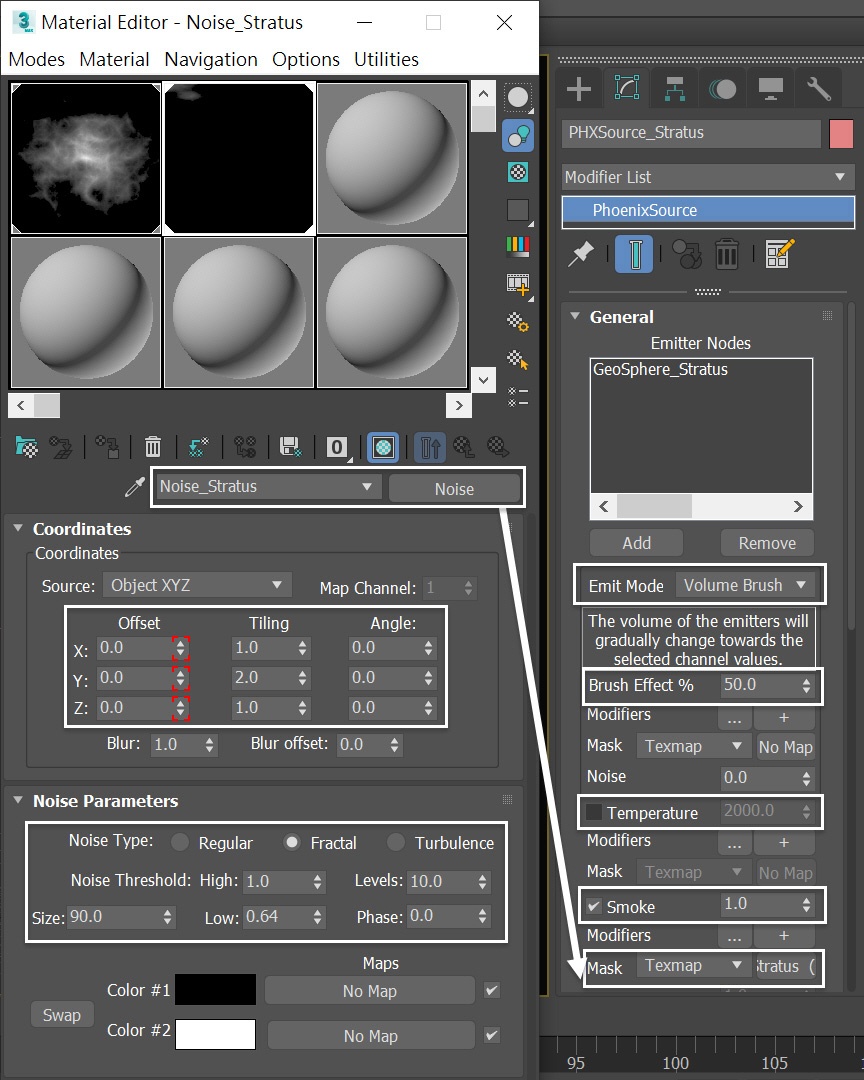
- Set the Emit Mode to Volume Brush
- Set the Brush Effect % to 50.0
- Disable the Temperature option
- Set the Smoke to 1.0
- Set the Mask for the Smoke to Texmap and plug a Noise texture map into the slot.
Rename the texture map to Noise_Stratus.
Set its Y Tiling to 2.0
Set its Size to 90.0
Set its High to 1.0
Set its Low to 0.64
Set its Noise Type to Fractal
Set its Levels to 10.0
Animate its X offset
Unlike the PHXSource_Cumulus, with the Stratus cloud we set the Smoke to a higher value of 1.0. This is because the smoke here is generated by brushing out and is quickly dissipated with the high dissipation value, which is set in later steps.
When switching the Emit Mode to Volume Brush, Phoenix prompts you to make the GeoSphere_Stratus non-solid. Make sure you click on Yes to make it non-solid. Otherwise, it collides with the fluid simulation.
Go to Graph Editors > Track View - Curve Editor and set keyframes to the curve of the Noise_Stratus's X Offset, so the texture can change over time. This change, along with the brush mode animation, creates animated Stratus clouds.
Each frame and value is shown in the screenshot.
Noise_Stratus X Offset screenshot
Scene Interaction
Select the Scene Interaction rollout of the PhoenixFDFire_Stratus Simulator.
- Switch the mode to Include List. This mode helps to manage the scene interaction more easily, without having the components of the Cumulus setup interfering with the Stratus simulator
- Use the Add button to add PHXSource_Stratus and GeoSphere_Stratus to the list.
Select the Simulation rollout of the PhoenixFDFire_Stratus Simulator and press the Start button to simulate.
This is a preview animation of the Stratus simulation so far from the VRayCam_RnD.
Smoke Dissipation
In the Dynamics rollout of the PhoenixFDFire_Stratus Simulator, increase the Smoke Dissipation to 0.5, so the Stratus clouds can dissipate quicker.
Run the simulation again with the new settings.
This is a preview animation of the simulation with the new settings from the VRayCam_RnD.
Unhide the PhoenixFDFire_Cumulus in the scene. Now both PhoenixFDFire_Cumulus and PhoenixFDFire_Stratus are visible in the view.
Here is a preview animation of both simulations from the VRayCam_Final.
Using Voxel preview instead of GPU for displaying two simulators avoids some possible issues. Such as one simulator displaying over the other, or the arrangement of the simulators not suiting your preferences.
Improving Volumetric Shading
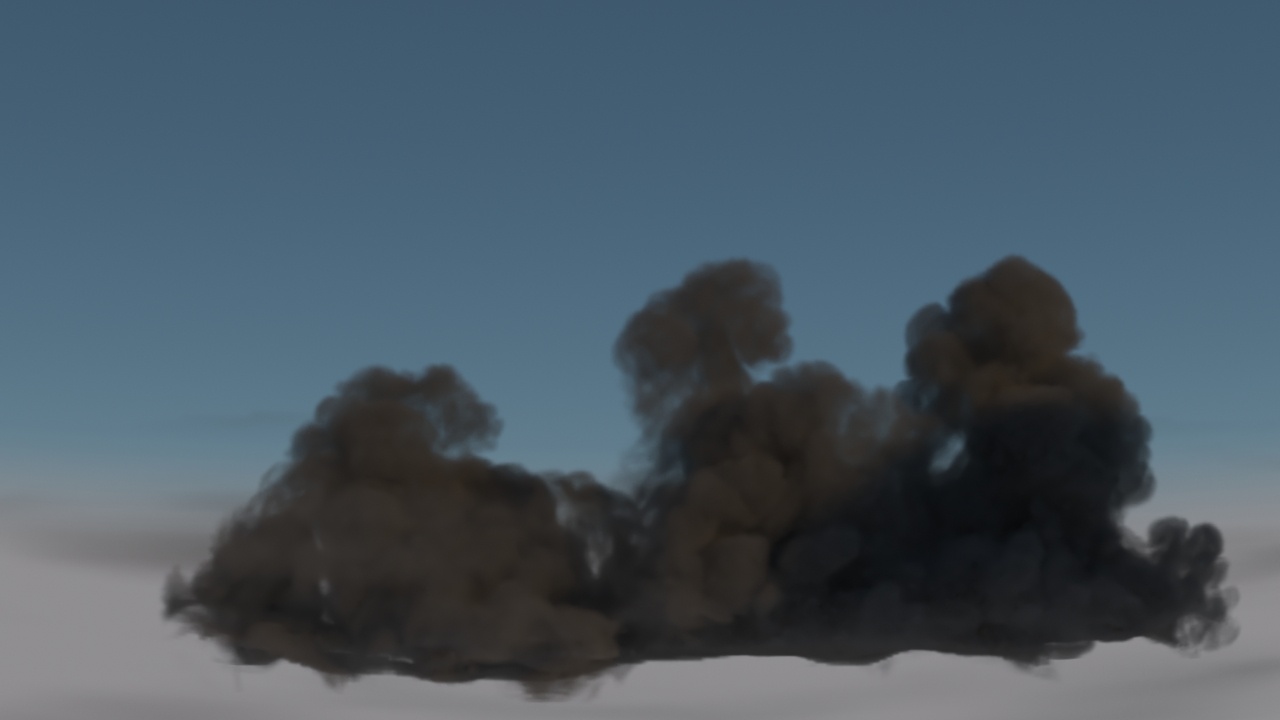
Run a test render from frame 60. This helps assess what changes are needed to improve the look of the simulation.
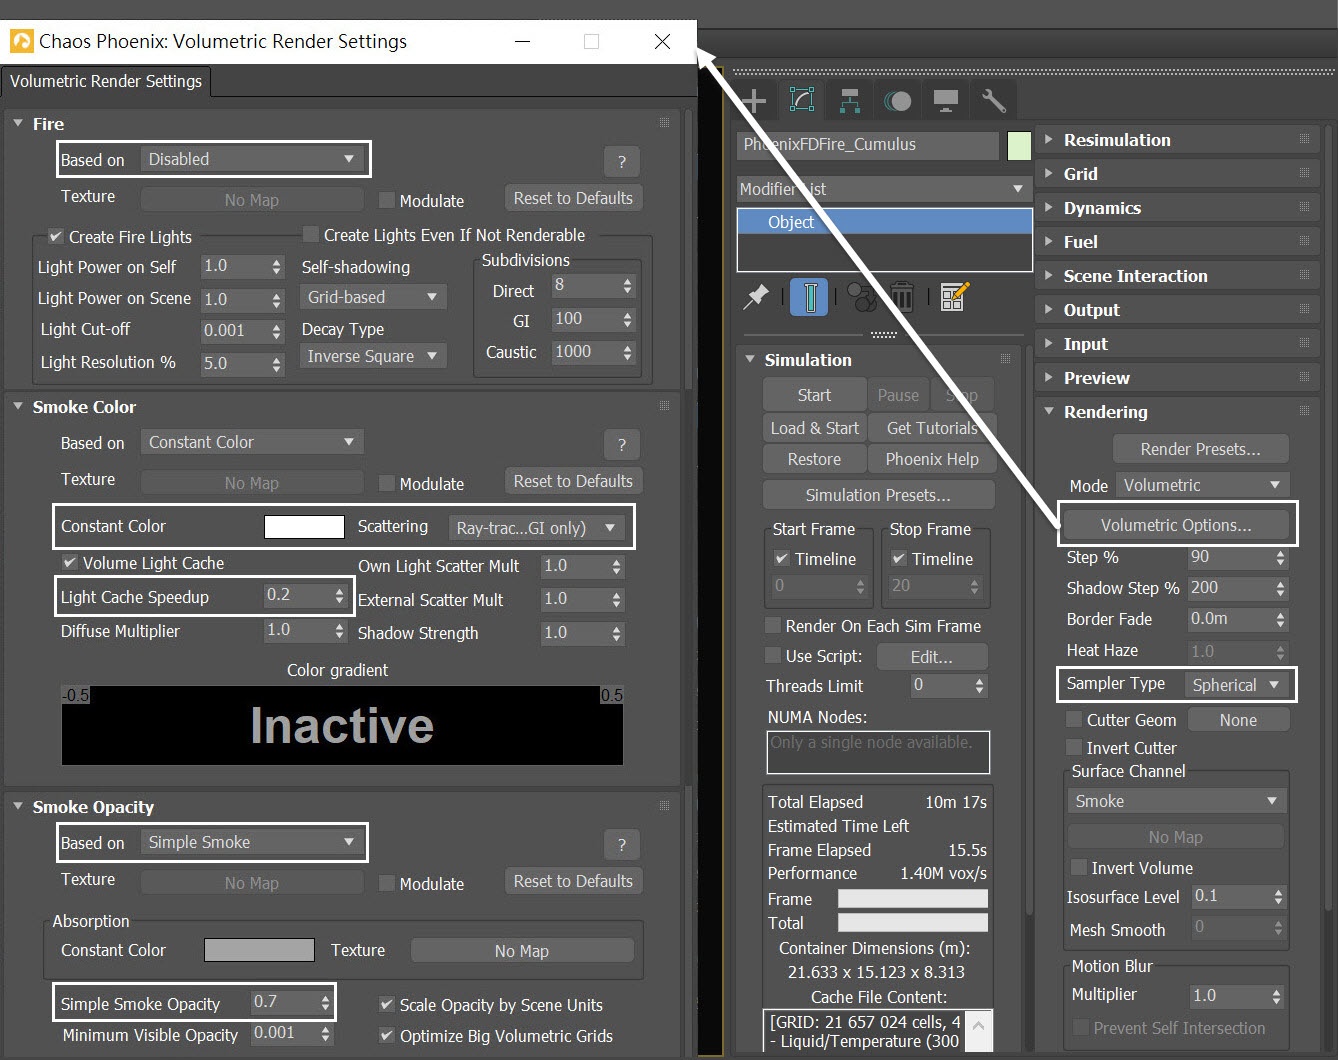
Select the PhoenixFDFire_Cumulus Simulator, and go to its Volumetric Render Settings.
- Set the Fire Based on option to Disabled - we won't need any fire in this scene.
- Change the Smoke Color to pure white of RGB (255, 255, 255)
- Set the Scattering to Ray-tracing (GI only) - this mode will use physically accurate scattering of light rays and will produce the most realistic results, though will be a bit slower to render.
- Reduce the Light Cache Speedup to 0.2
- Set the Smoke Opacity's Based on option to Simple Smoke
- Set the Simple Smoke Opacity to 0.7 - this will make the clouds denser.
Increasing the value for Light Cache Speedup, speeds up the render, but it also lowers the quality of the Volume Light Cache. If dark cubic grid artifacts start forming on the smoke, the parameter is set too high. For more information visit the Volumetric Rendering In-Depth page.
- In the Rendering rollout, set the Sampler Type to Spherical. The Sampler Type determines the blending method between adjacent grid voxels and is used to balance between rendering speed and quality. In this case the Spherical sampler will give us the best quality result.
Repeat these same Volumetric and Render settings for the PhoenixFDFire_Stratus Simulator.
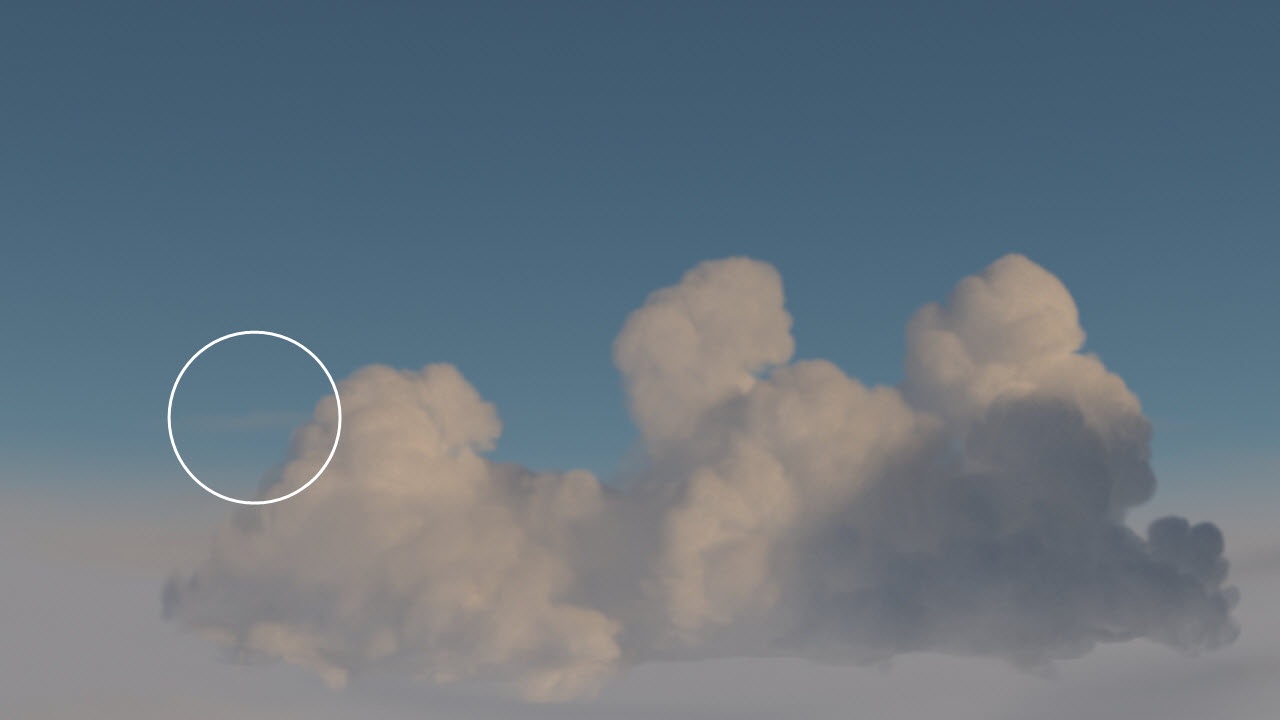
With the new volumetric settings for both simulators in the scene, run a test render from frame 60. The clouds look brighter now. However, there are some very subtle artifacts at the edge of the clouds. This is due to the simulator being low resolution and the curved geometry for the emission.
Border Fade for Stratus
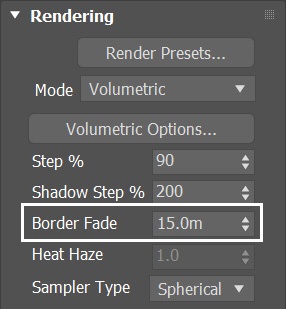
With the PhoenixFDFire_Stratus Simulator selected, go to its Rendering rollout. Increase the Border Fade to 15.0m. This decreases the appearance of cubic grid artifacts described in the previous step.
Alternatively, you can up-res the PhoenixFDFire_Stratus Simulator to alleviate the artifacts. Here we just use Border Fade for a quick fix.
Render Elements
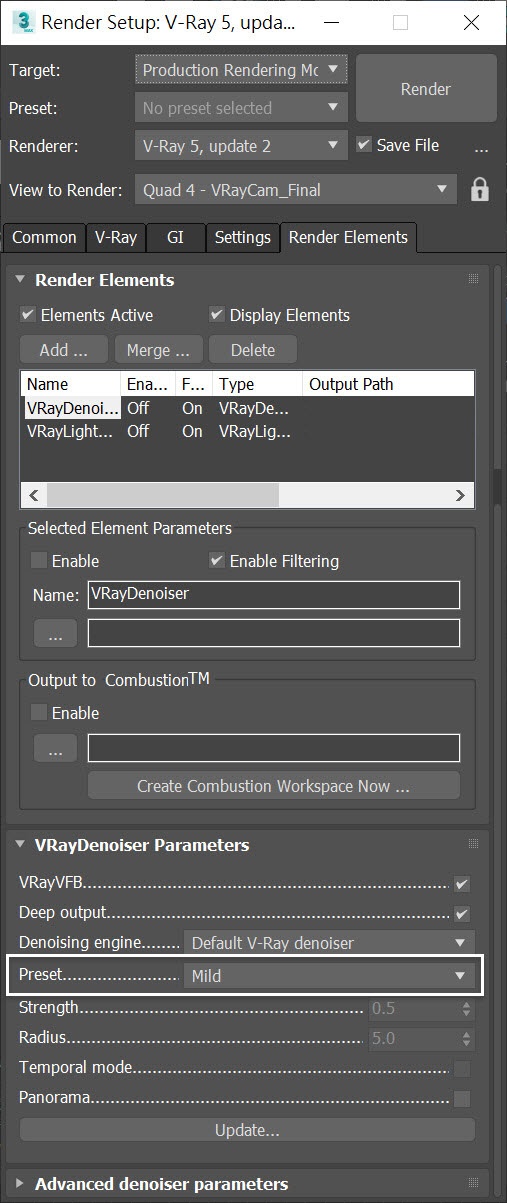
In the Render Setup > Render Elemets tab, add VRayDenoiser and VRayLightMix render elements. This is necessary for relighting the scene in the VFB.
In the VRayDenoiser settings, leave the Preset as Mild. Adding the VRayDenoiser render element smooths out the scene in the VFB.
V-Ray Frame Buffer
Open the V-Ray Frame Buffer and use the Create Layer icon ( )to add layers for Exposure and Filmic Tonemap.
The image is rendered using the V-Ray Frame Buffer. In the current example, the color corrections and post effects are set to:
Filmic Tonemap:
- Type: Hable
- Shoulder strength: 0.000
- Linear strength: 0.000
- Linear angle: 0.000
- Toe strength: 1.000
- White point: 1.500
The Filmic Tonemap render element simulates a camera film's response to light, making the scene more realistic.
Exposure:
- Exposure: 1.40
- Highlight Burn: 1.00
- Contrast: 0.10
Denoiser:
- Opacity: 0.500
- Preset: Mild
Feel free to use other values for the post effects, depending on your preferences.
Relighting with LightMix
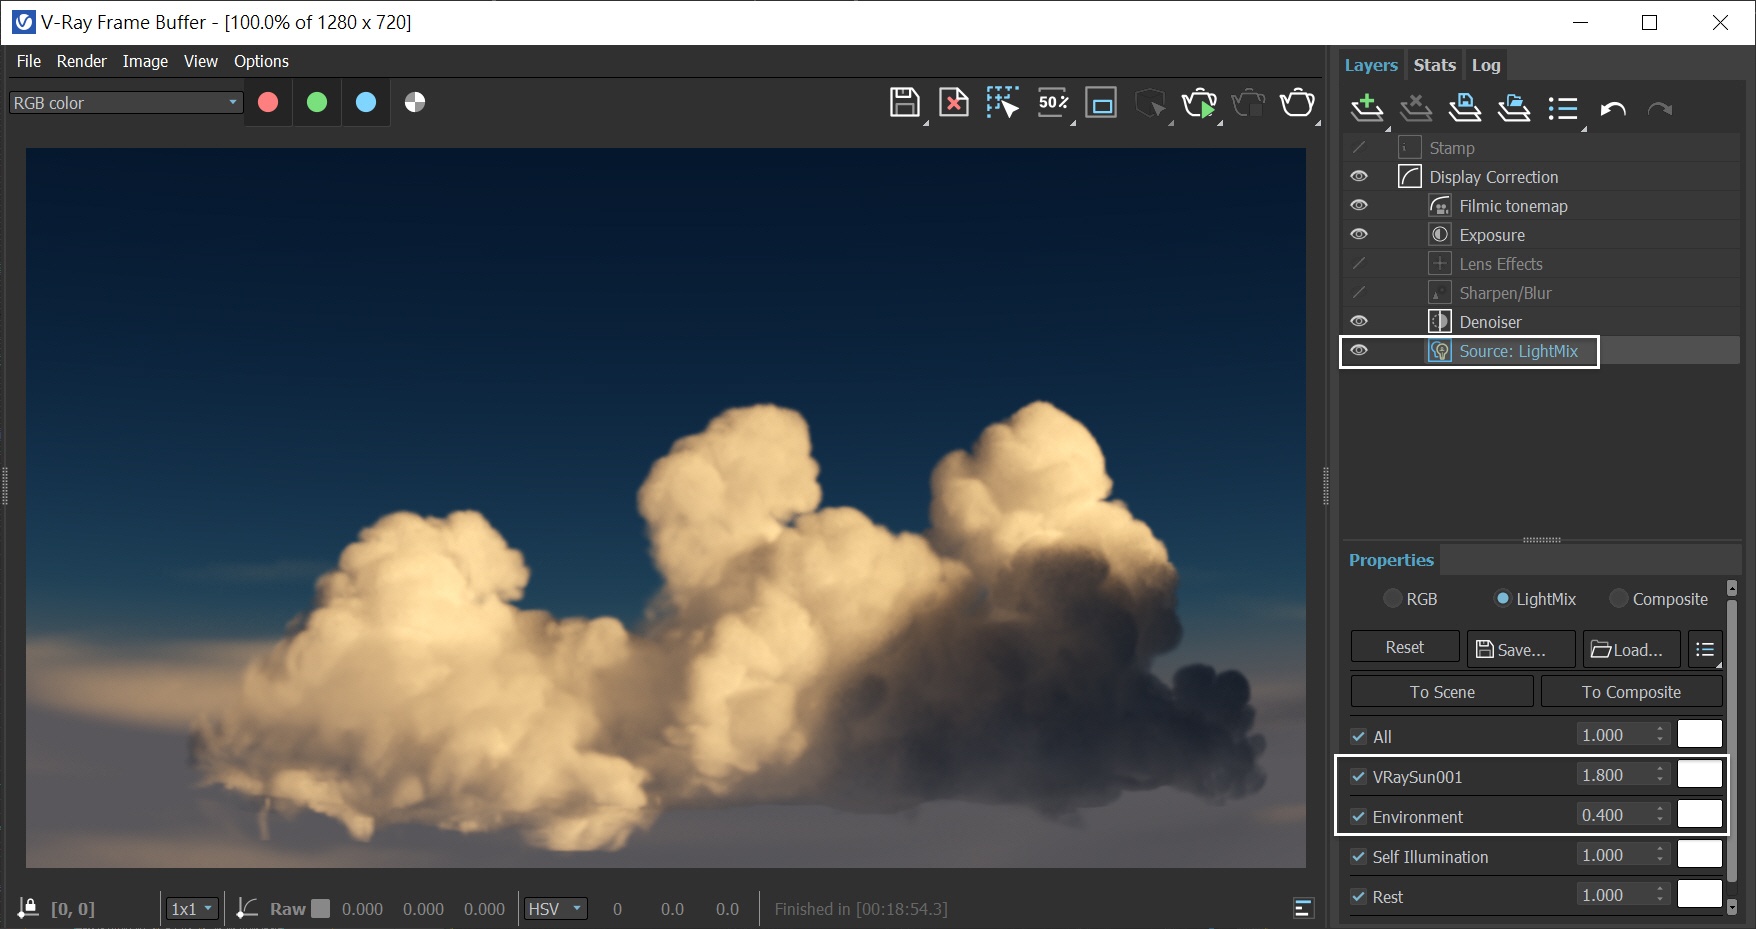
This step shows how to use LightMix to adjust the keylight (VRaySun) to fill-light (VRaySky) ratio. Increasing the VRaySun's weight and decreasing the weight of the Environment makes the shot more cinematic.
Select the Source:LightMix layer and switch its mode from RGB to LightMix.
Increase the weight of the VRaySun001 layer to 1.8
Decrease the weight of the Environment layer to 0.4
Now the contrast of the image increased, but it shifted towards a yellowish color.
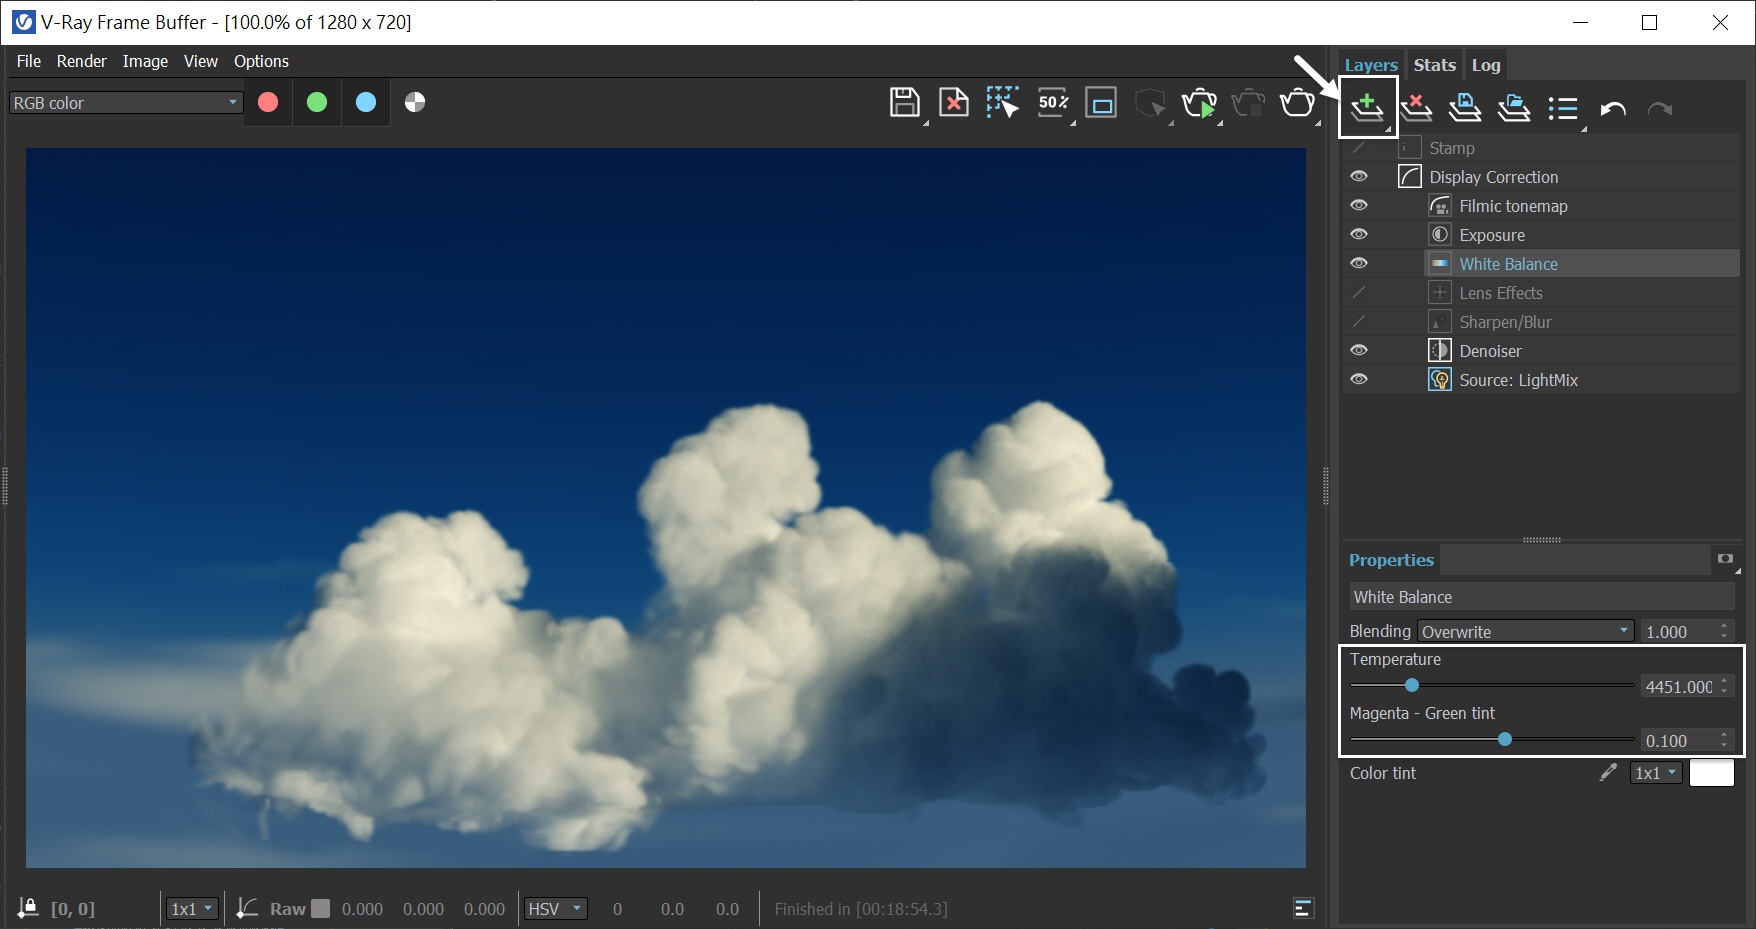
Open the V-Ray Frame Buffer and use the Create Layer icon to add a layer for White Balance.
Set the Temperature to 4451.00
Set the Magenta - Green tint to 0.10
These settings counterbalance the effect of LightMix. The result is an image with more neutral colors, plus a slightly green tint.
Alternatively, you can load up a Rendering Preset from the Animated_Clouds_VFB.vfbl file that is provided in the sample scene.
Phase Function
To further enhance the realism of the clouds, let's adjust the Phase Function of the simulators.
Select the PhoenixFDFire_Cumulus Simulator, and go to its Volumetric Render Settings. Set the Phase Function to 0.7.
Repeat these same Volumetric Render settings for the PhoenixFDFire_Stratus Simulator.
The Phase Function controls the direction in which the light scatters inside the volume. The default value of 0 means isotropic scattering where light is scattered in all directions. A positive value means forward scattering, while a negative value means backscattering.
In this case, we want to render realistic clouds that are made up of water droplets. The light should scatter more forward, that's why we give it a value of 0.7.
Note that values very close to 1.0 or -1.0 produce very directional scattering that is invisible from most angles, so such values are not recommended. When rendering with a Phase Function different than 0 and Volume Light Cache is enabled, the rendered result is brighter. The Phase Function is ignored when the Scattering is set to Approximate or Approximate+Shadows.
With the Phase Function tweaked for both simulators in the scene, run a test render from frame 60.
You can see fainted dark edges around the clouds, making them appear more realistic.
Phase Function comparison (front lighting)
To see the effect of different Phase Function values more clearly, let's do a slider comparison. We run test renderings with Phase Function set to -0.7, 0.0, and 0.7. We also record the rendering time. You can see that Phase Function set to 0.7 took the least rendering time, while Phase Function set to -0.7 took much more rendering time.
Overall, Phase Function with a negative value gives a more contrasty image, and Phase Function with a positive value makes the image appear flatter, but closer to a real photo of clouds.
Here is a comparison table for the three conditions.
Although different Phase Function values correspond to different physical objects, feel free to set other values for the Phase Function if you prefer a different look for the clouds. In this case, we choose to set the Phase Function to 0.7 for the clouds.
Phase Function = -0.7 | Phase Function = 0.0 (default) | Phase Function = 0.7 |
|---|---|---|
More light backscattering | Isotropic scattering where light is scattered in all directions | More light forward scattering |
Mimics a volume made up of solid particles and produces brighter, denser and more contrasty, detailed looks. | Mimics a volume made up of water droplets where light scatters more. Produces flatter looks, dimmer and with fainted dark edge. | |
Suitable for smoke or dust | Suitable for clouds | |
Longer rendering time | Shorter rendering time |
And here is the final rendered result.
Although the tutorial is completed, I would like to add one extra step for the scene. You can continue to the bonus step...
Bonus step: back lighting condition
Select the VRaySun in the scene, move it opposite to the camera.
The exact new position for the VRaySun is XYZ[ 201.0, 232.0, 66.0 ]. Now we have changed the lighting condition from front lighting to back lighting.
With the new back lighting condition, run a test render from frame 60. For the back lighting condition, we don't need the tweaks in the LightMix from the previous step. Therefore in the Soucre:RGB, let's switch its Properties to RGB.
See how light goes through the clouds and creates a beautiful rim light look.
Phase Function comparison (back lighting)
Let's make some comparison rendering with Phase Function set to -0.7, 0.0, and 0.7 under back lighting condition.
You can see with Phase Function set to 0.7, it took least rendering time and got the most realistic results among those three images.
And here is the final rendered result with back lighting condition.


