The instructions on this page guide you through the process of creating an artillery explosion effect using Chaos Phoenix 4, V-Ray Next and thinkingParticles 6.
Overview
This is an Advanced Level tutorial. The workflow for setting up the shot and the Phoenix settings involved in the simulation are explained in detail. However, it's recommended that you have at least basic knowleage in lighting, materials, and the Phoenix simulation. An understanding of thinkingParticles is beneficial but not required.
In this tutorial we demonstrate how to work with thinkingParticles in tandem with Phoenix. We generate bombs using thinkingParticles. When missiles hit the ground, bounced debris are procedurally created.
thinkingParticles contain velocity information and Phoenix can use them as sources for fire/smoke in order to produce realistic artillery explosions.
Also, we take advantage of the Time Base - Particle Age, a powerful feature of Fire/Smoke source. It allows us to animate the emission of fluid based on the age of each individual particle.
This simulation requires thinkingParticles 6, Phoenix 4.10 Official Release and V-Ray Next Official Release for 3ds Max 2015 at least. You can download official Phoenix and V-Ray from https://download.chaos.com. If you notice a major difference between the results shown here and the behavior of your setup, please reach us using the Support Form.
To download project files: Download Project Files
Want to follow along but don’t have a license?: Download Free Trial
Units Setup
Scale is crucial for the behavior of any simulation. The real-world size of the Simulator in units is important for the simulation dynamics.
Large scale simulations appear to move slower, while mid-to-small scale simulations have lots of vigorous movements.
When you create your Simulator, you must check the Grid rollout where the real-world extents of the Simulator are shown. If the size of the Simulator in the scene cannot be changed, you can cheat the solver into working as if the scale is larger or smaller by changing the Scene Scale option in the Grid rollout.
The Phoenix solver is not affected by how you choose to view the Display Unit Scale - it is just a matter of convenience.
As the focus of this tutorial is a large-scale simulation, setting the units to Meters seems like a reasonable choice.
Go to Customize → Units Setup and set Display Unit Scale to Metric Meters. Also, set the System Units such that 1 Unit equals 1 Meter.

Scene Layout
The final scene consists of the following elements:
- Plane-bomb-emitter is a plane where bombs are generated;
- thinkingParticles node (Thinking001);
- Phoenix Fire/Smoke Simulator;
- There are total of 7 Phoenix Fire/Smoke Sources, each representing different component of the explosion;
- V-Ray Sun&Sky for lighting;
- V-Ray Physical Camera for rendering;
- Shelled Plane001-collision for ground plane;
- Car and Posts geometry for additional detail, as well as for creating a better sense of scale in the scene;
- Plain Force as a wind force in the scene;
- A point helper for camera shake.

Underneath the ground plane, at the right corner, you can find geometries that produce the explosion procedurally.
- Bomb-Geo as the bomb itself;
- Rock 01 ~ 06 are six geometries for debris;
- Pointy, Cone_smaller, Con_bigger, Cylinder and Sphere_core are the geometries generated when the bomb hits the ground. They provide the position of the particle emission, allowing us to generate the raised dust, debris or particles for the major explosion.
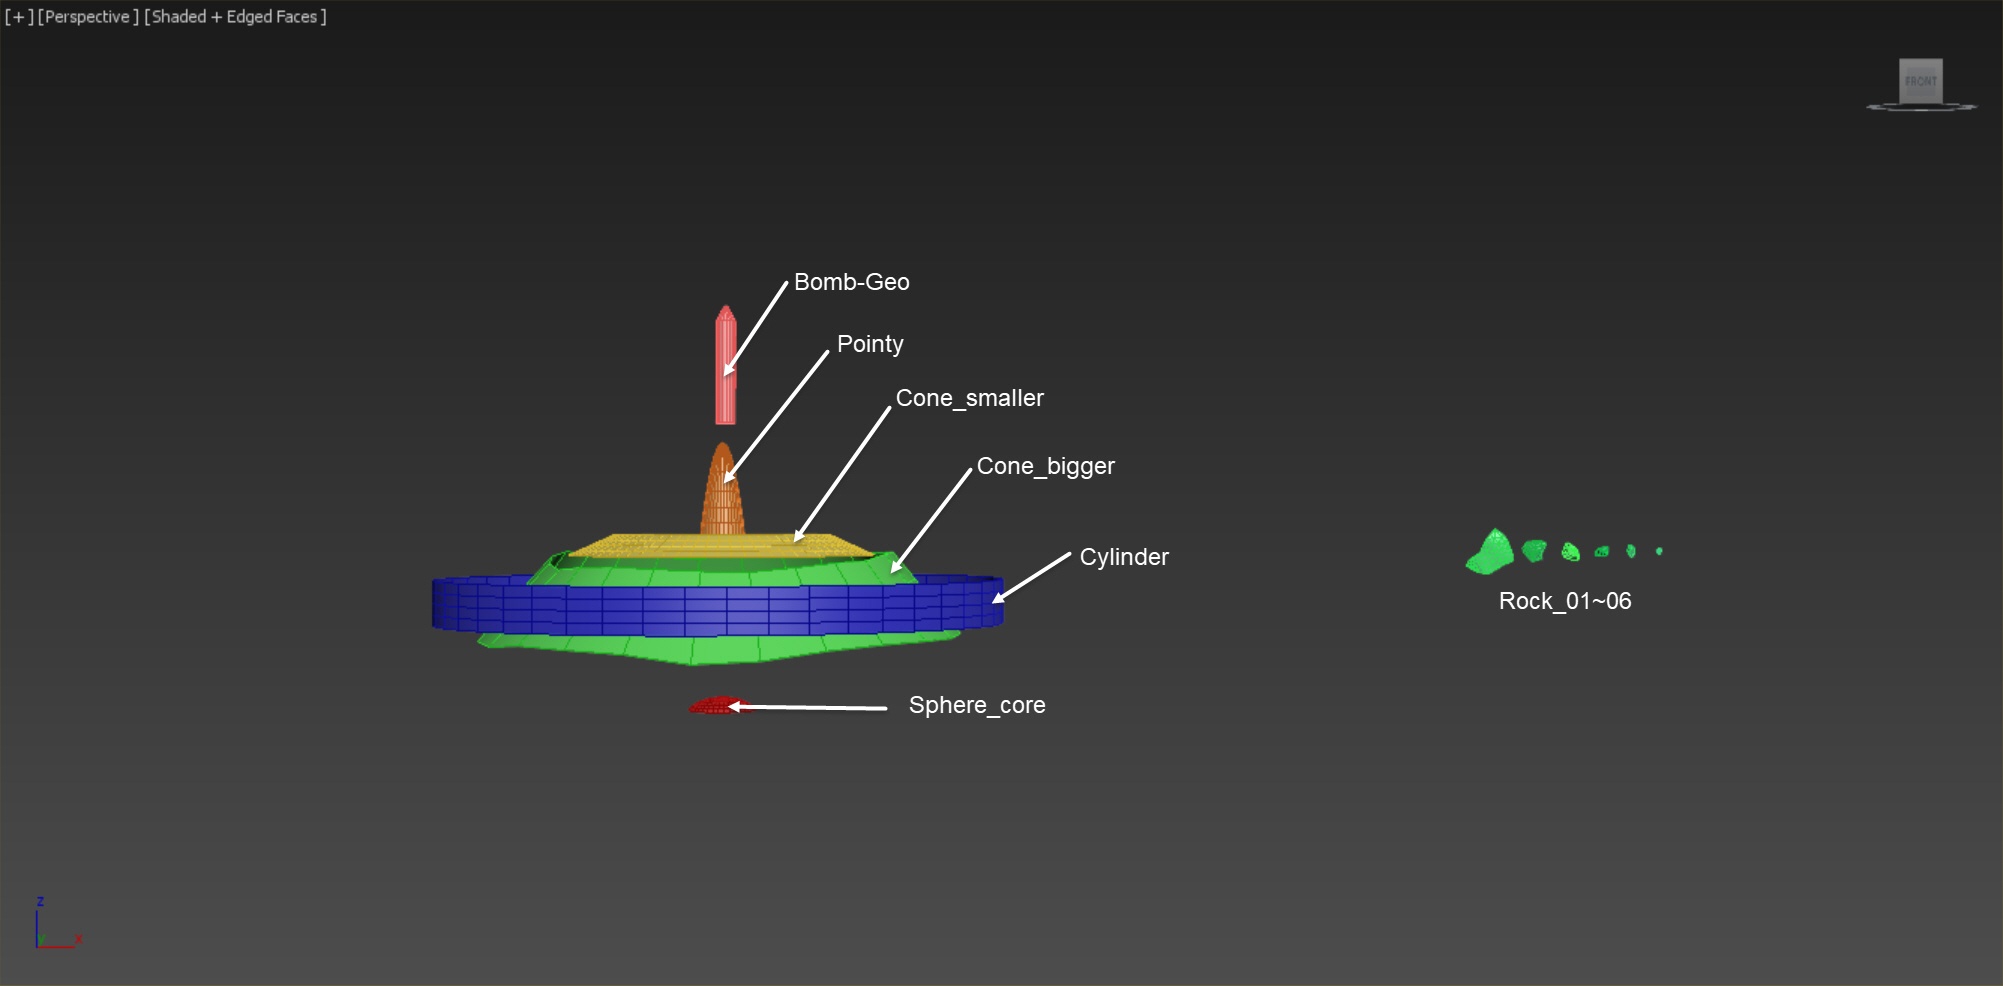
Notice that these helper geometries affect the bouncing angle of the particles. For example, for the Cone_bigger geometry, the slope is roughly 45 degrees. Therefore, when the dust particles rise, the slope gets to be 45 degrees.
You can customize your explosion by adjusting the helper geometry.

In this tutorial we have so many fire/smoke sources that need to be added, that the steps can get rather complicated. So let's focus here only on the Phoenix related steps and feel free to use the camera and lighting settings in the provided sample scene.
For your reference, below you can find the camera and light settings.
Camera Setting
Add a Command Panel → Cameras → V-Ray → VRayPhysicalCamera.
The exact position of the Camera is XYZ: [ 0, -73, 5 ].
The exact position of the Camera Target is XYZ: [ -2, -0.9, 13 ].
The Aperture → F-Number is set to 8.0.
The Aperture → Shutter Speed is set to 1000.
Motion Blur is Enabled.
Color & Exposure → White Balance is set to D50.
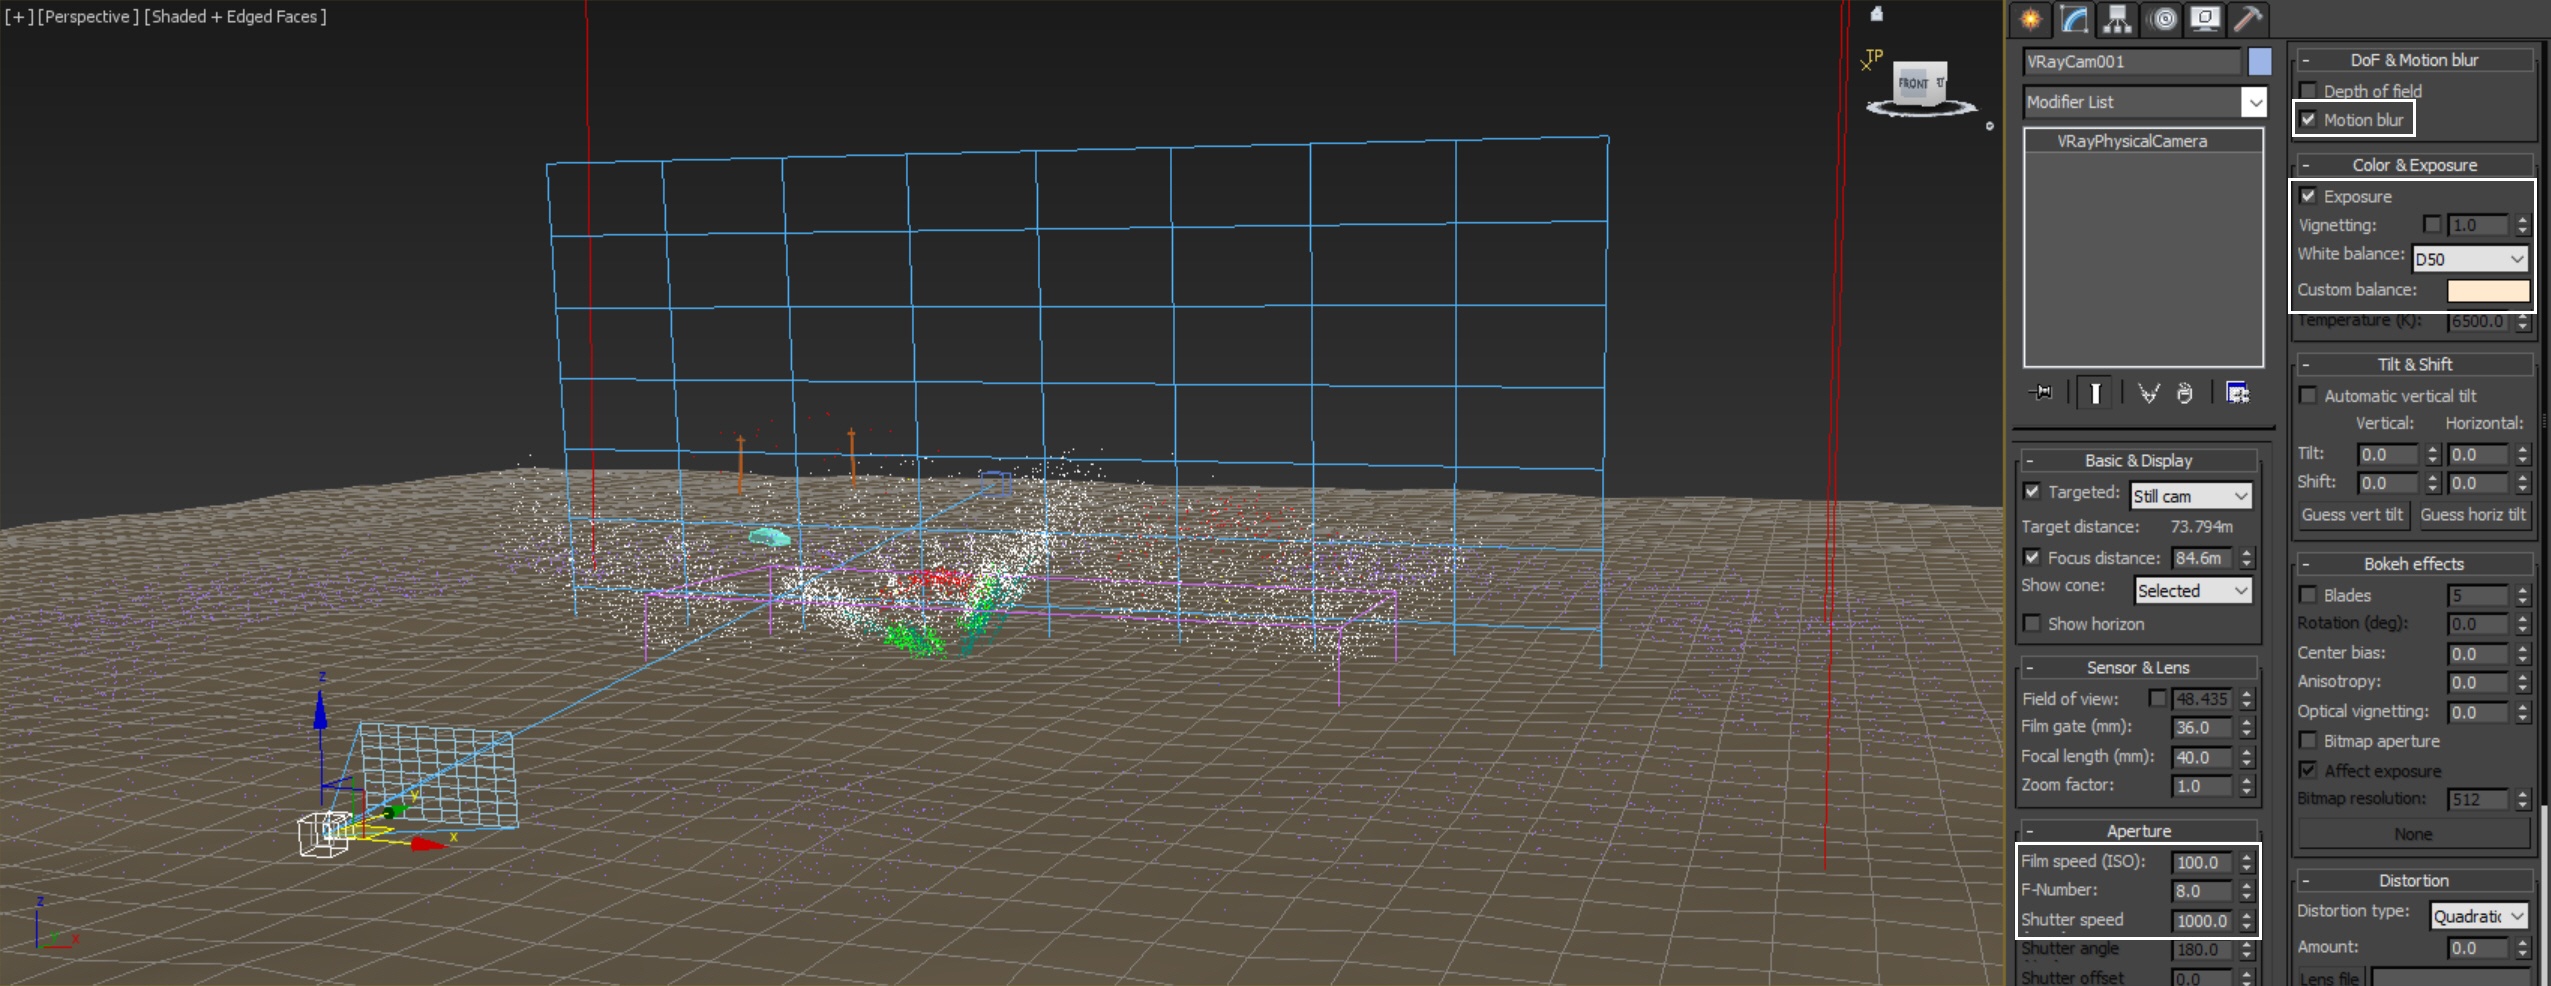
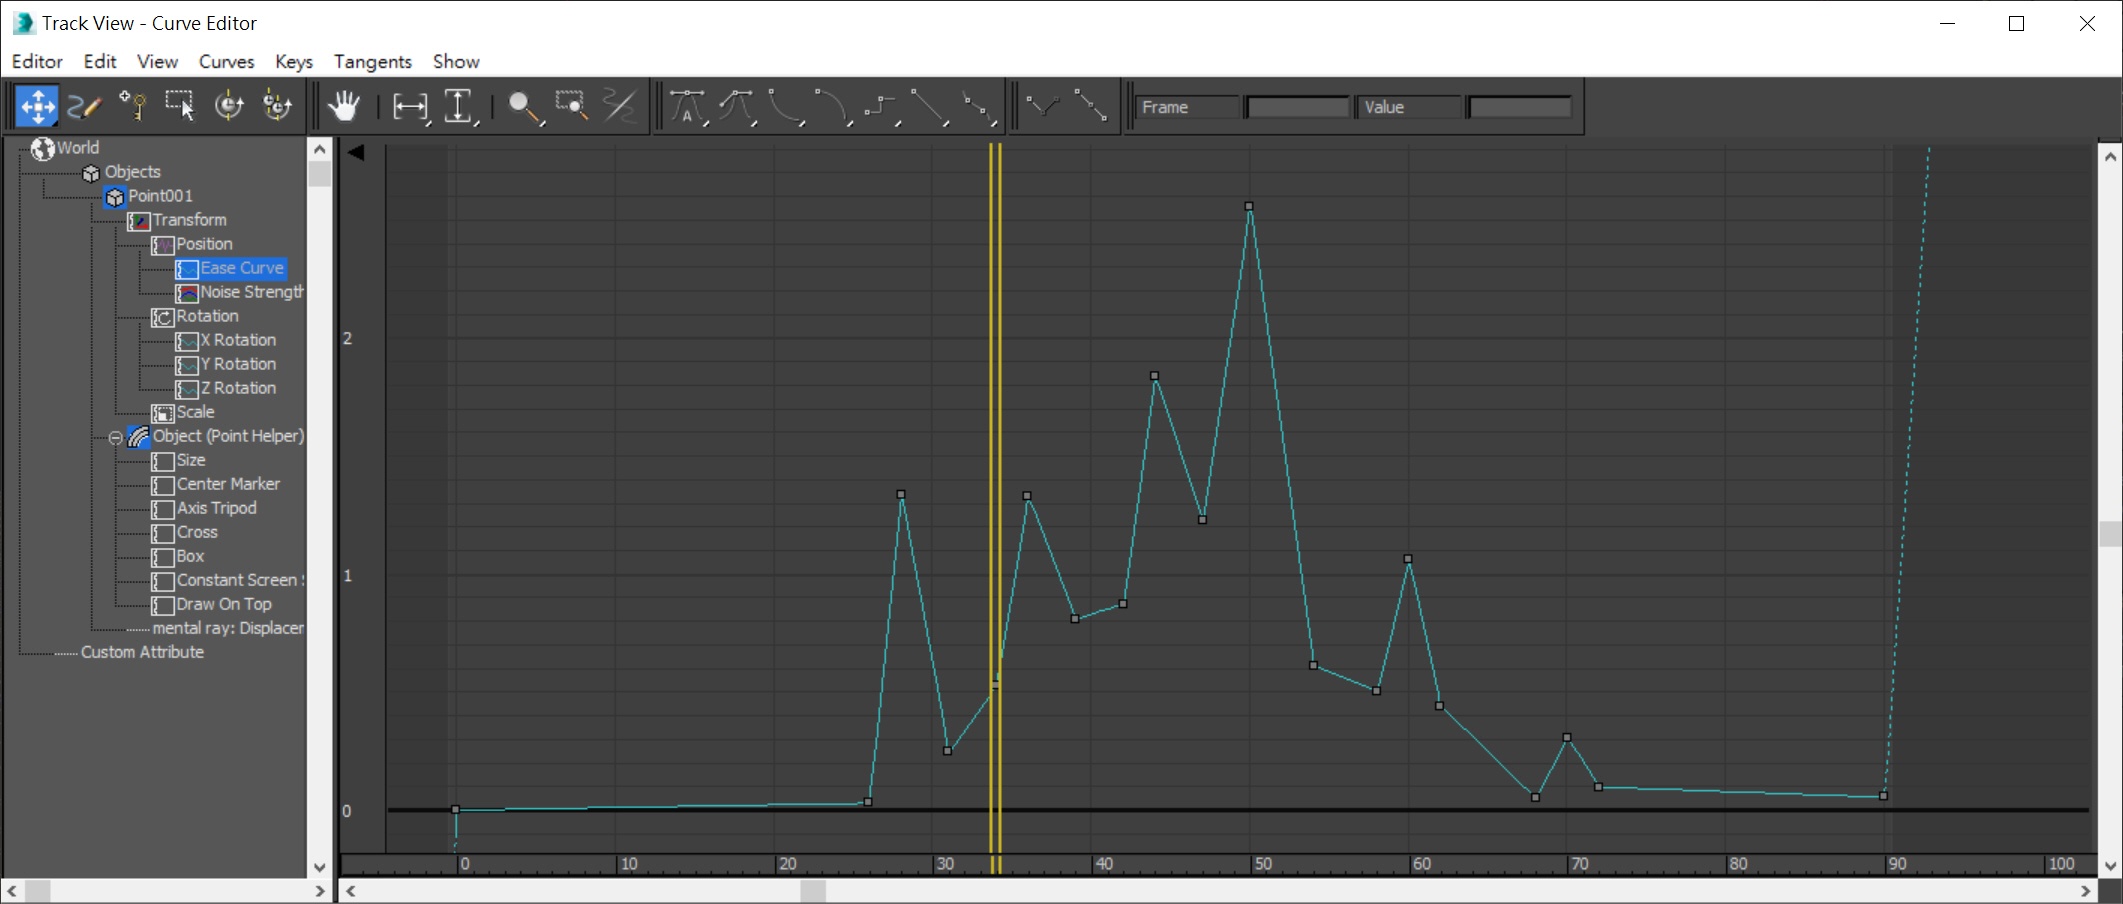
The camera target is linked to a Point helper. The Point has a Noise controller and ease curve applied. This way we can have a camera shake effect.
Lighting
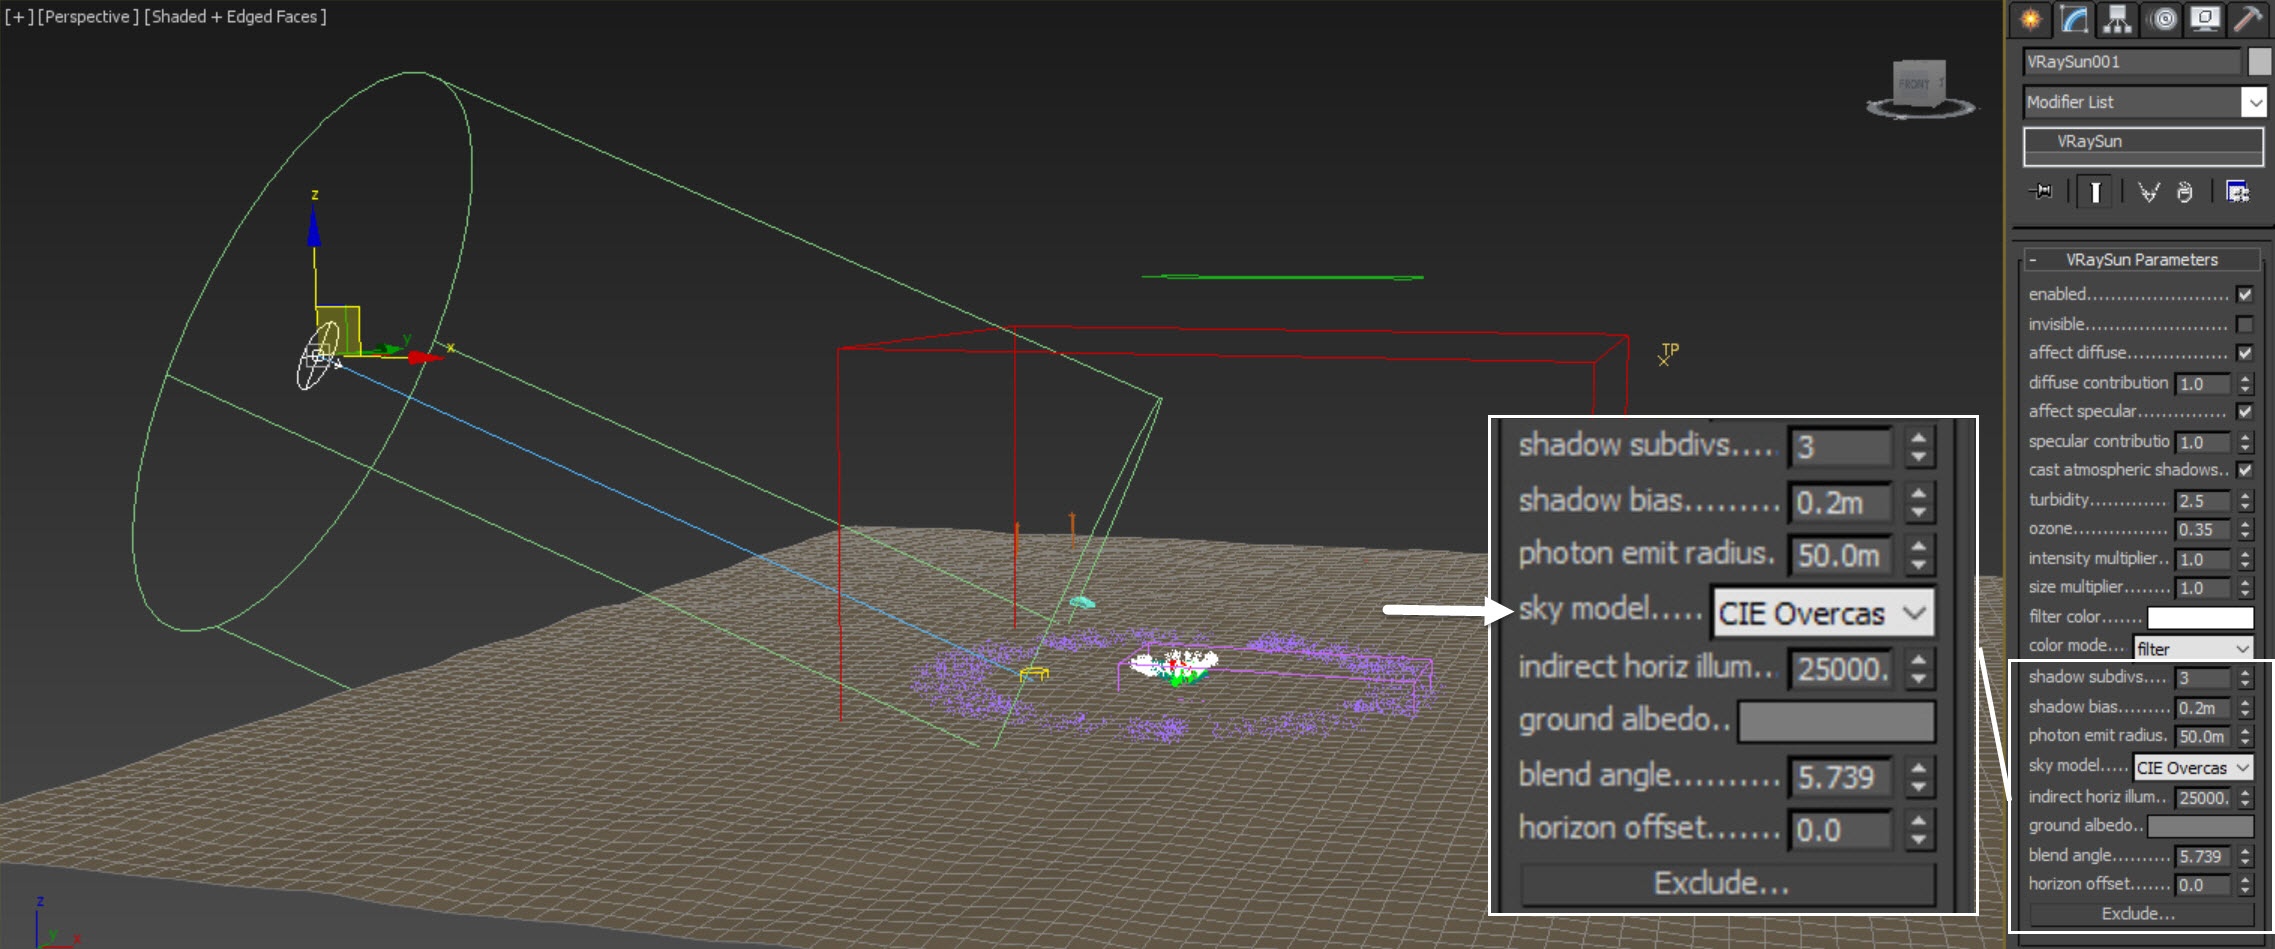
Add a Command Panel → Light → V-Ray → VRaySun, create a V-Ray Sun & Sky system in the scene.
The exact position of the V-Ray Sun is XYZ: [ -209.5, -208, 55.5 ].
The exact position of the V-Ray Sun Target is XYZ: [ -39, -2.5, 0 ].
Set sky model to CIE Overcast.
thinkingParticles Simulation
The next couple of sections contain instructions for caching the thinkingParticles simulation. The setup is not discussed in-depth, it is only provided as a starting point for the Phoenix simulation.
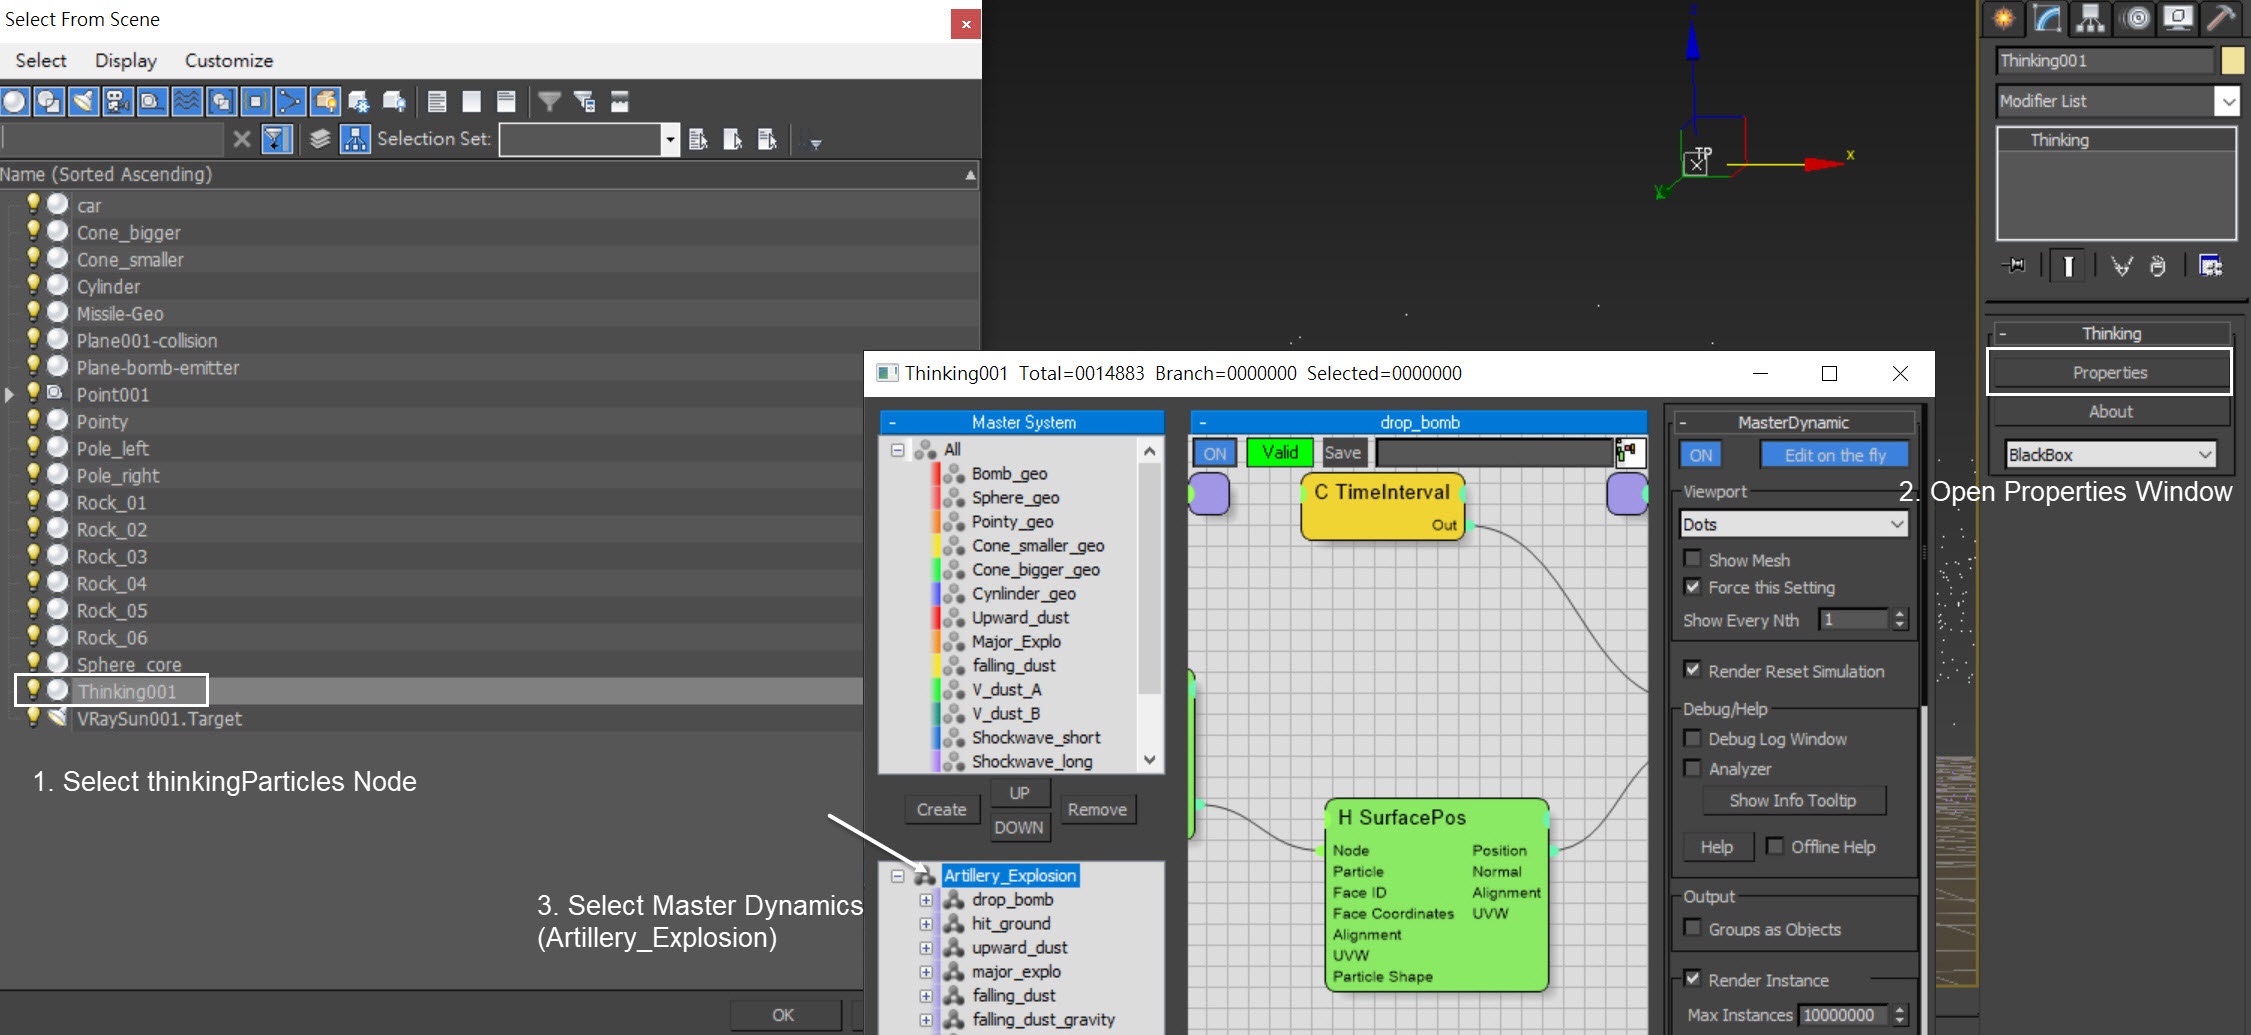
To cache the thinkingParticles simulation to disk, select the thinkingParticles node (Thinking001) in the Scene Explorer and open the Properties window.
Select Master Dynamic → Artillery_Explosion.
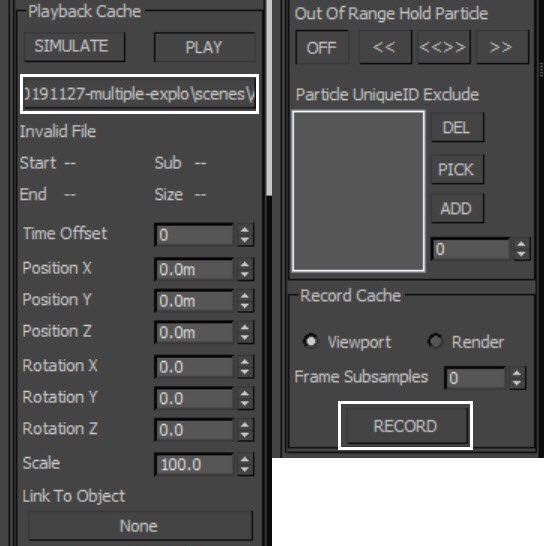
Under the Playback Cache section, select the Output Path for the cache files and press Record.
That's all. Once the thinkingParticles simulation is cached, we can proceed with the Phoenix simulation.
Here is displayed a preview animation of the simulation in its current state.
As you can see, bomb_geo is generated from Plane_bomb_emtter. Once the missiles hit Plane001_collision, five different helper geometry instances are placed at that spot: Pointy, Cone_smaller, Con_bigger, Cylinder and Sphere_core. Then:
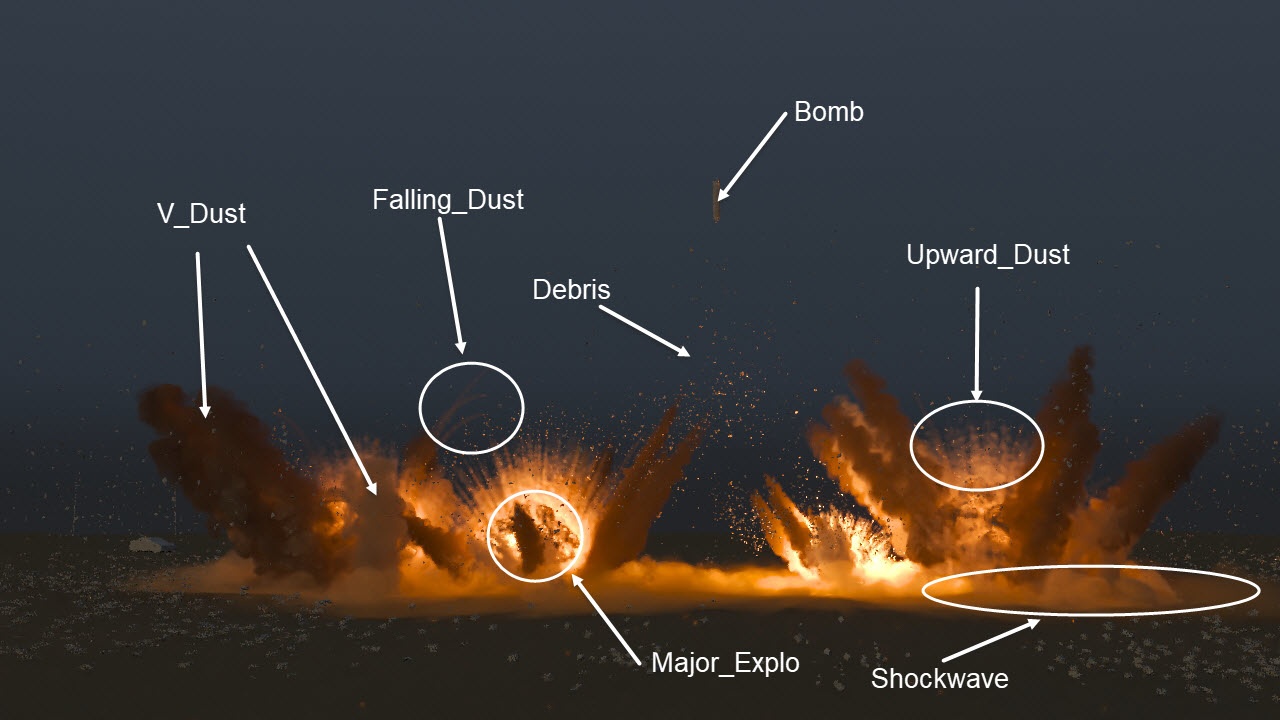
1. Major_explo particles are generated from the surface of Pointy_geo;
2. Upward_dust particles are generated from the surface of Sphere_geo;
3. Falling_dust particles are generated from the surface of Cone_smaller_geo;
4. V_dust particles seed A and V_dust particles seed B are generated from the surface of Cone_bigger_geo;
5. V_dust_A particles are generated based on the surface position of V_dust particles seed A. Similarly, V_dust_B particles are generated based on the surface position of V_dust particles seed B;
6. shockwave short particles are generated from Cylinder_geo;
7. shockwave long particles are generated from Cylinder_geo;
8. Debris particles are generated from Cone_bigger_geo, and use 6 of the rock geometries as instances.
V_dust_A and V_dust_B are essentially the same particles. As we want some color difference in the dust smoke, we split them into two particle groups.
The preview animation above is done with the Show Mesh option in the thinkingParticles enabled. You can turn that off for better viewport performance.

Here is a list of thinkingParticles. It summarizes all the different particles and their geometry instances. All are color-coded, so you can easily recognize them in the viewport.
Which particles are emitted from which helper geometry determines the characteristic of an explosion. It could be a landmine explosion, missile or a traditional bomb. For example, if v_dust emits from Cone_bigger_geo, the dust rises with 45 degrees and forms a V-shape. If the v_dust emits from the Sphere_geo, then the particles stream is sprayed out.
You can customize your explosion with different combinations. Here we give you different examples and you can use the scene as a template.
Particles | Emit From | Wireframe Color | Geometry Instance |
Missile | Plane_bomb_emitter | red | Missile_geo |
upward dust | Sphere_geo | red | - |
falling dust | Cone_smaller_geo | yellow | - |
major explo | Pointy_geo | orange | - |
v_dust A | Cone_bigger_geo | Bright green | - |
v_dust B | Cone_bigger_geo | Dark green | - |
shockwave_short | Cylinder_geo | blue | - |
shockwave_long | Cylinder_geo | purple | - |
Debris | Cone_bigger_geo | white | Rock 01 ~ 06 |
Anatomy of the Artillery Explosion
Here we show the final result of the explosion, so you can have a better idea of how the different elements look like.
Phoenix Simulation
Go to Modify Panel → Create → Geometry → PhoenixFD → FireSmokeSim.
The exact position of the Phoenix Simulator in the scene is XYZ: [ -15, 0, 0 ].
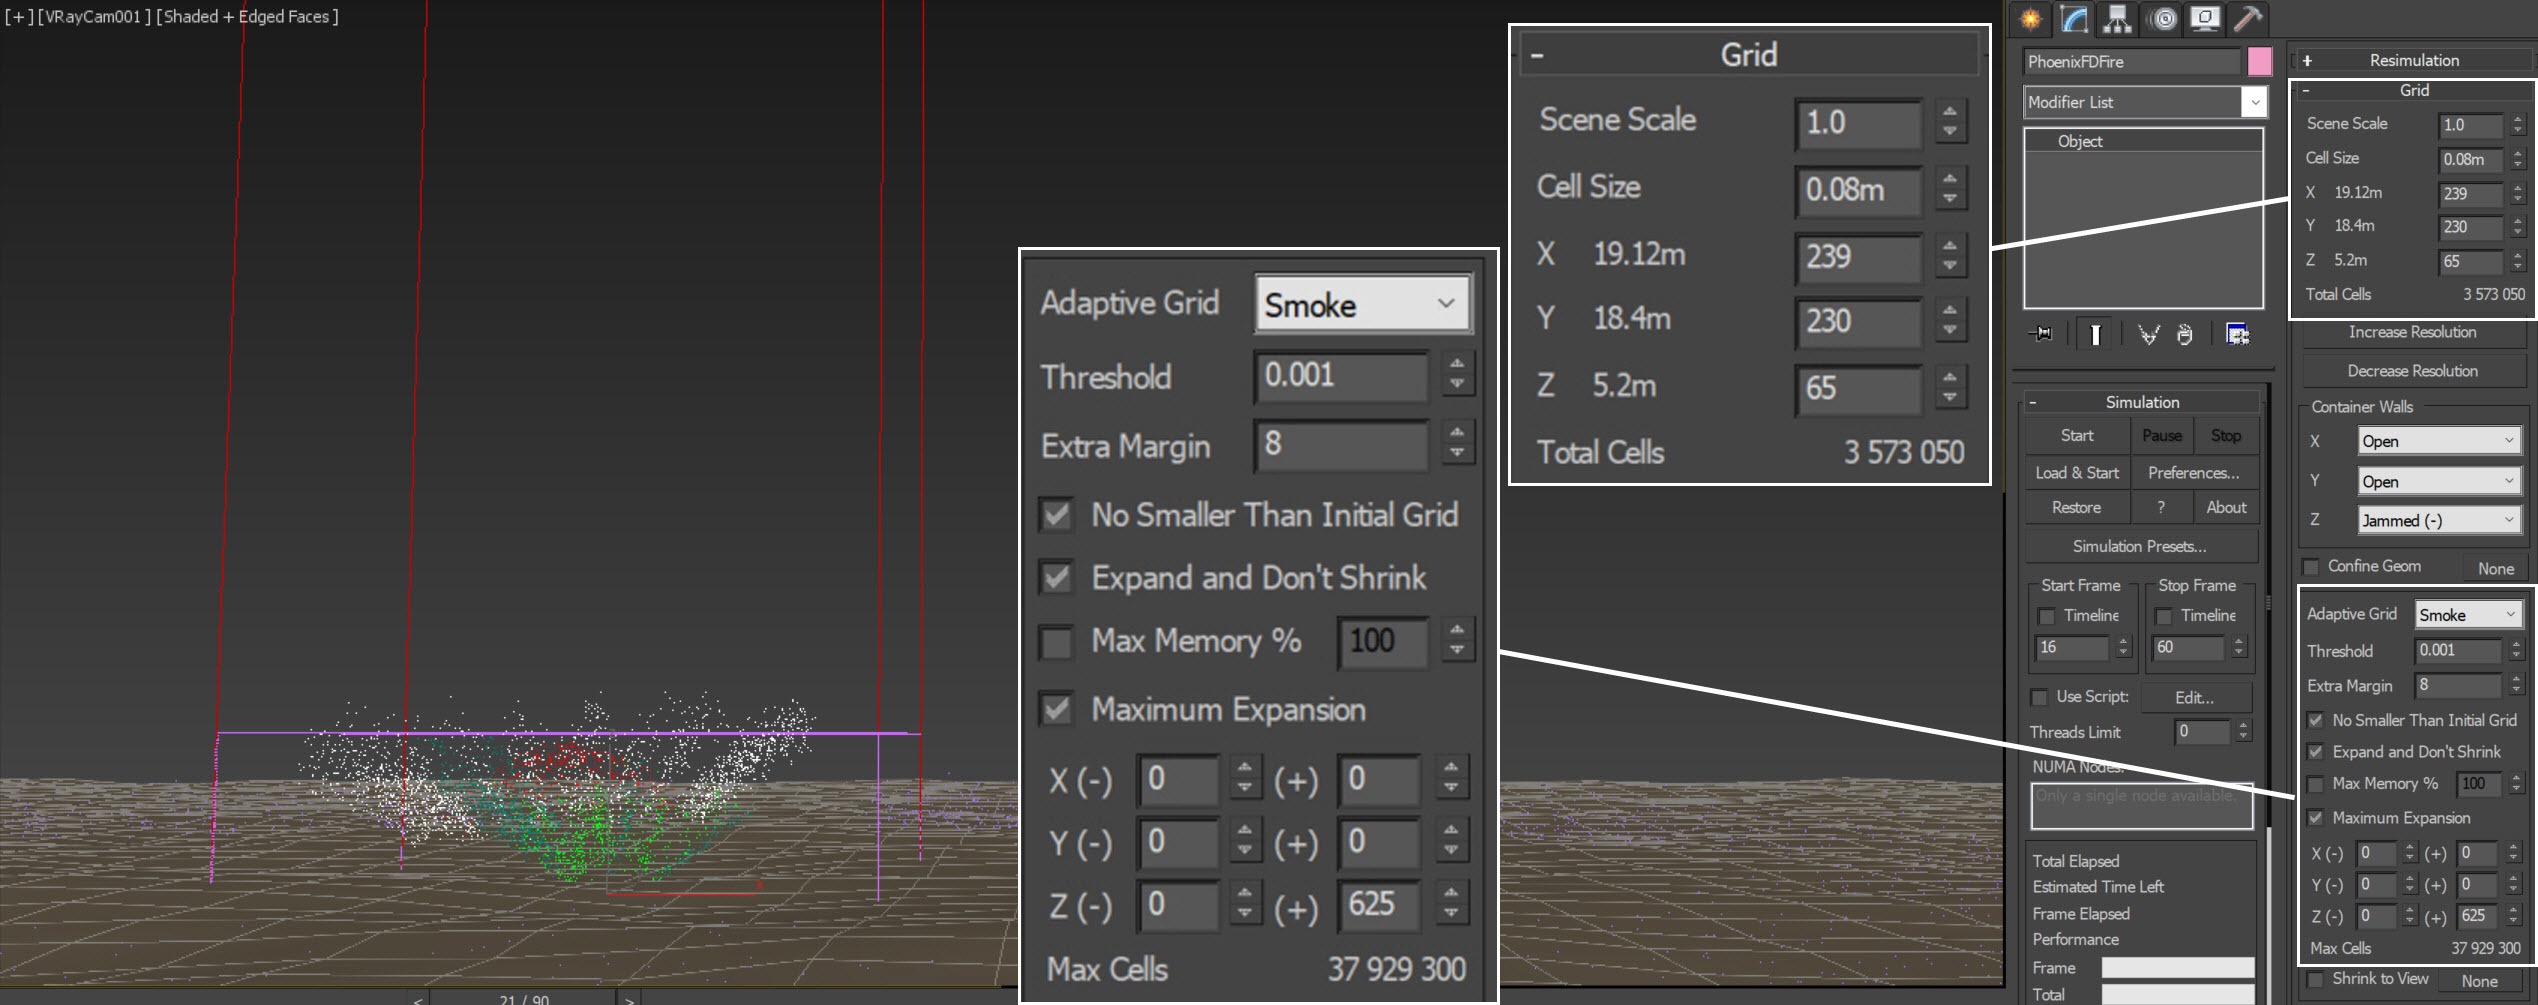
Open the Grid rollout and set the following values:
- Cell Size: 0.08 m;
- Size XYZ: [ 239, 230, 65 ] - at the start of the tutorial the Simulator size covers only one single explosion on the left. For the final simulation, the Size is increased so that every explosion is confined in the grid;
- Container Walls → Wall Z: Jammed (-) - the bottom of the simulator is jammed (closed) so that the smoke does not leave the bounds of the simulation as it travels down;
- Adaptive Grid: Smoke - the Adaptive Grid algorithm allows the bounding box of the simulation to dynamically expand on-demand. With a Threshold of 0.001, the Simulator expands when the Cells near the corners of the simulation bounding box reach a Smoke value of 0.001 or greater;
- Extra Margin: 8 - the Extra Margin option is useful when the Adaptive Grid algorithm is unable to expand fast enough to accommodate for quick movement in the simulation (e.g. an explosion). The Extra Margin parameter attempts to remedy this by expanding the grid preemptively with the specified number of voxels on each side;
- Enable Expand and Don't Shrink - this way the Adaptive grid will not contract back when there is very thin smoke at the borders of the grid.
- Enable Max Expansion: X: (0, 0), Y: (0, 0), Z: (0, 625) - to save memory and simulation time by limiting the Maximum Size of the simulation grid.
Select the Phoenix Simulator → Output rollout and enable the output of Temperature, Smoke, RGB, Velocity and Fuel Grid Channels.
If you'd like to perform a Resimulation using Wavelet Turbulence, enable the Wavelet Grid Channel.
Any channel that you intend to use after the simulation is complete needs to be cached to disk. For example:
- Velocity is required at render time for Motion Blur;
- Temperature is usually used at render time to generate Fire;
- Wavelet is used for Wavelet turbulence when performing a Resimulation.

We are going to create seven different Fire/Smoke sources. As an overview, we list them here first. Among those sources, only major_explo emits fuel and explodes, as the name implies.
The other sources are: Upward dust is white dust that flies upward; falling_dust is the dust that creates dust trails as particles fly; V_dust is created when the bomb hits the ground and rises up in V-shape. We have two types of shockwaves: one runs slower (shockwave_short) and the other runs faster (shockwave_long).
List of Fire/Smoke Sources and their settings
Let's create the sources.
Fire / Smoke Source | Emit Mode | Inject Power | Noise | Temperature | Smoke | Fuel | RGB | Motion Velocity | Prt Size |
Upward Dust | Volume Inject | Frame 17 – 25 10 → 0 | 0 | - | 1 | - | 220, 215, 212 | 1 | 0.04m |
Falling Dust | Volume Inject | Frame 17 – 67 10 → 0 | 0 | - | 1 | - | 92, 70, 52 | 1 | 0.06m |
Major Explo | Volume Inject | Frame 17 – 20 2 → 0 | 0 | Frame 17 – 20 2500 → 300 | 1 | 1 | 1, 1, 1 | 1 | 0.2m |
V_Dust A | Volume Inject | Frame 17 – 26 1.5 → 0 | 0.5 | - | 1 | - | 64, 61, 59 | 1 | 0.15m |
V_Dust B | Volume Inject | Frame 17 – 26 1.5 → 0 | 0.5 | - | 1 | - | 36, 27, 23 | 1 | 0.15m |
Shockwave_Short | Volume Inject | 1.0 | 0 | - | 0.25 | - | 176, 152, 126 | 1 | 0.15m |
Shockwave_Long | Volume Inject | Frame 17 – 19 1.0 → 0 | 0 | - | 0.25 | - | 123, 94, 64 | 1 | 0.05m |
Adding V-dust Fire/Smoke Sources
Create two Phoenix Fire/Smoke Sources in the scene: Modify Panel → Create → Helpers → PhoenixFD → PHXSource. Rename them to PHXSource_V_Dust_A and PHXSource_V_Dust_B respectively.
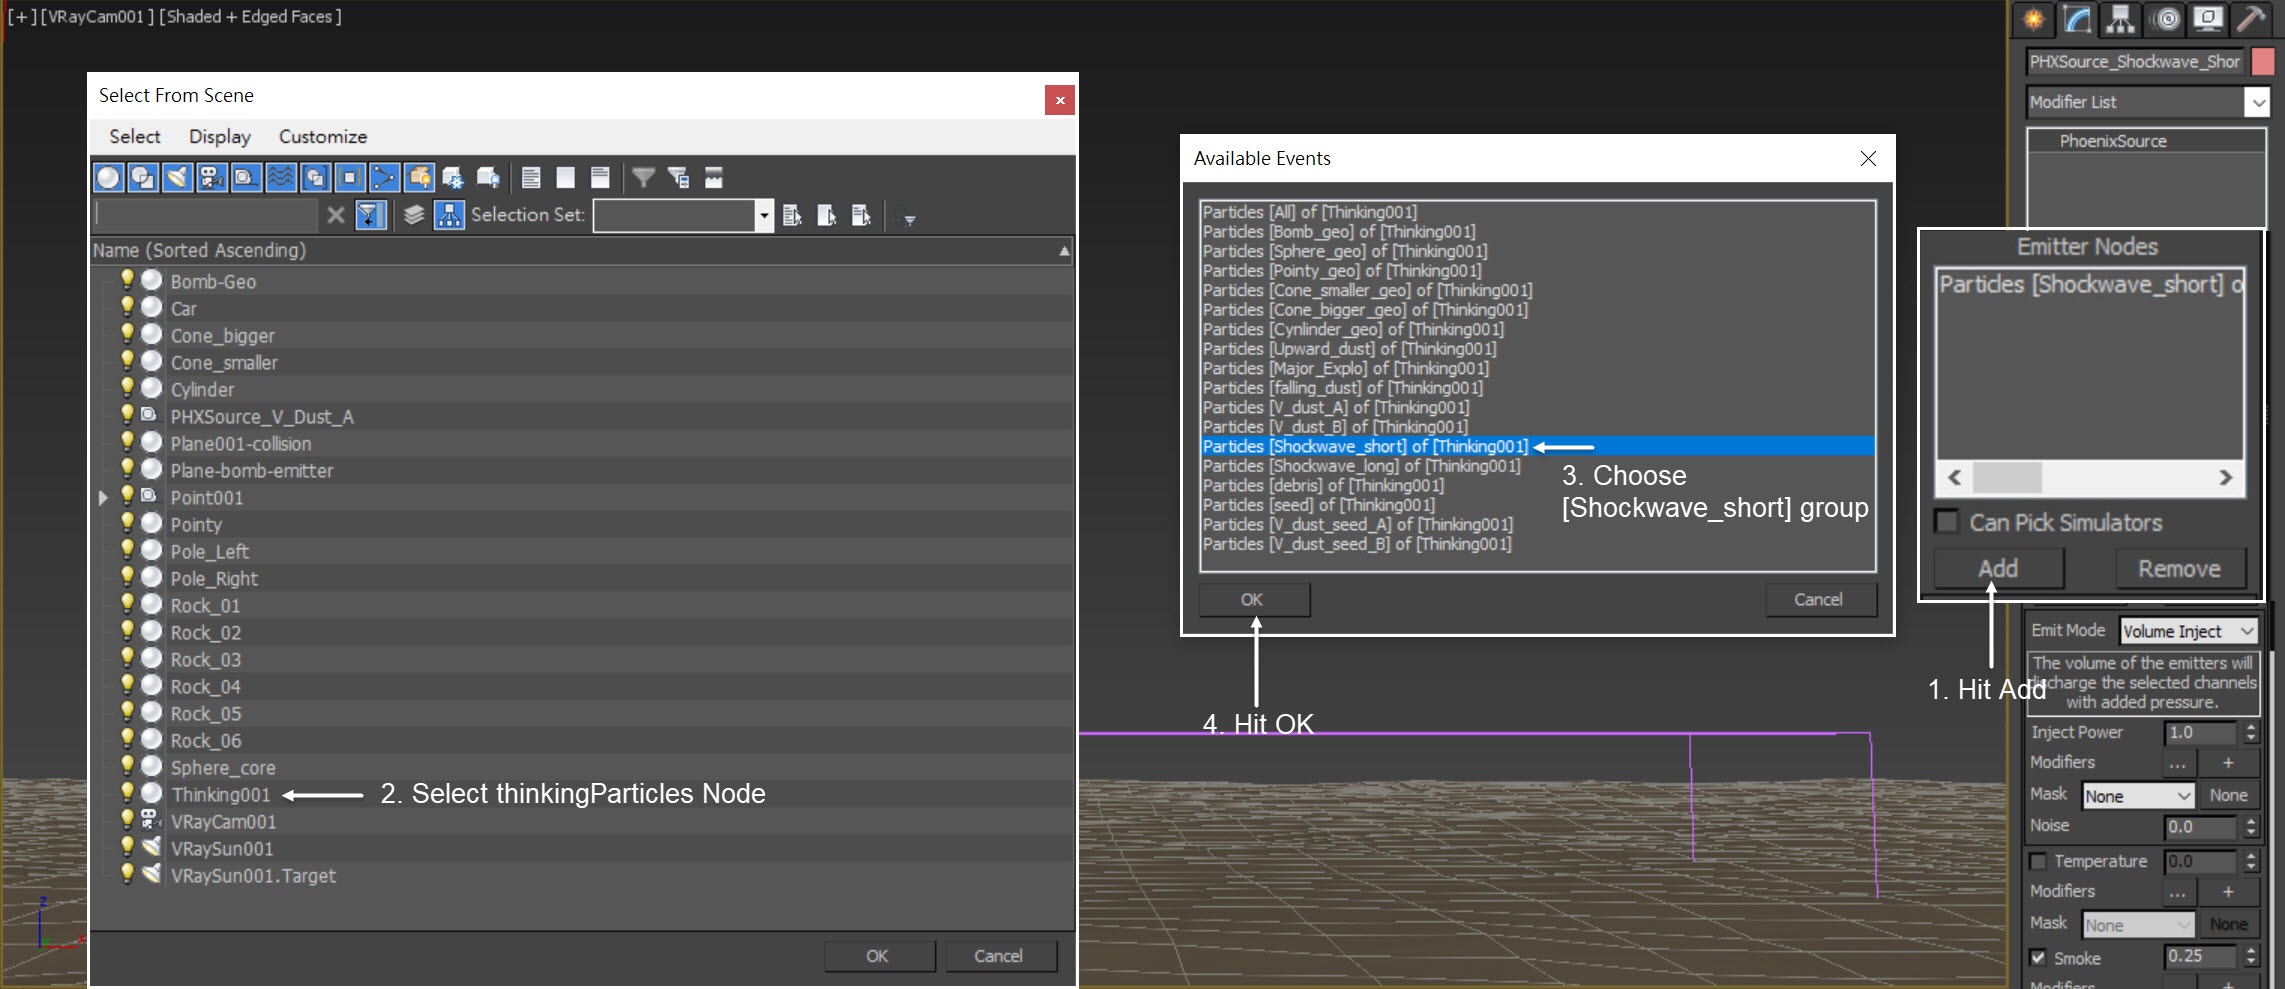
Press the Add button to choose which geometry to emit and select the thinkingParticles node (Thinking001) entry in the Scene Explorer.
A pop-up window appears listing all Particle Groups of the thinkingParticles simulation. Choose the Particles [V_dust_A] group and press OK.
Repeat the process above for V_dust_B by adding the [V_dust_B] group in its Emitter Nodes.

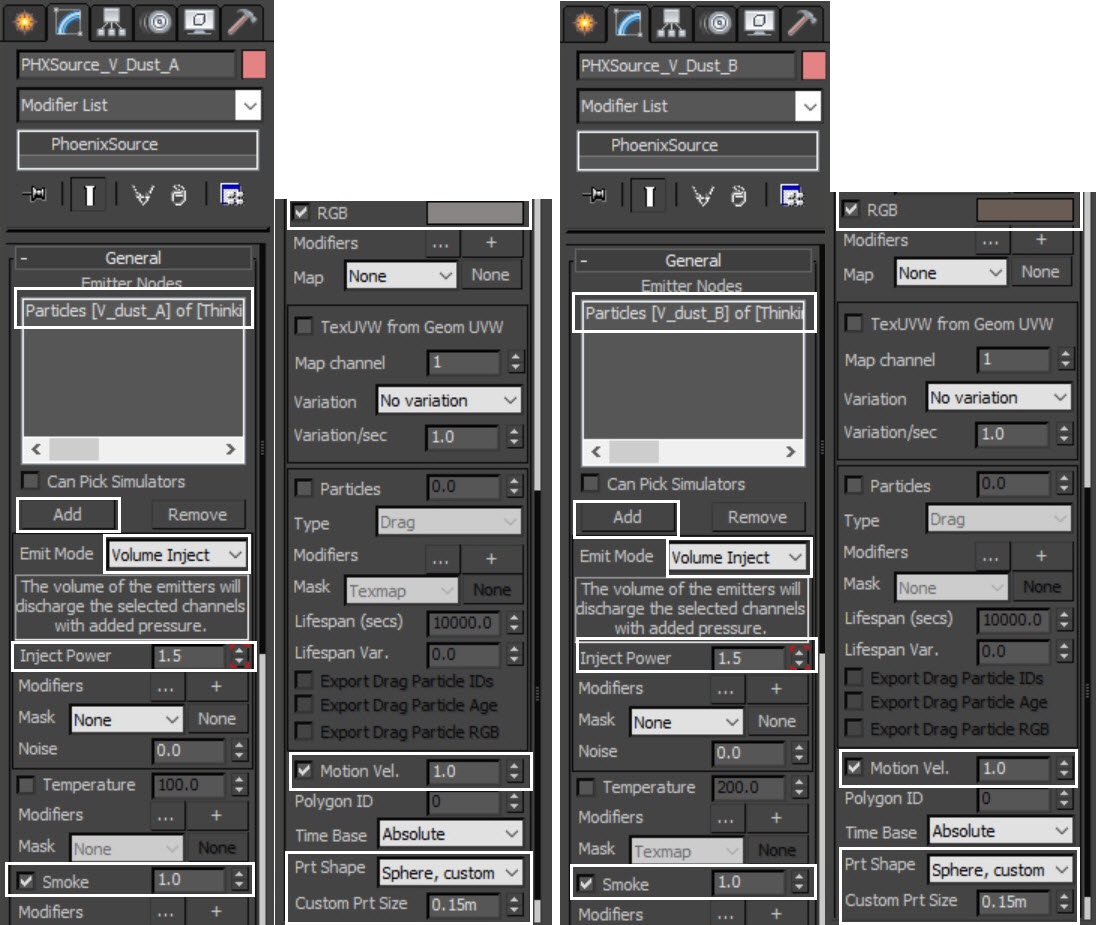
1. For PHXSource_V_dust_A
Set the Emit Mode to Volume Inject and Smoke to 1.0. Enable the RGB option and set it to dark gray color (RGB: 64, 61, 59); Motion Vel. to 1.0; Prt Shape to Sphere, custom; Custom Prt Size to 0.15 m.
From frame 17 to 26, animate the value of Inject Power from 1.5 to 0.0.
2. For PHXSource_V_dust_B
We name this source V_dust because its shape looks like V as the dust rises.
Set the Emit Mode to Volume Inject and Smoke to 1.0. Enable the RGB option and set it to dark gray color (RGB: 36, 27, 23); Motion Vel. to 1.0; Prt Shape to Sphere, custom; Custom Prt Size to 0.15 m.
From frame 17 to 26, animate the value of Inject Power from 1.5 to 0.0.
We animate the Inject Power, beginning with frame 17 as the first bomb hits the ground at frame 17. If your particle system changes, you will need to adjust the timing accordingly.
The settings of V_dust_A and V_dust_B are the same except for the RGB color. We use two different colors to give the rising dust some variation.
The Custom Prt Size affects the amount of fluid emitted from a source. In this case the appropriate value for this scene is (0.15 m) . If your scene differs, you can try and experiment with different values.
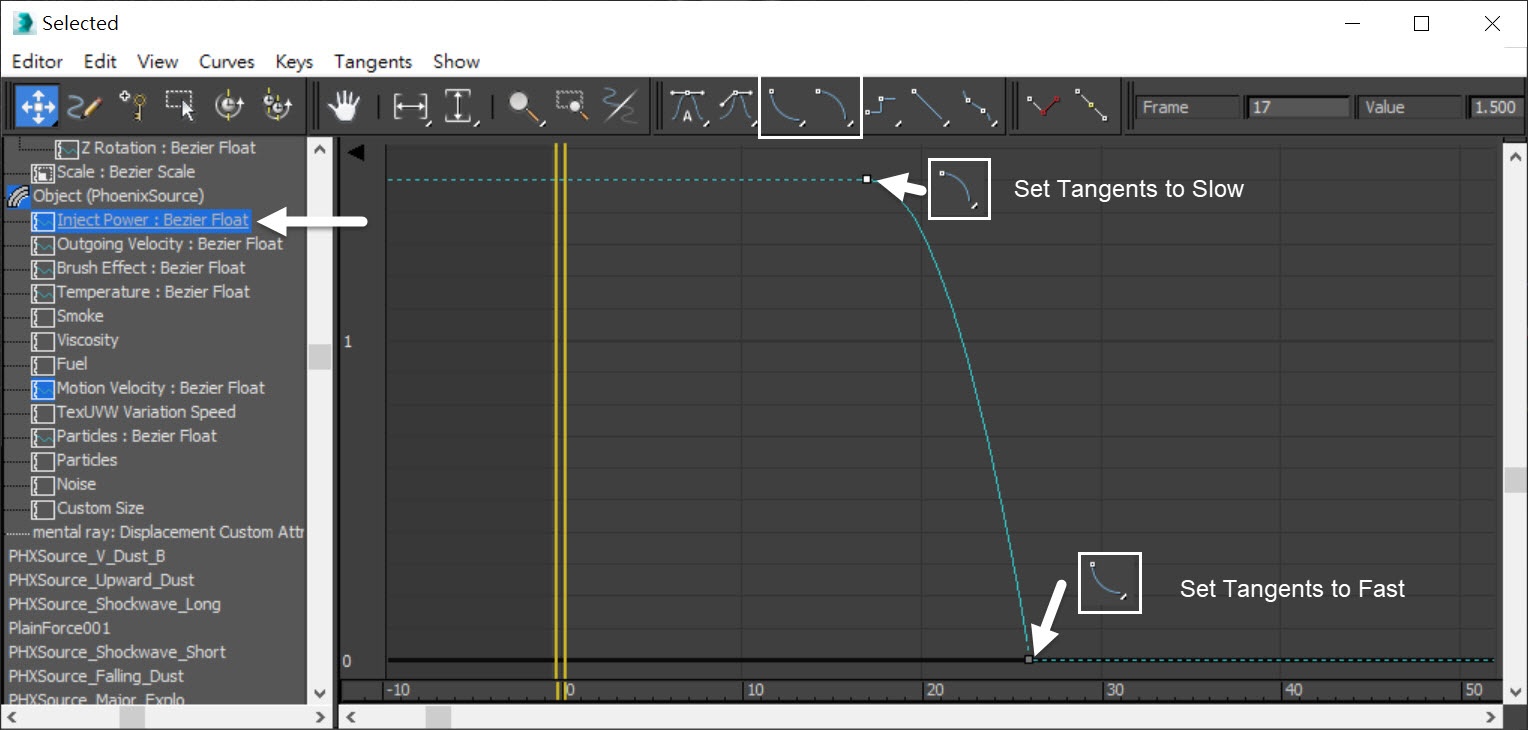
Go to Graph Editors/Track View → Curve Editor and check the curve of PHXSource_V_dust_A's Inject Power.
Set the first key frame to Tangents to Slow and the second key frame to Tangents to Fast.
Same applies for PHXSource_V_dust_B.
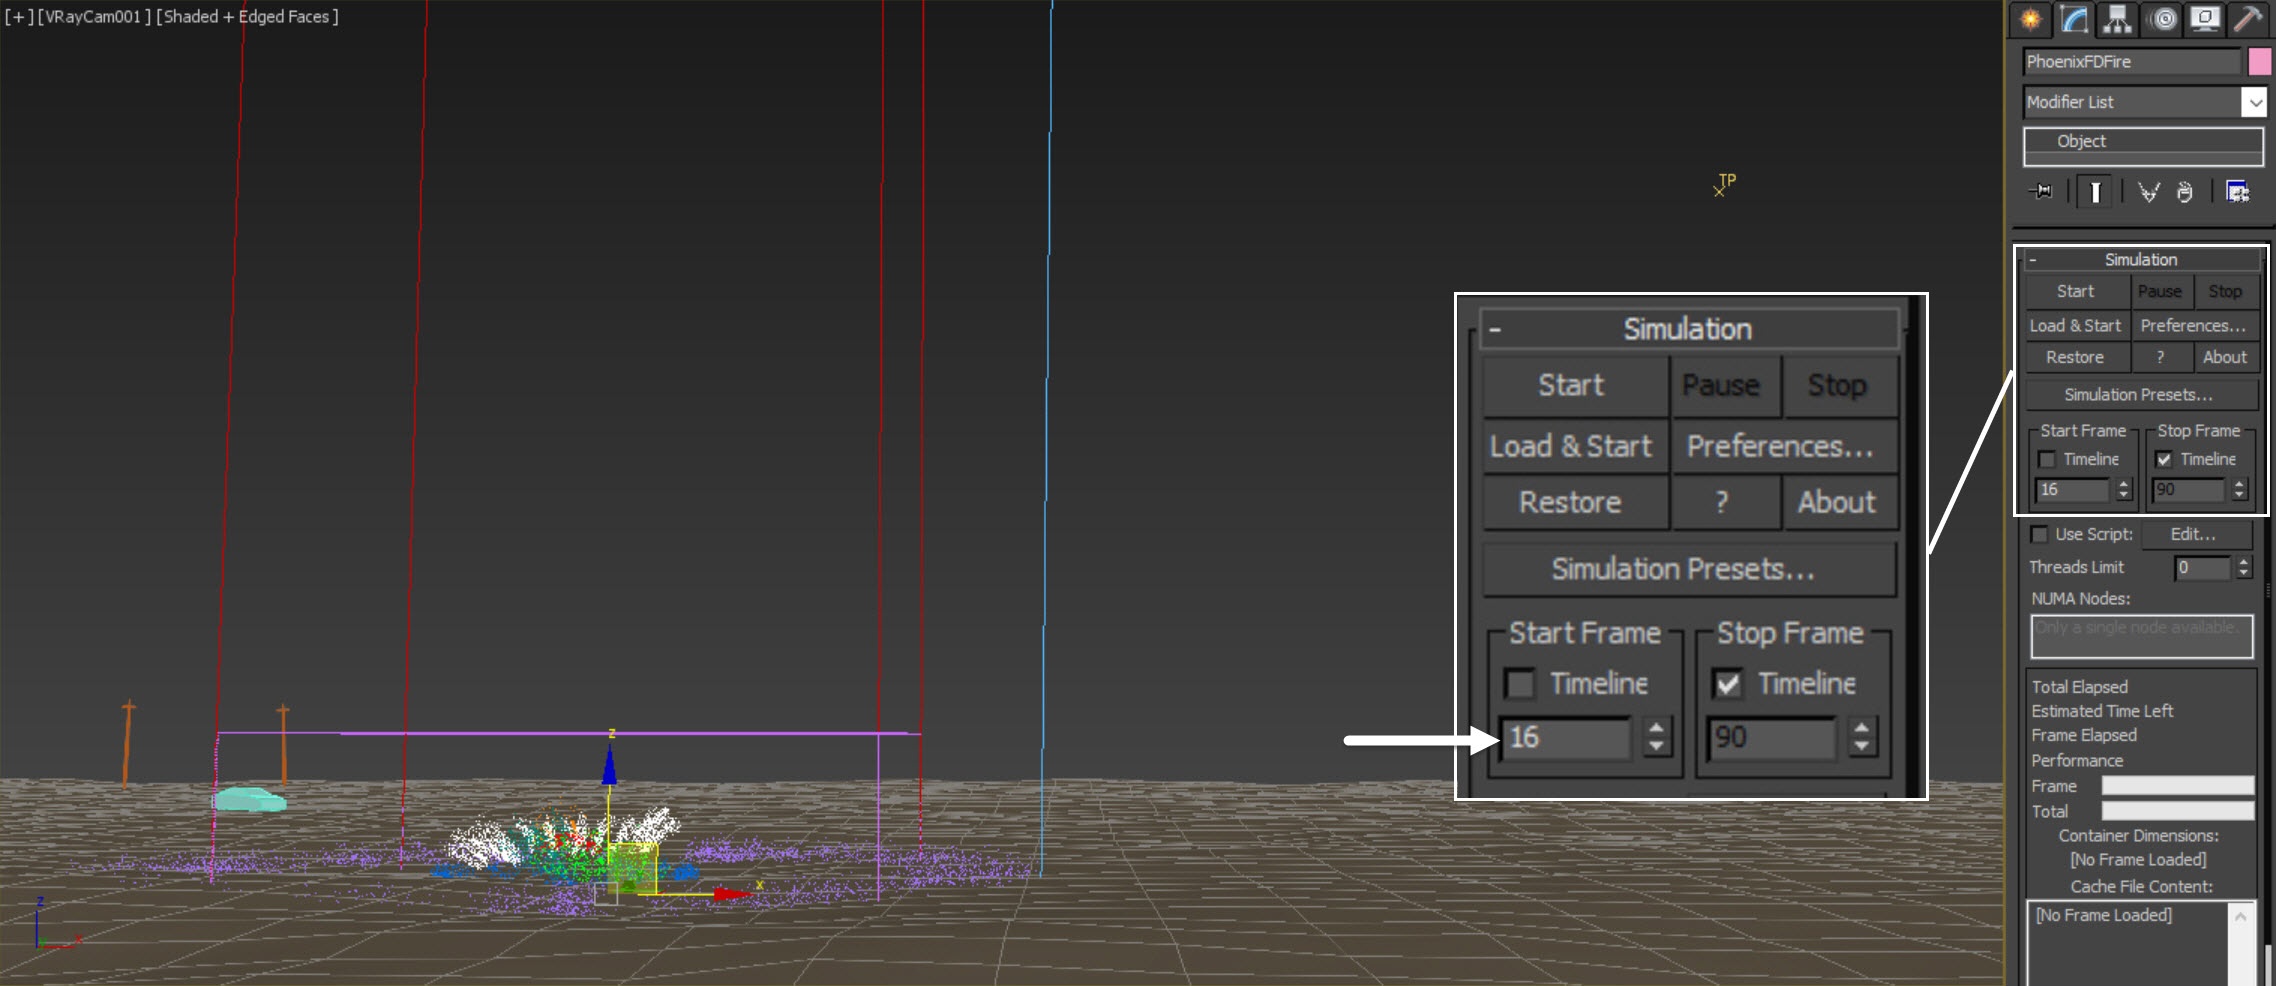
Set the Phoenix Simulator → Simulation rollout → Start Frame to 16 so that it matches the start frame of the thinkingParticles simulation.
The Timeline checkbox needs to be disabled for the numerical field to become untemplated. By default, the Timeline checkbox specifies the Start Frame as the first frame on the Timeline.
Here is a Preview Animation of the simulation up to this step.
To enable the GPU Preview as seen in the video, select the Phoenix Simulator → Preview rollout → GPU Preview → Enable in Viewport.
Adding Major Explosion Fire/Smoke Source
Add a Phoenix Fire/Smoke Source: Modify Panel → Create → Helpers → PhoenixFD → PHXSource. Rename it to PHXSource-major_explo.
Press the Add button to choose which geometry to emit from and select the thinkingParticles node (Thinking001) entry in the Scene Explorer.
A pop-up window appears listing all Particle Groups of the thinkingParticles simulation. Choose the Particles [Major_Explo] group and press OK.

Set the Emit Mode to Volume Inject and Smoke to 1.0. Enable the Fuel option. Enable the RGB option and set it to dark gray color (RGB: 1, 1, 1); Motion Vel. to 1.0; Prt Shape to Sphere, custom; Custom Prt Size to 0.2 m.
From frame 17 to 20 animate the value of Inject Power from 2.0 to 0.0.
Also, animate the value of Temperature from 2500 to 300.
We animate the Inject Power beginning at frame 17 as the first bomb hits the ground in frame 17. If your particle system changes, you will need to adjust the timing accordingly.
We also animate the Temperature of the exploding bomb - hot in the initial phase and then cools down to room temperature.

You can go to Graph Editors/Track View → Curve Editor and check the curve of PHXSource-major_explo's Inject Power and Temperature.
For the Inject Power, set the first key frame to Tangents to Fast and the second key frame to Tangents to Slow as shown. For the Temperature, set the first key frame to Tangents to Slow and the second key frame to Tangents to Fast.

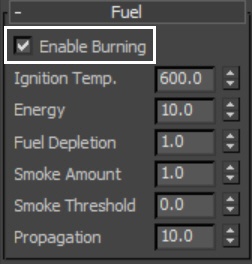
To allow Phoenix to burn the fuel from Major_Explo source, select the Simulator and go to the Fuel rollout. Check the Enable Burning option and leave all settings at their defaults.
If you want your explosion to emit less smoke and have a more fiery look, you can decrease the Smoke Amount here. If you want the explosion to swell faster, you can increase the Propagation value. All of these options will affect the character of the explosion.
Here is a preview animation of the simulation after the last step. We now see the explosion and the burning fuel, but the smoke looks too thin.
Let's see how to enhance it.
The default setting of the Smoke color is Constant color. Let's tweak the Smoke Color to get more variation.
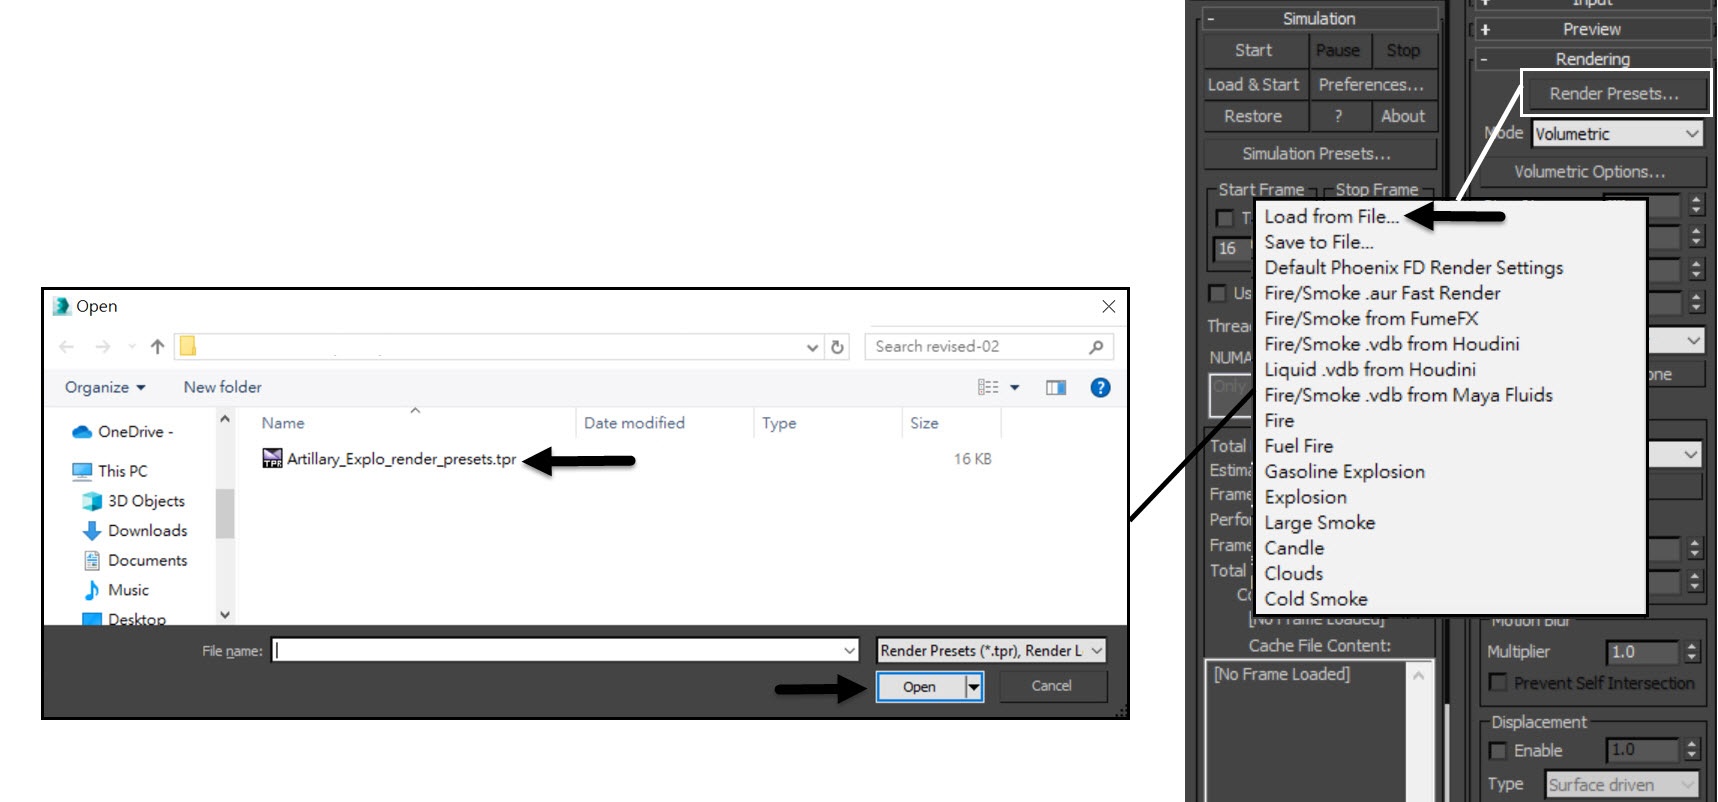
Select the Phoenix Simulator → Rendering rollout and press the Volumetric Options button.
In the Volumetric Render Settings window set the Smoke Color Based on RGB. Set the Smoke Opacity based on Smoke and then adjust the curve as in the screenshot.

Instead of manually creating the smoke curve yourself, you can load the preset file from the provided sample.
Go to Rendering rollout → Render Presets → Load from file and open up the Artillery_Explo_render_presets.tpr file.
Here's a preview of the simulation with the render settings changed.
As you can see now, we now have thicker smoke appearance. The color variation of the smoke looks more convincing. However, V_dust appears too uniform and the smoke rises too fast. Let's tackle that.
Adding Smoke Noise to the V_dust
Let's give V_dust some randomness.
Set both the PHXSource_V_dust_A and PHXSource_V_dust_B's Noise to 0.5.

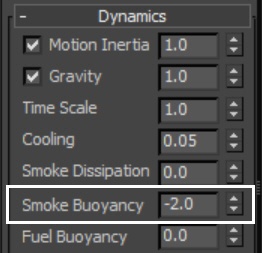
Select the Simulator in the scene. Go to Dynamics rollout. Set the Smoke Buoyancy to -2.0.
Run the simulation again.
Let's see a preview animation. Notice that V_dust now looks more organic. And the smoke rises more gently, it even falls on the ground with time.
There are a few ways to randomize your fluid:
1. The one we described here - the noise parameter in a Fire/Smoke source;
2. Using the Randomize Amount in the Dynamics rollout of a Simulator;
3. Adding a Phoenix Turbulence in the scene.
Adding Upward_dust Fire/Smoke Source
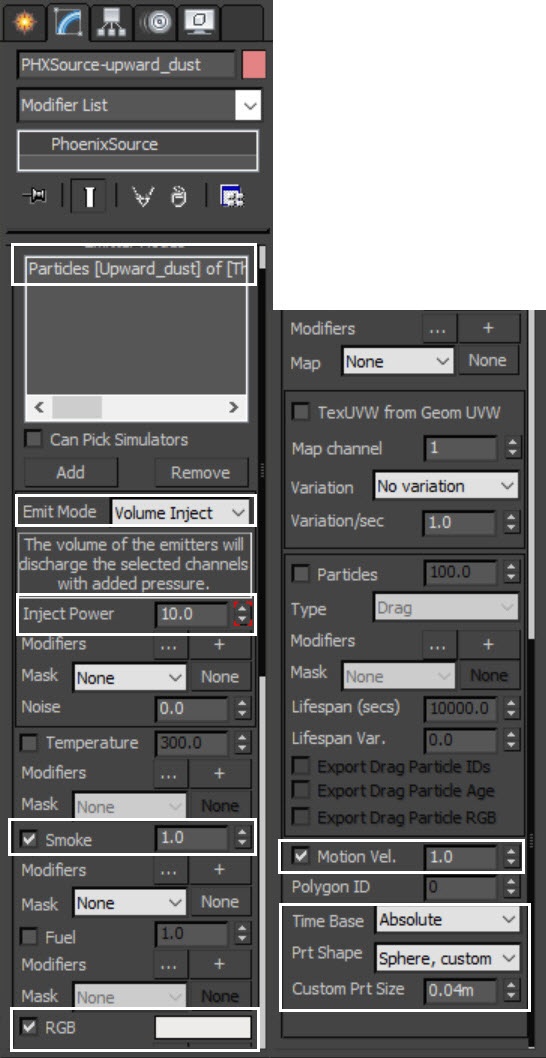
Add a Phoenix Fire/Smoke Source: Modify Panel → Create → Helpers → PhoenixFD → PHXSource. Rename it to PHXSource-upward_dust.
Press the Add button to choose which geometry to emit from and select the thinkingParticles node (Thinking001) entry in the Scene Explorer.
A pop-up window appears, listing all Particle Groups of the thinkingParticles simulation.
Choose the Particles [Upward_dust] group and press OK.

Set the Emit Mode to Volume Inject and Smoke to 1.0.
Enable the RGB option and set it to white color (RGB: 220, 215, 212); Motion Vel. to 1.0; Prt Shape to Sphere, custom. and Custom Prt Size to 0.04 m.
From frame 17 to 25 animate the value of Inject Power from 10.0 to 0.0.
You can go to Graph Editors/Track View → Curve Editor and check the curve of PHXSource-upward_dust's Inject Power.
For Inject Power, set the first key frame to Tangents to Slow and the second key frame to Tangents to Fast.

With the PHXSource-upward_dust in the scene, run the simulation again.
We start to see more details in the explosion.
Adding the Falling_dust Fire/Smoke Source
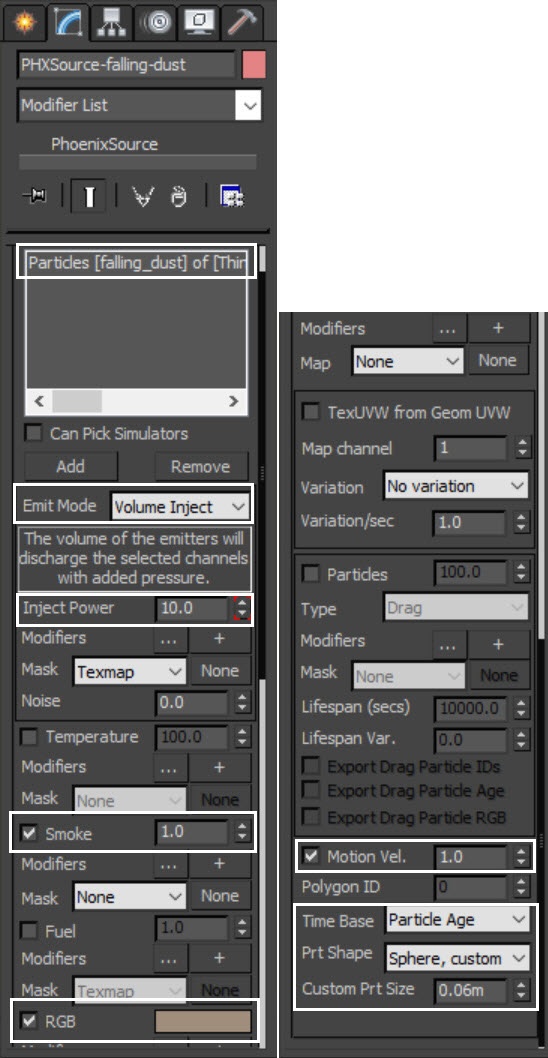
Add a Phoenix Fire/Smoke Source: Modify Panel → Create → Helpers → PhoenixFD → PHXSource. Rename it to PHXSource-falling-dust.
Press the Add button to choose which geometry to emit from and select the thinkingParticles node entry in the Scene Explorer.
A pop-up window appears listing all Particle Groups of the thinkingParticles simulation.
Choose the Particles [falling_dust] group and press OK.

Set the Emite Mode to Volume Inject and Smoke to 1.0. Enable the RGB option and set it to brown color (RGB: 92, 70, 52); Motion Vel. to 1.0; Prt Shape to Sphere, custom.; Custom Prt Size to 0.06 m.
From frame 17 to 67, animate the value of Inject Power from 1.0 to 0.0.
You can go to Graph Editors/Track View → Curve Editor and check the curve of PHXSource-falling-dust's Inject Power.
For the Inject Power, set the first key frame to Tangents to Slow and the second key frame to Tangents to Slow.

With the Falling_dust Fire/Smoke in the scene simulate again. The smoke trails are visible in the explosion now.
Adding Shockwave Fire/Smoke Sources
Create two Phoenix Fire/Smoke Sources in the scene: Modify Panel → Create → Helpers → PhoenixFD → PHXSource. Rename them to PHXSource_shockwave_short and PHXSource_shockwave_long respectively.
Press the Add button to choose which geometry to emit from and select the thinkingParticles node (Thinking001) entry in the Scene Explorer.
A pop-up window appears listing all Particle Groups of the thinkingParticles simulation. Choose the Particles [Shockwave_short] group and press OK.
Repeat the process above for Shockwave_long particle group.
1. For PHXSource_shockwave_short: Set the Emit Mode to Volume Inject; Inject Power to 1.0; Smoke to 0.25. Enable the RGB option and set it to light brown color (RGB: 176, 152, 126); Motion Vel. to 1.0; Prt Shape to Sphere, custom.; Custom Prt Size to 0.15 m.
2. For PHXSource_shockwave_long: Set the Emit Mode to Volume Inject; Smoke to 0.25. Enable the RGB option and set it to brown color (RGB: 123, 94, 64); Motion Vel. to 1.0; Prt Shape to Sphere, custom.; Custom Prt Size to 0.05 m.
From frame 17 to 19, animate the value of Inject Power from 1.0 to 0.0.
We don't want the shockwave to be too thick, that's why we reduce its amount to 0.25. Same goes for the Custome Prt Size that affects the overall amount of smoke emission.
Here we give you the appropriate value for this scene, but in real production you have to try and find an optimal value for your scene.

Go to Graph Editors/Track View → Curve Editor and check the curve of PHXSource_shockwave_long's Inject Power.
For Inject Power, set the first key frame to Tangents to Fast and the second key frame to Tangents to Slow.

The shockwave is faster and expands to larger scale, so let's extend our Simulator Grid to be slightly bigger.
Open the Grid rollout and set the following parameters:
- Size XYZ: [ 239, 230, 65 ];
- Adjust the Max Expansion to: X: (150, 36), Y: (108, 0), Z: (0, 625).

With the two shockwave sources in the scene, run the simulation again.
You can now see the two layers of shockwaves: one runs faster and the other slower. All these seven Fire/Smoke sources complete the single explosion.
With this we completed the settings for a single explosion from frame 17. We have added the whole set of Fire/Smoke sources in the scene. Now it's time to simulate all the explosions in the scene.
The Final Simulation
Since the whole explosion covers a large region, we have to expand the Simulator grid. In order to get a more detailed result we also increase the grid resolution by lowering the Cell Size for the final simulation.
Move the Phoenix Simulator to XYZ: [ -22, 0, 0 ].
Open the Grid rollout and set the following values:
- Cell Size: 0.07 m;
- Size XYZ: [ 654, 262, 74 ];
- Adaptive Grid: Smoke - Threshold of 0.001;
- Adjust the Max Expansion to: X: (479, 380), Y: (454, 454), Z: (0, 714).

Not only the Simulator Grid needs to be changed, but we also have to adjust every Fire/Smoke source in the scene.
In the previous steps we animated the Outgoing Velocity of each Fire/Smoke Sources. The keyframe starts at frame 17 because that is when the first missile hits the ground. However, we have 5 more missiles in the scene. They explode at frames 17, 23, 29, 35, 41 and 47 respectively. Though we can manually set keyframes every time when a bomb explodes, if the particle animation changes, we have to move the keyframes accordingly and that can be very tedious.
Instead we can do something else...

Thanks to the Time Base option in the Fire/Smoke source, we can do it in a smarter way.
Set the Time Base to Particle Age instead of Absolute. By doing so, we don't need to set multiple follies of keyframes to the Fire/Smoke. We simply shift-move the keyframes to begin at frame 0. The Fire/Smoke source reads the particle age information from thinkingParticles, so we can have sources emitting fluid procedurally.
Time Base Particle Age is used when emitting from particle systems. It allows you to animate the parameters using the age of the particle instead of the timeline frame time. It is a very powerful feature of the procedural pyro effect.
This is the most important step for the tutorial, make sure to change the Time Base to Particle Age, and shift-move the keyframes for every source to begin at frame 0. Otherwise, the emission for the explosions will not work correctly.
Here we show only one example for the Upward_dust Fire/Smoke Source. Be sure to do the same for all six other Fire/Smoke Sources in the scene.

Shift-move all the keyframes of every Fire/Smoke Source to the first frame. This table shows the positions of the new keyframes.
Fire / Smoke Source | Old keyframes position | New Keyframes position |
Upward Dust | Frame 17, 25 | Frame 0, 8 |
Falling Dust | Frame 17, 67 | Frame 0, 50 |
Major Explo | Frame 17, 20 | Frame 0, 3 |
V_Dust A | Frame 17, 26 | Frame 0, 9 |
V_Dust B | Frame 17, 26 | Frame 0, 9 |
Shockwave_Short | - | - |
Shockwave_Long | Frame 17, 19 | Frame 0, 2 |
With the new position of the keyframes and the Time Base set to Particle Age, run the simulation again.
Everything looks good, but we can add a wind force in the scene for additional realism.
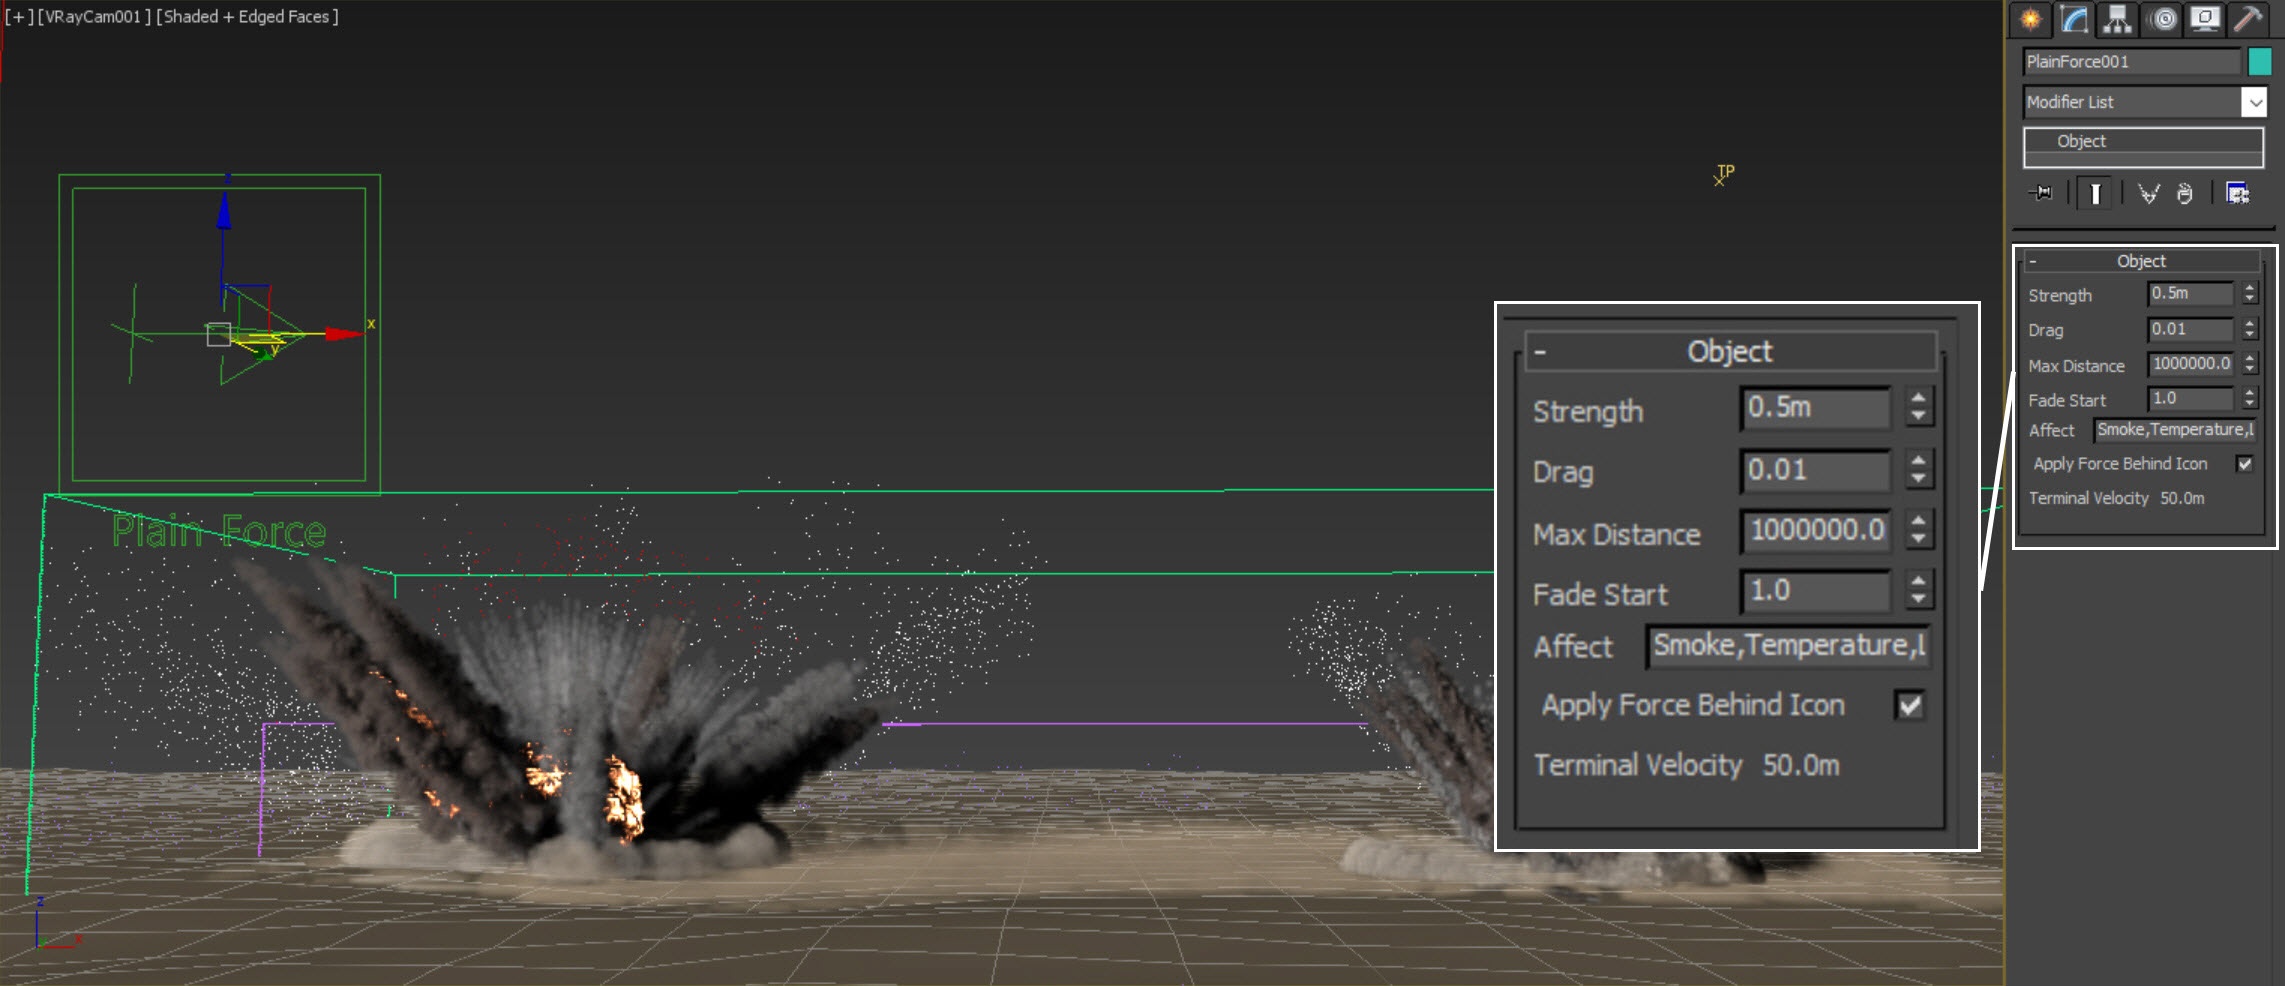
To add additional realism to the simulation, we use a Phoenix Plain Force to simulate the effect of wind.
Go to the Helpers tab → Phoenix FD and add a Plain Force. The Plain Force is a simple directional force.
Rotate it so that it points in the positive X direction and set the Strength to 0.5 m. Enable the Apply Force Behind Icon option.
The exact Position of the Plain Force in the scene is XYZ: [ -28, -1, 18 ].
When enabling the Apply Force Behind Icon option, the force is applied behind the helper icon. Otherwise, the fluid behind the icon will not be affected by the Plain Force.
With the Plain Force in the scene, simulate again.
Now the explosion shifts slightly toward the right as the wind blows.
We are ready for the final render.
V-Ray Frame Buffer
The final image is rendered using the V-Ray Frame Buffer with the Color Corrections set to:
Exposure:
- Exposure: -0.37;
- Highlight Burn: 1.00;
- Contrast: 0.14.
Hue / Saturation:
- Saturation: 0.28.
Bloom/Glare Effect is enabled from the Lens Effects panel:
- Size: 30.00;
- Bloom: 0.40;
- Intensity: 1.70.
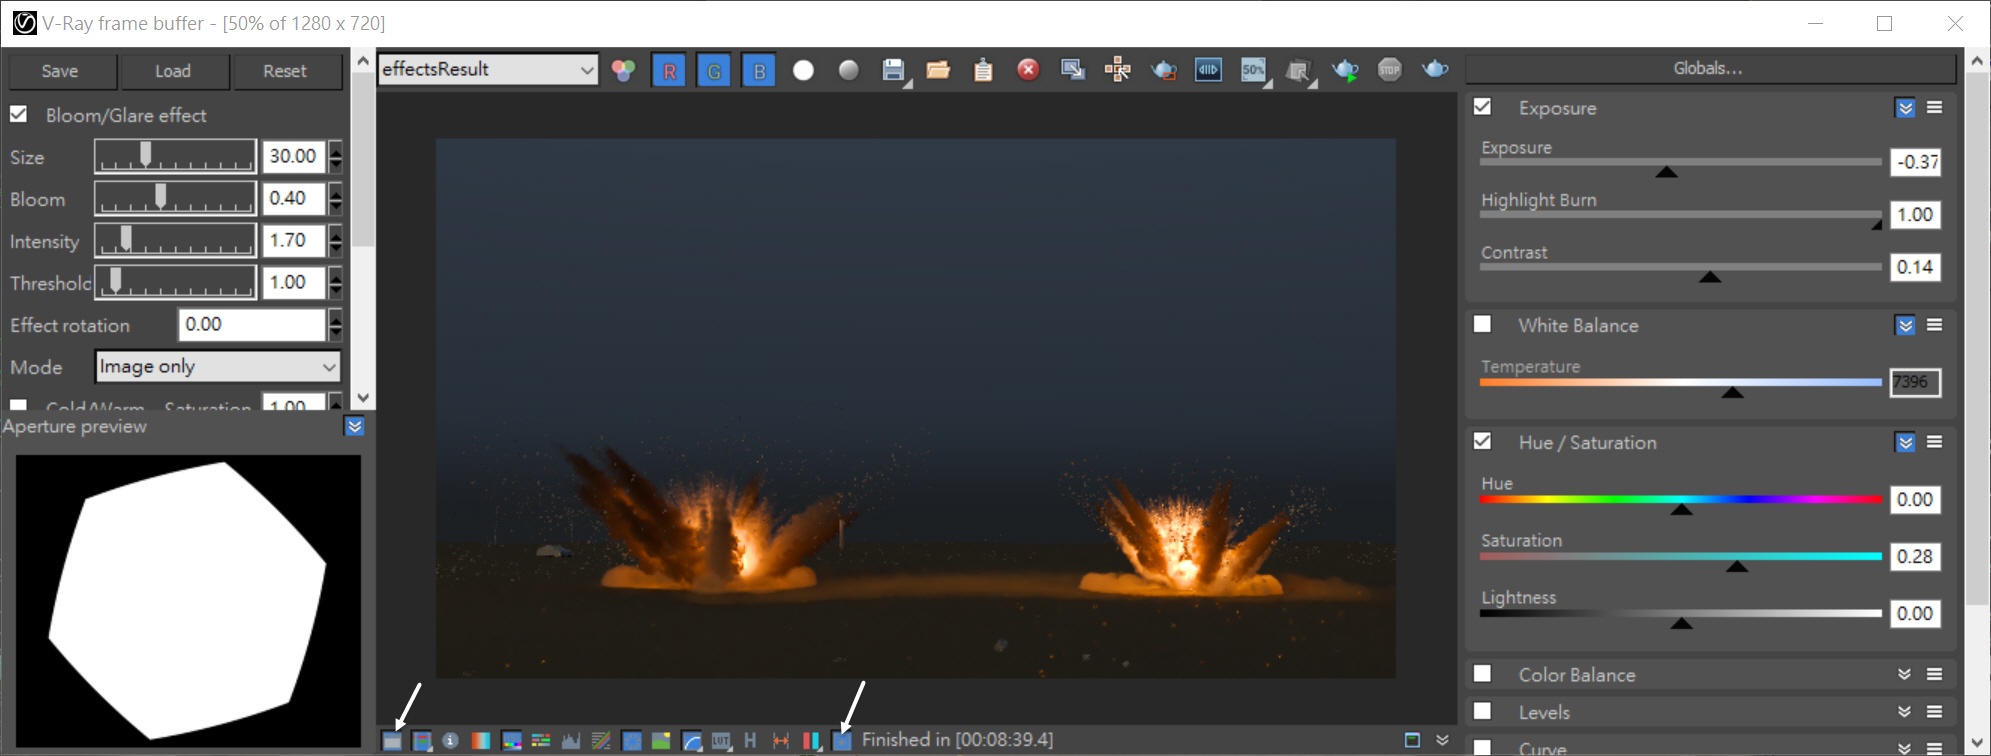
And here is the final rendered result.