This page provides information on the Globals rollout under the Globals tab in V-Ray's Render Settings.
Overview
The Globals rollout allows you to control some of V-Ray's features globally so as to quickly debug your scene.
Camera
Auto Exposure – Automatically determines an appropriate exposure value for the render. This option requires Light Cache in Single Frame mode. Note that the Auto Exposure does not take into account pixels with zero Alpha value.
Auto White Balance – Automatically determines a suitable white balance value for the image. This option requires Light Cache in Single Frame mode. Note that the Auto White Balance does not take into account pixels with zero Alpha value.
Auto Corrections Mode – Specifies which camera and/or views to use the automatic exposure and white balance setting. This option is available only if Auto Exposure or Auto White Balance are enabled.
All cameras – Applies Auto Exposure and Auto White Balance to all cameras, regardless of their local exposure settings.
Cameras without exposure only – Applies Auto Exposure and Auto White Balance only to cameras with no local exposure settings.

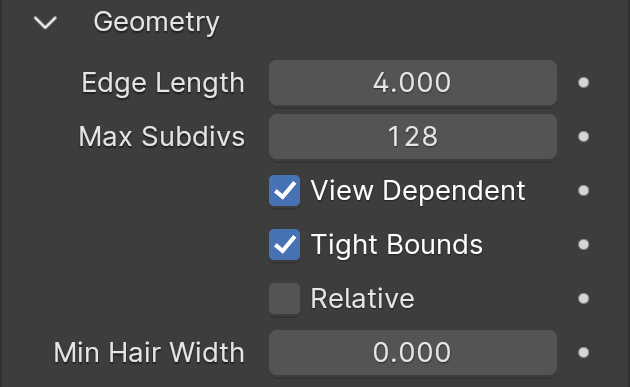
Geometry
Edge Length – Determines the quality of the displacement or subdivision. Each triangle of the original mesh is subdivided into a number of sub-triangles. More sub-triangles means more detail in the displacement, slower rendering times and more RAM usage. Less sub-triangles mean less detail, faster rendering and less RAM. The meaning of Edge length depends on the View-dependent parameter below.
Max Subdivs – Controls the maximum sub-triangles generated from any triangle of the original mesh. The value is in fact the square root of the maximum number of sub-triangles. For example, a value of 256 means that at most 256 x 256 = 65536 sub-triangles are generated for any given original triangle. It is not a good idea to keep this value very high. If you need to use higher values, it is better to tessellate the original mesh itself into smaller triangles instead.
View Dependent – When on, Edge Length determines the maximum length of a sub-triangle edge, in pixels. A value of 1.0 means that the longest edge of each sub-triangle is about one pixel long when projected on the screen. When View-dependent is off, Edge Length is the maximum sub-triangle edge length in world units.
Tight Bounds – When on, V-Ray computes the exact bounding volume of the displaced triangles from the original mesh. This requires pre-sampling of the displacement texture, but the rendering is faster, if the texture has large black or white areas. However, if the displacement texture is slow to evaluate and varies a lot between full black and white, it may be faster to turn this option off. When off, V-Ray assumes worst-case bounding volumes, and does not pre-sample the texture.
Relative – When on, the actual displacement amount is based on the bounding box of the objects. When off, the displacement is expressed in generic world units where white areas in the displacement map correspond to displacement of 1 generic unit. You can use the Amount parameter to increase or decrease the displacement amount.
Min Hair Width –
Lighting
Lights – Enables lights globally. Note: Disabling this will cause V-Ray to use the default lights.
Shadows – Enables shadows globally. When using V-Ray GPU renderer, this option is not available.
Disable self-illumination – Disables the rendering of self-illuminated objects (objects assigned a VRayLightMtl). When using V-Ray GPU renderer, this option is not available.
Light evaluation – Determines how lights are sampled in scenes with many lights. For more information, see the Adaptive Lights example below.
Adaptive lights – Uses information from the Light cache to determine which lights to sample. If a Light cache is not used, light tree sampling is used. Depending on the scene, it can be faster than the Full lights evaluation mode.
Full evaluation – V-Ray goes through each scene light and evaluates it at each shading point. In scenes with many lights and lots of GI bounces, this leads to a lot of shadow rays being traced and rendering can become extremely slow.
Light tree – V-Ray selects a variable number of suitable finite light sources based on proximity and evaluates only those. This mode may speed up the Light Cache and Brute Force calculations for scenes with lots of lights. It can also reduce flickering due to missed light sources.
Number of lights – Number of lights from the scene that are evaluated by V-Ray when the Light evaluation parameter is set to Adaptive. Lower values make the rendering go faster, but the result is noisier. Higher values cause more lights to be computed at each hit point, thus producing less noise but increasing render times.

Example: Adaptive Lights
Below is an example rendering of a scene with the default Progressive Image Sampler settings, using Brute Force/Light Cache GI engines. Only the Noise Limit parameter was set to 0.002. Notice how the render time is reduced significantly in favor of the Adaptive Lights in comparison to Full Evaluation.
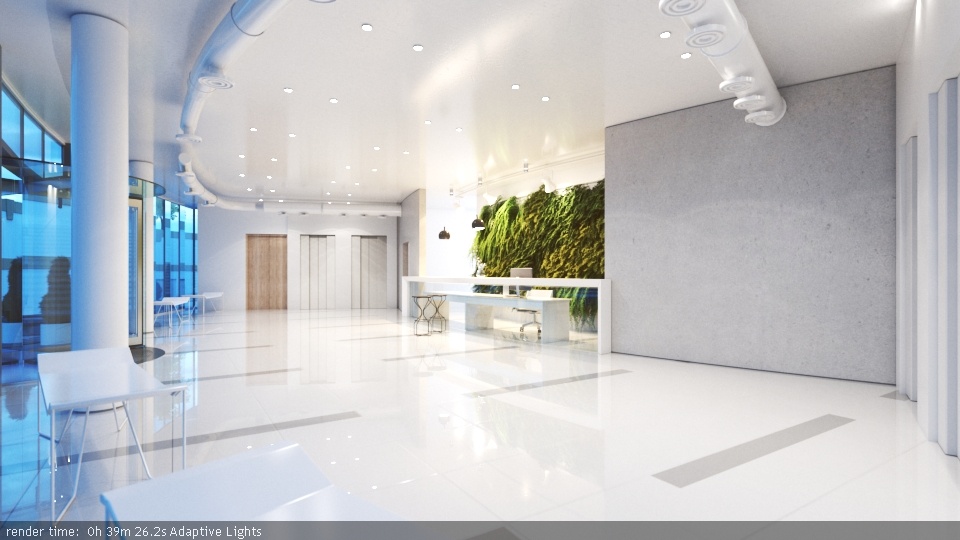
Adaptive Lights; render time 39 mins

Light Tree; render time 48 mins

Full Lights Evaluation; render time 1h 9 mins
Materials
Reflection / Refraction – Enables (default) or disables the calculation of reflections and refractions in V-Ray maps and materials.
Glossy effects – Enables (default) or disables the rendering of glossy effects.
SSS – Enables (default) or disables the rendering of sub-surface scattering effects.
Use Global Max Depth – Enables global limiting of the reflection/refraction depth of a material. When this is disabled, the depth is controlled locally by the materials' Reflection Max depth parameter. When this option is enabled, all materials use the Global Max Depth specified in this rollout. For more details, see the Global Max Depth example below.
Global Max Depth – Specifies the maximum depth when Global Max Depth is checked. To disable all reflections/refractions in the scene, set this value to 0.
Max. Transparency Levels – The depth to which transparent objects will be traced. For more details, see the Max Transparency Levels and Reflection/Refraction example below.
Transparency Cutoff – Determines when tracing of transparent objects will be stopped. If the accumulated transparency of a ray is below this threshold, no further tracing will be performed.

Example: Global Max Depth
The images below show the original beauty render along with Use Global Max Depth enabled and a Global Max Depth of 1. When Max depth has been set to a value of 1, all reflections and refraction will only have a single bounce and therefore we can see that the windshield's refractions are incorrect.

Original Beauty render with local Reflection Max Depth 5 and a Refraction Max depth of 5

Beauty render with Global Max Depth set to a value of 1, overriding local Reflection Max Depth 5 and Refraction Max depth of 5
Example: Max Transparency Levels and Reflection /Refraction
When all refractions and reflections are disabled, the car retains only its black diffuse color because refractions and reflections are no longer present on any of the materials in the scene, and when Max Transparency Levels is reduced to a value of 1 nothing is visible through the windshield.

Beauty render with Reflection / Refraction disabled
![]()
Beauty render with Max. Transparency Levels set to a value of 1, overriding local Reflection Max Depth 5 and Refraction Max depth of 5. As a result, we can't see through the windshield.
Textures
Maps – Enables (default) or disables texture maps. This option is useful for troubleshooting renderings, for example, for determining the extent to which texture maps contribute to noise or other rendering artifacts. When using V-Ray GPU renderer, this option is not available.
Filter maps – Enables (default) or disables texture map filtering. When enabled, the depth is controlled locally by the settings of the texture maps. When disabled, no filtering is performed. When using V-Ray GPU renderer, this option is not available.
Uninverted Normal Bump – A global option to prevent inversion of a normal bump in tangent space on flipped UVs. When using V-Ray GPU renderer, this option is not available.
Max Mipmap Resolution - Sets the maximum resolution for mipmaped files. All planes with higher resolution from the file won't be used. If set to zero, the original file resolution is used. When using V-Ray GPU renderer, this option is not available.

Rendering
Secondary rays bias – A small positive offset applied to all secondary rays. This setting is useful when the scene contains overlapping faces, which can cause black splotches to appear in the rendering. For more information, see the Secondary Rays Bias example below.
When overlapping faces are present in a scene, in order for GI to calculate correctly it is often necessary to assign a 2-sided material to the overlapping objects in addition to enabling the Secondary rays bias option.
Clamp Max Ray Intensity – Uses the Max ray intensity value to suppress the contribution of very bright rays, which can typically cause excessive noise (fireflies) in the rendered image. The Max Ray Intensity value is applied to all secondary (GI/reflection/refraction) rays as opposed to the final image samples, allowing fireflies to be effectively suppressed without losing too much HDR information in the final image.
Max Ray Intensity – The maximum ray intensity when Clamp Max Ray Intensity is enabled.

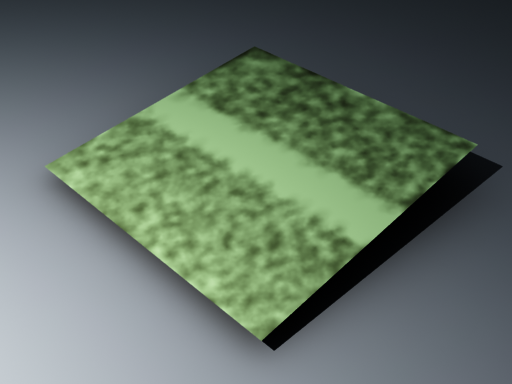
Example: Secondary Rays Bias
This example shows the effect of the Secondary rays bias parameter. The scene below has a box object with a height of 0.0, which makes the two sides of the box to occupy exactly the same region in space. Due to the overlapping faces, V-Ray cannot resolve intersections of rays with these surfaces.
The first image shows what happens when the scene is rendered with the default settings. Splotches appear in the GI solution, caused by the fact that rays randomly intersect one or the other surface:
In the second image below, the Secondary rays bias is set to 0.001, which offsets the start of each ray a little bit along its direction. In effect, this makes V-Ray skip the problematic surface overlaps and render the scene correctly:

Note that the Secondary rays bias setting affects light ray calculations in the rendering (such as GI and reflections), but it alone cannot correct for materials on overlapping faces. In order to correctly render the overlapping faces, the material assigned to the box has its 2-sided option checked. This is so that the object looks the same way regardless of whether the camera rays hit the top or the bottom of the box. If the material did not have this option checked, it would appear "noisy" even though the Secondary rays bias is greater than 0.0:

Volumetrics
Enable Probabilistic Volumetrics – When Probabilistic volumetrics is enabled, the volumetrics will select a only few samples (based on the smoke density) along each camera ray, and evaluate the volume lighting at those points. When disabled, the volumetrics will evaluate the lighting at regular intervals using many steps along each camera ray, and thus each pixel will take longer to render, but when it's finished, it will have no noise at all. Enabling Probabilistic volumetrics is particularly useful when using the Progressive Image Sampler in V-Ray, as well as when using complex lighting on the volume. The Probabilistic volumetrics option makes the shading much faster, but also it can result in noisier renders with low sample counts. This mode applies to the Volumetric Grid (VRayVolumeGrid) and the Environment Fog. When using V-Ray GPU renderer, this option is not available in the UI, but is turned on and the Number of Direct Samples are set to 1.
Number of Direct Samples – Specifies the number of probabilistic samples to use when Probabilistic volumetrics is enabled. For the best rendering performance, use a higher number of samples for transparent smoke, and lower number for dense smoke. A very high number of samples will converge to standard ray-marching.
