This page provides general information about the Fire Lights sub-section of the Rendering tab of the V-Ray Volumetric Grid.
Overview
The Fire Lights rollout controls how the fire casts light on the other scene objects as well as on the Volume Grid's own Smoke. When using Global Illumination (GI), the fire will illuminate everything automatically but the rendering will take quite long. Turning on Create Fire Lights simulates GI by placing light sources in the bright parts of the fire, which gives similar results and renders much faster. The color and power of these lights are adjusted automatically but can be overridden.
The smoke illumination caused by the Simulator's own fire can be controlled with the Self Shadowing option. If enabled, the smoke will obstruct the path of light from the fire, creating a much more realistic look but decreasing rendering performance. To gain back the rendering speed, set Self Shadowing to Grid-based and decrease the Light Grid Resolution (%) parameter to reduce the number of generated lights.
All Fire Lights options are ignored when rendering with V-Ray GPU. Enable Global Illumination from the V-Ray Settings if you need the Smoke and/or the scene to be illuminated by the fire.
Parameters
Create Fire Lights | emLightsCountEnbl – When enabled, allows the fire to shine on smoke and on surrounding objects in the scene even without using Global Illumination (GI). With GI, the fire will automatically illuminate the other scene objects and the simulator's own smoke, but the rendering will take quite long. Enabling Create Fire Lights simulates GI by placing light sources in the bright parts of the fire, which produces similar results and renders much faster.
If Create Fire Lights is enabled when rendering using GI, additional light sources will still be created by the fire at render time. You should disable Create Fire Lights if you want to let the GI naturally illuminate the scene.
Using Generate GI and Receive GI options from the V-Ray Object Properties will be ignored while Create Fire Lights is enabled.
Light Power on Self | emLightsPowerOnSelfMult – Controls the light intensity over the Volume Grid's own smoke. This will not change the intensity and color of the fire itself; only the illumination over the smoke is affected.
Light Power on Scene | emLightsPowerMult – Controls the light intensity over all scene objects except the Volume Grid itself.
Self Shadowing | emLightsSelfShadow – Enables self-shadowing of the smoke from the fire's light. If enabled, the smoke will obstruct the path of light from the fire, creating a much more realistic look but decreasing rendering performance. To gain back the rendering speed, set Self-Shadowing to Grid-based and decrease the Light Grid Resolution (%) parameter to reduce the number of generated lights. See the Self-Shadowing example.
None – Smoke does not obstruct the light propagation and it is brightly lit.
Ray-traced – The simulator's smoke will be illuminated by the fire's light sources using precise but slow ray-tracing. Note that the fire lights always illuminate the rest of the scene using ray-tracing. This mode is physically correct and takes into account non-transparent obstacles inside the Phoenix volume, but requires intense computation and can take considerable time to render and clear the noise from the image.
Grid-based – The self-illumination of the smoke will be calculated separately from the light that the Volume Grid casts on the scene using an approximate fast formula. While Ray-traced may produce noise, this mode has no such effect - the resulting illumination on the smoke is always smooth. However, any obstacles inside the volume are ignored by this mode and will not cast shadows on the smoke from the Volume Grid's own light. The Light Grid Resolution (%) parameter can be used to lower the resolution of the light grid and further speed up the illumination process. Reducing the grid will generally produce smoother self-illumination. Note that using Grid-based self-shadowing requires additional memory, so beware of high RAM usage with high resolution grids or many copied or instanced volumes.
Light Grid Resolution (%) | emLightsGrid – Specifies the resolution of the light grid as a percentage of the fire grid's resolution. Perfect illumination from fire could be achieved by placing a light in each fire cell, but this could take a tremendous amount of time to render and such accuracy is usually not necessary to approximate the fire's illumination convincingly. In order to speed up rendering, a separate light grid is created internally which can have a lower resolution than the fire grid, and this light grid is populated with one Omni light per each cell. The lower resolution (and thus fewer lights) speeds up rendering at the expense of some illumination detail, which might not always be visible anyway. At a value of 100, the light grid has the same resolution as the fire grid. The smaller the Light Resolution is, the smoother the illumination becomes and the faster the rendering is. However, at very low values the fire might not blend well with the light it casts on the smoke. See the Grid Reduction example.
Light Cut-off | emLightsCutoff – This parameter works the same as the V-Ray Light cutoff parameter. It specifies a threshold for the light intensity, below which the light will not be computed. This can be useful to limit the effect of the light to some distance around the simulator. Larger values cut away more light; lower values make the light range larger. At 0.0, the light will be calculated for all surfaces, but the rendering could slow down significantly.
Decay Type | emLightsDecayType – Controls how quickly the Volume Grid's emissive light fades when travelling away from the fire light sources:
None – The light does not fade at all unless obstructed.
Inverse – The light intensity fades with the inverse of the distance. E.g. at a distance of 5 units, the intensity is 1/5th of the intensity of the emitter.
Inverse Square – The light fades with the inverse square of the traveled distance. This is physically correct light propagation. For example, at a distance of 5 units, the intensity is 1/25th of the intensity of the emitter.
The parameters below control how many rays have to be traced in order to calculate the lighting. The larger the ray count, the better looking the result will be, but it will render more slowly. For general explanation of how light sampling works, see the V-Ray Image Sampler page.
Direct Subdivs | emLightsSubdivs – Sampling control for direct lighting. This parameter controls the number of the rays traced from the shaded point toward the fire in order to find the optical passability between them. The number of rays cast towards the fire is the square of this value. If the value is zero, a special case is used and all emissive lights are sampled. This could be quite slow when having a big number of emissive lights.
Caustic Subdivs | emLightsCaustSubdivs – Sampling control for Caustic effects. Similar to GI subdivisions, but used when caustics are calculated.
Create Lights Even If Not Renderable | emLightsPersist – When enabled, forces the Volume Grid to emit light over the scene even if rendering the simulator itself is disabled. Can be used for compositing when the simulator is rendered in a separate pass.

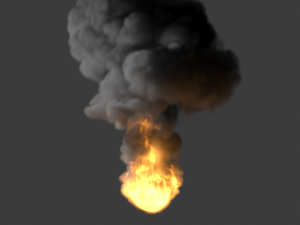
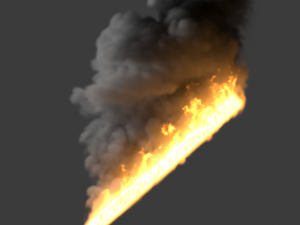
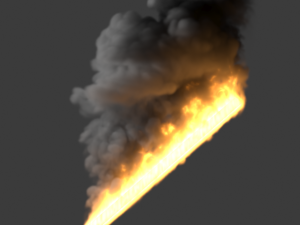
Example: Self-Shadowing

Self Shadowing = None
(render time = 2 min )
Self Shadowing = Ray-traced
(render time = 17 min )

Self Shadowing = Grid-based, Reduce grid to % = 10
(render time = 1 min )
Example: Grid Reduction
Self Shadowing = Grid-based, Light Grid Resolution (%) = 1
render time = 40 secs

Self Shadowing = Grid-based, Light Grid Resolution (%) = 10
render time = 58 secs
Self Shadowing = Grid-based,Light Grid Resolution (%) = 100 (no reduction at all)
render time = 6:39 mins