This page offers a tutorial on how to make a translucent plastic material with V-Ray for Maya.
Overview
In this tutorial we show you how to create translucent plastic using the V-Ray Fast SSS2 material. We explore how the VRayFastSSS2 parameters work together in order to get a colored plastic shampoo bottle.
First, we make the material translucent, then we show you how to introduce color tint. Later, we adjust the specular component and finish the plastic look by adjusting a few key options.
Want to follow along but don’t have a license?
Prerequisites
For the purpose of the tutorial, we focus only on the shampoo bottle material.
The bottle cap uses a VRayFastSSS2 material with the Color Mode set to Sub-surface color and scatter radius and the Single Scatter set to Raytraced (solid).
The shampoo's liquid content is a VRayMtl with a black Diffuse Color, light gray Reflection Color and Reflection glossiness set to 0.85; light gray Refraction Color and Refraction glossiness set to 0.99. The Refraction IOR is set to 1.457, the IOR of glycerine, which makes the content resemble a gel-like liquid.
For the final image, we use a VRayBlendMtl to add the bottle labels. The plastic bottle material shown in the tutorial is used as the Base Material, and two Coat Materials are used - one for the golden label and one for the overall front label.
Scale is crucial for the accuracy of the VRayFastSSS2 material. In this scene, we work in centimeters, which is the default unit scale in Maya.
The scatter radius and scale parameters are set according to the dimensions of the bottle geometry.
Make it Translucent
Let's start by assigning a V-Ray Fast SSS2 material to the bottle. We'll rename it to Bottle_Mtl for ease of use.
First, we want the bottle to be translucent, so let's look at how we can get this effect.
The Single Scatter parameter can be changed to get different looks out of the material. We change the mode to Raytraced (refractive) to introduce refractive properties to the material.
Next, we set the Color Mode to Scatter coefficient and fog color. This mode is designed for translucent or refractive materials.
For the proper work of this Color mode we need to set the correct Scatter radius values. For the bottle in this scene, we set it to 1 cm - the thickness of the bottle geometry is a little less than 1 cm.
It is also important to set the right Index of Refraction. The Index of Refraction defines how the material refracts transmitted light. Air has an IOR of 1 by definition, which means it is no obstacle for light transmission.
Cosmetics plastic bottles are commonly made of PET, so we use PET's IOR here, which is 1.575. Feel free to experiment with different plastic IOR values to get the desired look.
We are ready to do one test render and see how the bottle looks.

Here is how the test render looks like.
You can see the liquid content clearly and we get some nice caustics on the ground, but in terms of having a plastic bottle - the look is not quite there yet.
![]()
Color the Bottle
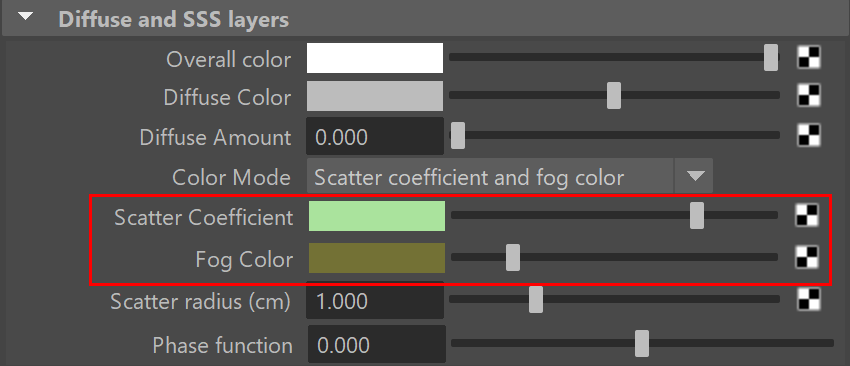
To match the bottle color to the color of the cap, we can play with the Scatter Coefficient and Fog Color parameters.
The Scatter Coefficient defines the outer refractive layer of the material, while the Fog Color gives it some coloring.
In general, lighter Scatter Coefficient color values make the object look more opaque, while darker colors make it more refractive. At the same time, black Fog Color makes the material fully refractive, but any dark color other than black makes it opaque.
To make the bottle look green, we set the Scatter Coefficient to light green [103, 196, 86] and the Fog Color to dark green with a yellow tint [44, 42, 9] to give the bottle some density.
There is no need to change the Diffuse or Overall color when working with translucent materials, as the material has no diffuse color and the Overall color parameter is used only as a filter for both the diffuse and the sub-surface components and we don't have such here.
The color looks good and the bottle is still see-through. Notice how the color of the bottle changes the caustics on the ground.
However, the reflections need a bit more attention and we can improve further the overall look of the plastic.
![]()
![]()
Specular Layer and Phase Function
The Specular layer controls the reflections or the specular component of the material. For the bottle, we can emphasize the reflections more by increasing the Specular glossiness to around 0.75.
Decreasing this parameter makes the material look more matted, while increasing it makes the material glossier.
If we look at how light travels through different media, we realize that plastic, as a volume, behaves like a rigid body. The light scatters mostly backwards through it and for that we need to change the Phase function to -0.5.

The glossiness highlights are better pronounced and emphasize the curvature of the bottle. The overall look achieves the plastic goal - the bottle is not as glossy as glass, yet it is not as soft as rubber.
![]()
![]()
Final Touches
For the final image, we enable Scatter GI in the Options rollout. This makes the material scatter global illumination more accurately, especially for translucent materials such as ours.
Then, we increase the Refraction depth to 8. The more we increase this parameter, the more ray bounces we get inside the volume. The higher we go with this number, the more accurate result we get for refractive materials, but at the expense of render time.
We are now ready to render the final image with the labels added on top.

Here is the final image of the plastic bottle done with VRayFastSSS2Mtl.
![]()
![]()