This page provides information on the V-Ray Light Lister window.
Overview
The V-Ray Light Lister window provides an easy way to modify common attributes of all of the lights in the scene.
||V-Ray Shelf|| > V-Ray Light Lister icon

||V-Ray Menu|| > Lights > V-Ray Light Lister

||Create menu|| > V-Ray > V-Ray Light Lister


General Light Lister Parameters

Selection Modes – Allows the user to choose between listing all lights in the scene or only the selected lights. See the Selection Modes example below.
Refresh – Updates the listed lights if lights have been added or removed from the scene.
Zebra – When enabled, visually separates lights in the Light Lister UI by alternating bright and dark backgrounds. See the Zebra and Lines Display Options example below.
Lines – When enabled, visually separates lights in the Light Lister UI by adding a line between lights. See the Zebra and Lines Display Options example below.
Light Selection Box – Click to select the light in the viewport. When a light has been selected, the box will change from grey to green. Shift click to add to selection. Middle-click and drag to toggle selection state. Right-click to isolate a selected light with the Solo light option. See the Isolating a Light example below.
Multiple lights can be edited at the same time by middle-clicking and dragging. For more information, see the Editing Multiple Lights example below.
Instanced lights will be listed under one entry. For more information, see the Instanced Lights example below.
Example: Selection Modes
The Selection modes are used to control which lights are listed in the Light Lister.
When the Selection mode is set to Scene, use shift + select to choose which lights you wish to edit.

Change the Selection mode to Selected to display only the selected light(s). This can be useful for editing the selected lights simultaneously.


Middle-click selection can be used to edit multiple lights simultaneously.
Here it is used to rename multiple lights.

The result after renaming lights with middle-click selection.
Example: Zebra and Lines Display Options
Zebra and Lines can assist the user in reading the Light Lister when the scene contains many lights.

Light Lister with Zebra enabled.

Light Lister with Lines enabled.
Example: Isolating a Light
A single light can be isolated by right clicking a light's Light Selection Box and selecting the Solo light option. The isolated light will be on in the scene, while all other lights will be turned off.

Right-click to enable the Solo light option.

The result after Solo light is used.
Example: Editing Multiple Lights
To edit multiple lights of the same type at once, middle-mouse click and drag through a column of attributes. The affected attributes will have their states inverted.

Middle-click and drag is used over the Inv attribute column.

The resulting states.
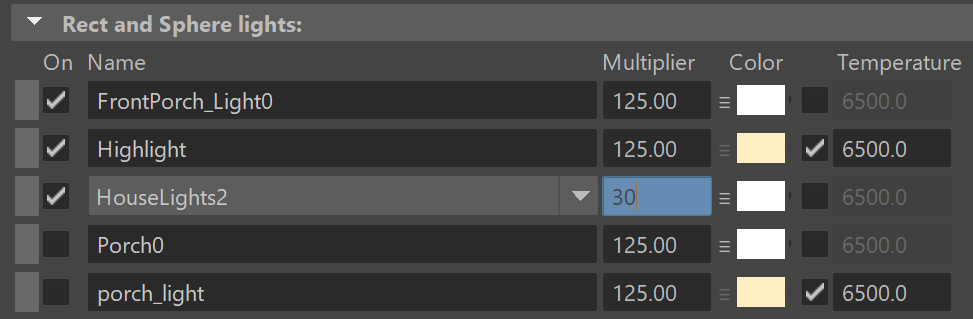
Middle-click and drag through numeric fields to set all their values. Type in a new value in one of the affected fields and hit enter. All affected fields will change to the new value.

Middle-click and drag is used over the Multiplier field.

A new value of 125 is specified in one of the affected fields.

After pressing enter, the affected fields update to the new value.
Middle mouse click-and-drag can be used on text fields as well. In this example, it is used to rename multiple lights. After inputting a new name and pressing enter, all of the affected lights will be updated.

Example: Light Instances
Instanced lights show up as a single entry with a drop down. Editing any parameter will effect all instances.
Changing the Intensity of all instances
The dropdown can be used to select a specific instance in the viewport.

Selecting an instanced light
Example: Render Layer Override
A triple bar icon allows for the parameter next to it to be overridden in a pre-selected render layer directly from the Light Lister.

Right-click on the icon to see Maya's render layer override context menu.

Notes
For more information on the specific light parameters implemented in the Light Lister, see their respective light pages at VRayLightRect, VRayLightSphere, VRayLightDome, VRaySun and VRaySky, VRayLightMesh, and VRayLightIES.
Standard Maya lights cannot be instanced.