This page provides information on the V-Ray Bitmap Texture.
Overview
The Bitmap texture has a versatile use, allowing a bitmap image to be loaded as a texture.
The Bitmap texture settings are organized in Basic and Advanced modes. You can switch the mode from the toggle button under the Preview Swatch or globally from the Configuration rollout of the Settings tab.
Any texture can be replaced via the Replace With New Texture ( ) button, which activates when you select the texture to be replaced. If the texture is an instance, all copies are changed as well.
With V-Ray 5 permanent support for the SketchUp texture colorization functionality is added. Note that for Bitmap textures it does not affect the material preview in the Asset Editor but only the appearance of the rendered image.

The Switch To Advanced Settings ( ) toggle activates the Advance Settings mode, giving you access to a larger number of settings for modification of the Bitmap texture.

UI Paths
||V-Ray Asset Editor|| > Textures (right-click) > Bitmap
||V-Ray Asset Editor|| > Create Asset (left-click) > Textures > Bitmap
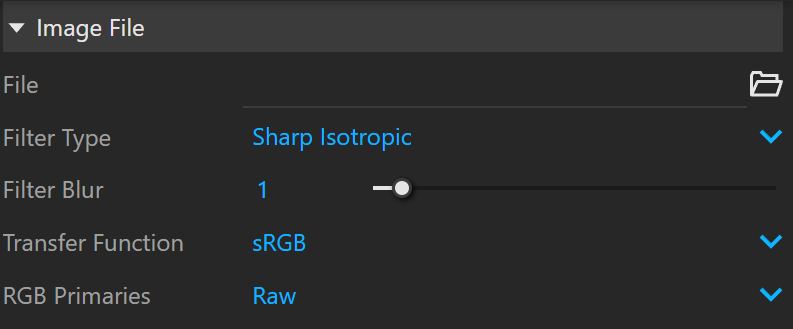
Image File
Some options are available only in Advanced mode.
File – Specifies the file from which the bitmap is loaded.
Filter Type – Specifies a type of filter to be applied to the bitmap.
Sharp Isotropic - Sharp and accurate isotropic filter. Produces results that are close to the results with disabled filtering with less AA samples required.
No Filter – No filter is applied.
Mip-map – Depending on the distance from the camera, the texture is rendered in full detail (when closer to the camera) or blurred, if it is far away.
Summed-area – Applies a summed-area filter. It is not recommended to use this filter.
Filter Blur – Specifies the strength of the blur filter applied to the bitmap.
Transfer Function 1 – Specifies the transfer function for the loaded image file.
None – No correction is applied.
sRGB – The loaded image is considered in sRGB transfer function.
Custom Gamma Curve – The transfer function is controlled through the Gamma parameter.
Auto – Automatically determines the color transfer function. If a bitmap file name contains the string "_srgb" the transfer function is sRGB. If a bitmap file name contains the strings "_lin_srgb" or "raw", no correction is applied. For bitmap files with 8 bits per color component and 3 or 4 color components (like png, jpg and other), the transfer function is sRGB. In all other cases, no correction is applied.
RGB Primaries – Allows you to manually override the RGB primaries of the Bitmap.
Raw – No transformation is applied to R|G|B colors. This option is suitable for normal maps, linear textures and textures controlling float value parameters.
sRGB primaries – The loaded image is considered in sRGB color space.
ACEScg primaries – The loaded image is considered in ACEScg color space. It is recommended to use this option when the texture is saved in ACEScg color space.
Gamma – Specifies the gamma curve correction applied when the Transfer Function is set to Custom Gamma Curve.
Sequence
V-Ray allows animating Bitmap textures. This can be done by loading an IFL file or by loading a sequence of images. Animation should be enabled and set up as usual.
IFL (Image file list) sequences can be loaded by manually copying the file path into the Bitmap texture’s File path field. Keep the Sequence toggle disabled when working with IFL sequences.
An IFL file can be manually created by creating a text file containing the image file names, where each image file name is in a new line corresponding to the frame number, and saving it with an .ifl extension.
Animating Bitmap texture by using sequence of images is done by loading the first texture from the images location and enabling the Sequence toggle. The image file names have to end with the corresponding frame number, e.g. - Image_001.jpg, Image_002.jpg etc.
Sequence – Enables the use of a sequence of image files to create an animation. Load the first texture from the images location as the Bitmap Image File. The file names have to end with a sequence frame number (001, 002 etc.).
Start Frame, Playback Speed, and Playback Type options work only with IFL sequences.
Start Frame – Specifies the start frame at which the map animation begins.
Playback Speed – This options speeds up or slows down the animation rate.
Playback Type – Determines what happens after the last frame of the bitmap animation, in case the animation is shorter than the scene.
Loop – Causes the animation to repeat over again from the beginning.
Ping-Pong – Causes the animation to be played forward and then backwards repeatedly, making every animated sequence loop smoothly.
Hold – Freezes the bitmap animation on the last frame.

Color Manipulation
Invert Texture – Inverts the RGB texture values.
Invert Alpha – When enabled, inverts the bitmap alpha values.
Alpha from Intensity – Uses the texture RGB intensity/luminance as alpha channel.
Color Gain – Corrects the color of the texture by multiplying the RGB color values in the texture with the RGB color values specified here. A texture map can be assigned here.
Color Offset – Corrects the color of the texture by adding the RGB color values specified here to the RGB color values of the texture. A texture map can be assigned here.
Default Color – Specifies a default color used for polygons with no valid UVs. In case the map is not tiled, specifies a default color that is used outside the texture square. When a texture is selected, it overrides the color as long as the texture checkbox is enabled.

Crop/Place
These settings are available only when you switch to the Advanced mode.
Placement – Specifies the type of placement to be used.
Whole Texture – Uses the whole bitmap.
Crop – Uses a section of the bitmap.
Place – Adjusts of the position of the image.
Width/ Height – Specifies the width/height of the bitmap. A value of 1 specifies the full width/height.
Jitter Placement – Specifies the amount of displacement to be applied in order to produce better anti-aliasing.

These settings are available only when you switch to the Advanced mode.
Amount – Controls the amount of noise.
Size – Controls the scale of the noise function.
Levels – Controls the noise color distribution.

Texture Placement
Type – Controls how the texture is positioned on the geometry.
2D (UV Channel) – The texture uses the object UV coordinates.
Environment – This mode is applicable if the map is connected to an Environment slot or a Dome light.
Texture Remapping – Uses UVW values from a color texture or separate grayscale textures.
Mapping Source – The texture uses an external UV placement source.
2D (UV Channel)
UV Channel/Set – Specifies the index of the mapping channel data to use. A value of 1 takes the first available channel.
Repeat U/V – Determines how many times the texture is repeated in the 0 to 1 UV square.
Lock U/V Repeat – Locks the U/V Repeat.
Offset U/V – Controls the texture offset in the U and V direction.
Rotate – Rotates the texture (in degrees).
Tile U/V – Tiles the texture in the U and V direction. If the option is disabled, the Default texture color is used outside the 0 to 1 UV square. Default color is found in Parameters > Color Manipulation.
Mirror U/V – Mirrors the texture in the U and V direction separately. The option cuts the texture in the half flipping one side vertically or horizontally. This can be used to avoid seams in-between non-tileable repeated textures.
Environment
Mapping – Specifies the type and shape of the texture.
Angular
Cubic
Spherical
Mirror Ball
Screen
Rotate H – Rotates the environment sphere horizontally.
Flip H – Flips the environment sphere horizontally.
Rotate V – Rotates the environment sphere vertically.
Flip V – Flips the environment sphere vertically. This option is active only in Spherical Mapping.
Ground – Enables ground projection of the texture.
Position X/Y/Z – Offsets the ground projection along the X/Y/Z axis.
Radius – Specifies a projection radius. Can be used to control the scale of the projection.
2d Transformation – see 2D (UV channel) parameters.
Texture Remapping
Mode – Determines whether a single or multiple textures should be used for U and V texture coordinates remapping.
UV – The Red input texture channel determines the U sampling coordinate. The Green input texture channel determines the V coordinate.
U – The value of this texture determines the U sampling coordinate.
V – The value of this texture determines the V sampling coordinate.
Mapping Source
UV Placement Source – External UV placement source to be used for the texture placement.

2D (UV Channel)

Environment

Texture Remapping

Mapping Placement
Notes
The Bitmap texture's transfer function (gamma curve correction) is automatically adjusted when it is created in any of the following material map slots:
- Roughness
- Highlight Glossiness
- Reflection Glossiness
- Fresnel IOR
- Metalness
- Refraction Glossiness
- Refraction IOR
- Opacity
- Coat Amount
- Coat Glossiness
- Coat IOR
- Coat Bump
- Coat Bump Amount
- Sheen Glossiness
- Bump
- Bump Amount
Copy-pasting, replacing or wrapping a texture does not trigger this automatic adjustment. It is reserved solely when creating a Bitmap in any of the specified material slots.