Versions Compared

Key

  • This line was added.
  • This line was removed.
  • Formatting was changed.

...

Section
Column
width50%

Camera Type – Determines the type of the physical camera to simulate. This mostly has an effect on the motion blur effect produced by the camera:

Still – Simulates a still photo camera with a regular shutter.
Cinematic – Simulates a motion-picture camera with a circular shutter.
Video – Simulates a shutter-less video camera with a CCD matrix. 

Shutter Angle – Shutter angle (in degrees) for the cinematic camera.

Shutter Offset – Shutter offset (in degrees) for the cinematic camera.

Latency – CCD matrix latency, in seconds, for the video camera

Specify Field of View – Specifies the source for the camera's field of view setting. When enabled, the FOV parameter is manually set. When disabled, FOV is determined by the Focal Length parameter.

Field of View – Specifies a value for the camera's field of view when Specify Field of View is enabled.

Film Width – Specifies the horizontal size of the film gate in millimeters. Note that this setting takes into account the system units configuration to produce the correct result.

Focal Length – Specifies the equivalent focal length of the camera lens. This setting takes into account the system units configuration to produce the correct result. Vertical film gate size is calculated by taking image aspect ratio into account (vertical film size = horizontal film size / aspect ratio).

Exposure – Specifies how the F-NumberShutter Speed, and Film Speed (ISO) settings affect the image brightness.

DisableShutter SpeedF-Number and ISO settings do not affect the image brightness;
Physical Exposure – Image brightness is controlled by the Shutter SpeedF-Number and ISO;
Exposure Value – Uses the Exposure Value to control image brightness. Grays out the ISO parameter and uses Shutter Speed and F-Number values only for Motion Blur and Depth of field respectively.

F-Number – Determines the width of the camera aperture. For more information, see the F-Stop (F-Number) example below.

ISO – Determines the film power (i.e. sensitivity). Smaller values make the image darker, while larger values make it brighter. For more information, see the ISO (Film Speed) example below.

Exposure ValueControls the exposure value when Exposure is set to Exposure ValueHigher values make the render darker, whereas lower values make the render brighter.

Shutter Speed – Specifies the shutter speed, in inverse seconds, for the still photographic camera. For example, a shutter speed of 1/30 of a second corresponds to a value of 30 for this parameter. For more information, see the Shutter Speed example below.

White Balance – A color that can be used to alter the image output. Objects in the scene that have the specified color appear white in the image. Note that only the color hue is taken into consideration; the brightness of the color is ignored. For more information, see the White Balance example below.

Transfer ROP Auto Corrections – (available only if Auto Exposure/Auto white balance in the ROP are enabled) Lets you transfer the calculations to a camera as an ISO correction, keeping the options affecting Depth of Field and Motion Blur unchanged (e.g. shutter speed, f-number).

Use Vignetting – When enabled, the optical vignetting effect of real-world cameras is simulated.

Vignetting – Specifies the amount of the vignetting effect, where 0.0 is no vignetting and 1.0  is normal vignetting. For more information, see the Vignetting example below.

Optical Vignetting – Controls the strength of the optical vignetting, also known as "cat's eye" vignetting. This effect is due to the fact that the shape of the bokeh highlights resembles the shape of the aperture. As the distance to the optical axis increases, the bokeh highlights are progressively narrowed and begin to resemble the shape of a cat's eye. The larger the distance from the image center, the narrower the cat's eye becomes. Optical vignetting tends to be stronger in wide angle lenses and large aperture lenses, but the effect can be noticed with most photographic lenses.

Auto Vertical Lens Shift – When enabled, automatically sets the Lens Shift parameter to achieve 2-point perspective.

Horizontal/Vertical Lens Shift – Values other than 0 tilt the lenses to simulate 2-point perspective.

Horizontal/Vertical Offset – Shutter offset (in degrees) for the cinematic camera.

UI Text Box
typeinfo

The following parameters of the physical camera are linked to some of Houdini's channels as part of the integration of V-Ray for Houdini:

  • Film Width is linked to Aperture
  • Focal Length is linked to Focal Length
  • F-Number is linked to F-Stop
  • Horizontal/Vertical Offset are linked to Screen Window X/Y
Column
width5%


Column
width45%


...


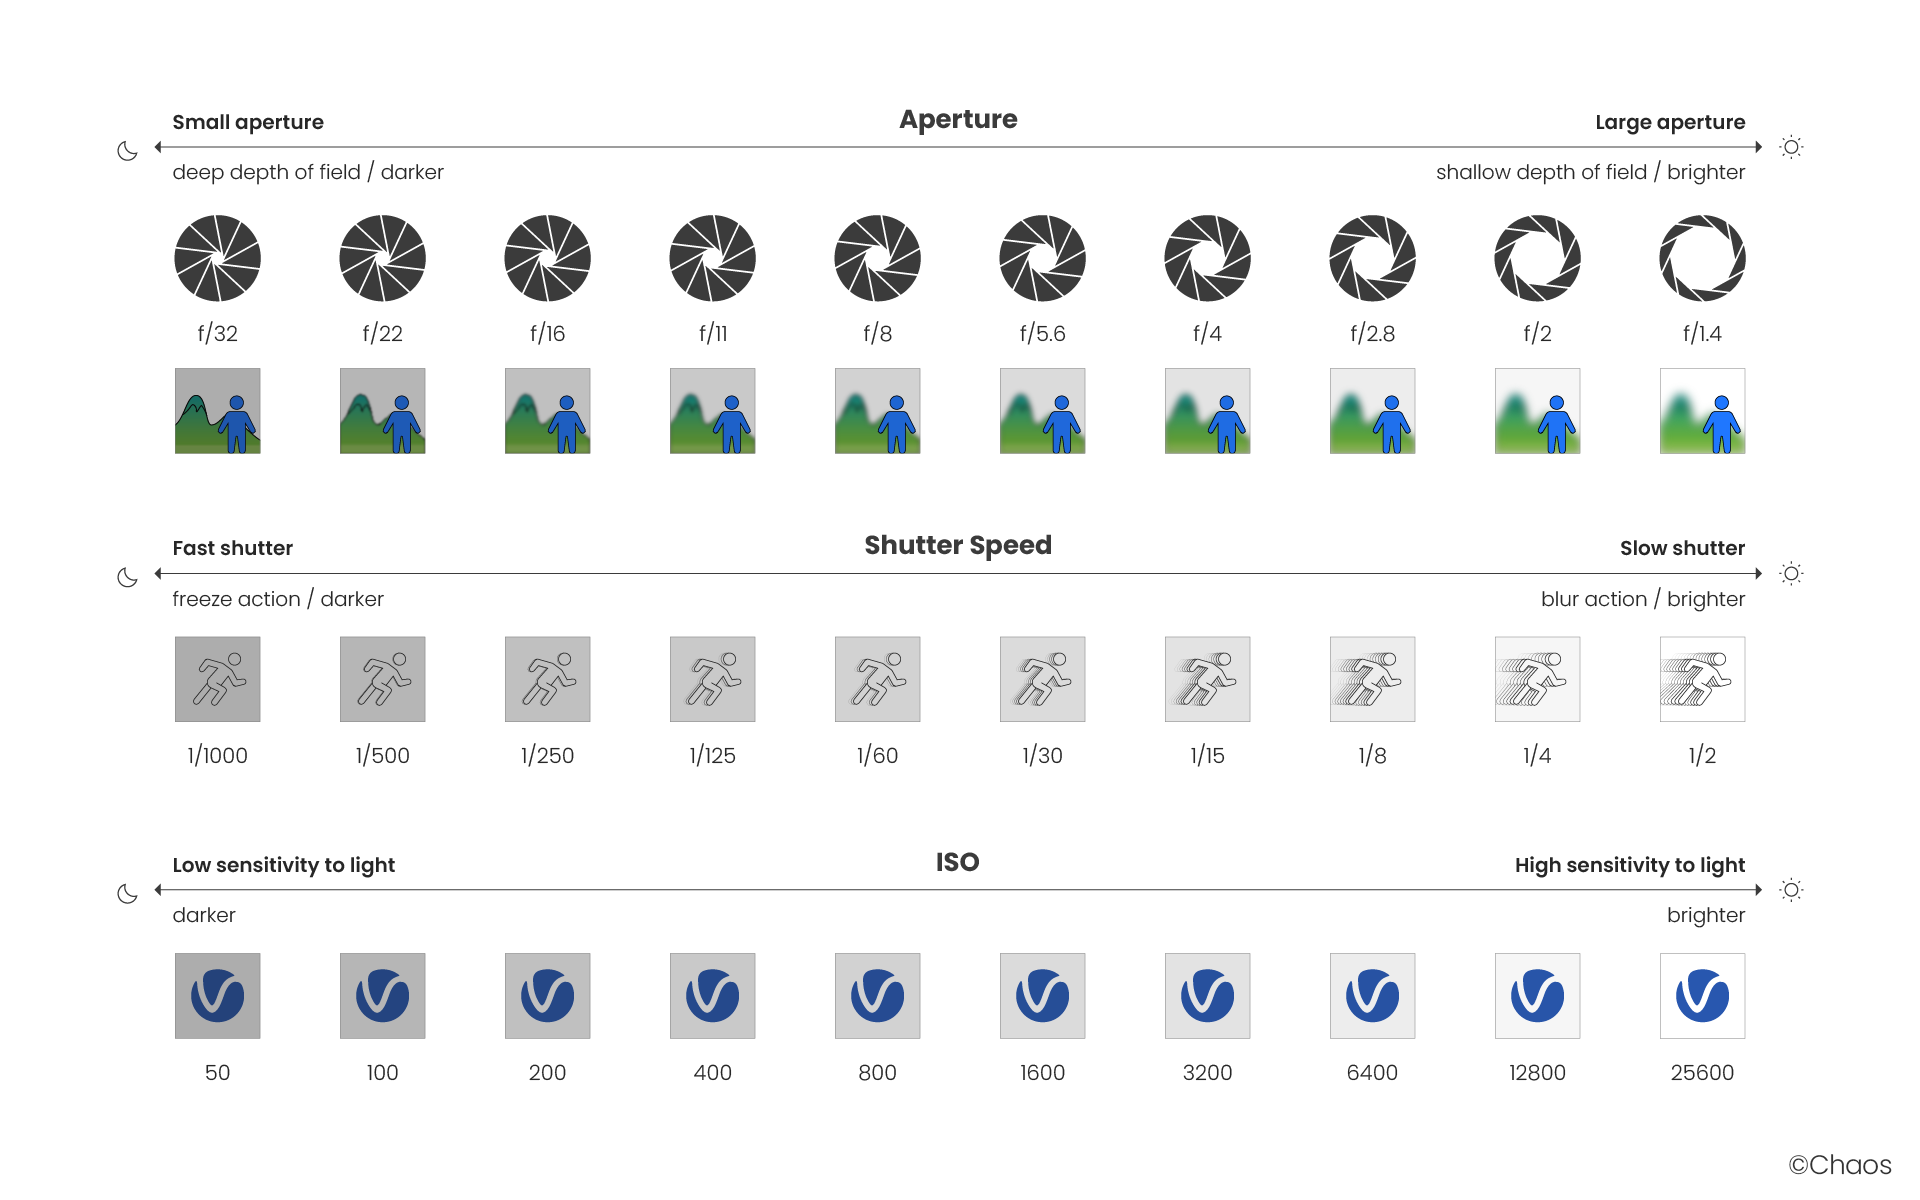
Aperture F-number vs Shutter Speed vs ISO
Cheat Sheet


The main options that control the brightness of a V-Ray Physical camera are Aperture F-number, Shutter Speed and ISO. They affect each other and you need to balance them according to your scene. Keep in mind that these settings do not correspond to those of a real-life camera. They apply only to the V-Ray Physical camera.

Fancy Bullets
typecircle
  • F-number determines the size of the opening in the camera lens. What the number refers to is the ratio between the aperture's focal length and the actual diameter of the aperture. A smaller F-number means a larger aperture. The larger the Aperture, the brighter the scene becomes but that also introduces more Depth of field.

  • Shutter Speed determines how long the lens stays open when taking the photo. The numbers refer to fractions of a second. The slower the Shutter Speed, the brighter the scene becomes but that also introduces Motion Blur.

  • ISO determines the camera's sensitivity to light in the scene. Lowering the ISO means that more light is needed to achieve good lighting. Increasing the ISO means that less light is needed to achieve good lighting. A day scene, lit with a V-Ray Sun, for instance, looks best when captured with around 100 ISO.

Section
Column
width10%


Column
width80%

Image Added

Column
width10%


Depth of Field

...

Section
Column
width50%

Enable – Turns on depth of field sampling. For more information, see the Depth Of Field (DOF) example below.

Focus Distance – Sets the focus distance of the camera.

Bokeh

Enable – When enabled, simulates a polygonal aperture.

Number of Blades – Specifies the number of blades of the polygonal aperture.

Blades Rotation – Defines the rotation of the blades in radians.

Center Bias – Defines a bias shape for the bokeh effects. Positive values make the outer edge of the bokeh effects brighter; negative values make the center of the effect brighter.

Bokeh Anisotropy – Allows stretching of the bokeh effect horizontally or vertically to simulate anamorphic lenses. Values other than 0.0 stretch the bokeh effect horizontally or vertically. If you want the ratio of height to width of the bokeh to be k:1,  then the value for anisotropy should be sqrt(1/k)-1For example, for anamorphic bokeh, which is 2.39:1, the anisotropy value should be -0.353.

Bitmap Apperture

Enable – Enables a texture file to define the shape of the aperture.

Affect Exposure – When enabled, the texture affects the camera's exposure in addition to the shape of the aperture.

Texture – Specifies the texture file that will determine the shape of the aperture.

Resolution – Specifies the resolution of the texture file.

Column
width5%


Column
width45%

...