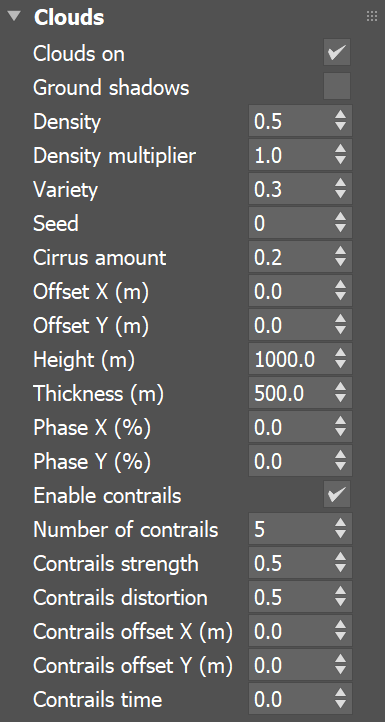
Ground shadows – When disabled, the entire scene is covered by a single shadow or fully illuminated depending on whether the sun is blocked by a cloud at the current camera position. This is useful for smaller scenes and speeds up the rendering process. When enabled, V-Ray calculates the shadows precisely at every point of the scene. This provides a lot more definition to the shadows but may slow down the rendering process. It is helpful in larger scenes where the effect of the clouds is more visible. See the Clouds shadows example below.
Density – Controls the density of the cumulus and stratus types of clouds. A value of 1 fills up the sky with clouds. See the Clouds Density example below.
Density multiplier – A multiplier to the Density parameter. The larger the value, the darker the sky becomes at the horizon. Setting a value of 0 results in no clouds, regardless of the the Density valuevalue.
Variety – Controls the variety of the cumulus and stratus types of clouds. See the Clouds Variety example below.
Seed – Generates a random value, based on the given number, to change the pattern of the clouds and the Contrails.
Cirrus amount – The maximum value of 1 fills the sky with cirrus clouds. Decreasing the value, lowers the presence of such clouds. When set to 0, the cirrus clouds are completely gone. See the Cirrus Amount example below.
Thickness(m) – Lower values make the cumulus and stratus types of clouds thin and sheer/lucent, while higher values make them full and heavy. See the Clouds Thickness example below.
Phase X (%) – Controls the phase by X axis, can be used to fine-tweak the cumulus and stratus clouds appearance. The appearance of the clouds loops at 0, 100, 200, etc. This parameter can be animated to resemble natural clouds appearance. See the How to add and animate clouds, without an HDRI example below.
Phase Y(%) – Controls the phase by Y axis, can be used to fine-tweak the cumulus and stratus clouds appearance. The appearance of the clouds loops at 0, 100, 200, etc. This parameter can be animated to resemble natural clouds appearance. See the How to add and animate clouds, without an HDRI example below.
Enable contrails – When enabled, plane contrails are simulates simulated in the sky.
Number of contrails – Determines the number of contrails generated. See the Number of Contrails example below for more information.
Contrails strength – Determines the opacity of the contrails. Lower values create less opaque trails, which look older. See the Contrails Strength example below for more information.
Contrails distortion – Determines the amount of distortion in the contrails. See the Contrails Distortion example below for more details.
Contrails offset X/Y (m) – Offsets the contrails by a given value, according to the X or Y axis. See the Contrails Offset example below for more information.
Contrails time – Determines how long along their way the planes arefar the contrails progress along the sky. See the Contrails time animation below for more details.
Column
width
5%
Column
width
35%
...
Section
Column
width
25%
Column
width
50%
Column
width
25%
Notes
...
Fancy Bullets
type
circle
Anchor
Notes
Notes
By default, the VRaySun and VRaySky are very bright. In the real world, the average solar irradiance is about 1000 W/m^2 (see the references below). Since the image output in V-Ray is in W/m^2/sr, you will typically find that the average RGB values produces by the sun and the sky are about 200.0-300.0 units. This is quite correct from a physical point of view, but is not enough for a nice image. You can either use Color mapping to bring these values to a smaller range (which is the preferred way) or you can use the Sun intensity multiplier to make the sun and sky less bright. Using the VRayPhysicalCamera with suitable values also produces a correct result without changing the sun and sky parameters.
The Affect atmospherics option has no effect on VRayAerialPerspective as this atmospheric effect only simulates volumetric appearance.