Versions Compared

Key

  • This line was added.
  • This line was removed.
  • Formatting was changed.

This page provides information on the Simulation rollout of the Simulator.

Overview

...

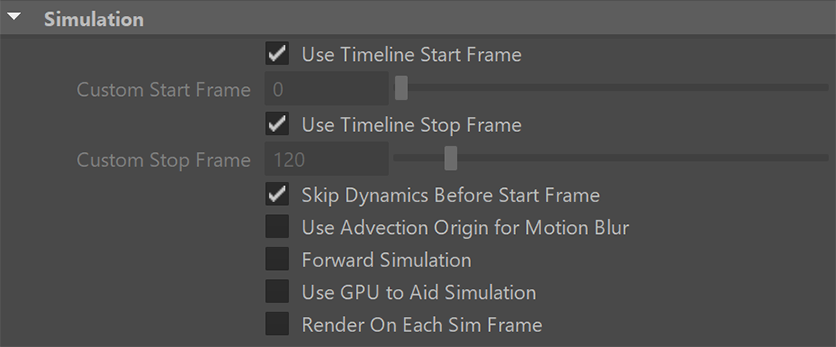
The Simulation rollout contains the main panel for controlling the simulation process. It also displays statistical information like simulation times, and the content of the cache file for the current frame. The content can be grid channels such as Temperature, Velocity, etc., as well as particle groups. You can select which channels to export to the cache files from the Output Rollout, while the particle groups may be created by the Fire Source, as well as the Splash and Foam rollouts of the Simulator.

...

Section
Column
width40%

Use Timeline Start Frame | start_from_timeline - When enabled, the Simulation will run from the Timeline Start Frame to the Timeline End Frame or the Custom Stop Frame, depending on the options.

Custom Start Frame | startFrame – Explicitly sets the Start frame of the Simulation. This can also be a negative number.

Use Timeline Stop Frame | stop_from_timeline - When enabled, the Simulation will run from the Timeline Start Frame or the Custom Start Frame to the end of the Timeline.

Custom Stop Frame | stopFrame – Explicitly sets the End frame of the Simulation. This can also be a negative number.

Skip Dynamics Before Start Frame | skipStartFrames – If enabled, the simulation will jump to the starting frame at the start of the simulation. Disabling will evaluate from the start of the timeline to allow Maya dynamics to run before simulating. For instance, Maya's nParticles are sensitive to large jumps in the timeline and disabling this option when the start frame for the Phoenix Simulator is different from the start frame of other dynamics in the scene could potentially resolve issues related to this. However, it is best to cache all dynamics before using them in a Phoenix simulation.

Use Advection Origin for Motion Blur rendUVWForMB – The Advection Origin channel will be used to calculate the fluid movement for more precise motion blur, compared to using the Velocity channel which is the default way. Note that you must first enable the Advection Origin channel export from the Output rollout and then simulate, in order to be able to use Advection Origin for motion blur. Also note that it can be used only in Volumetric, Volumetric Geometry and Isosurface render modes.

Forward Simulation forwardSim – Enabling will first move the scene geometry and then simulate the fluid. This will fix simulation lag relative to scene changes.

Use GPU to Aid Simulation useGPU – When enabled, runs suitable phases of the simulation on the GPU instead of the CPU, which can help the simulation speed. Currently only the PCG Fluidity (Conservation) method of Fire/Smoke simulations takes advantage of this. Currently this is not supported on macOS.

UI Text Box
typeinfo

The PCG fluidity on CPU and the PCG fluidity on GPU will not produce identical results - the fluid will slowly start moving in slightly different directions between the two implementations.

UI Text Box
typenote

If the GPU can't be initialized, Phoenix will automatically fall back to CPU and will indicate this in the Phoenix log file. The reason the GPU is not initialized may be that there is no GPU, or the GPU is old, or the GPU drivers need to be updated.

Render On Each Sim Frame rend_sim_frame – During simulation, after each new frame is simulated, this option will start a render with your currently assigned production renderer and with the render settings you have dialed in your Render Settings Maya dialog. You need to have set a Render File Name Prefix in the Maya Render Settings in advance. In order to have the frame number in the file name, you can insert a "<frame>" token in the filename. For example, "image<frame>" will create files named "image1", "image2", "image3", etc. If you want to pad the number with zeros, you can use for example "image<frame04>", which will create files named "image0001", "image0002", "image0003", etc. You can use Render On Each Sim Frame when you leave a long simulation overnight, so you will have a ready rendered sequence when you come back to check on it, even if the entire simulation did not have time to finish. If you are doing test iterations and you don't need your fire/smoke to be rendered with production quality, you could enable the GPU Preview and use the Save Images During Simulation option instead.


UI Text Box
typetip

When doing test iterations on your simulation setup, you can also speed up the simulation by enabling Cacheless Simulation from the Output rollout.

UI Text Box
typetip

An alternative approach to Render On Each Sim Frame is to automatically start a sequence render after the entire simulation has finished by adding a 'RenderIntoNewWindow' command under the OnSimulationEnd() callback of the Use Script option below.

Column
width60%

Image RemovedImage Added


Progress sub-section

...