This page provides information on the Simulation rollout of the Simulator.
Overview
The Simulation rollout contains the main panel for controlling the simulation process. It also displays statistical information like simulation times, and the content of the cache file for the current frame. The content can be grid channels such as Temperature, Velocity, etc., as well as particle groups. You can select which channels to export to the cache files from the Output Rollout, while the particle groups may be created by the Fire Source.
Most simulations require a long time to calculate and it's very convenient to let them run during the night. However, you still have to render the result in the morning, and this also consumes a lot of time. In this case, the Phoenix Scripting system can be helpful, since it enables you to execute any action at the end of the simulation, including rendering. You simply need to enable "Use Script" from the Simulation rollout, and specify the Mel or Python script file to use during the simulation. For more information, see the Nightly Simulation and Rendering section on the Tips and Tricks page.
UI Path: ||Select PhoenixFDSimulator|| > Attribute Editor > PhoenixFD Simulator > Simulation rollout
Actions
Above the Simulation rollout are several actions for controlling the simulation.
Start, Pause, Stop, Resume – Starts, pauses and stops the simulation. Once the simulation has been paused, the option to Resume becomes available. Note that you can stop a running simulation using the Shift + Escape key combination, or with the Escape key, if the option to do so is enabled in the Phoenix FD Global Preferences.

Restore – Continues a simulation from the currently viewed frame on the timeline, or the latest Backup frame containing the full simulation state up to the current timeline frame, which is controlled by the Backup Interval parameter in the Output rollout. This way, a Phoenix simulation that has been stopped previously can be resumed from the point you left off, even after the software has been closed and reopened.
The ability to restore a sim is only possible when the full internal state of a Phoenix simulation has been exported. This is controlled by the Backup Interval parameter in the Output rollout, which determines how often the full simulation state is backed up. Frames with the full state are called Backup frames.
When a Backup frame is currently viewed, the text "Can Restore From Here" appears in the Cache File Content list. The Restore command finds the latest Backup frame up to the current timeline frame, and continues the simulation from there. Note that restoring does not work for cache sequences imported from 3rd party software.
Load – Loads the data from a single cache as an initial state for the simulation and starts simulating from the Start Frame the same way the Start action works. The cache can be of the .aur, .vdb, or .f3d formats and so can be imported from a 3rd party software into Phoenix. The loaded grid will be resized to fit the grid's dimensions at the Start Frame. The loaded cache does not need to be a Backup frame or to contain velocity at all - the simulator will load any available channels from the cache file and the rest of the simulated channels will be empty as when starting a brand new simulation. If you wish to smoothly continue a simulated sequence from a given frame, please use the Restore command instead.
Load Current – Same as the Load command, but instead of loading the initial state from a cache file, the currently viewed simulation data would be used.
Phoenix FD Template Dropdown – Sets the controls for the Simulator. Advanced will show all the controls for the Simulator, while Fire, Smoke, and Liquid will only show parameters related to those types of simulations.
Note that the Liquid rollout will be visible only when using the Advanced Template.
The options in the Liquid rollout are also available in the Liquid Simulator → Dynamics rollout when using the Liquid Template.
UI Path: ||Select PhoenixFDSim|| > Attribute Editor > Liquid rollout

When running a new simulation, Phoenix saves each simulated frame in a cache file with a .aur or .vdb extension, numbered using the frame index. By default, the cache files are stored under the data folder of the Maya project folder. They are put in a folder with the same name as the scene and with "_Phoenix_frames" appended:

Inside the cache folder, the default names use the simulator's name. For example, a simulator named "PhoenixFDSimulator1" outputs these cache files:

You can manually change the output path from the Output rollout. After Phoenix has created the .aur frame cache files, you can preview them in the viewport and render them using V-Ray or another renderer.
The diagram illustrates the basic simulation workflow.
For more information on changing paths for cache files, see the Tips and Tricks page.

Parameters
Use Timeline Start Frame | start_from_timeline - When enabled, the Simulation will run from the Timeline Start Frame to the Timeline End Frame or the Custom Stop Frame, depending on the options.
Custom Start Frame | startFrame – Explicitly sets the Start frame of the Simulation. This can also be a negative number.
Use Timeline Stop Frame | stop_from_timeline - When enabled, the Simulation will run from the Timeline Start Frame or the Custom Start Frame to the end of the Timeline.
Custom Stop Frame | stopFrame – Explicitly sets the End frame of the Simulation. This can also be a negative number.
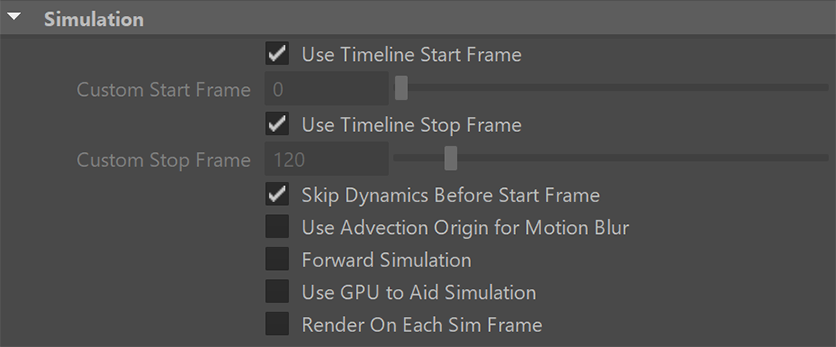
Skip Dynamics Before Start Frame | skipStartFrames – If enabled, the simulation will jump to the starting frame at the start of the simulation. Disabling will evaluate from the start of the timeline to allow Maya dynamics to run before simulating. For instance, Maya's nParticles are sensitive to large jumps in the timeline and disabling this option when the start frame for the Phoenix Simulator is different from the start frame of other dynamics in the scene could potentially resolve issues related to this. However, it is best to cache all dynamics before using them in a Phoenix simulation.
Use Advection Origin for Motion Blur | rendUVWForMB – The Advection Origin channel will be used to calculate the fluid movement for more precise motion blur, compared to using the Velocity channel which is the default way. Note that you must first enable the Advection Origin channel export from the Output rollout and then simulate, in order to be able to use Advection Origin for motion blur. Also note that it can be used only in Volumetric, Volumetric Geometry and Isosurface render modes.
Forward Simulation | forwardSim – Enabling will first move the scene geometry and then simulate the fluid. This will fix simulation lag relative to scene changes.
Use GPU to Aid Simulation | useGPU – When enabled, runs suitable phases of the simulation on the GPU instead of the CPU, which can help the simulation speed. Currently only the PCG Fluidity (Conservation) method of Fire/Smoke simulations takes advantage of this. Currently this is not supported on macOS.
The PCG fluidity on CPU and the PCG fluidity on GPU will not produce identical results - the fluid will slowly start moving in slightly different directions between the two implementations.
If the GPU can't be initialized, Phoenix will automatically fall back to CPU and will indicate this in the Phoenix log file. The reason the GPU is not initialized may be that there is no GPU, or the GPU is old, or the GPU drivers need to be updated.
Render On Each Sim Frame | rend_sim_frame – During simulation, after each new frame is simulated, this option will start a render with your currently assigned production renderer and with the render settings you have dialed in your Render Settings Maya dialog. You need to have set a Render File Name Prefix in the Maya Render Settings in advance. In order to have the frame number in the file name, you can insert a "<frame>" token in the filename. For example, "image<frame>" will create files named "image1", "image2", "image3", etc. If you want to pad the number with zeros, you can use for example "image<frame04>", which will create files named "image0001", "image0002", "image0003", etc. You can use Render On Each Sim Frame when you leave a long simulation overnight, so you will have a ready rendered sequence when you come back to check on it, even if the entire simulation did not have time to finish. If you are doing test iterations and you don't need your fire/smoke to be rendered with production quality, you could enable the GPU Preview and use the Save Images During Simulation option instead.
When doing test iterations on your simulation setup, you can also speed up the simulation by enabling Cacheless Simulation from the Output rollout.
An alternative approach to Render On Each Sim Frame is to automatically start a sequence render after the entire simulation has finished by adding a 'RenderIntoNewWindow' command under the OnSimulationEnd() callback of the Use Script option below.
Progress sub-section
This section of the UI displays information on the current simulation.
Total Sim Duration – The amount of time the simulation has run.
Estimated Time Left – Estimated time until the simulation reaches the set Stop frame.
Performance – How much time since the last frame was calculated and the frame calculated per second.
Frame – Percentage of the current frame calculated.
Total – Percentage of total simulation complete.
Cached Frames – Shows the frame range which contains simulated caches.

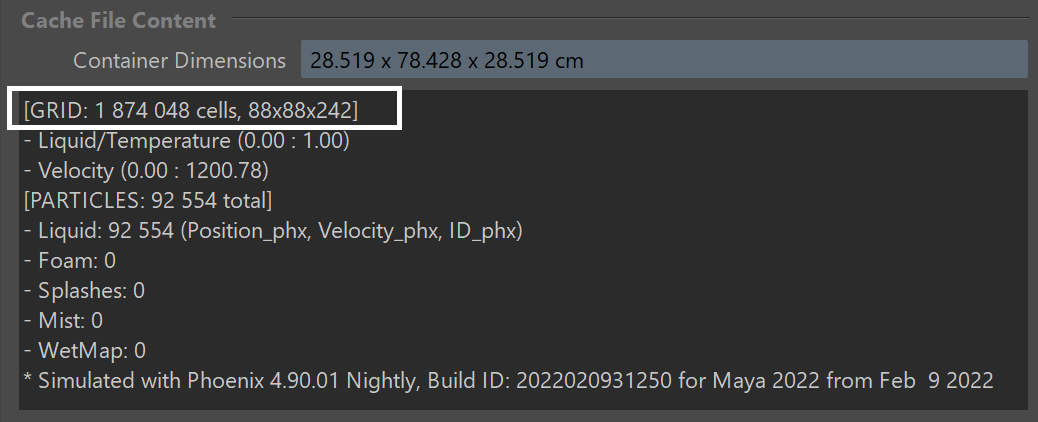
Cache File Content sub-section
This area displays information on the current simulation. Any data from channels that have been loaded into the simulator are shown. This includes the minimum and maximum ranges for each channel. Check the Grid Channel Ranges and Particle Channel Ranges pages for more information.
Note that the Container Dimensions show the loaded cache size as seen in the scene, in the currently selected units. This size is not multiplied by the Scene Scale parameter from the Grid rollout. If you want to see how big the container is as seen by the Phoenix simulator when the Scene Scale parameter is used, check the Total Cells info in the Grid rollout.
Scripting
For more information and examples, please see the Scripting documentation.
Use Script | useScript – Enables using Mel or Python script during the simulation.
Script File | scriptFile – Specifies the Mel or Python script file to use during the simulation.
Python help in Script Editor – Shows quick usage information about the phxfd Python module inside the Script Editor.
Edit Script – Opens the script file in the default external editor.

Threading
Threads Limit | threadsLimit – Specifies an upper limit on the number of threads used for the simulation. When the value is set to 0, the maximum number of threads (cores) will be used.
NUMA Node Start | NUMANode0 – If the value of Threads Limit is 0, this parameter specifies the starting index of the NUMA nodes that will be used for simulation.
NUMA Node End | NUMANode1 – If the value of Threads Limit is 0, this parameter specifies the end index of the NUMA nodes that will be used for simulation.

Note: NUMA stands for Non-Uniform Memory Access and currently is available only on Windows. NUMA can be used to restrict the threads used for simulation based on the physical CPUs available on the system (in multiprocessor systems). In this way, better memory access can be achieved when multiple simulations are run on the same machine.