![]()
Page History
...
| Section | ||||||||||||||||||||||||||||||||||||||||||||||||||||
|---|---|---|---|---|---|---|---|---|---|---|---|---|---|---|---|---|---|---|---|---|---|---|---|---|---|---|---|---|---|---|---|---|---|---|---|---|---|---|---|---|---|---|---|---|---|---|---|---|---|---|---|---|
|


Basic & Display
...
| Section | |||||||||||||||||
|---|---|---|---|---|---|---|---|---|---|---|---|---|---|---|---|---|---|
|


| Anchor | ||||
|---|---|---|---|---|
|
...
The set up is a white board with a small black rectangle and a camera in front of it. Notice how changing the focus distance produces images with different brightness even though the illumination and all other camera parameters are the same in both cases. Also notice the change in the field of view.
| Section | ||||||||||||||||||||
|---|---|---|---|---|---|---|---|---|---|---|---|---|---|---|---|---|---|---|---|---|
|


...
| Section | ||||||||||||||||
|---|---|---|---|---|---|---|---|---|---|---|---|---|---|---|---|---|
|

...
Example: Zoom Factor
This parameter determines the zooming (in and out) of the final image. It doesn't move the camera forward nor backwards.
The following constant settings were used for some parameters: Exposure is set to Physical Exposure mode, F-Number is 4.0, Shutter speed is 8.0, Film speed (ISO) is 100, Vignetting is on, White balance is white.
...
| Section | ||||||||||||||||||||||||||||||||||||
|---|---|---|---|---|---|---|---|---|---|---|---|---|---|---|---|---|---|---|---|---|---|---|---|---|---|---|---|---|---|---|---|---|---|---|---|---|
|


Aperture
...
| Section | |||||||||||||||||
|---|---|---|---|---|---|---|---|---|---|---|---|---|---|---|---|---|---|
|
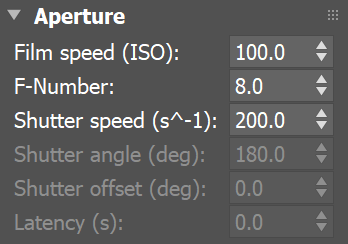
...
...
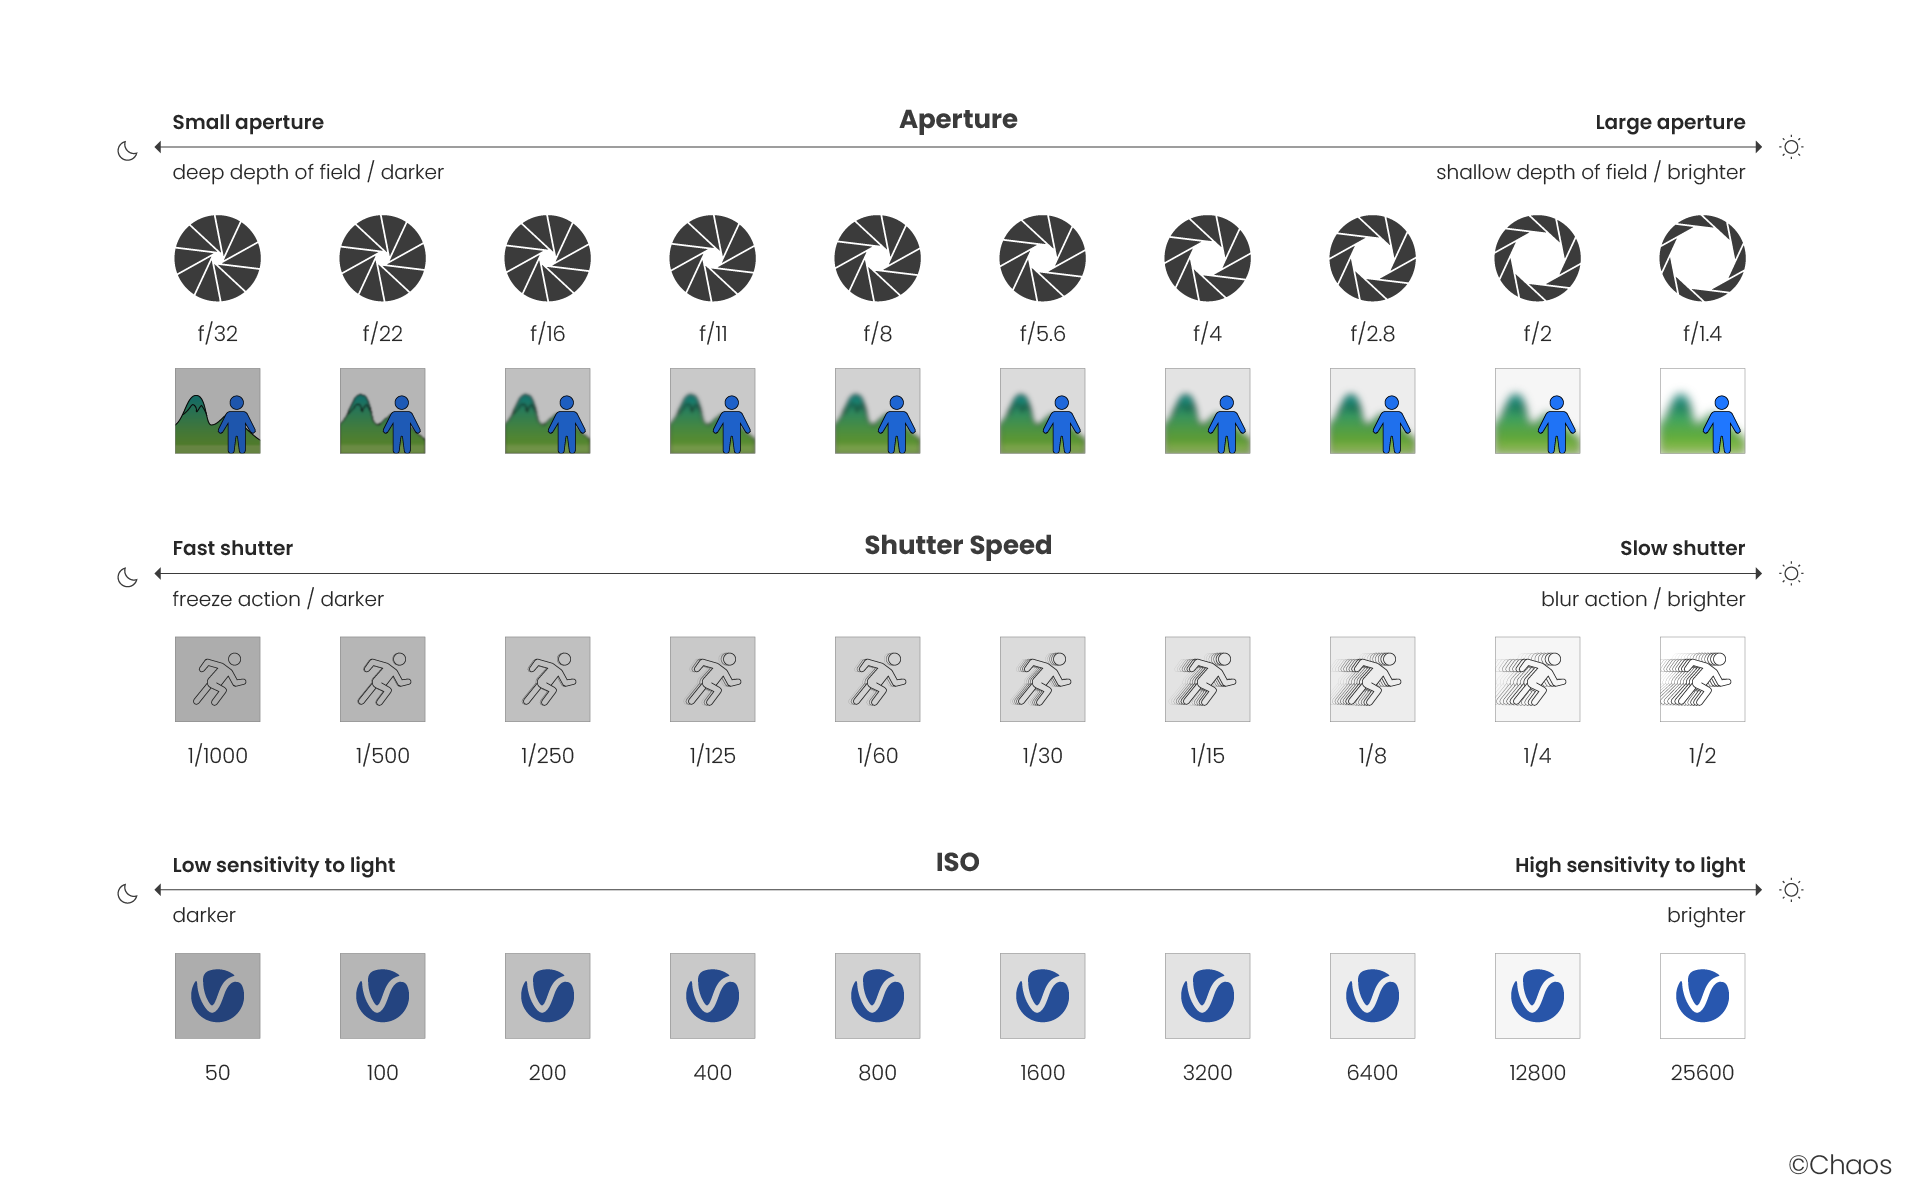
Aperture F-number vs Shutter Speed vs ISO
Cheat Sheet
The main options that control the brightness of a V-Ray Physical camera are Aperture F-number, Shutter Speed and ISO. They affect each other and you need to balance their values according to your scene. Keep in mind that these settings do not correspond to those of a real-life camera. They apply only to the V-Ray Physical camera.
| Fancy Bullets | ||
|---|---|---|
| ||
|
| Section | |||||||||||||||||
|---|---|---|---|---|---|---|---|---|---|---|---|---|---|---|---|---|---|
|
...
| Anchor | ||||
|---|---|---|---|---|
|
...
Example: Film Speed (ISO)
The Film speed (ISO) parameter determines the sensitivity of the film and consequently the brightness of the image. If the ISO value is high (film is more sensitive to light), the image is brighter. Lower ISO values mean that the film is less sensitive and produces a darker image.
The images in this example show the effect of changing the Film speed (ISO). The following constant settings were used for some parameters: Exposure is set to Physical Exposure, Shutter speed is 8.0, F-Number is 4.0, Vignetting is on, and White balance is white.
| Section | ||||||||||||||||||||||||||||||||||
|---|---|---|---|---|---|---|---|---|---|---|---|---|---|---|---|---|---|---|---|---|---|---|---|---|---|---|---|---|---|---|---|---|---|---|
|


| Anchor | ||||
|---|---|---|---|---|
|
...
Example: F-Number (f-stop)
...
The images in this example show the effect of changing the F-Number. The following constant settings were used for some parameters: Exposure is set to Physical Exposure, Shutter speed is 8.0, Film speed (ISO) is 100, Vignetting is on, White balance is white.
| Section | |||||||||||||||||||||||||||||||||
|---|---|---|---|---|---|---|---|---|---|---|---|---|---|---|---|---|---|---|---|---|---|---|---|---|---|---|---|---|---|---|---|---|---|
|


...
| Anchor | ||||
|---|---|---|---|---|
|
...
Example: Shutter speed
The Shutter speed parameter determines the exposure time for the virtual camera. The longer this time is (small shutter speed values), the brighter the image would be. In reverse - if the exposure time is shorter (high shutter speed value), the image would get darker. This parameter also affects the motion blur effect, see the Motion Blur Example.
The images in this example show the effect of changing the Shutter speed. The following constant settings were used for some parameters: Exposure is set to Physical Exposure, F-Number is 4.0, Film speed (ISO) is 100, Vignetting is on, and White balance is white.
| Section | ||||||||||||||||||||||||||||||||||||
|---|---|---|---|---|---|---|---|---|---|---|---|---|---|---|---|---|---|---|---|---|---|---|---|---|---|---|---|---|---|---|---|---|---|---|---|---|
|


Anchor DOFMotion DOFMotion
DoF & Motion blur
...
| Section | |||||||||||||||||
|---|---|---|---|---|---|---|---|---|---|---|---|---|---|---|---|---|---|
|

...
| Anchor | ||||
|---|---|---|---|---|
|
...
Example: Depth of Field (DoF)
...
For the images in this example, the following constant settings were used for some parameters: Exposure is set to Exposure Value, F-Number is 1.0, EV is 7.0, Shutter speed is 125, Vignetting is off.
| Section | ||||||||||||||||||||||||||||||||||
|---|---|---|---|---|---|---|---|---|---|---|---|---|---|---|---|---|---|---|---|---|---|---|---|---|---|---|---|---|---|---|---|---|---|---|
|


...
| Anchor | ||||
|---|---|---|---|---|
|
...
Example: Motion blur (MB)
...
To enable the motion blur effect, you need to enable the Motion blur option in the DoF & Motion blur rollout of the physical camera. The amount of motion blur is determined by the speed of the moving object itself as well as the Shutter speed setting of the camera. Long shutter speeds will produce more motion blur, as the movement of the object is tracked over a longer time. In reverse, short shutter speeds will produce less motion blur.
...
For the images in this example, the following constant settings were used for some parameters: Exposure is set to Exposure Value, EV is set to 7 and Vignetting is on.
| Section | |||||||||||||||||||||||||||||||||||
|---|---|---|---|---|---|---|---|---|---|---|---|---|---|---|---|---|---|---|---|---|---|---|---|---|---|---|---|---|---|---|---|---|---|---|---|
|


Color & Exposure
...
| Section | |||||||||||||||||||||
|---|---|---|---|---|---|---|---|---|---|---|---|---|---|---|---|---|---|---|---|---|---|
|

| Anchor | ||||
|---|---|---|---|---|
|
...
Example: Vignetting
...
This parameter control the optical vignetting effect of real-world cameras.
| Section | |||||||||||||||||||||||||||||||||
|---|---|---|---|---|---|---|---|---|---|---|---|---|---|---|---|---|---|---|---|---|---|---|---|---|---|---|---|---|---|---|---|---|---|
|


...
| Anchor | ||||
|---|---|---|---|---|
|
...
Example: White balance
...
Using the White balance color allows additional modification of the image output. Objects in the scene that have the specified color will appear white in the image. E.g. for daylight scenes this should be peach color to compensate for the color of the sun light etc.
The images in this example show the effect of changing the White balance. The following constant settings were used for some parameters: Exposure is set to Physical Exposure, F-Number is 8.0, Shutter speed is 200.0, Film speed (ISO) is 200.0, and Vignetting is off.
| Section | ||||||||||||||||||||||||||||||||||
|---|---|---|---|---|---|---|---|---|---|---|---|---|---|---|---|---|---|---|---|---|---|---|---|---|---|---|---|---|---|---|---|---|---|---|
|


Resolution Override
...
| Section | ||||||||||||||||||||||
|---|---|---|---|---|---|---|---|---|---|---|---|---|---|---|---|---|---|---|---|---|---|---|
|

Tilt & Shift
...
| Section | |||||||||||||||||
|---|---|---|---|---|---|---|---|---|---|---|---|---|---|---|---|---|---|
|

Anchor tilt tilt
...
Example: Vertical tilt
...
Using this parameter, you can achieve 2-point perspective. To have that done automatically, use the Guess vert tilt button.
| Section | |||||||||||||||||||||||||||||||||
|---|---|---|---|---|---|---|---|---|---|---|---|---|---|---|---|---|---|---|---|---|---|---|---|---|---|---|---|---|---|---|---|---|---|
|


...
...
Example: Horizontal tilt
Using this parameter, you can achieve 2-point perspective. To have that done automatically, use the Guess horiz tilt button.
| Section | |||||||||||||||||||||||||||||||||
|---|---|---|---|---|---|---|---|---|---|---|---|---|---|---|---|---|---|---|---|---|---|---|---|---|---|---|---|---|---|---|---|---|---|
|


...
...
Example: Horizontal shift
...
Using this parameter, you can offset the camera field of view.
| Section | |||||||||||||||||||||||||||||||||
|---|---|---|---|---|---|---|---|---|---|---|---|---|---|---|---|---|---|---|---|---|---|---|---|---|---|---|---|---|---|---|---|---|---|
|


...
|
...
Example: Vertical shift
Using this parameter, you can offset the camera field of view.
| Section | ||||||||||||||||||||||||||||||||||
|---|---|---|---|---|---|---|---|---|---|---|---|---|---|---|---|---|---|---|---|---|---|---|---|---|---|---|---|---|---|---|---|---|---|---|
|


...
Bokeh Effects
...
| Section | ||||||||||||||||||||||
|---|---|---|---|---|---|---|---|---|---|---|---|---|---|---|---|---|---|---|---|---|---|---|
|
Distortion
...
| Section | ||||||||||||||||||||||
|---|---|---|---|---|---|---|---|---|---|---|---|---|---|---|---|---|---|---|---|---|---|---|
|

...
| Anchor | ||||
|---|---|---|---|---|
|
...
The difference between the Cubic and Quadratic types of distortion is slightly visible. The Cubic type should be used in some camera tracking programs like SynthEyes, Boujou, etc.
| Section | |||||||||||||||||||||||||||||||||||||||
|---|---|---|---|---|---|---|---|---|---|---|---|---|---|---|---|---|---|---|---|---|---|---|---|---|---|---|---|---|---|---|---|---|---|---|---|---|---|---|---|
|


...
| Section | ||||||||||||||||
|---|---|---|---|---|---|---|---|---|---|---|---|---|---|---|---|---|
|

...
| Section | |||||||||||||||||||||||||||||
|---|---|---|---|---|---|---|---|---|---|---|---|---|---|---|---|---|---|---|---|---|---|---|---|---|---|---|---|---|---|
|


| Section | ||||||||||||||||||||||||||||||
|---|---|---|---|---|---|---|---|---|---|---|---|---|---|---|---|---|---|---|---|---|---|---|---|---|---|---|---|---|---|---|
|


Clipping & Environment
...
| Section | ||||||||||||||||
|---|---|---|---|---|---|---|---|---|---|---|---|---|---|---|---|---|
|

...
Rolling Shutter
...
| Section | ||||||||||||||||
|---|---|---|---|---|---|---|---|---|---|---|---|---|---|---|---|---|
|

...
Example: Rolling Shutter Effect
...
The example below shows a capture of a plane propeller spinning. The first image has motion blur applied and the rolling shutter effect is turned off. The second image shows the rolling shutter effect enabled (Top to bottom).
| Before after | ||||||||||
|---|---|---|---|---|---|---|---|---|---|---|
| ||||||||||
|


Camera Shader
...
| Section | ||||||||||||||||
|---|---|---|---|---|---|---|---|---|---|---|---|---|---|---|---|---|
|

Proportion guides
...
Determines the structure and appearance of the camera guides in the viewport.
| Section | ||||||||||||||||
|---|---|---|---|---|---|---|---|---|---|---|---|---|---|---|---|---|
|

...
Notes
...
| Fancy Bullets | ||
|---|---|---|
| ||
|