![]()
Page History
This page provides information about the Emissive material in V-Ray for Revit.
Overview
...
| Section | |||||||||||||||
|---|---|---|---|---|---|---|---|---|---|---|---|---|---|---|---|
|

UI Options
...
| Section | ||||||||||||||||||||
|---|---|---|---|---|---|---|---|---|---|---|---|---|---|---|---|---|---|---|---|---|
|

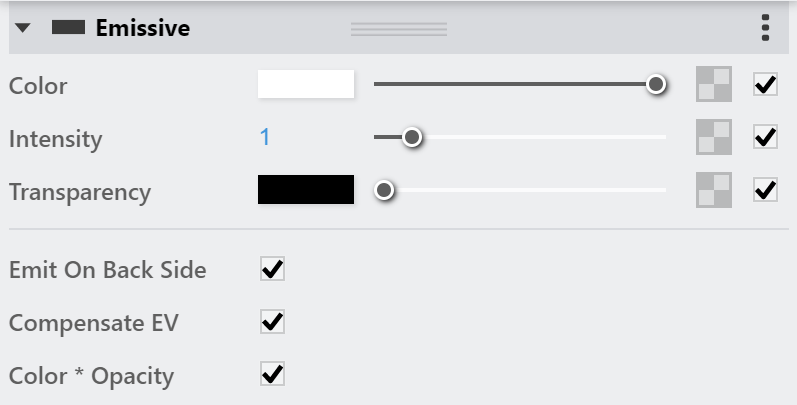
Emissive
...
| Section | |||||||||||||||
|---|---|---|---|---|---|---|---|---|---|---|---|---|---|---|---|
|
Multipliers
...
| Section | |||||||||||||||
|---|---|---|---|---|---|---|---|---|---|---|---|---|---|---|---|
|

Anchor
...
Example: Color and Texture, Intensity, Emit On Back Side
| Anchor | ||||
|---|---|---|---|---|
|
Here are some examples showing the difference in Intensity, the Emit On Back Side turned on and off and using an image in the Color Texture slot
...
Example: Textures
This example shows using the BRDFLight with a texture in the Color slot. In order to control the strength of the light we will need to adjust the Value of the Color Multiplier parameter in the Color Balance roll out of the texture.
| Section | ||||||||||||||||||||||||||||||||||||||||||
|---|---|---|---|---|---|---|---|---|---|---|---|---|---|---|---|---|---|---|---|---|---|---|---|---|---|---|---|---|---|---|---|---|---|---|---|---|---|---|---|---|---|---|
| ||||||||||||||||||||||||||||||||||||||||||
|


Anchor
Example: Default Color and Multiplier Values
Here is a scene rendered with the default BRDFLight. These examples demonstrate how the material behaves in V-Ray, and how its parameters influence the overlook of the final results.
Transparency Texture On/OffAnchor Transparency Texture Transparency Texture
| Transparency Texture | |
| Transparency Texture |
This example shows the usage of an image in the Transparency Texture slot. Both renders have the Emit On Back Side function turned on as well.
| Section | ||||||||||||||||||||||||||||||||||||||
|---|---|---|---|---|---|---|---|---|---|---|---|---|---|---|---|---|---|---|---|---|---|---|---|---|---|---|---|---|---|---|---|---|---|---|---|---|---|---|
| Section | ||||||||||||||||||||||||||||||||||||||
| ||||||||||||||||||||||||||||||||||||||
|
...
|

Intensity: 10
Color: Blue
Override Control
...
| Section | |||||||||||||||
|---|---|---|---|---|---|---|---|---|---|---|---|---|---|---|---|
|

Attributes
...
The attributes from the following expandable menus are available for the Emissive material.
| Anchor | ||||
|---|---|---|---|---|
|
| Expand | ||||||
|---|---|---|---|---|---|---|
| ||||||
Translucency
|
| Expand | ||||||
|---|---|---|---|---|---|---|
| ||||||
Bump
|
| Expand | ||||||
|---|---|---|---|---|---|---|
| ||||||
Outline
|
| Expand | ||||||
|---|---|---|---|---|---|---|
| ||||||
Displacement
|
| Expand | ||||||
|---|---|---|---|---|---|---|
| ||||||
Raytrace Properties
|
| Expand | ||||||
|---|---|---|---|---|---|---|
| ||||||
Override
|
| Expand | ||||||
|---|---|---|---|---|---|---|
| ||||||
Material ID
|
Layers
...
The Layers available for the Emmisive material are as follows.
VRay Mtl
Emissive
Diffuse Coat
Reflective Coat
Flakes 2
Stochastic Flakes
...
Example: Higher Multipliers/2-Sided On and Off
| Section | |||||||||||||||||||||||||||||||||||||
|---|---|---|---|---|---|---|---|---|---|---|---|---|---|---|---|---|---|---|---|---|---|---|---|---|---|---|---|---|---|---|---|---|---|---|---|---|---|
| |||||||||||||||||||||||||||||||||||||
|
For all other material settings, see the Attributes section on Materials page.
Notes
...
| Fancy Bullets | ||
|---|---|---|
| ||
|