Page History
This page provides information about the Anima UI.
Introduction to the UI
...
| Section | |||||
|---|---|---|---|---|---|
|
...
|
...
|
...
|
...
|
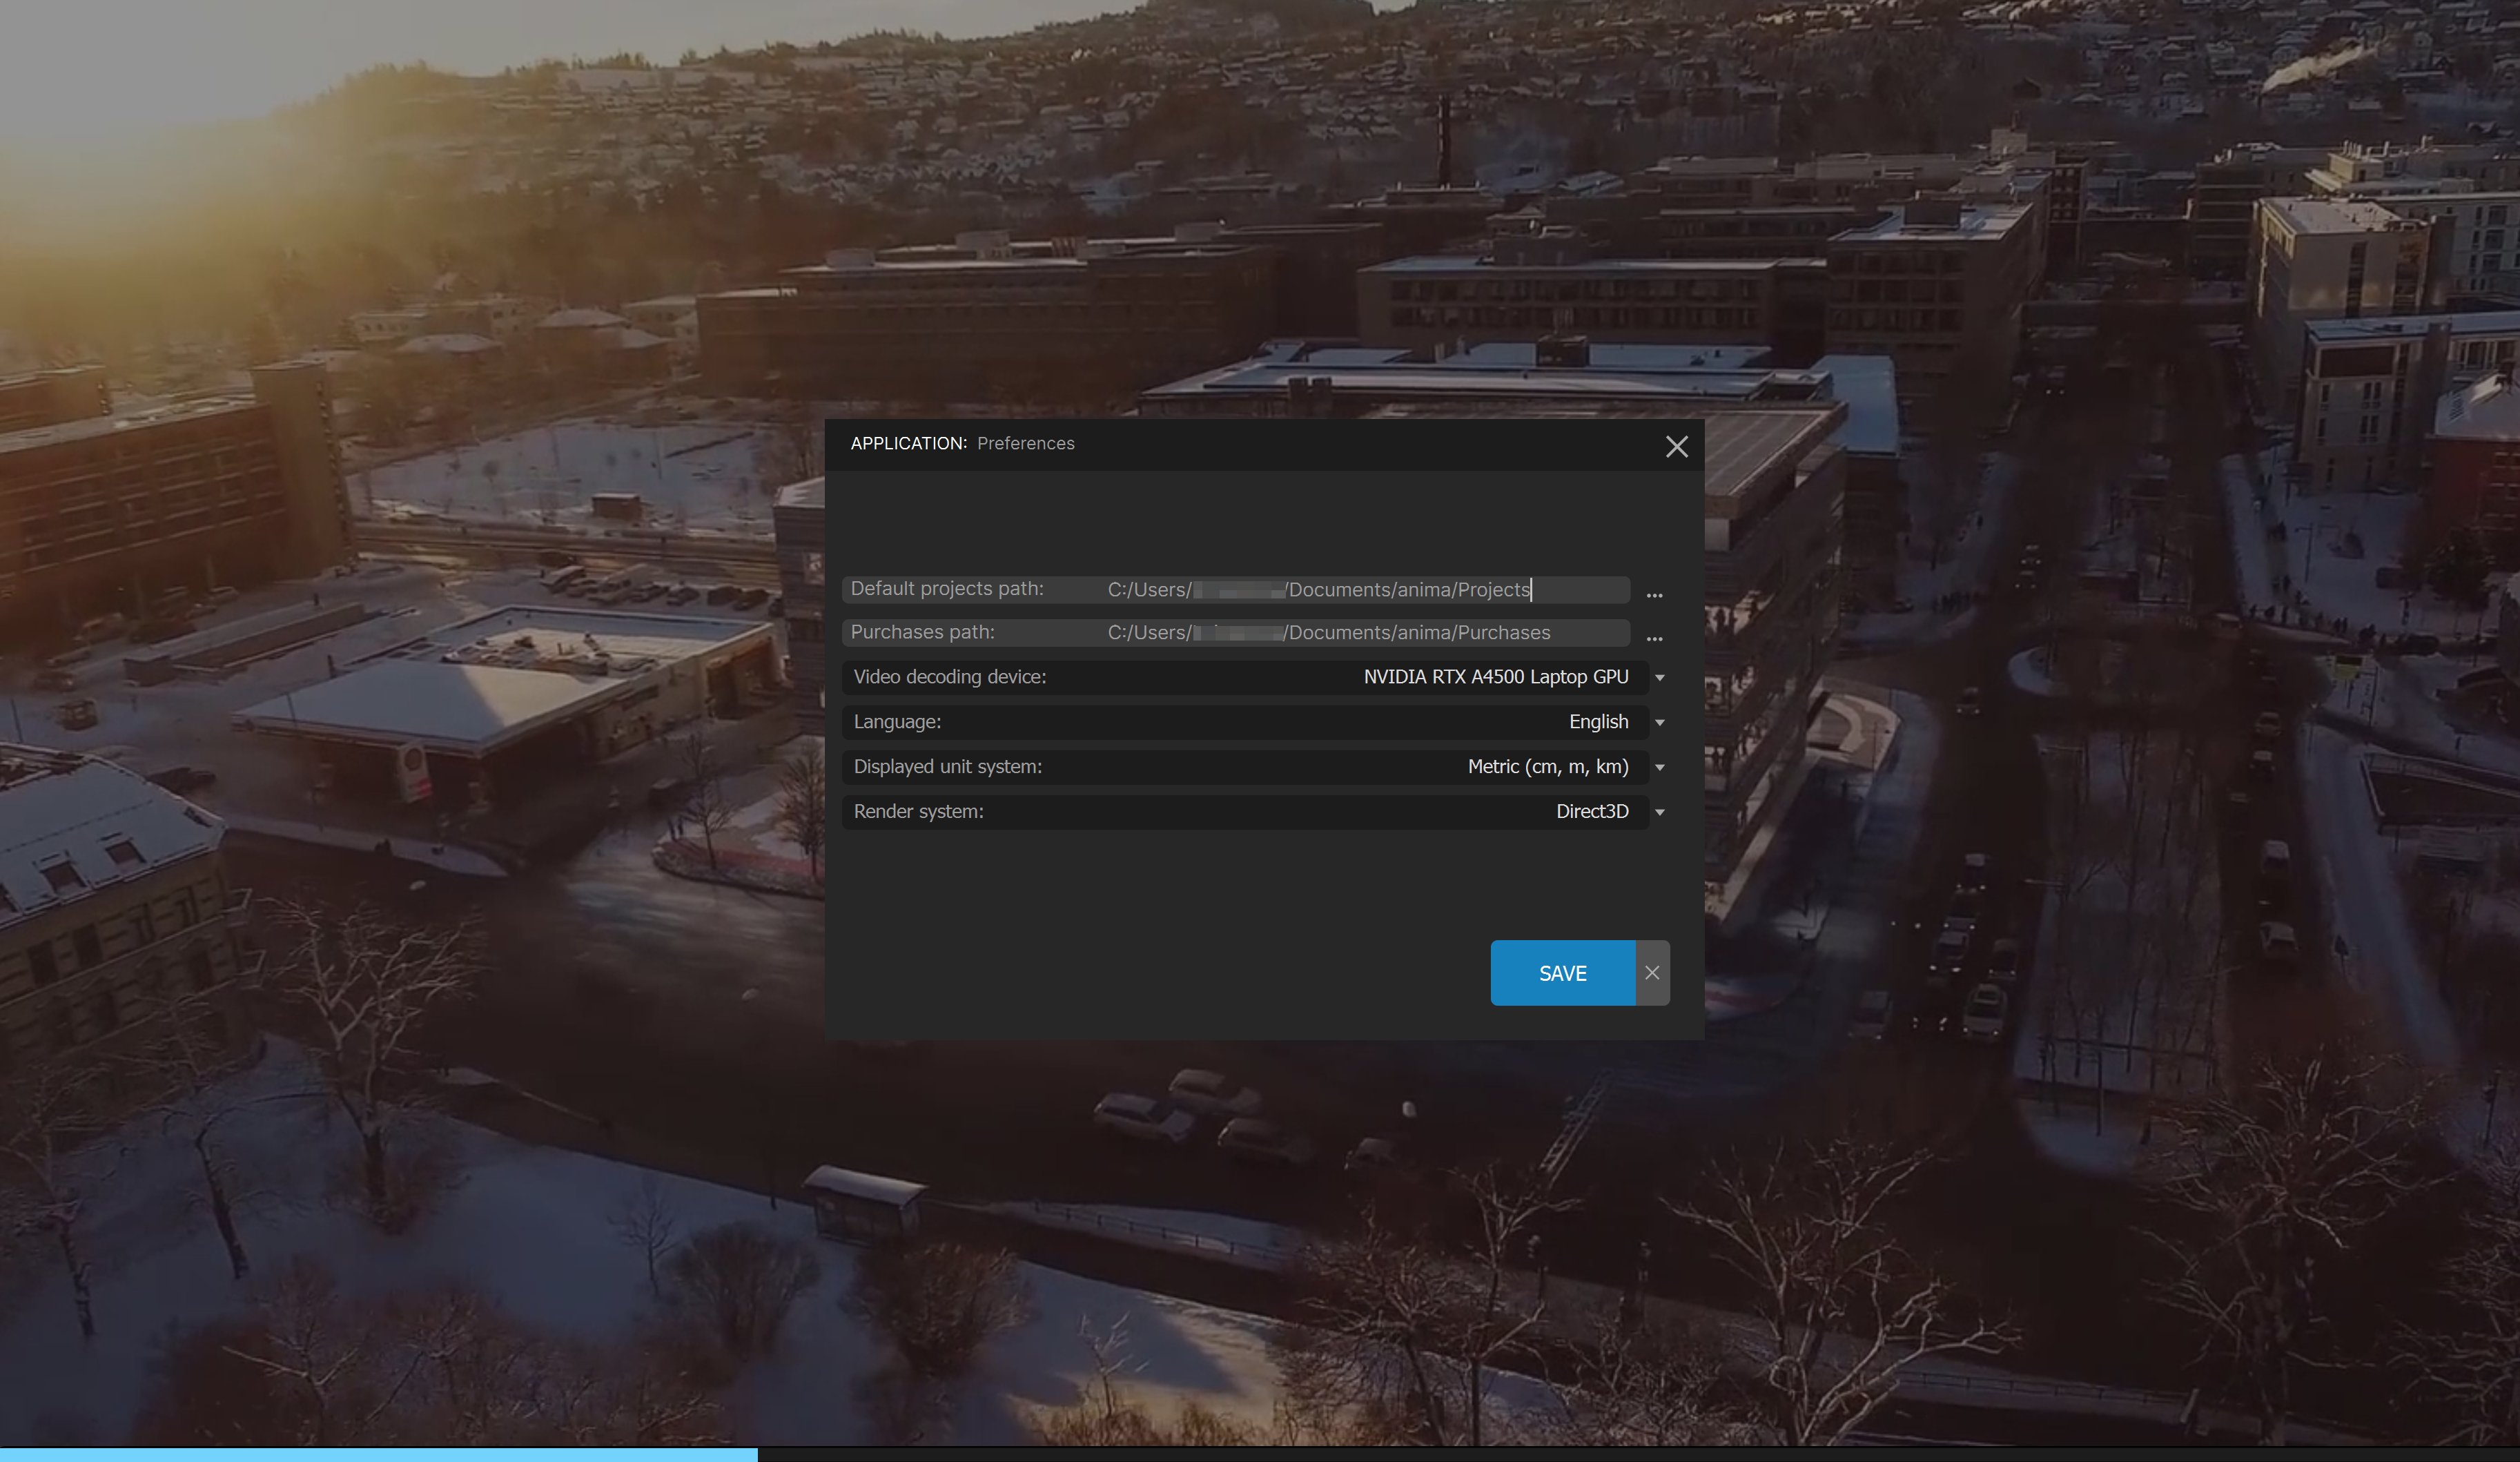
First boot: Preferences
...
| Section | |||||||||||
|---|---|---|---|---|---|---|---|---|---|---|---|
|
...
|
...
|
...
|
In a normal situation, this dialog should be shown only once, the first time you start anima® in the machine. However, you can also force it to appear again by using the “anima® Safe Mode” shortcut icon available in the Windows Start menu:
...
|
...
| Fancy Bullets | ||||||||||||||||||||||||||||||
|---|---|---|---|---|---|---|---|---|---|---|---|---|---|---|---|---|---|---|---|---|---|---|---|---|---|---|---|---|---|---|
| type | circle
|
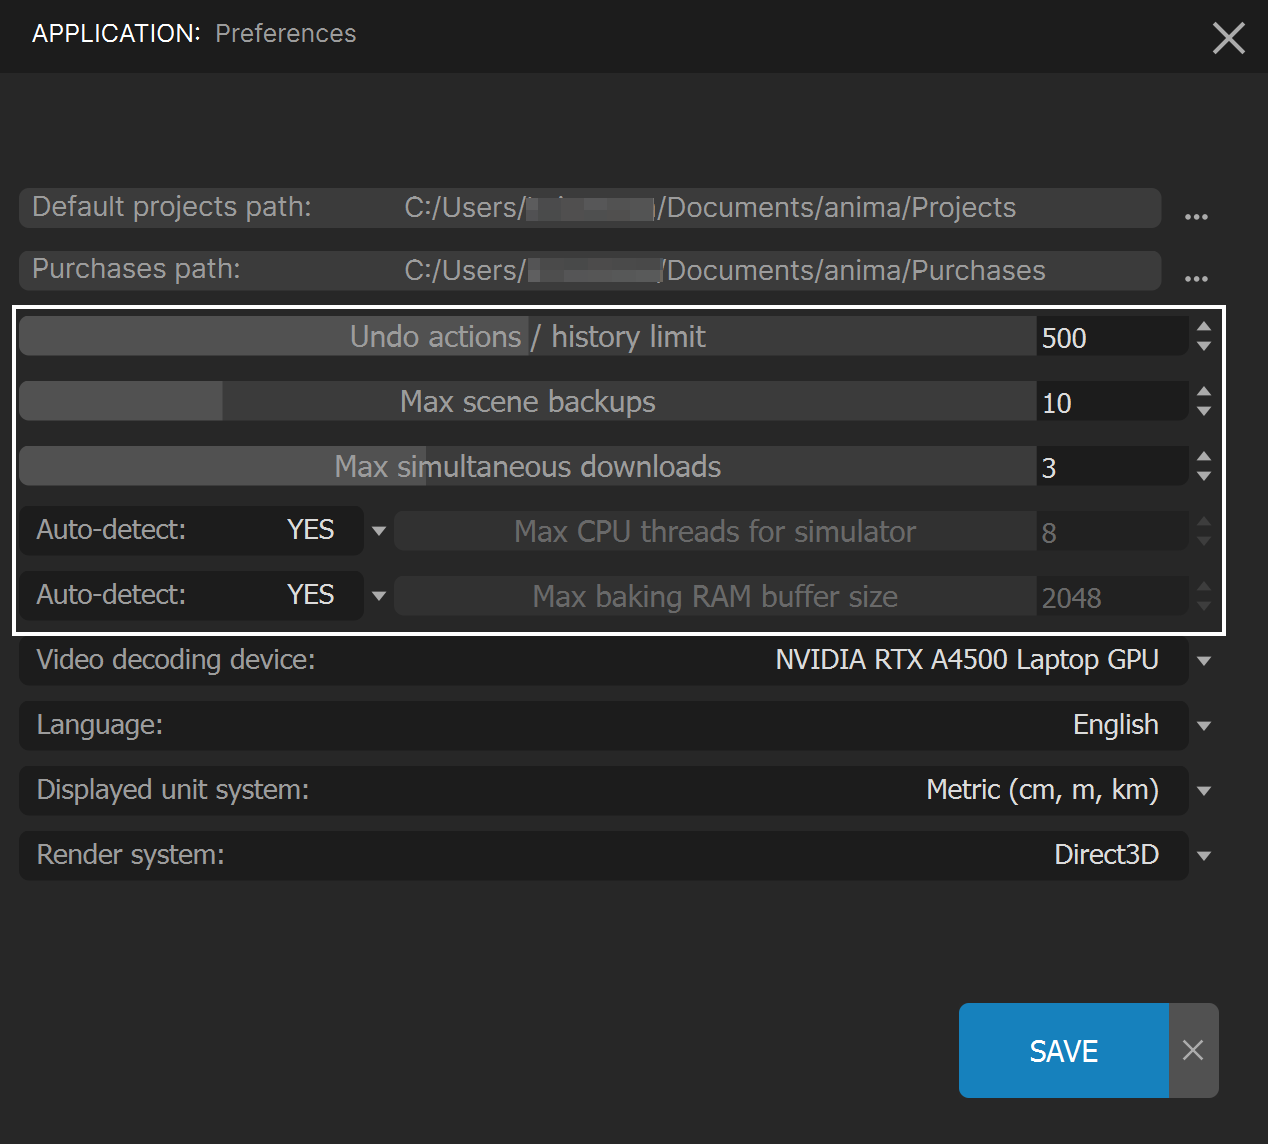
All these settings can be changed anytime from the complete version of the Preferences dialog available in anima® Menu > Preferences:
Which will show the following dialog with a few extra options:
| Fancy Bullets | ||
|---|---|---|
| ||
|
| UI Text Box | ||
|---|---|---|
| ||
If you don’t understand the need for some of those settings, don’t worry and bare with us, keep reading and you will understand them all soon. |
When all the options are defined, click the SAVE button to continue.
The Welcome Screen
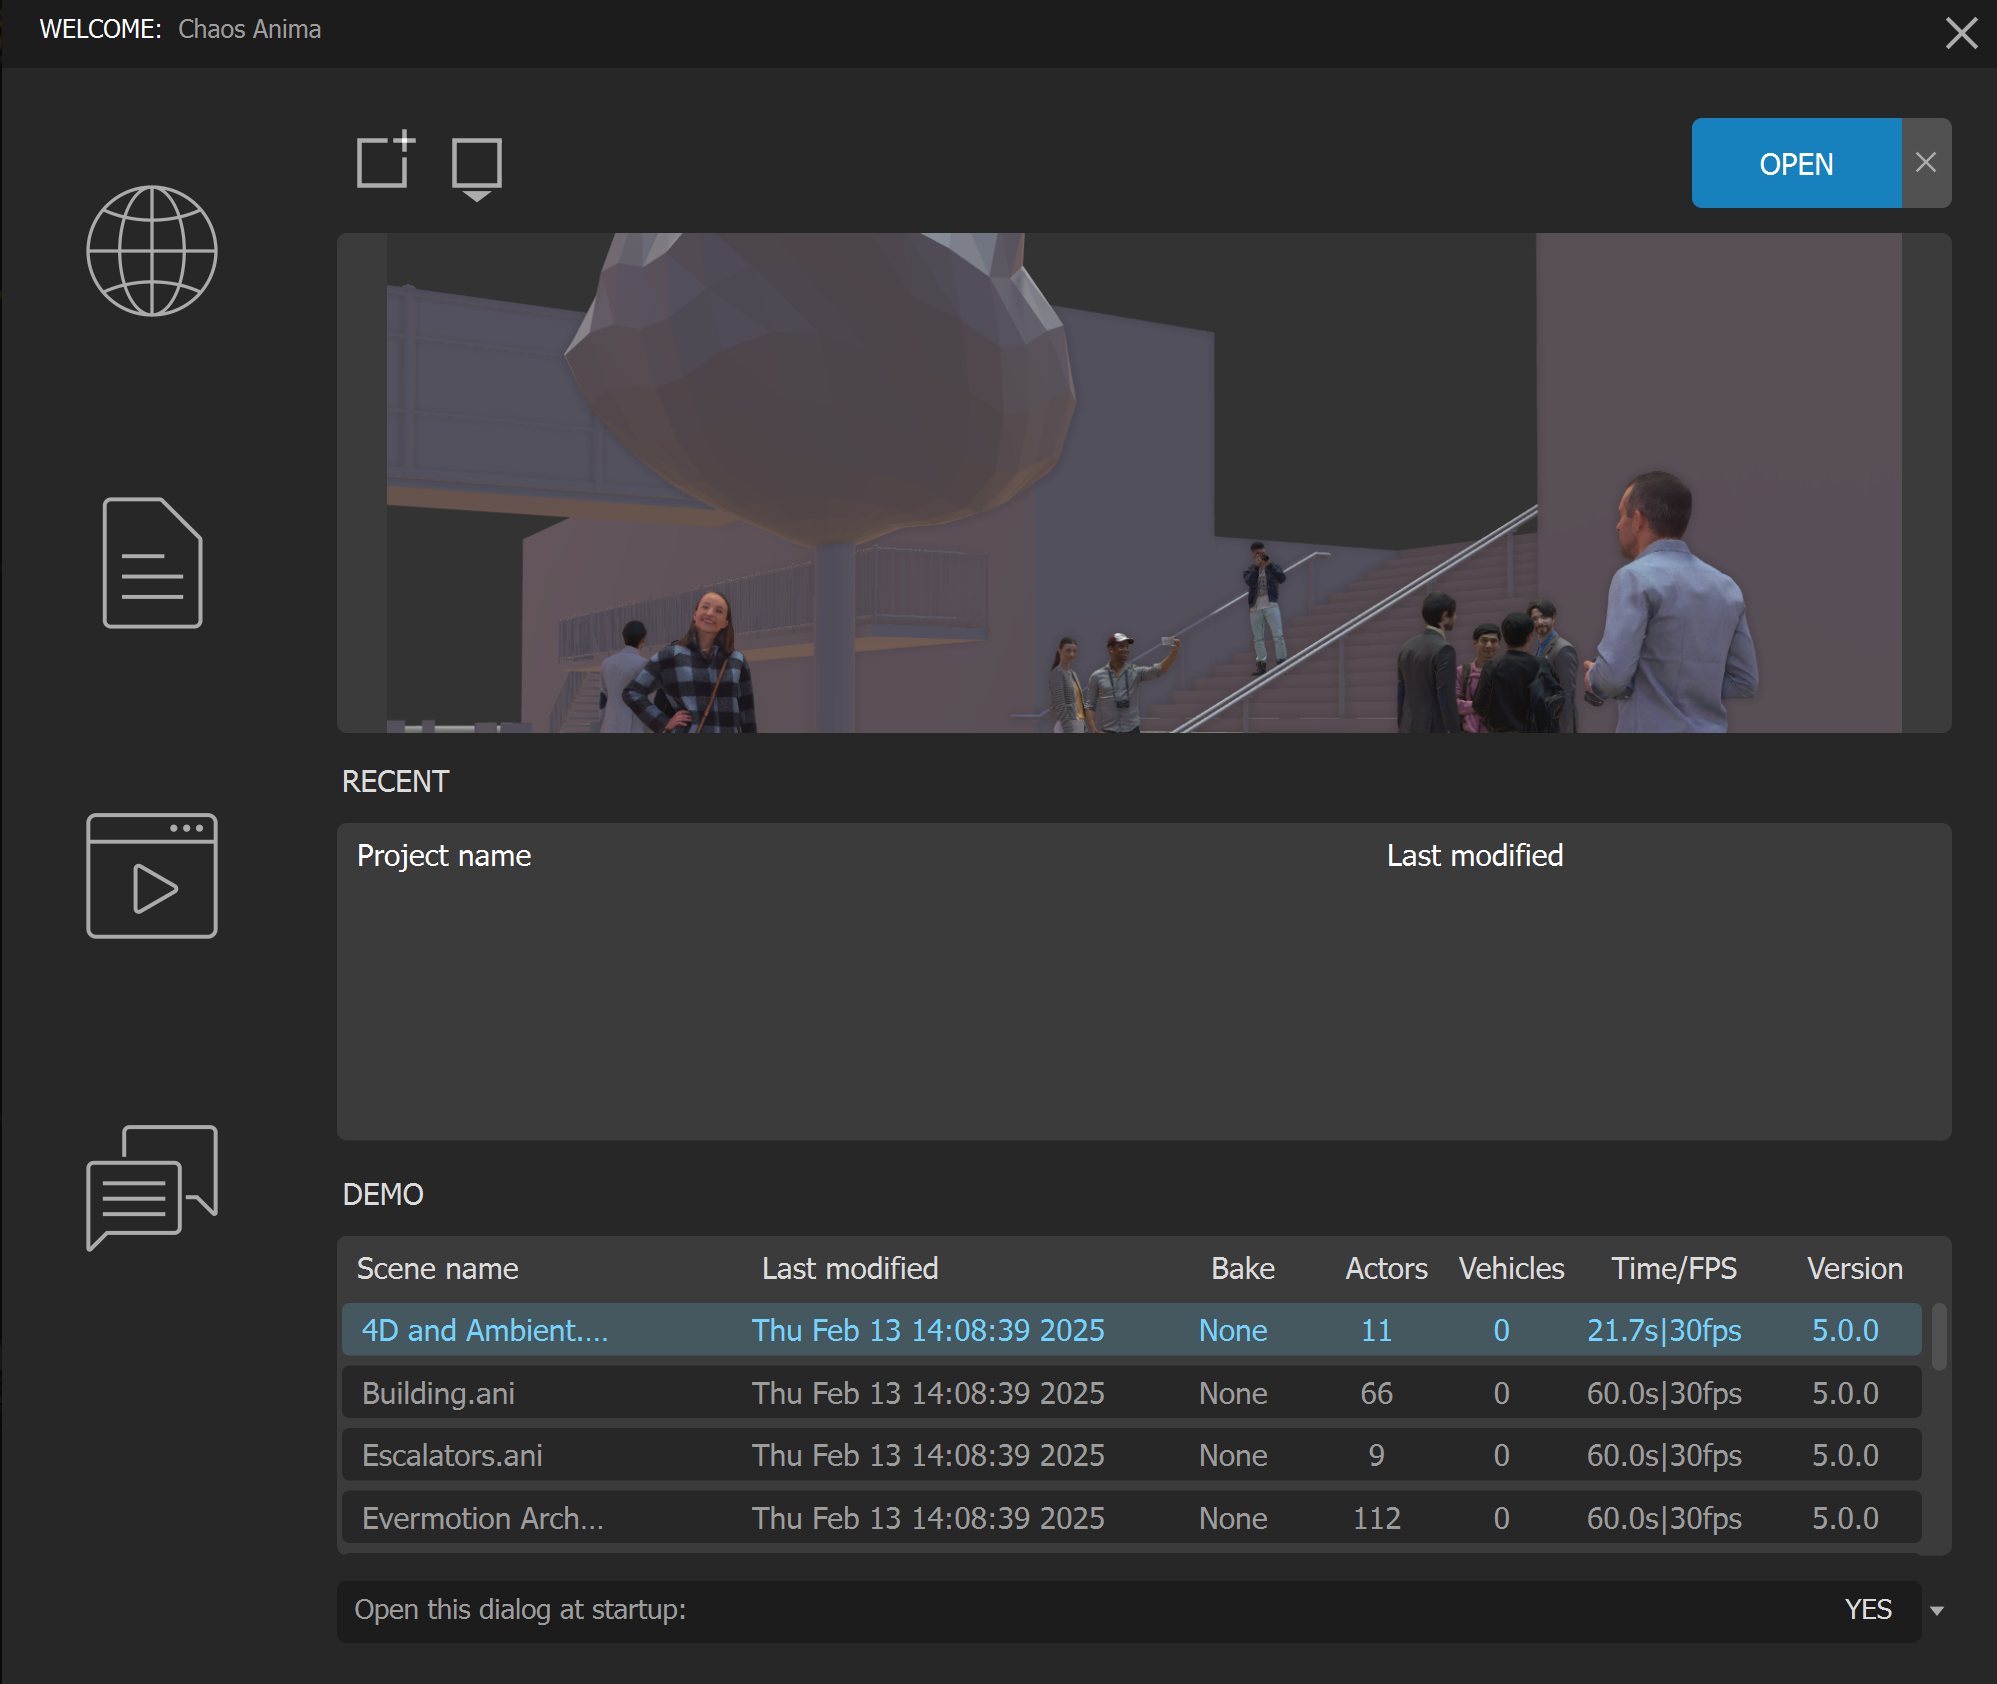
After the first boot, the first dialog that will always appear when anima® is launched is the Welcome Screen:
This window gives instant access to most of the things you will probably want to do when you start working.
In the center of the window (7), you will find a brief list of the projects that have been modified recently in your machine, being the most recent at the top of the list. At the upper center (5), you can see a preview of the last scene that was saved from that project. Above the preview, there are 4 shortcuts to quickly manage the projects: Create New (1), Browse (2), Open (3), and Close Window (4).
Below the recent projects, a list of the Demo files is displayed (8), which is handy if you want to check some of the examples provided with the installer.
On the left side, a column with 5 links is displayed to let you quickly access useful anima® resources that are available online: the AXYZ design website (9), this anima® documentation (10), the AXYZ design Youtube channel (11) where you will find a lot of sample videos and tutorials, the Frequently Asked Questions (12) and direct contact to our great Support Service (13) where we will be happy to give you any assistance you may need.
On the right side of the window (6), we will keep you updated with the latest news about anima® that we publish on the AXYZ design’s Blog.
At the bottom center (14), you can choose whether you want to see this Welcome Screen or not when anima® is started. If you choose to not show it automatically, you can always show it manually by going to anima® Menu > Help > Welcome screen:
This is the complete list of items described:
- Create a New Project
Create a new project. - Browse Project
Opens the browser to manually select the path of the project that you want to open (that is not in the recent projects list). - Open Selected Project
Opens the scene selected in the Project Scenes list. - Close Welcome Screen
Click to close the welcome screen. - Preview
Shows a preview of the scene selected in the Project Scenes list. These are generated by Anima automatically. - AXYZ News Blog
A quick view of the latest posts at the AXYZ Labs Blog. - Recent Projects
Lists the 5 most recently used projects. - Demo Scenes
Open any of those scenes to see sample files that show anima®‘s key features. - View Website
Click here to open the AXYZ Design web site. - Open Documentation
Click here to go to the anima® online documentation - View Video Tutorials
Click here to access anima® tutorials - FAQ
Click here to see frequently asked questions about anima®. - Contact Support.
If you have a question that’s not answered in our documentation, in the tutorials or in our Facebook User Group, click this button to contact our Customer Support service and open a ticket. - Open at Startup.
Choose whether you want the welcome screen to appear when anima® starts.
The Draw Mode Interface
The place to design, organize, and simulate your animations is the anima® Draw mode.
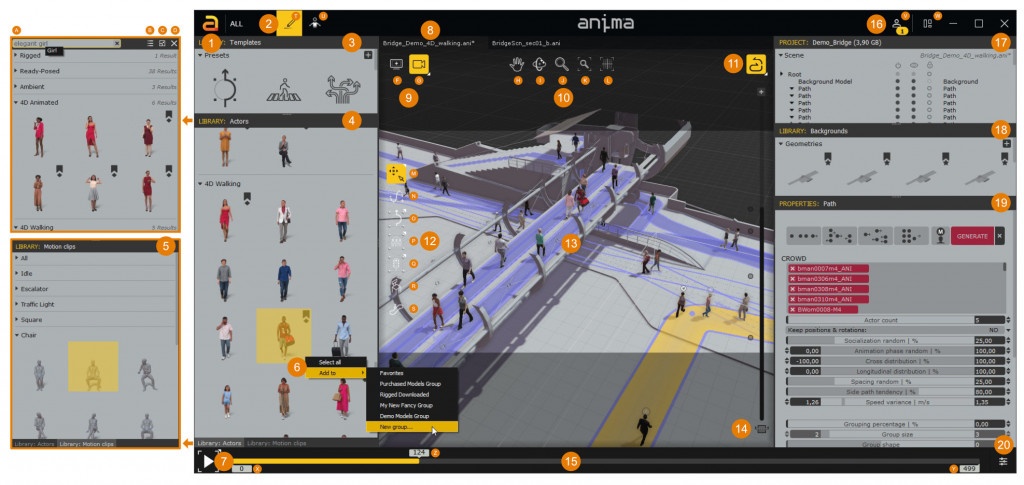
This mode is arranged into logical panels to help you focus on different aspects of your work such as selecting actors, drawing paths and areas, synchronizing the scene with your 3D app with alive™, applying motion clips, editing the properties of the nodes, or managing their hierarchy in the node tree.
...
|
...
| Section | |||||||||||||||
|---|---|---|---|---|---|---|---|---|---|---|---|---|---|---|---|
|
...
| Section | |||||||||||||||
|---|---|---|---|---|---|---|---|---|---|---|---|---|---|---|---|
|
...
| Section | ||||||||||||||||||||
|---|---|---|---|---|---|---|---|---|---|---|---|---|---|---|---|---|---|---|---|---|
|
The Welcome Screen
...
| Section | |||||||||||||||
|---|---|---|---|---|---|---|---|---|---|---|---|---|---|---|---|
|
...
This is the complete list of items described:
Create a New Project –Create a new project.
Browse Project –Opens the browser to manually select the path of the project that you want to open (that is not in the recent projects list).
Open Selected Project –Opens the scene selected in the Project Scenes list.
Close Welcome Screen –Click to close the welcome screen.
Preview –Shows a preview of the scene selected in the Project Scenes list. These are generated by Anima automatically.
Recent Projects –Lists the 5 most recently used projects.
Demo Scenes – Open any of those scenes to see sample files that show Anima‘s key features.
View Website – Click here to open the Chaos website.
Open Documentation – Click here to go to the Anima online documentation.
View Video Tutorials – Click here to access Anima tutorials.
FAQ –Click here to see frequently asked questions about Anima.
Contact Support –If you have a question that’s not answered in our documentation, in the tutorials or in our Facebook User Group, click this button to contact our Support service and open a ticket.
Open at Startup –Choose whether you want the welcome screen to appear when Anima starts.
The Draw Mode Interface
...
| Section | |||||||||||||||
|---|---|---|---|---|---|---|---|---|---|---|---|---|---|---|---|
|
...
| Section | |||||||||||||||
|---|---|---|---|---|---|---|---|---|---|---|---|---|---|---|---|
|
...
| Section | |||||||||||||||
|---|---|---|---|---|---|---|---|---|---|---|---|---|---|---|---|
|
...
| Section | |||||||||||||||
|---|---|---|---|---|---|---|---|---|---|---|---|---|---|---|---|
|
...
| Section | |||||||||||||||
|---|---|---|---|---|---|---|---|---|---|---|---|---|---|---|---|
|
...
Playback controls – Use these controls to play back animations. There are three playback modes: Simulate and play (showing the tool nodes), Simulate and play preview (hiding the tool nodes), and Generate Preview Video (*.avi).
...
| Section | |||||||||||||||
|---|---|---|---|---|---|---|---|---|---|---|---|---|---|---|---|
|
...
| Section | |||||||||||||||
|---|---|---|---|---|---|---|---|---|---|---|---|---|---|---|---|
|
...
| Section | |||||||||||||||
|---|---|---|---|---|---|---|---|---|---|---|---|---|---|---|---|
|
...
| Section | |||||||||||||||
|---|---|---|---|---|---|---|---|---|---|---|---|---|---|---|---|
|
...
| Section | |||||||||||||||
|---|---|---|---|---|---|---|---|---|---|---|---|---|---|---|---|
|
...
| Section | |||||||||||||||
|---|---|---|---|---|---|---|---|---|---|---|---|---|---|---|---|
|
...
| Section | |||||||||||||||
|---|---|---|---|---|---|---|---|---|---|---|---|---|---|---|---|
|
...
Timeline bar – Use this bar to set the current frame or the animation range.
...
| Section | |||||||||||||||
|---|---|---|---|---|---|---|---|---|---|---|---|---|---|---|---|
|
...
| Section | |||||||||||||||
|---|---|---|---|---|---|---|---|---|---|---|---|---|---|---|---|
|
...
| Section | |||||
|---|---|---|---|---|---|
|
...
|
...
|
...
| Section | |||||
|---|---|---|---|---|---|
|
...
|
...
| Section | |||||
|---|---|---|---|---|---|
|
...
|
...
|
...
| Section | |||||
|---|---|---|---|---|---|
|
...
|
The Edit Mode Interface
...
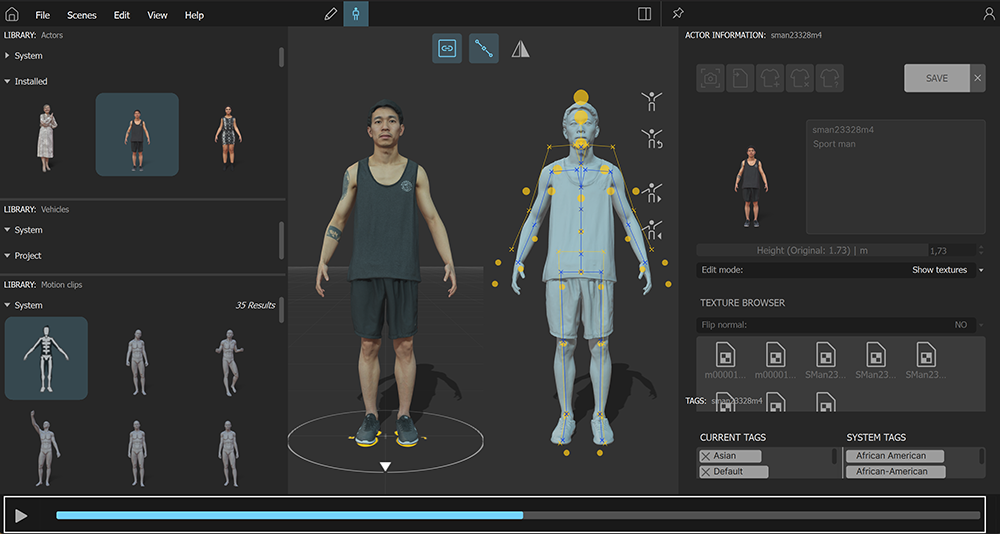
The Edit Mode is the place to adjust, fine-tune and preview the animations of the actors. It is also the place to import new models and motion clips from external files in FBX format.
Notice that not all the actors can be modified. For example, the 4D models use cutting-edge technology with animated textures and dynamic topology that is simply too complex to be adjusted. Also, the models from the subscription service cannot be modified yet (they will be in the mid-term future, we are already working on that)the 4D models use cutting-edge technology with animated textures and dynamic topology that is simply too complex to be adjusted.
The model types that can be duplicated and modified are the Posed (static) and the Rigged (animable), either purchased from our website or imported in FBX from third-party providers.
...
The base pose of the Motion Clips can also be adjusted, both in the ones provided in the default library and in the ones that you might have imported from third-party providers. It is also possible to edit the TAGs and Categories of the motion clips to organize them as you wish.
| Section | |||||
|---|---|---|---|---|---|
|
...
|
...
|
...
|
...
|
...
| Section | |||||
|---|---|---|---|---|---|
|
...
|
...
|
...
| Section | |||||
|---|---|---|---|---|---|
|
...
|
...
|
...
| Section | |||||||||||||||
|---|---|---|---|---|---|---|---|---|---|---|---|---|---|---|---|
|
...
| Section | |||||
|---|---|---|---|---|---|
|
...
|
...
|
...
|
...
|
...
| Section | |||||
|---|---|---|---|---|---|
|
...
|
...
|
...
|
...
|
...
|
...
|
...
|
...
|
...
|
...
|
...
|
...
|
...
| Section | |||||
|---|---|---|---|---|---|
|
...
...
|
...
|
...
| Section | |||||||||||||||
|---|---|---|---|---|---|---|---|---|---|---|---|---|---|---|---|
|
...
| Section | |||||||||||||||
|---|---|---|---|---|---|---|---|---|---|---|---|---|---|---|---|
|
...
Playback
Plays the motion clip and the character selected.
Customizing the Workspace
...
The anima® interface has been designed Anima interface is designed to be extremely flexible. All the panels can be freely moved around, detached, and docked again in a different position, to let you set up the window layout that better fits into your workflow.
...
| Multimedia | ||||||
|---|---|---|---|---|---|---|
|
To Show / Hide Panels
...
| Section | |||||
|---|---|---|---|---|---|
|
...
|
...
|
...
|
...
|
...
To Re-arrange, Re-size, and Tear Off Panels
...
| Section | ||||||||||||
|---|---|---|---|---|---|---|---|---|---|---|---|---|
|
...
|
To Create Tabbed Panels
...
| Section | |||||
|---|---|---|---|---|---|
|
...
|
...
To Toggle Between Thumbnail and List Views
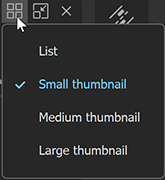
...
Click the icon for thumbnails for lists and the icon for thumbnails.more options, such as lists.
To Reset the Workspace
...
| Section | |||||
|---|---|---|---|---|---|
|
...
|


