Versions Compared

Key

  • This line was added.
  • This line was removed.
  • Formatting was changed.

...

Creates a layer. Multiple layers of the same type can be added.

Folder - Allows grouping multiple layers in folders. This is only available when the Source layer is set to Composite;
Background – Adds a background Vignette – Adds a vignetting effect to the image.
ICC Profile – The ICC correction allows you to apply an ICC profile to the image, so that (for example) it matches the appearance of the image in Adobe PhotoShop. 
Filmic Tonemap – Contains different types of mapping curves and gamma corrections. Also allows selection of a color space.
Lookup Table - Allows loading a LUT file for color transformations;
Curves – Adds a Curves color correction layer;
Color Balance - Adds a Color Balance color correction layer;
Hue/Saturation - Adds a Hue/Saturation color correction layer;
White Balance - Adds a White Balance color correction layer;
Render element - Selects a render element from your image that you can use in compositing. This is only available when the Source layer is set to CompositeExposure - Adds an Exposure color correction layer;
Constant - Adds a solid color that can be used to achieve an effect on another layer (for example to multiply by the constant);
Exposure - Adds an Exposure color correction layer;
White Balance - Adds a White Balance color correction layer;
Hue/Saturation - Adds a Hue/Saturation color correction layer;
Color Balance - Adds a Color Balance color correction layer;
Curves – Adds a Curves color correction layer;
Lookup Table - Allows loading a LUT file for color transformations;
Filmic Tonemap – Contains different types of mapping curves and gamma corrections. Also allows selection of a color space.
Integer mask elementRender element - Selects a render element from your image that you can use in compositing. This is only available when the Source layer is set to Composite;
BackgroundAdds a background color correction layer;
Integer mask – Mask is used with integer render elements like VRayRenderID, VRayObjectID, and VRayMtlID Render Elements.
MultiMatte mask element – Mask – Mask is based on the MultiMatte Render Element.
Image alpha maskThe Image Alpha Mask is based on the MultiMatte Render Elementrendered Alpha channel.
Cryptomatte mask element –  Mask 
is based on the VRayCryptyomatte Render Element.
Proportion Guide – Adds a grid proportion guide layer.

Deletes the selected layer(s).

Saves a layer tree preset.

Loads a layer tree preset.

Quick access to custom layer presets. You must set the path to it in the VFB Settings.

Undo various actions related to layers, such as create, delete, reorder, or modify a layer.

Redo various actions related to layers, such as create, delete, reorder, or modify a layer.

...

Section
Column
width60%

LightMix needs to be added to the render elements for this mode to be available. Alternatively, LightMix can be added inside the VFB. Click on the Add LightMix to the scene option. Start a new render to apply the changes.

When the Source is set to LightMix, you can enable/disable lights and adjust light intensity and color during and after the render. The modifications can be saved as light mix presets and reused. Start a new render and VRayLightMix automatically creates Environment and Self Illumination render elements. See the LightMix page and the VFB Light Mix courseware page for more information and examples.


Reset – Resets all changes made to default values.

Save – Saves the changes as light mix preset.

Load – Loads a light mix preset.

To scene – Applies the current VRayLightMix changes to the scene. This sends all changes to colors/intensities back to the scene lights.

To Composite – Sends the Light Selects from LightMix to Composite for additional post adjustments.

Recent – Shows a list of recent light mix presets.

Checkbox – Enables/Disables the selected light.

Multiplier – Specifies an intensity multiplier.

Color Slot – Specifies a color for the selected light.

Column
width5%


Column
width35%


Vignette

...

...

Section
Column
width60%

This layer adds a vignetting effect to the image. Its settings can be controlled through the layer's parameters or directly from the overlay handles visible in the VFB.

Preview as mask – Opens the vignette mask for the vignette effect, so you can preview it.

Size – Determines how much of the image's edge is affected. The size is relative to the image resolution.

Feather – Controls how defined is the edge of the vignette. Smaller values make the transition sharp, while larger values make the transition effect soft.

Rotation – Rotates the vignette effect. Increasing this value rotates the effect counterclockwise.

Inverted – Inverts the vignette effect.

Smoothness – Controls how smooth the outer edge of the Feather effect is.

Aspect ratio – This option is available when Match image aspect option is disabled. It gives a manual control over the aspect ratio.

Match image aspect – This option is enabled by default. It matches the currently loaded image aspect ratio.

Horizontal center offset – Offsets the center of the vignette effect horizontally.

Vertical center offset – Offsets the center of the vignette effect vertically.

Color – Sets a color for the vignette effect.

Show handles – Controls the preview of the overlay handles.

Never – The handles are not displayed.
Auto – Displays the handles only upon image hover.
Always – Displays the handles at all times.

Column
width5%


Column
width35%

...

Section
Column
width60%

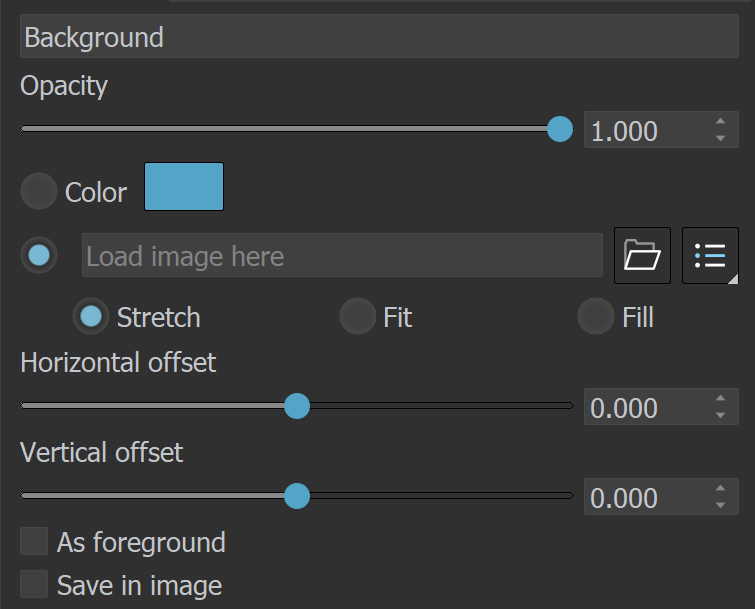
This layer allows you add a background to your rendering.

Opacity – Controls the layer opacity.

Color – Picks a solid color to be used as background.

File – Loads a file that is going to be used as a background. Image sequences can be loaded as well using the <frameNum> tag.

Recent – Lists recently used files.

Stretch Controls the aspect ratio of the image by stretching the image to fit the VFB.

Fit Keeps the aspect ratio of the image. Enlarges or shrinks the VFB to fit the image.

Fill – Keeps the aspect ratio of the image and cuts some parts of the picture to fill the VFB.

Horizontal offset – Controls the background image position by the X axis.

Vertical offset – Controls the background image position by the Y axis.

As foreground – When enabled, the image loaded in the field above is used as a foreground. This means that the image is on top of the rendering and you are able to see the rendering only if the image has an alpha channel.

Save in image – When enabled, saves the layer to the image.

Color transformation – This dropdown allows display corrections to be applied to the Background layer independently.

Auto – Recognizes what the desired transformation would be based on the image suffix (_srgb, _lin_srgb, _acescg...) and sets those settings automatically.

Manual – Allows manual setup of the color transformation options. The options can be left at Auto and be determined automatically by V-Ray. The options can be set to None to None and apply no transformations.

RGB color space – Choose which color space to use for the color transformations. sRGB is the color space for most monitors and computer displays. ACEScg allows for greater range of color transformations in post. It has a wider gamut of colors than the sRGB linear gamut.

Transfer function – Alters the pixel values to a new range. Gamma 2.2 is the standard for most monitors.

OCIO – Allows an Input color space to be selected when an OCIO profile is already loaded. OCIO profiles can be loaded either through the Display Correction layer or through the OCIO environment variable.

Input color space – Determines the input color space for the background image; normally this is a linear color space as V-Ray internally works in that space.

UI Text Box
typetip

The Background image is not visible when a V-Ray Dome Light with Affect alpha channel enabled is used in the scene.

Column
width5%

Column
width35%

MAYA2024_VRay6.2_Layers_Background_Params


...