![]()
Page History
...
| UI Text Box | ||
|---|---|---|
| ||
UI Path: ||Select Fire Smoke Simulator | FireSmokeSim|| > Modify panel > Dynamics rollout |
Parameters
...
General

...
| Section | |||||||||||||||||||||||||||||||||||||||||||||||||||||||||||||||||||||||||||||||||
|---|---|---|---|---|---|---|---|---|---|---|---|---|---|---|---|---|---|---|---|---|---|---|---|---|---|---|---|---|---|---|---|---|---|---|---|---|---|---|---|---|---|---|---|---|---|---|---|---|---|---|---|---|---|---|---|---|---|---|---|---|---|---|---|---|---|---|---|---|---|---|---|---|---|---|---|---|---|---|---|---|---|
|

| Anchor | ||||
|---|---|---|---|---|
|
Vorticity
...
| Section | |
|---|---|
|
...
|
...
|

| Anchor | ||||
|---|---|---|---|---|
|
| Section | ||||||||||||||||||||||||||||||||
|---|---|---|---|---|---|---|---|---|---|---|---|---|---|---|---|---|---|---|---|---|---|---|---|---|---|---|---|---|---|---|---|---|
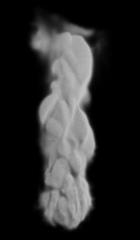
Example: Vorticity
|


...
| Div | ||||
|---|---|---|---|---|
| ||||
These options add random fluctuations in the fluid's velocity for each grid voxel. It works in combination with the Vorticity parameters. |
...
| Section | ||||
|---|---|---|---|---|
|
...
|
...
|

Fluidity (Conservation)
...
| Div | ||||
|---|---|---|---|---|
| ||||
The conservation process gives the fluid its characteristic swirling motion. It transforms straight-line movement of the fluid into swirling vortices. The higher the strength of the conservation, the farther the motion forces will be propagated throughout the container, so a movement in one point will cause the fluid to start moving at a distance too. The conservation directs smoke and fire into realistic shapes and helps liquids to support their own weight when at rest, and to fill up a volume they are poured into. |
| UI Text Box | ||
|---|---|---|
| ||
Internally, the conservation updates the directions and magnitudes of the velocities of each cell in the grid, preparing them for the Advection step when the content will be moved between cells. Basically it tries to equalize the velocities coming in and going out from each cell, and does this in many passes, getting closer to the perfect equilibrium. The number of passes is the conservation strength (quality). In nature, conservation has an infinite strength and is always perfect. In Phoenix, the better the quality of the conservation is, the farther the movement from one point will be propagated, making the simulation more realistic, but at the expense of longer simulation time for each frame. There are a number of conservation methods in Phoenix that you can choose between, depending on the type of your simulation. Each of them comes with pros and cons for the given situation. |
...
| Section | |
|---|---|
|
...
|
...
|

| Anchor | ||||
|---|---|---|---|---|
|
| Section | ||||||||||||||||||||||||||||||||
|---|---|---|---|---|---|---|---|---|---|---|---|---|---|---|---|---|---|---|---|---|---|---|---|---|---|---|---|---|---|---|---|---|
Example: Conservation Method Types
|


...
| Section | ||||||||||||||||||||||||||||||||
|---|---|---|---|---|---|---|---|---|---|---|---|---|---|---|---|---|---|---|---|---|---|---|---|---|---|---|---|---|---|---|---|---|
Example: Conservation Quality
|


...
| UI Text Box | ||
|---|---|---|
| ||
Phoenix may perform advection more than once per frame, or once in a number of frames, depending on the Steps per frame (SPF) parameter. To get the best detail for smoke and fire, it is best to keep the SPF low. On the other hand a higher SPF works better to keep liquids steady and smooth, and is better for quickly moving fluids in general. |
| Section |
|---|
...
|
...
|
...
|
...
...
|
...
|
...
|
...
|
...
|
...
|
...
|
...
|
| Anchor | ||||
|---|---|---|---|---|
|
| Section | |||||||||||||||||||||||||||
|---|---|---|---|---|---|---|---|---|---|---|---|---|---|---|---|---|---|---|---|---|---|---|---|---|---|---|---|
Example: Advection Method Types
|


| Anchor | ||||
|---|---|---|---|---|
|
| Section | ||||||||||||||||||||||||||||||||
|---|---|---|---|---|---|---|---|---|---|---|---|---|---|---|---|---|---|---|---|---|---|---|---|---|---|---|---|---|---|---|---|---|
Example: Steps Per Frame (SPF)
|


Active Bodies
| UI Text Box | ||
|---|---|---|
| ||
Interaction between Active Bodies and the Phoenix Fire/Smoke Simulator is not supported yet. |
| Section |
|---|
|

|
|

| Anchor | ||||
|---|---|---|---|---|
|
Texture UVW
| UI Text Box | ||
|---|---|---|
| ||
The main purpose of the Texture UVW feature is to provide dynamic UVW coordinates for texture mapping that follow the simulation. If such simulated texture coordinates are not present for mapping, textures assigned to your simulation will appear static, with the simulated content moving through the image. This undesired behavior is often referred to as 'texture swimming'. UVW coordinates are generated by simulating an additional Texture UVW Grid Channel which has to be enabled under the Output roll-out for the settings below to have any effect. The custom UVW texture coordinates can be used for advanced render-time effects, such as recoloring of mixing fluids, modifying the opacity or fire intensity with a naturally moving texture, or natural movement of displacement over fire/smoke and liquid surfaces. Some examples uses are:
The Texture UVW channel values represent the UVW coordinates of each Cell in the Simulator, with a range of [ 0 - 1 ]. The channel is initialized when a simulation is started in one of two ways:
|
| Section | |
|---|---|
|

|
|
|
|
|
|
|
|
|
|
|

| Anchor | ||||
|---|---|---|---|---|
|
| Section | |||||||||||||||||
|---|---|---|---|---|---|---|---|---|---|---|---|---|---|---|---|---|---|
Example: Interpolation
|
| Anchor | ||||
|---|---|---|---|---|
|
| Section | |||||||||||||||||
|---|---|---|---|---|---|---|---|---|---|---|---|---|---|---|---|---|---|
Example: Interpolation Step
|