This page provides details on the V-Ray for Unreal Render Settings.
Overview
When the Settings button is pressed, the V-Ray Settings tab pops up. It provides access to all options available in V-Ray for Unreal.
Common
- Interactive - Toggles between interactive and production rendering. Features such as Light cache and on-demand mipmapping are not supported in interactive mode.
- Lock Render Camera/View – When enabled, locks the render camera from Render from Camera/View .
- Render from Camera/View – Specifies the view to render from when the V-Ray render button is clicked.
- Lock Image Aspect – When enabled, locks the X value and scales the Y according to the viewport size.
- Resolution – Sets the output resolution for rendering.
- Export VRScene – Enables the export of a .vrscene file when the V-Ray render button is clicked. The .vrscene file is saved in <Unreal_install_path>\UE_4.XX\Engine\Plugins\VRayForUnreal\Content.
- Compress – Compresses geometric information when Export VRScene is enabled, thus making the resulting .vrscene file is smaller.

V-Ray
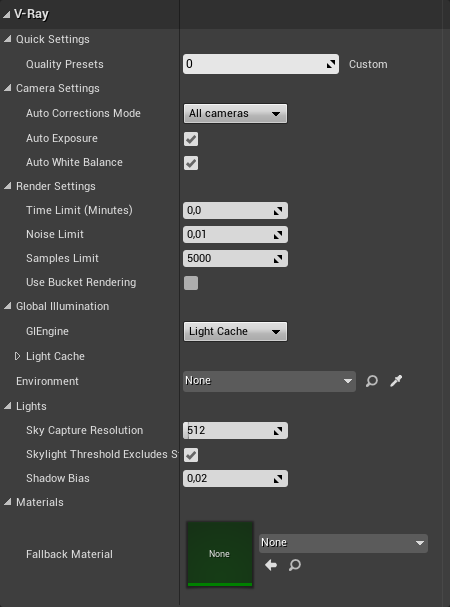
- Render Settings
- Time Limit (Minutes) – Specifies the maximum time (in minutes) for refining the image.
- Noise Limit – A threshold that determines when to stop refining a pixel. Higher values allow more noise in the image, but the render is faster. Lower values help reduce the noise, but take more time to render. A value of 0.0 traces the entire image unconditionally.
- Sample Limit – Specifies the maximum number of samples per pixel for refining the image. V-Ray performs adaptive sampling on the image, trying to put more samples into areas with more noise.
- Global Illumination
- GI Engine – Specifies the type of secondary engine. Note that Brute force is always used as a primary engine.
- Brute Force
- GI Depth – The number of bounces for indirect illumination.
- Light Cache
- Subdivs – Determines how many paths are traced from the camera. The actual number of paths is the square of the subdivs (the default 500 subdivs mean that 250,000 paths will be traced from the camera).
- Sample Size – Controls the size of the individual light cache samples.
- Retrace – Enables retracing of GI near corners. This helps prevent light leaks and flickering. The value specifies the extent to which GI near corners is retraced instead of being read from the light cache. A value of 0.0 disables retracing. A value of 2.0 is good for still images. Higher values will result in more rays traces at render time.
- Render Elements
- Denoiser – A render element that progressively applies a denoising operation to the image. The denoising operation detects areas where noise is present and smooths them out.
- Environment – Specifies which VRaySettingsEnvironment blueprint will be used at render time for environment overrides.
Performance
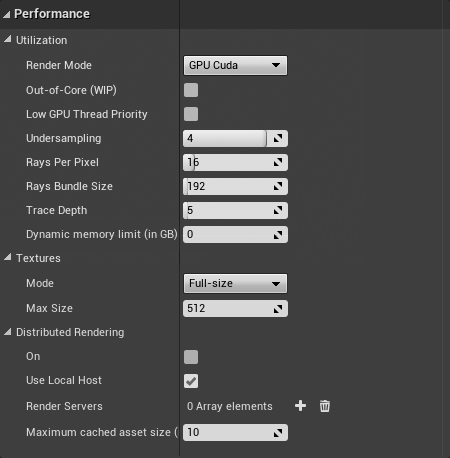
- Utilization
- Low GPU Thread Priority – When enabled, V-Ray will try to lessen the load on GPUs working on displaying graphics to the monitor(s). This frees more resources to complete other processes and tasks for the OS. This is done by internally using a lower value for Ray bundle size for those GPUs with attached displays (Rays per pixel is still the same for all GPUs). This can affect the overall performance, and the render speed might be reduced. It is recommended to utilize a separate GPU for the display, if possible.
- Rays Per Pixel – The number of rays that are traced for each pixel during one image pass. The greater the value, the smoother the picture from the very beginning of the rendering with GI, but interactivity might be significantly diminished. Increasing this value also reduces the amount of data transferred from the render servers back to the client machine.
- Rays Bundle Size – Controls the number of rays that are sent to the V-Ray render servers for processing. When using distributed rendering, smaller sizes cause more frequent client-server communication with smaller network packets, thus decreasing the speed of the renderer but increasing the interactivity. Conversely, larger values increase the render speed, but decrease interactivity. Note that this number is not the exact amount of rays, but is proportional to it. It is not recommended to increase this value beyond 512.
- Trace Depth – The maximum number of bounces that will be computed for reflections and refractions. The individual material reflection/refraction depth settings are still considered, as long as they don't exceed the value specified here.
- Textures
- Mode – Determines how texture resolution and size will be handled to help optimize memory usage.
- Full-size – Textures are loaded at their original size.
- Resize – Adjusts the size of high-resolution textures to a smaller resolution in order to optimize render performance. The GPU engine will load as much texture tiles on the GPU as it can, then swap the ones that are needed between GPU RAM and CPU RAM.
- On-demand – Instead of loading all the texture files at their default resolution (original or resized), V-Ray will load the textures as needed and will automatically create mip-map tiles for them (regardless of their texture type). As a result, the GPU memory consumption could be decreased; textures that are not visible will not be loaded, and textures that are further away from the camera will be loaded with lower resolution.
- Max Size – When the Mode parameter is set to Resize, this value specifies the resolution to which textures will be resized.
- Mode – Determines how texture resolution and size will be handled to help optimize memory usage.
- Distributed Rendering
- On – Enables or disables distributed rendering for V-Ray for Unreal. Use the Render Servers list to specify the machines that will be used for distributed rendering.
- Render Servers – Specifies the render servers. Click the + button to manually add a server by entering its IP address or network name followed by its port number (default is 20206) (e.g. 127.0.0.1:20206)
We recommend to enable Low GPU Thread Priority if you have only one graphics card. The render time will increase but you will have a more responsive viewport.
Choosing Which Devices to Use for Rendering
You may not want to use all available GPU devices for rendering, especially if you have multiple GPUs and you want to leave one of them free for working on the user interface or you may want to combine your CPU and GPU together. To do this, you can use the supplied GUI tool, which you can find here:
Windows: Start Menu > Programs > V-Ray for Unreal > Select devices for V-Ray GPU rendering:
After changing this option, you need to restart Unreal and/or any Standalone DR servers (if any are running) for the changes to take effect. If the Standalone DR server is running as a service, you may need to restart it.
Note that the tool determines the devices to use for both CUDA and OpenCL rendering.