This page provides information about the resource cache in Anima.
What is the Resource Cache
In Chaos Anima, all the assets used in a project are stored inside the resource_cache subfolder, inside the main project folder.
This cache has been made to free the nodes from needing access to the Library and avoid the potential problems related to that requirement (complex setup when dealing with large numbers of nodes).
The nodes only need access to this new resource cache folder to correctly load and render any Anima scene from the compatible 3D applications. As this folder is inside the Anima project folder that is being rendered, the nodes only need to be confirmed to have access to this main Anima project folder and there is no extra setup needed in the nodes anymore.
Resource Cache Troubleshooting
Missing Actors
In Anima version 4.5.x, when we designed the first iteration of the resource cache, there was an important downside to this new setup. If the user has 4D models in the project and then tries to modify any of the project's scenes while other scenes are rendered on other machines from the same local network, the following warning message will be shown. |
|
When the OK button is clicked, it is possible to continue working just fine BUT, as the message says, Anima could not update the resource cache, which means that the new assets used could not be saved in that cache and probably Missing Actors will appear in the images rendered by the Nodes (either locally or in an online Render Farm). |
|
Fixed in Version 5.0.x
This issue has been completely solved in Anima 5.0.x and should not be a problem anymore. We have redesigned the management of the resource cache to make it much more resilient and flexible.
Now, if the main cache file (pack.bin) cannot be updated for some reason, more cache files will be created automatically to store the new assets added. Also, if the write block disappears the next time that the cache is modified, Anima will automatically consolidate all the segmented information into a new single file to continue with the optimal usage of the storage and speed up the loading process.
Solutions for Version 4.5.x
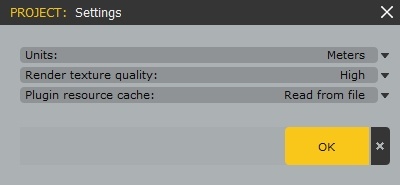
As this is a fairly common situation (most people keep working on newer scenes while they render other scenes of the same project), for the people using Anima 4.5.x, we added a Keep in Ram option that helps to avoid this problem by loading in the RAM of the computer all the resources used in the project instead of reading them from the disk directly. The Read from disk option is the default because it is the one that has the lower footprint on your system. Both cases have their own pros and cons. On one hand, using the Keep in RAM option, you will be able to keep working on a project that uses 4D models even when you are rendering it on your Render Farm, but it also will increase the amount of RAM needed to open and render those same projects. On the other hand, using the Read from file option will have the lower possible impact on your RAM, but you won’t be able to modify a project while it is being rendered. So, we let you choose this setting for each project, because you may want to use it or not depending on the characteristics of the project itself or the amount of RAM it uses. The setting can be set in the Project Settings panel (Anima Menu > Project > Settings). |
 |
|
How to Fix the Resource Package
As mentioned above, this issue has been solved on version 5 so the best way to fix this problem for good is to update to the latest version of Anima. If now is not a good moment to update your machines, try one of the solutions described below.
OPTION A: Small Modification and Resave
To fix this issue, you need to follow the instructions of the message, that is, try to save that same scene again sometime later when the resource cache is not blocked anymore by your render nodes or by any other machine in your network that is reading the 4D model stream data and blocking the write access.
Once you confirm that no other machine in the network is accessing any scene of that project, you can open that scene in the Anima designer application, make a small modification, and save it again. That will force Anima to verify the information stored in the resource cache and add any missing information.
OPTION B: Save Project as and Resave
If you are using an even older Anima version (4.5.2 or lower), the best workaround would be to use the Save As option of the Project menu to create a duplicate of the project and continue working on the new scenes there in the new copy. As the problem happens only because someone else in your network is blocking access to the current resource package of your current project, if you duplicate this project, the write block will still happen only in the older one, and Anima will not have any problem rebuilding the resource package of the new one.
If you want to go ahead and fix the problem in your current project, then once the new version of Anima is installed, follow this process to ensure that you don’t get those Missing Actors anymore:
- In Anima designer, open a scene that is being rendered with the problem.
- In the same machine, open your 3D application scene where this Anima scene is loaded and wait for it to complete the load.
- Make a small modification inside Anima (move any actor a few centimeters) and save it.
- The Alive connection will automatically re-import that scene into your 3D app. (If you have Alive disabled, just re-import the scenes manually).
- In your 3D app, save the scene after the reload is complete.
- Re-send the render job.
After these steps are done, you should not get more Missing Actors in your renders. If you still get them, please try the full reset described in the section below (Full Reset of the Resource Cache).
OPTION C: Full Reset of the Resource Cache
In some rare cases, the resource package might get corrupted to a point that cannot be restored automatically by Anima. In those situations, you can try to force a full reset of the resource package by deleting it completely. After doing that, the next time the project is saved, Anima will rebuild it from scratch, avoiding any possible corruption issues.
Please follow the process described below to force a full reset of your resource cache:
- Go to the machine where the Anima project is being created and sure that Anima and your 3D apps using the Anima plugins are closed.
- Find your Anima project folder and go into the resource_cache subfolder; you should see at least one pack.bin file.
- Delete all the files that are inside that resource_cache folder.
- Open Anima and make a small change somewhere in the Anima scenes that are being used in your 3D application.
- Save the Anima project.
After that, the resource package should be completely restored. You should now see a pack.bin file inside that folder that is bigger than the one you had previously. However, you can confirm that the regeneration process was successful by following the process described in the section below (How to confirm if you have any “Missing Actors”).
How to Confirm if the Fix Was Successful
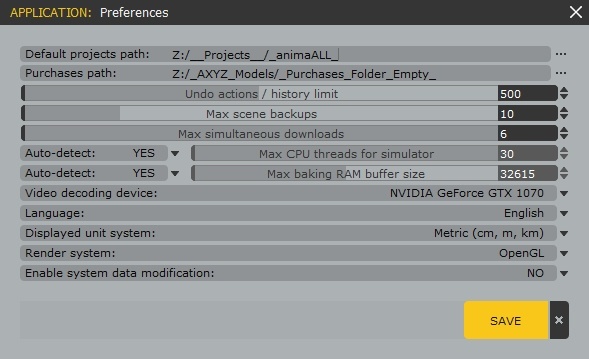
One thing that might be confusing is that when the resource cache is incomplete, you will only see Missing Actors in the renders that are made from machines using Anima Render Node. That happens because when some assets are not found in the resource cache, the Anima versions have a fallback implemented that tries to find those missing assets in the Purchases folder, too. If they succeed and the assets can be found there, the plugin uses that information to avoid failure. This design might generate some confusion because you can end up having different results rendering the same scene locally or on a render farm, so we have decided to change it on our next big version of Anima (v5) to keep coherence on the results you get on all situations. Meanwhile, there is a way to verify if your resource cache is complete and working fine by temporarily using an empty Purchases folder. Therefore, if you are getting Missing Actors in the renders from your nodes and you are trying to fix the resource cache, it is a good idea to confirm that it has been successfully fixed before sending another test render (especially if you are using an online Render Farm service because they can take some time to upload the resources and/or cost you money). You do that verification by following the process described below: 1. Close the Anima designer and your 3D application. 2. Create an empty folder somewhere on your hard drive. 3. Open Anima designer again, and do not load any project. 4. Go to Anima Menu > Preferences and change your Purchases path to that temporal empty folder created in step 2: |
 |
|
5. Choose Change path when the following question appears (we don’t want to move the currently downloaded actors there; we only want to empty our library temporarily). |
|
6. Close Anima designer. 7. Open your 3D application and load your scene again. 8. Select the animaScene001 object and enable the checkbox Draw all characters from the Display section. |
|
At this point, if there is still some missing information on some asset in the resource cache, it will appear as a Missing Actor in your viewport. If no missing actors appear, it means that all the resources have been included successfully, and you can render again safely in your render farm (either locally or using an online render farm service).
If you see the 3D text that says No License instead of Missing Actor then the issue is a totally different one; it means that the machine that renders is not able to find a valid license. If that is what happens, then contact our support service, and they will help you fix that problem.
Related Topics


